If you have ever stared at a shiny premium vacuum and thought, “That is a bold price for a glorified dust goblin,” welcome home. The good news is that a cyclonic vacuum cleaner does not have to cost luxury-gadget money to be useful. In fact, the whole idea behind a budget-friendly cyclonic vacuum is beautifully hacker-approved: move the expensive magic out of the marketing brochure and back into physics, airflow, seals, and smart design.
A cyclonic vacuum cleaner uses spinning air to separate heavier dust and debris before that mess reaches the filter. That sounds fancy, but at its heart it is just controlled chaos. Air enters the chamber, spins fast, and drops larger particles into a bin or bucket while the remaining air continues toward the fan and final filter. The result is a cleaner that can stay more consistent for longer because the filter is not getting hammered by every crumb, hairball, and renegade drywall flake all at once.
That is why this topic matters. A budget cyclonic vacuum can be a smart upgrade for a garage, workshop, hackerspace, apartment, or home lab. It can also be a trap if you spend all your money on the cyclone and forget about the boring stuff that actually determines whether the machine is pleasant to use. Spoiler: the boring stuff is where victory lives.
What a Cyclonic Vacuum Cleaner Actually Does
The phrase cyclonic vacuum cleaner gets tossed around like it automatically means “powerful,” “premium,” and “worth selling a kidney for.” Not quite. A cyclone is a method of separating debris from the airflow. It is not, by itself, proof of better cleaning. Think of it as traffic control for dirt. The cyclone takes the large and medium debris out of the airstream early, which helps preserve airflow and reduces how quickly the main filter clogs.
That matters in real life. A vacuum with a clogged filter often starts strong and then fades into a sad wheeze that can barely intimidate a Cheerio. Cyclonic separation helps delay that decline. In workshops, it is especially useful because sawdust, plastic shavings, and general bench grime can overwhelm a filter in no time.
But the cyclone is only half the story. Fine dust is the sneaky villain here. The tiniest particles can stay airborne longer, travel deeper into the machine, and matter more for health and cleanup. So while a cyclone helps with debris management, it does not replace proper filtration. If your budget build lacks a good final filter and decent seals, you have not built a smart vacuum. You have built a dust redistribution service.
Why the Hacker Mindset Fits This Project So Well
The hacker approach is perfect for vacuum design because this is one of those rare household tools where understanding the basics really pays off. You do not need gold trim, a glossy ad campaign, or a motor that sounds like a small jet auditioning for Broadway. You need the right combination of airflow, containment, convenience, and serviceability.
That is also why budget builds are so appealing. Many premium vacuums charge heavily for industrial design, brand prestige, and form factors that look fantastic in commercials. Meanwhile, a practical hacker looks at a bucket cyclone, a used shop vac, a 3D-printed chamber, or a compact brushless motor and asks a far more useful question: “Can this solve my actual mess for less money?”
Usually, the answer is yes. The trick is being honest about the use case. A handheld DIY unit for crumbs, solder dust, and desktop cleanup is not the same thing as a workshop dust collector. A bucket-top cyclone paired with a shop vac is not the same thing as a lightweight stick vacuum for stairs. Build for the job, not for your ego. Your ego is terrible at cleaning baseboards.
The Three Smartest Low-Cost Paths
1. Add a Cyclone Separator to a Shop Vac You Already Own
This is the cheapest high-impact route for many people. If you already own a decent shop vac, adding a cyclone separator can dramatically improve the experience. The separator catches most of the heavy debris before it reaches the vacuum, which means fewer clogged filters, less loss of suction over time, and less disgusting maintenance.
This route is ideal for garages, woodworking corners, renovation cleanup, and benches where dust appears faster than your ambition to clean it. It is not glamorous, but it works. You can build a DIY separator using a bucket, fittings, gasket material, and hose adapters, or you can start with an affordable pre-made separator and customize from there.
The beauty of this setup is modularity. If a hose cracks, replace the hose. If the bucket lid leaks, reseal it. If you need a better filter, upgrade the filter instead of tossing the whole machine. That is peak hacker value.
2. Buy a No-Frills Canister or Upright and Improve the Weak Spots
Not every budget solution needs a soldering iron. Sometimes the smartest move is buying a simple bagless canister or upright vacuum and focusing on the features that matter most: a sealed dust path, good attachments, manageable weight, and a filter system you can maintain without swearing in three languages.
Canister vacuums often shine in tight spaces, stairs, furniture edges, and mixed-floor homes. Uprights are convenient for large open areas and quick passes. On a budget, the best machine is usually the one that fits your floor plan and your patience. A vacuum that is technically powerful but miserable to drag around will spend more time in a closet than on a floor.
If you go this route, prioritize function over flash. Fancy LEDs are cute. A tool that actually reaches under the couch is better. A sculpted dust cup is fine. A model that empties without blasting yesterday’s fuzz into your face is better.
3. Build a Compact DIY Handheld
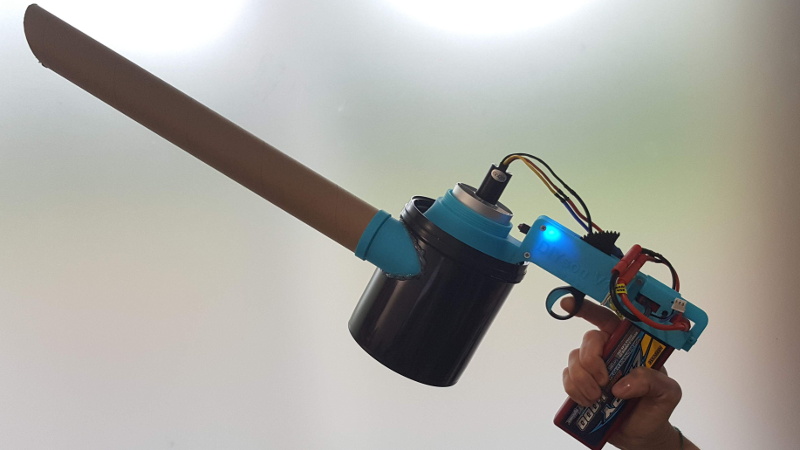
This is the most fun path and the most likely to turn into a weekend rabbit hole. Compact DIY handheld cyclonic vacuums are perfect for hackers because the core ingredients are now accessible: 3D printing, compact brushless motors, lithium-ion batteries, and a ton of maker-friendly design inspiration.
A small handheld unit makes sense for desks, keyboard crumbs, electronics benches, 3D-printer cleanup, and tiny messes that do not justify hauling out a full-size vacuum. It can also be an excellent learning project in airflow, battery management, noise control, and printed-part tolerances.
Just remember that miniaturization is not free. Making a cyclone work in a small handheld package is harder than building a bucket separator. Once you shrink the chamber, airflow paths and leakage become much less forgiving. A cool-looking handheld vacuum with poor seals is basically an expensive noisemaker that occasionally kidnaps glitter.
Where to Spend and Where to Save
Spend on Filtration and Seals
If you are cutting costs, do not cut them here. Fine dust is where cheap designs fall apart. Good filtration matters, especially if you are dealing with drywall dust, fine sawdust, insulation, pet dander, or any renovation debris. A cyclone helps, but the final filter and sealed airflow path are what keep that dust from coming right back into the room.
Spend on Hose Fit and Air Path Design
A vacuum is an airflow machine. Every sloppy adapter, sharp bend, and bad seal steals performance. Smooth transitions, snug fittings, and sensible hose diameters often matter more than bragging about raw motor specs. That is one reason budget hackers can compete surprisingly well with commercial units: careful design beats random brute force.
Save on Cosmetics
This is not a perfume bottle. It is a dirt-eating appliance. Use practical containers, reusable housings, and straightforward controls. A plain bucket with a well-designed cyclone is better than a sleek plastic shell hiding mediocre internals.
Save by Reusing Existing Hardware
Used shop vacs, spare hoses, reclaimed bins, old tool batteries, and donor motors can all lower costs without killing performance. The best hacker builds rarely start with an empty shopping cart. They start by looking around the garage and muttering, “I can absolutely do something irresponsible and brilliant with this.”
Common Mistakes That Make Cheap Vacuums Feel Terrible
Mistake one: chasing motor wattage instead of usable airflow. A bigger motor is not an automatic win if the air path is inefficient or the filter chokes immediately.
Mistake two: ignoring the exhaust side. If fine dust escapes, you are not cleaning; you are remixing.
Mistake three: building a separator that is too fiddly to empty. Convenience matters. If emptying the bin feels like a bomb-disposal exercise, you will put it off, performance will drop, and the machine will become a garage ornament.
Mistake four: forgetting noise. Shop vacs and high-speed handheld builds can be hilariously loud. Add insulation, isolate vibrations, and avoid pretending your ears are optional accessories.
Mistake five: choosing the wrong tool for the job. A handheld vacuum is not a whole-house cleaner. A shop-vac cyclone rig is not a sleek everyday living-room companion. Match the form factor to the mess.
A Sample Budget Strategy That Actually Makes Sense
If you want the most practical answer for the least money, here is the sweet spot: start with a decent existing vacuum or used shop vac, add a cyclone separator, upgrade the filter, and tighten every seal you can find. That setup is not glamorous, but it solves the biggest problems people complain about: clogged filters, fading suction, messy maintenance, and poor dust containment.
If you want something more portable, hunt for a modest canister vacuum with useful attachments and a manageable footprint. The goal is not to win a beauty contest. The goal is to make cleaning just frictionless enough that you will actually do it.
If you want a maker project, build the handheld. But do it with the understanding that you are paying partly in money and partly in tinkering hours. That is not a flaw. For a lot of hackers, the tinkering is the dessert.
Practical Experiences With a Cyclonic Vacuum Cleaner on a Tight Budget
In real-world use, the biggest surprise with a budget cyclonic vacuum is not usually the suction. It is how much cleaner and less annoying the entire workflow becomes when the separator is doing its job. The first time you open a shop vac after a dirty project and discover that the filter is still reasonably clean, it feels like finding money in an old coat pocket. Suddenly the machine is easier to maintain, less likely to wheeze halfway through the job, and much less dramatic about fine debris.
One of the most common experiences is also one of the least glamorous: the cheap setup often wins because it is easier to repair. When a premium machine breaks, you may end up hunting for proprietary parts or wrestling with plastic clips designed by someone who clearly resented humanity. A budget hacker setup is usually built from buckets, clamps, hoses, printed parts, common filters, and adapters. If something leaks, you can see it. If something cracks, you can patch or replace it. If something rattles, you can tighten it instead of writing a farewell letter.
Another practical lesson is that emptying behavior matters more than people expect. A cyclone rig that captures debris in a bucket is fantastic right up until you realize you packed that bucket with ultra-fine dust and now have to open it without creating a small weather event. Good seals and good separation are important, but so is having a cleanup routine. Empty outdoors when possible, avoid overfilling, and remember that “I’ll do it later” is how many filters end up looking like they survived a volcanic eruption.
Noise is another part of the experience that deserves honesty. Budget builds can be loud. Sometimes impressively loud. The kind of loud that makes the neighbors wonder whether you are vacuuming or launching a hobby rocket. That does not mean the project failed; it just means acoustics should not be an afterthought. Mounting motors with vibration isolation, avoiding resonance in printed housings, and using smoother airflow paths can make the machine much more livable.
There is also a very specific kind of satisfaction that comes from using a cyclonic vacuum you assembled or upgraded yourself. You stop thinking of it as a disposable appliance and start seeing it as a system. You understand why the hose diameter matters, why the lid must seal flat, why the filter needs cleaning, and why a sharp bend right before the chamber hurts performance. That knowledge changes how you buy, maintain, and modify tools later.
And yes, there is humor in it too. Every hacker budget project reaches a moment where you proudly announce that you saved money, while quietly ignoring the value of six hours spent testing adapters, reprinting parts, and staring at a bucket like it personally offended you. But even then, the payoff is real. You get a tool tuned to your mess, your space, and your budget. That is the kind of practical win that outlasts the novelty of a flashy retail purchase.
Conclusion
A cyclonic vacuum cleaner on a hacker’s budget is not about copying a luxury product piece for piece. It is about understanding what makes a vacuum genuinely useful, then spending money where it counts. Cyclonic separation is worth having because it helps manage debris and preserve performance. But the smartest budget builds pair that cyclone with good filtration, tight seals, practical maintenance, and a form factor that fits the job.
For workshops and heavy messes, a cyclone plus shop vac is often the best value. For everyday home cleaning, a simple canister or upright with sensible features may be the better move. For makers who enjoy the build as much as the result, a compact DIY handheld can be both useful and delightfully nerdy.
In other words, you do not need an overpriced plastic spaceship to win the war on dust. You need airflow, containment, common sense, and just enough stubbornness to improve what the market is overcharging for. Luckily, stubbornness is usually free.