A door closer is one of those pieces of hardware you barely notice until it stops doing its job. Then, suddenly, your storm door is slamming like it has somewhere important to be, hanging halfway open, or launching itself into the wind with alarming enthusiasm.
Fortunately, replacing a typical residential pneumatic or hydraulic storm door closer is one of the more approachable home-repair projects. In many cases, the job requires little more than a screwdriver, a replacement closer, and about 15 to 30 minutes. The easiest replacements are nearly identical to the original unit because the existing mounting holes can often be reused.
This guide explains how to replace a door closer safely, how to choose the correct replacement, what to do when old screw holes are damaged, and how to adjust closing speed when installation is complete. It primarily covers the cylindrical closers commonly found on storm and screen doors while also explaining when a commercial door closer requires a different approach.
What Does a Door Closer Actually Do?
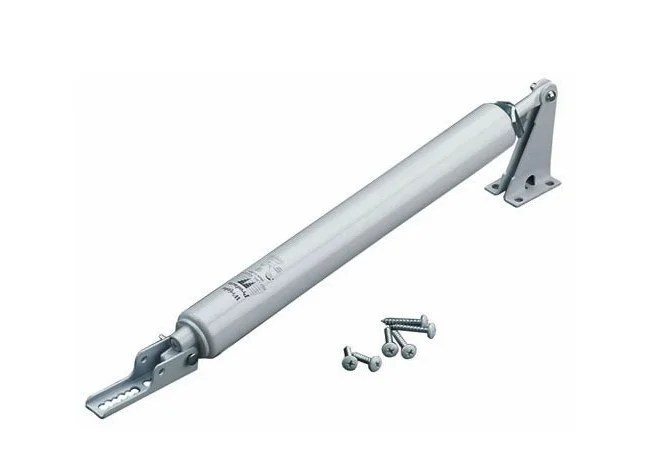
A residential storm door closer uses a spring along with pneumatic or hydraulic resistance to control the movement of the door. Instead of allowing the door to swing freely and slam shut, the closer absorbs some of that motion and returns the door toward the frame at a controlled speed.
Most conventional storm door closer systems include:
- A cylindrical closer body
- An extending piston rod
- A jamb bracket mounted to the frame
- A door bracket attached to the storm door
- Connecting pins
- A hold-open washer or similar mechanism
- An adjustment screw or valve for closing speed
Commercial hydraulic door closers work on the same general principle but are considerably more complicated. They may include separate adjustments for sweep speed, latch speed, backcheck, delayed action, and spring power. Translation: that innocent-looking metal rectangle above an office door may have more settings than your toaster.
Signs Your Door Closer Should Be Replaced
Not every misbehaving door closer needs immediate replacement. Sometimes an adjustment or tightened screw solves the problem. Replacement becomes more reasonable when the closer itself is damaged or can no longer control the door properly.
Oil or fluid is leaking
Visible leakage from a hydraulic closer is a strong indication that the internal seals have failed. Once enough fluid escapes, the closer may lose its ability to regulate movement and begin slamming.
The piston rod is bent
A strong gust of wind can fling a storm door open hard enough to bend the closer rod. A noticeably bent rod should generally be replaced rather than straightened because the deformation can interfere with smooth operation and weaken the component.
The door slams despite adjustment
Before buying a new closer, try making small adjustments to the speed-control screw. If the door continues to slam regardless of reasonable adjustment, the closer may be worn internally.
The closer no longer pulls the door shut
A properly installed closer should help the storm door travel the final distance necessary to latch. However, remember that a closer cannot magically repair a sagging or badly misaligned door. If hinges are loose or the latch rubs against the strike plate, correct those problems first.
The mounting hardware is damaged
Sometimes the closer is perfectly healthy but its jamb bracket has ripped out of the wood. In that case, you might only need a replacement bracket or structural repair rather than a completely new closer.
Choose the Right Replacement Door Closer
Buying a replacement that closely matches the existing unit makes installation dramatically easier. Matching models may allow you to reuse the original mounting locations instead of drilling another constellation of holes into your door.
Identify the type
For a storm or screen door, determine whether the existing unit is a standard-duty or heavy-duty closer. Heavier storm doors, especially models with large glass panels, generally need stronger hardware than lightweight screen doors.
If your door currently uses two closers, don’t automatically replace the system with a single lightweight unit. Dual-closer arrangements are often designed to provide greater control over heavier storm doors.
Measure before shopping
Measure the existing cylinder and, more importantly, the distance between attachment points. Check the brackets as well. Some manufacturers specifically recommend measuring closer length from mounting hole to mounting hole when selecting a compatible replacement.
If possible, take the old closer with you when buying locally. A five-minute comparison at the hardware store can prevent a 30-minute session of staring at incompatible screw holes later.
Tools and Materials You’ll Need
- Replacement door closer kit
- Phillips screwdriver
- Flat-head screwdriver if required
- Drill and appropriately sized drill bits
- Tape measure
- Pencil
- Safety glasses
- Replacement screws if the old ones are corroded or damaged
- Wood repair materials if mounting holes are stripped
Most replacement kits include the closer, brackets, pins, screws, and hold-open hardware. Confirm the contents before removing the old unit. Discovering that your shiny new kit is missing an important pin while the door is already disassembled is a classic DIY plot twist.
How to Replace a Door Closer Step by Step
Step 1: Support the door and inspect the existing installation
Start with the storm door closed. Examine how the old closer connects to both the jamb and the door. Take a quick photo before disassembly. That reference can be surprisingly valuable if you later forget which direction the cylinder faced.
Check whether the frame is solid, the hinges are tight, and the door closes reasonably well without the closer. Repair major alignment problems before installing new hardware.
Step 2: Disconnect the old closer
Remove the connecting pins from the jamb and door brackets. Depending on the model, you may be able to detach the cylinder without removing either bracket.
If you’re replacing the entire assembly, remove the screws securing both brackets after the cylinder is disconnected.
Keep control of the door while doing this. Once disconnected, a storm door can swing freely, particularly on a windy day.
Step 3: Compare the old and new hardware
Place the replacement closer beside the old one. Compare the cylinder length, mounting holes, bracket dimensions, and orientation.
If everything lines up, congratulations: you may have won the home-repair lottery. Reusing solid existing mounting locations makes the next steps considerably easier.
Step 4: Inspect the screw holes
Never install a new closer into obviously loose or damaged mounting holes and hope enthusiasm will hold everything together.
If the screws pulled out because the surrounding wood is rotten or badly split, repair the damaged jamb before reinstalling the closer. Severely deteriorated wood may require removal and replacement of the affected section.
If the holes are simply stripped but the surrounding material is sound, use an appropriate wood repair method or reposition the bracket according to the manufacturer’s instructions. The bracket must be securely anchored because it experiences repeated pulling forces every time the door moves.
Step 5: Install the jamb bracket
Attach the jamb bracket to the frame in the recommended position. If the new bracket exactly matches the old one and the holes remain strong, the existing locations may be reusable.
For new mounting locations, follow the replacement manufacturer’s template instead of copying measurements from a different model. Small differences in bracket placement can significantly change the closer’s geometry.
Drill pilot holes when appropriate, particularly in wood, to reduce the chance of splitting the frame.
Step 6: Install the hold-open washer
On traditional storm door closers, slide the hold-open washer onto the piston rod before connecting everything. The washer usually allows the door to remain open temporarily when positioned against the closer body.
Newer systems may use buttons, pedals, or integrated hold-open mechanisms instead, so follow the instructions supplied with your model.
Step 7: Connect the closer to the jamb
Position the closer in the correct orientation and connect it to the jamb bracket using the supplied pin.
Do not assume every replacement closer mounts cylinder-first in exactly the same orientation. Manufacturer diagrams matter here.
Step 8: Set the initial rod position
Many storm door closers require a small amount of preload before the door-side bracket is attached. For example, some systems instruct the installer to extend the rod slightly and hold it temporarily with the hold-open washer.
This initial tension helps provide enough force for the door to complete the final portion of its travel and latch properly.
Because the required amount differs among products, use the installation instructions supplied with your replacement rather than guessing.
Step 9: Attach the door bracket
With the door closed and the closer positioned correctly, align the door bracket.
If the original holes match perfectly and remain strong, secure the bracket using the appropriate screws. Otherwise, mark the new mounting holes, drill pilots as directed by the manufacturer, and attach the bracket.
Connect the closer rod to the door bracket with its pin.
Step 10: Test the door
Open the door normally and release it.
Watch the complete closing cycle. The door should move smoothly without bouncing, jerking, or slamming, and it should have enough energy near the end of travel to engage the latch.
Run the test several times. One successful closing isn’t enough if the second attempt stops three inches short.
How to Adjust Door Closer Speed
Traditional storm door closers generally have an adjustment screw at the end of the cylinder.
Make adjustments gradually. A quarter-turn at a time is a sensible starting point on many residential units. Some storm-door manufacturers specify clockwise adjustments to slow closing and counterclockwise adjustments to increase speed, but always confirm the direction for your particular closer.
After every adjustment:
- Open the door normally.
- Release it without pushing.
- Observe the closing speed.
- Check whether it fully latches.
- Make another small adjustment only if necessary.
Do not remove an adjustment screw completely unless the manufacturer specifically instructs you to do so. On hydraulic systems, excessive adjustment can release fluid and permanently damage the closer.
Common Door Closer Replacement Problems
The door closes too slowly and won’t latch
The speed setting may be too restrictive, or the closer may not have enough initial preload. The latch or door alignment may also be creating unnecessary resistance.
First confirm that the door swings freely. Then make a small speed adjustment or check the manufacturer’s instructions for the correct bracket or rod position.
The door slams during the last few inches
A slightly faster final movement can sometimes be intentional because enough force is needed to engage the latch. However, the door should not violently slam.
Adjust the closer in small increments. If adjustment has virtually no effect, replacement hardware may be defective or incorrectly installed.
The closer makes a popping or clicking sound
Loose mounting brackets are a common culprit. Movement between the bracket and mounting surface can create noises whenever the closer changes direction.
Tighten the hardware and inspect the mounting holes for damage.
The jamb bracket keeps pulling loose
Don’t keep driving the same screw into an increasingly oversized hole. Determine why the mounting point is failing.
Possible causes include weak or rotten wood, unsuitable screws, repeated wind loads, poor bracket positioning, or a storm door that isn’t latching correctly and is therefore vulnerable to being caught by strong wind.
What About Commercial Hydraulic Door Closers?
The rectangular hydraulic closer above a commercial entrance, apartment corridor door, or fire-rated opening is a different animal from the simple storm door cylinder described above.
Surface-mounted commercial closers may be installed in regular-arm, top-jamb, or parallel-arm configurations. Many provide separate adjustments for closing speed, latch speed, backcheck, and spring force. Installation dimensions and arm preload also vary by model.
For that reason, use the exact manufacturer’s mounting template when replacing one. Don’t assume that two similarly sized closers use identical hole locations or arm geometry.
Accessibility can matter as well. Current U.S. accessibility standards specify that qualifying door closers on accessible routes be adjusted so a door takes at least five seconds to move from 90 degrees open to 12 degrees from the latch. Interior hinged doors subject to the standard generally have a maximum continuous opening force of 5 pounds, while different rules apply to fire doors and exterior hinged doors.
Fire-rated openings deserve additional caution. Fire doors commonly depend on approved self-closing hardware to perform as a complete assembly, so replacing or modifying a closer can involve code, listing, inspection, and manufacturer requirements. If the closer belongs to a rated fire door, multifamily stair enclosure, commercial exit, school, healthcare building, or similar regulated opening, involving a qualified door-hardware professional is usually wiser than improvising.
Practical Experience: Lessons That Make Door Closer Replacement Easier
After dealing with door hardware, one lesson quickly becomes obvious: replacing the cylinder is often the easiest part. The condition and alignment of everything around it determine whether the repair actually feels successful.
Imagine a storm door that has slammed for several years. You install a brand-new closer, carefully adjust the speed, and confidently step back for the grand test. The door glides inward beautifully… and stops half an inch before the latch.
The temptation is to blame the new closer. But look closer and you may discover that the hinge screws are loose and the door has sagged enough for the latch to rub against the strike plate. Increasing closing force might eventually shove the door closed, but it also makes the door harder to open and adds unnecessary stress to the closer.
The better repair is to correct the alignment first.
Another lesson involves replacement size. When possible, matching the new closer to the old one saves an impressive amount of aggravation. Similar cylinder length, bracket geometry, and attachment spacing can allow existing holes to be reused. That’s one reason physically bringing the old hardware to the storeor at least taking measurements and clear photographsis worth the effort.
Wind deserves special attention too. A storm door closer controls closing; it should not be treated as an indestructible device for stopping a door launched open by a powerful gust. Repeated overextension can bend rods, loosen brackets, or damage the door frame. Some storm-door systems use additional wind-control features or reinforced arrangements for this reason.
I’ve also found that patience during adjustment produces much better results than aggressive screwdriver diplomacy. People often turn the adjustment screw a full revolution, test the door, dislike the result, and turn it two revolutions in the opposite direction. Soon nobody remembers where the original setting was.
Small adjustments are much easier to evaluate. Turn the screw slightly, cycle the door, and observe what changes. Repeat until the door closes smoothly and reliably.
Cold and hot weather can expose borderline adjustments, too. Door movement may change with weather, seals, air pressure, and seasonal storm-door configurations. If a door starts behaving differently several months later, inspect the entire opening before assuming the closer has suddenly failed.
Finally, resist the urge to make every door close feather-soft. The goal isn’t to create a slow-motion movie scene. The door needs enough controlled energy to reach the frame and engage the latch reliably. A beautifully gentle door that remains slightly open isn’t really doing its job.
The best setup is boring in the best possible way: you open the door, walk through, release it, and never think about the closer again.
When to Call a Professional
A standard storm door closer is usually a reasonable DIY project, but professional help makes sense when:
- The door or frame has structural damage.
- Large sections of the jamb are rotten.
- The door is unusually heavy.
- The closer belongs to a fire-rated assembly.
- The opening must comply with accessibility requirements.
- The hardware is part of an access-control system.
- You are replacing a concealed or complicated commercial closer.
- The door remains badly misaligned after basic hinge adjustments.
Final Thoughts
Replacing a residential door closer is a refreshingly manageable DIY repair. The formula is simple: identify the correct replacement, inspect the mounting surfaces, reproduce the correct installation geometry, secure the brackets firmly, and make closing-speed adjustments gradually.
The biggest mistake is assuming the closer is responsible for every door problem. A new cylinder won’t cure rotten wood, loose hinges, a misaligned strike plate, or a storm door that doesn’t fit its frame properly. Take a few minutes to diagnose the whole opening before replacing parts.
Do that, and the reward is wonderfully uneventful: a door that opens, closes, latches, and stops demanding attention. In the world of home maintenance, boring hardware is excellent hardware.