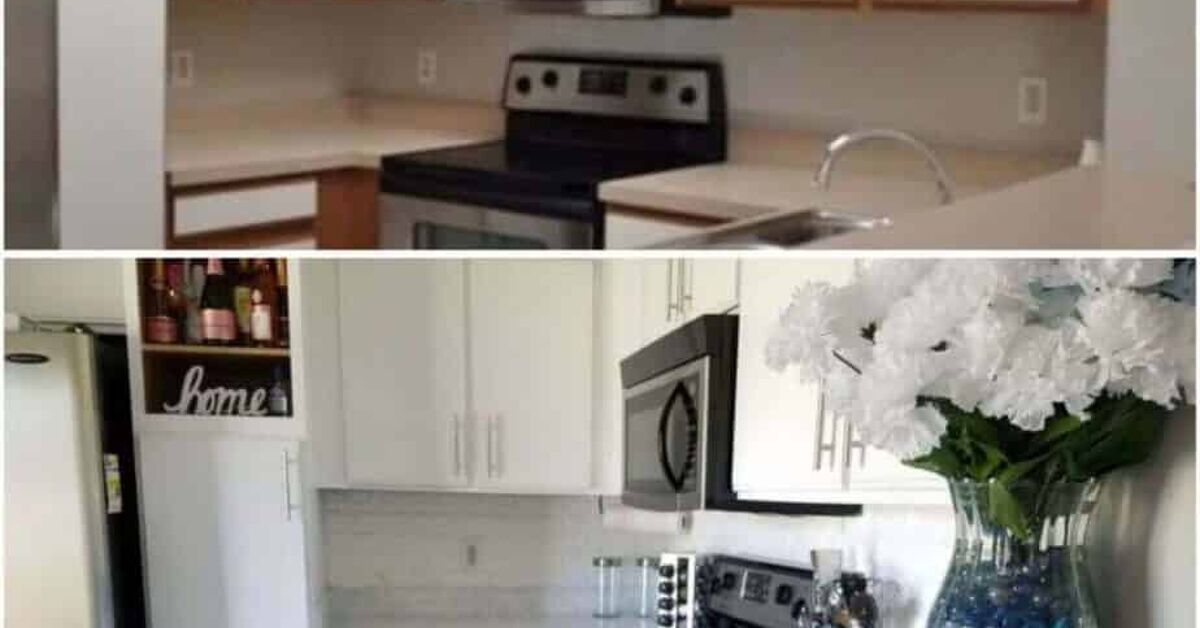
A kitchen renovation for less than $300 sounds like the opening line of a home-improvement fairy tale. Surely there must be a catch, a magical contractor, or a truckload of free marble hiding behind the refrigerator.
There is a catch, but it is a reasonable one: You are not replacing the kitchen. You are refreshing what is already there. For a strict $300 budget, success comes from keeping the existing cabinets, counters, appliances, plumbing, and layout while improving the surfaces and details people notice first.
With careful planning, that modest budget can cover cabinet paint, updated hardware, a small backsplash treatment, improved lighting, wall repairs, and a few organizational upgrades. The result will not be a luxury showroom kitchen, but it can feel cleaner, brighter, more intentional, and far less dated.
Note: The prices in this guide are illustrative U.S. retail estimates and will vary by location, kitchen size, product choice, taxes, and tools you already own. This project assumes DIY labor and cosmetic improvements only.
What an Under-$300 Kitchen Renovation Can Realistically Accomplish
Three hundred dollars can make an impressive visual difference, but it cannot negotiate with reality. It will not fund new cabinets, stone countertops, major electrical work, relocated plumbing, or a heroic television-style demolition sequence.
What it can do is address the visual clutter that makes an otherwise functional kitchen feel old. Dull cabinet doors, mismatched knobs, stained caulk, greasy walls, weak task lighting, and an uninspiring backsplash often create more visual damage than the room’s basic layout.
The smartest low-cost kitchen makeover focuses on four priorities:
- Refreshing the largest visible surface, usually the cabinets or walls
- Creating one clear focal point, such as a backsplash
- Making small finishes consistent throughout the room
- Improving cleanliness, lighting, and organization
Consistency matters more than luxury. Ten inexpensive knobs in the same finish usually look better than five stylish knobs, three old pulls, and two mystery handles that appear to have survived separate historical periods.
Start With a Written $300 Budget
Before buying anything, measure the kitchen and count every cabinet door, drawer pull, exposed wall section, and backsplash square foot. A renovation budget can disappear surprisingly quickly when someone realizes halfway through the project that the kitchen has 18 handles instead of 12.
Here is one sample budget for a small or medium-size kitchen:
| Project Item | Estimated Cost |
|---|---|
| Degreaser, sandpaper, filler, caulk, tape, and cleaning supplies | $30 |
| Bonding primer and cabinet-quality paint | $85 |
| New cabinet knobs or pulls | $40 |
| Peel-and-stick backsplash for a focal area | $50 |
| Plug-in or rechargeable under-cabinet lighting | $25 |
| Wall paint, shelf liner, or decorative accents | $30 |
| Contingency fund | $40 |
| Total | $300 |
Prices can be reduced by reusing existing hardware, shopping clearance sections, purchasing open-box products, checking local reuse stores, and borrowing tools. Saving $20 on a roller, drill, or cabinet-hardware jig leaves more money for materials that remain in the finished room.
Choose One High-Impact Anchor Project
A $300 kitchen renovation becomes disappointing when the money is divided among too many unrelated ideas. Choose one anchor project and let the remaining purchases support it.
For most kitchens, painting the cabinets creates the greatest transformation because cabinets occupy so much visual space. In a rental or a kitchen with cabinets that should not be painted, the anchor project might instead be a removable backsplash, a bold wall color, improved lighting, or open-shelf styling.
Pick a simple palette before shopping. One cabinet color, one metal finish, one accent color, and one wood tone are usually enough. This keeps bargain purchases from looking like bargain purchases.
Step-by-Step Under-$300 Kitchen Renovation
1. Empty, Clean, and Inspect the Room
The cheapest renovation tool is a serious cleaning session. Remove countertop appliances, magnets, paper piles, dish racks, expired spices, and the decorative bowl that somehow became permanent housing for old batteries.
Wash cabinet doors, frames, walls, switches, baseboards, and the area above the stove with a suitable degreasing cleaner. Kitchen paint often fails because it is applied over invisible grease. Sanding greasy cabinets simply spreads the problem around with enthusiasm.
Once the surfaces are clean, inspect for loose hinges, damaged caulk, nail holes, peeling paint, swollen particleboard, and water damage. Cosmetic materials should not be used to hide an active leak or structural deterioration.
Homes built before 1978 may contain lead-based paint. Before sanding, scraping, or disturbing old painted surfaces, determine whether lead-safe precautions or professional testing are needed.
2. Paint the Cabinets Properly
Cabinet painting is affordable because the labor is yours. Unfortunately, the labor is also yours. The project requires patience, labeling, cleaning, light sanding when appropriate, priming, painting, drying, and careful reassembly.
Remove doors, drawer fronts, hinges, and hardware whenever possible. Label every piece with painter’s tape so that Door 7 returns to Cabinet 7 instead of beginning an unwanted exchange program with Cabinet 12.
After degreasing, repair dents and unused hardware holes with an appropriate filler. Scuff-sand compatible surfaces to improve adhesion, remove the dust, and apply a bonding primer recommended for the cabinet material. Laminate, wood, and previously painted cabinets may require different preparation.
Use cabinet, trim, or furniture paint formulated to create a durable finish. Apply thin coats with a quality brush and small smooth-surface roller. Thick paint may cover faster, but it also creates drips, ridges, and doors that look as though they were frosted like birthday cakes.
Respect the manufacturer’s drying and curing instructions. Paint can feel dry while still being soft underneath. Reinstalling hardware too soon may leave dents or cause painted doors to stick.
3. Replace or Refresh Cabinet Hardware
New knobs and pulls are among the fastest ways to modernize a kitchen. To control costs, choose hardware that fits the existing holes. Changing from a knob to a long pull may require drilling new holes and filling old ones.
Measure the distance between the screw holes on existing pulls from center to center. Buy one sample before ordering the entire set. Test its scale, comfort, finish, and clearance around adjacent doors.
If the existing hardware has a good shape but an outdated finish, remove it, clean it thoroughly, and use a compatible metal primer and spray finish. This can save money, although frequently touched hardware may eventually show wear.
4. Add a Budget Backsplash
A backsplash can give a plain kitchen a focal point without covering every wall. Concentrate the material behind the sink or range area, or use it along one highly visible counter run.
Peel-and-stick panels are popular for low-budget and renter-friendly makeovers because many require no mortar or grout. The wall must be smooth, clean, dry, and compatible with the adhesive. Buy a little extra material for pattern matching and cutting mistakes.
Use the manufacturer’s installation and heat-clearance instructions. Not every adhesive product is suitable beside a high-heat cooking surface. A backsplash should add drama visually, not through unexpected melting.
Other inexpensive options include washable wallpaper, painted beadboard, a painted accent panel, or a small amount of conventional ceramic tile installed only in a focal zone.
5. Improve the Lighting Without Major Electrical Work
Better lighting can make inexpensive improvements look more polished. Shadows beneath upper cabinets make counters feel darker and can exaggerate stains, scratches, and uneven finishes.
Plug-in LED bars, rechargeable puck lights, and adhesive light strips can add task lighting without rewiring the kitchen. Choose a consistent light temperature so that one side of the room does not resemble a cozy café while the other resembles an airport security checkpoint.
Keep cords away from sinks, burners, and work areas. Any hardwired fixture replacement or electrical repair should follow local requirements and be handled by a qualified professional when the work is beyond your training.
6. Repair Caulk and Touch Up the Walls
Old caulk can make a relatively clean kitchen look neglected. Remove failed material around the sink or backsplash and replace it with a product designed for kitchens and wet areas. Do not apply fresh caulk over mold, moisture damage, or loose material.
A quart of wall paint may be enough for a small accent area, breakfast nook, or narrow kitchen. Washable finishes are practical near food preparation zones. Light colors can brighten a dim room, while a darker accent wall can create contrast with pale cabinets.
7. Finish With Organization and Styling
Renovation is not only about color. A clear counter makes the room feel larger and allows the new finishes to be seen.
Group frequently used tools in one container, move rarely used appliances into cabinets, and use inexpensive shelf risers or drawer dividers where they solve a real problem. Open shelves should hold items that are attractive, useful, or both. Twelve decorative objects that must be moved before making coffee are not storage; they are an obstacle course.
Finish with one or two intentional accents, such as a washable runner, a framed print, a small plant, matching towels, or thrifted wooden boards. Repetition creates cohesion, so echo the hardware finish or accent color in at least two places.
A Renter-Friendly Under-$300 Kitchen Makeover
Renters can use the same visual strategy while prioritizing removable materials. Start by reviewing the lease and requesting written permission before painting cabinets, drilling tile, altering fixtures, or applying permanent adhesives.
A renter-friendly budget might include removable backsplash panels, countertop contact paper approved for the surface, battery-powered task lights, temporary wallpaper, a washable runner, freestanding shelving, and replacement hardware.
Store the original knobs, screws, shades, and other removable pieces in a labeled container. Before covering an entire counter or wall, test the product in an inconspicuous area and leave it in place long enough to check adhesion and removal.
Temporary does not always mean harmless. Adhesives can react differently to paint, laminate, wood, and textured walls. Heat, steam, and direct sunlight can also affect performance.
Common Budget Kitchen Renovation Mistakes
Skipping Surface Preparation
Paint cannot permanently solve grease, dust, loose finish, or moisture damage. Preparation is less exciting than choosing colors, but it determines whether the makeover lasts six years or six breakfasts.
Changing Too Many Finishes
Mixing metal finishes can look sophisticated when it is intentional. On a limited budget, however, one consistent finish is easier to manage and less likely to resemble a hardware-store sample board.
Spending the Entire Budget Immediately
Keep at least 10% of the budget for extra screws, replacement blades, filler, touch-up paint, shipping, or the inevitable second trip to the store.
Buying Materials Before Measuring
Measure twice, calculate the coverage, and check package quantities. Small purchases become expensive when the wrong size, sheen, or pattern cannot be returned.
Attempting Risky Repairs to Save Money
A cosmetic budget should not encourage unsafe electrical, plumbing, gas, structural, or lead-paint work. Repairing damage caused by an incorrect DIY job can cost far more than the original professional service.
A Practical Three-Day Schedule
Day One: Preparation
Empty the room, clean surfaces, remove hardware, label cabinet parts, complete repairs, protect the floors, and test paint or adhesive products.
Day Two: Main Transformation
Prime and paint cabinet components, paint walls, install a removable backsplash, or complete whichever anchor project drives the design.
Day Three: Reassembly and Styling
Allow finishes to dry as directed, reinstall hardware when safe, add lighting, organize storage, touch up mistakes, and return only useful items to the counters. Cabinet coatings may need additional curing time before normal use.
Real-World Experience: What an Under-$300 Kitchen Renovation Actually Feels Like
The first lesson from working within a tiny renovation budget is that the project begins long before the first paint can opens. The most useful step is standing in the kitchen and identifying what truly makes it feel dated. It is tempting to blame everything at oncethe counters, cabinets, floor, appliances, lighting, and possibly the toasterbut usually two or three visual problems are doing most of the damage.
In one typical small-kitchen scenario, dark cabinet doors dominated the room, weak lighting made the counters look dingy, and mismatched hardware created visual noise. Replacing the cabinets was financially impossible, but replacing them was not actually necessary. The boxes were stable, the doors closed properly, and the layout worked. Once the surfaces were cleaned and painted, the same cabinets looked dramatically lighter and more deliberate.
The experience also demonstrates why preparation should receive both money and time. Cleaning the doors revealed grease in places that had appeared perfectly clean. Around the handles, several layers of residue prevented primer from bonding during a small test. A second cleaning and light sanding solved the problem. That boring discovery probably saved the entire paint job.
Hardware can produce an equally surprising change. Inexpensive pulls may not seem exciting while sitting in a cardboard package, but repeated across the room they create rhythm and consistency. Reusing the original screw spacing made installation simple and prevented the cost of wood filler, templates, and specialized drill bits. Testing one pull first also revealed that the longest option bumped into a neighboring cabinet, a small issue that would have become a 14-handle return.
The backsplash stage is where discipline matters most. It is easy to fall in love with an elaborate pattern and decide that every available wall needs to be covered. On a $300 budget, limiting the material to the most visible area creates a stronger focal point and leaves enough money for lighting and repairs. Careful dry-fitting before removing adhesive backing reduces waste, especially around outlets and corners.
Another practical lesson is that the room often looks worse halfway through the makeover. Doors are missing, supplies cover the counters, tape runs along every edge, and dinner consists of something eaten over the sink. This phase can make a careful plan feel like an expensive mistake. Taking progress photos helps because the improvement is easier to see when the original room is no longer visible.
The final result usually feels successful not because every surface is new, but because the room tells one coherent visual story. Fresh cabinets, matching hardware, brighter task lighting, clean caulk, and uncluttered counters work together. None of the individual purchases is especially luxurious. Their coordination is what makes the kitchen feel renovated.
The biggest takeaway is simple: An under-$300 kitchen renovation rewards restraint. Keep what works, repair what is failing, improve what is visible, and avoid spending money merely because a social-media makeover included the same product. The best budget kitchen is not the one with the most projects. It is the one that looks better, functions better, and still leaves enough money to buy groceries when the painting is finished.