Note: This article is written for web publication and is based on current U.S. kitchen remodeling cost guidance, consumer renovation advice, energy-efficiency data, and practical contractor budgeting principles. Actual kitchen renovation costs vary by location, home age, materials, labor market, permit rules, and how many “while we’re at it” ideas sneak into the plan wearing a fake mustache.
A kitchen renovation has a funny way of starting with one innocent sentence: “Maybe we should replace the countertops.” Three hours later, you are staring at luxury cabinet hardware that costs more than your first car and wondering whether your toaster deserves its own built-in garage. I know this because I nearly became that person.
My kitchen remodel began with a quote that made my soul briefly leave my body: more than $70,000 for a midrange renovation. The plan included new cabinets, new counters, new appliances, a new backsplash, electrical upgrades, flooring, lighting, demolition, painting, and a few design extras that sounded “small” until they appeared on the estimate like tiny financial gremlins.
In the end, I finished the project for a little under $40,000, saving more than $30,000 without turning the kitchen into a sad beige cave or doing unsafe work I had no business touching. The secret was not one magical discount. It was a stack of practical decisions: keeping the existing layout, reusing what still worked, shopping strategically, doing beginner-friendly DIY, and hiring pros only where mistakes could become expensive or dangerous.
Here is exactly how I saved $30,000+ on my kitchen renovationand how you can use the same strategy to create a beautiful kitchen remodel budget without eating cereal over the sink for the next decade.
Start With the Real Kitchen Renovation Cost Drivers
Before you can save money on a kitchen renovation, you need to know where the money goes. Kitchen remodel costs are usually driven by cabinets, labor, countertops, appliances, plumbing, electrical work, flooring, lighting, permits, and design changes. Recent U.S. cost guides commonly place professional kitchen remodels in the tens of thousands of dollars, with project scope causing huge swings from cosmetic refreshes to full gut renovations. Angi’s 2026 data, for example, lists a typical professional kitchen remodel range of $14,588 to $41,550, while national remodeling reports show that major upscale projects can climb far higher.
That wide range is important. It means the words “kitchen renovation” do not describe one project. They describe a financial buffet. You can grab a reasonable plate, or you can wander back three times and somehow leave with a $12,000 pot filler.
The First Quote Was Not the Final Truth
My first estimate looked polished, detailed, and professional. It also assumed I wanted to replace nearly everything. Full cabinet replacement, relocated plumbing, premium quartz, custom storage, designer lighting, and new flooring throughout the adjoining space were all rolled into one beautiful, terrifying number.
Instead of panicking, I broke the quote into categories and asked one question for each line item: “Is this necessary, nice-to-have, or purely decorative?” That single exercise cut thousands from the plan before a hammer touched the wall.
My Biggest Savings: Keeping the Kitchen Layout
The largest single decision was keeping the sink, stove, refrigerator, and dishwasher in roughly the same locations. Moving plumbing, gas lines, vents, and major electrical runs can turn a kitchen remodel budget into a runaway shopping cart. Yes, a new layout can improve function, but in my kitchen, the basic work triangle already made sense. The room was ugly, not broken.
By preserving the layout, I avoided extra plumbing labor, major electrical rerouting, drywall repair, floor patching, and permit complications. I still upgraded outlets, added better lighting, and improved storage, but I did not pay tradespeople to play musical chairs with every appliance.
Estimated Savings: $8,000 to $12,000
In my case, keeping the layout saved roughly $10,000 compared with the more ambitious design. That money stayed in my bank account, where it looked much more attractive than a sink moved 26 inches to the left.
I Refaced and Reworked Cabinets Instead of Replacing Everything
Cabinets are often one of the biggest kitchen remodeling expenses. Retailer and remodeling guides consistently identify cabinetry as a major budget category, and cabinet refacing or refinishing is often recommended when the cabinet boxes are structurally sound. Home Depot notes that minor remodels often use money-saving measures such as refacing existing cabinets, while Better Homes & Gardens and The Spruce describe refacing as a lower-disruption alternative to complete replacement.
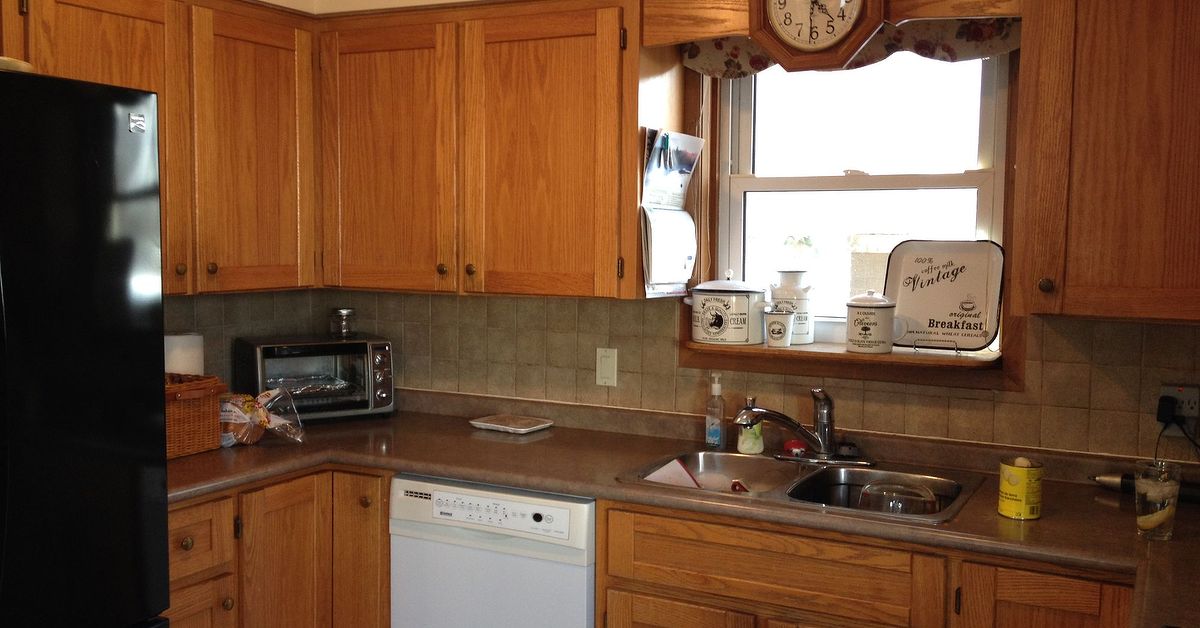
My old cabinets were not glamorous. They had the personality of a waiting room. But the boxes were solid, the layout worked, and the drawers did not collapse when opened. That meant I did not need entirely new cabinetry. I needed a cabinet makeover with better doors, better hardware, better paint, and a few smarter inserts.
What I Changed
I kept the cabinet boxes, replaced several worn doors, painted the frames, added soft-close hinges, installed new pulls, and used organizers inside the drawers. I also removed one small bank of upper cabinets and replaced it with open shelves to make the room feel lighter.
This was not free, and it was not effortless. Cabinet prep is where optimism goes to be sanded. But compared with ordering a full custom cabinet package, the savings were enormous.
Estimated Savings: $10,000 to $15,000
Full cabinet replacement would have eaten a giant portion of the budget. Refacing, repainting, and selectively replacing pieces gave me the new look I wanted while keeping the most expensive bones of the kitchen in place.
I Chose Countertops With a Calculator, Not My Feelings
Countertops are dangerous because the samples are small, shiny, and emotionally manipulative. A beautiful slab whispers, “You deserve me.” Your budget whispers back, “Please stop touching the marble.”
I originally wanted a premium stone option throughout the kitchen. After pricing the material, fabrication, edging, and installation, I changed direction. I chose a durable midrange quartz for the main counters, skipped complicated edge profiles, and used a butcher-block section on a small prep area. Houzz’s recent kitchen trend reporting shows quartz and engineered surfaces remain popular choices among renovating homeowners, but the final cost can vary widely depending on material, thickness, edge style, fabrication, and slab requirements.
Countertop Choices That Saved Money
I avoided waterfall edges, full-height stone backsplash, rare colors, and oversized slabs that required extra fabrication. I also asked fabricators about remnants for smaller surfaces. Remnants are not always available, but when they are, they can be a quiet little gift from the renovation gods.
Estimated Savings: $4,000 to $7,000
I still got a clean, modern countertop. I simply refused to let the countertop become the main character, supporting actor, producer, and entire film crew of the renovation budget.
I Bought Appliances Strategically Instead of Emotionally
Kitchen appliances are another place where the budget can either behave or sprint into the woods. I made a list of what I actually needed: a reliable refrigerator, dishwasher, range, and microwave. Then I waited for sales, compared open-box options, checked scratch-and-dent inventory, and avoided paying extra for features I would never use.
Energy efficiency also mattered. ENERGY STAR notes that certified refrigerators are about 9% more energy efficient than models meeting the federal minimum standard, and standard-size ENERGY STAR certified dishwashers can save water over their lifetime while costing about $50 per year to run. ENERGY STAR also states that certified electric cooking products are, on average, 18% more efficient than standard models.
What I Skipped
I skipped the built-in espresso machine, the panel-ready refrigerator, the ultra-premium range, and the smart features that mostly seemed designed to let my oven send me notifications I would ignore. I like technology, but I do not need my dishwasher to have a more active social life than I do.
Estimated Savings: $3,000 to $5,000
By choosing reliable midrange appliances during promotional periods, I saved thousands while still improving performance and efficiency.
I Did My Own Demolition, Painting, and Simple Finishing Work
DIY can save money, but only when you are honest about your skills. I did not move electrical wiring. I did not install plumbing. I did not pretend YouTube had turned me into a licensed contractor by breakfast. Instead, I handled demolition, cabinet prep, painting, hardware installation, basic shelving, cleanup, and some trim touch-ups.
Architectural Digest and other renovation resources often recommend selective DIY for cost control, especially demolition and simple finishing work, while leaving technical trades to professionals. That advice matched my experience exactly: do the safe, low-risk work yourself, and hire experts for the work that can flood, spark, leak, crack, or fail inspection.
DIY Jobs That Were Worth It
Removing old cabinet doors, pulling outdated hardware, painting walls, assembling shelves, installing knobs and pulls, and managing daily cleanup all saved labor hours. Cleanup alone was shockingly valuable. Contractors are skilled people, but if you pay them to move cardboard from one side of the room to the other, cardboard has won.
DIY Jobs I Refused to Touch
I hired professionals for electrical upgrades, plumbing connections, countertop installation, and anything related to code compliance. Also, because older homes can involve lead paint hazards, homeowners should be careful before disturbing painted surfaces. The EPA states that paid renovators who disturb paint in pre-1978 housing generally must be certified in lead-safe work practices.
Estimated Savings: $2,500 to $4,000
Selective DIY helped me save money without gambling with safety or quality. That is the sweet spot.
I Used a “Save vs. Splurge” Kitchen Remodel Budget
A budget kitchen remodel does not mean choosing the cheapest version of everything. That is how you end up replacing the same faucet twice and developing a personal grudge against particleboard. Instead, I used a save-versus-splurge plan.
Where I Splurged
I spent more on electrical safety, plumbing quality, durable cabinet hardware, good task lighting, and professional countertop installation. Designers often recommend investing in durable daily-use elements such as cabinetry, appliances, plumbing, and skilled labor because failures in those areas are expensive and irritating.
Where I Saved
I saved on decorative lighting, backsplash tile, open shelving, cabinet paint, hardware sourced during sales, and nonessential accessories. The backsplash is a perfect example: I chose a simple, affordable tile and used a classic pattern. It looks intentional, not cheap.
The real trick was choosing simple things carefully. Plain white tile with clean grout lines can look better than expensive tile installed badly. A $12 cabinet pull placed consistently can look polished. A small lighting upgrade can make budget materials look more expensive. In a kitchen renovation, neatness is a luxury finish.
I Got Multiple Quotes and Asked Better Questions
Getting multiple quotes was uncomfortable at first. I did not want to seem difficult. Then I remembered I was preparing to spend the price of a very nice car on a room where I mostly reheat leftovers. Suddenly, asking questions felt reasonable.
I asked each contractor to separate labor and materials where possible, identify allowances, clarify exclusions, describe permit responsibilities, and explain what could trigger change orders. I also asked what they would do if this were their own kitchen and their own money. That question produced surprisingly honest answers.
Questions That Helped Me Save
“Can we keep the existing layout?” “Are the cabinet boxes worth saving?” “Which material gives the best durability for the price?” “Is this upgrade functional or just pretty?” “What would you remove if we needed to cut 15%?” These questions turned vague estimates into real decisions.
Estimated Savings: $3,000 to $6,000
The best quote was not the cheapest. It was the clearest. A low quote with missing details can become expensive later, especially once change orders start multiplying like rabbits in a spreadsheet.
I Protected the Budget With a Contingency Fund
A kitchen remodel budget without a contingency fund is basically a wish with cabinets. Once walls open, surprises appear. Old wiring, uneven floors, hidden leaks, strange previous repairs, and mystery pipes can all show up wearing villain costumes.
I set aside about 15% for surprises and treated it as untouchable. That prevented panic when a few small issues surfaced. It also kept me from approving unnecessary upgrades just because the project was already messy.
One of the smartest ways to save money on a kitchen renovation is to avoid emotional spending in the middle of the project. Renovation fatigue is real. At some point, you may be willing to pay $900 just to make someone else decide where the trash pullout goes. Do not let exhaustion become a design consultant.
The Final Savings Breakdown
Here is the approximate savings summary from my kitchen renovation:
- Kept the existing layout: about $10,000 saved
- Refaced and repainted cabinets instead of replacing everything: about $12,000 saved
- Chose practical countertops and simpler fabrication: about $5,000 saved
- Bought midrange sale appliances: about $4,000 saved
- Handled safe DIY work: about $3,000 saved
- Compared quotes and reduced unnecessary upgrades: about $4,000 saved
Total estimated savings: more than $30,000. More importantly, the kitchen works better, looks brighter, and no longer feels like it was designed by a committee of beige filing cabinets.
Extra Experience: What Living Through the Renovation Taught Me
The part nobody glamorizes about a kitchen renovation is the living-through-it part. Online, you see the before photo, the after photo, and maybe a charming shot of someone holding coffee in linen pants. You do not see the person washing a cereal bowl in the bathroom sink while standing next to a stack of cabinet doors. That person was me. I was not wearing linen pants. I was wearing sawdust and regret.
The first experience I would share is this: set up a temporary kitchen before demolition begins. I created a small station with a microwave, coffee maker, toaster oven, cutting board, paper plates, basic utensils, and a plastic bin for snacks. It was not glamorous, but it kept us from ordering takeout every night. Takeout can become the silent budget killer of a kitchen remodel. You save $500 on tile, then accidentally spend $900 on tacos because your stove is in the garage.
Second, label everything. I used painter’s tape and marker on cabinet parts, hardware bags, outlet covers, appliance manuals, and random screws that looked important. Were all of them important? Absolutely not. Did I know which ones mattered? Also no. Labeling gave me a fighting chance. When the installer asked where a specific hinge plate was, I could find it without performing an archaeological dig through cardboard boxes.
Third, expect decision fatigue. At the beginning, choosing a faucet feels fun. By week four, choosing between satin nickel and brushed stainless can feel like a hostage negotiation. I learned to make decisions in batches. One evening for lighting, one for hardware, one for paint, one for backsplash. That kept me from making expensive choices while hungry, dusty, or irritated by the temporary dishwashing situation.
Fourth, protect your relationship with the people in your house. Renovation stress makes everyone weird. The sound of a saw at 8 a.m., missing utensils, delayed deliveries, and dust in places dust should not legally be allowed can make small problems feel dramatic. We created one rule: no major renovation decisions after 9 p.m. Late-night remodeling conversations are how people end up buying a farmhouse sink large enough to bathe a golden retriever.
Fifth, take progress photos. Not just pretty photosuseful photos. I photographed open walls before they were closed, plumbing locations, outlet positions, cabinet measurements, paint labels, product boxes, and receipts. Those photos helped later when we needed to remember what was behind a wall or reorder a matching item. They also reminded me that progress was happening, even when the kitchen looked like a construction-themed escape room.
Finally, I learned that saving money does not mean settling. It means understanding what actually matters to your daily life. I did not need the most expensive appliances, but I did need a quiet dishwasher. I did not need custom cabinets, but I did need drawers that opened smoothly. I did not need rare stone counters, but I did need surfaces that could survive coffee, tomato sauce, and my occasional belief that I am a much tidier cook than I am.
That is the heart of a successful budget kitchen remodel: spend where function matters, save where style can be achieved creatively, and never confuse “expensive” with “better.” My kitchen renovation taught me that smart planning is more powerful than a giant budget. Also, never underestimate the emotional value of finally having your sink back.
Conclusion: A Beautiful Kitchen Does Not Have to Bankrupt You
Saving $30,000+ on my kitchen renovation came down to discipline, research, and a willingness to question every assumption. I did not need a bigger kitchen. I needed a smarter one. I did not need full custom everything. I needed durable materials, better lighting, improved storage, and a design that made the existing space work harder.
If you want to save money on a kitchen remodel, start with the layout. Keep what works. Reface or repaint solid cabinets. Choose countertops with both style and math in mind. Buy appliances strategically. DIY only what you can do safely and well. Hire professionals for technical work. Most of all, build a kitchen renovation budget that reflects your real lifenot a showroom fantasy where nobody ever spills marinara.
A great kitchen is not the one with the highest invoice. It is the one that makes cooking, gathering, cleaning, and everyday living easier. If you can get that while saving tens of thousands of dollars, congratulations: you have officially beaten the renovation game. Your prize is a functional kitchen and, hopefully, enough money left over to buy groceries for it.