Note: This HTML includes only the <body> content for easy copying and publishing.
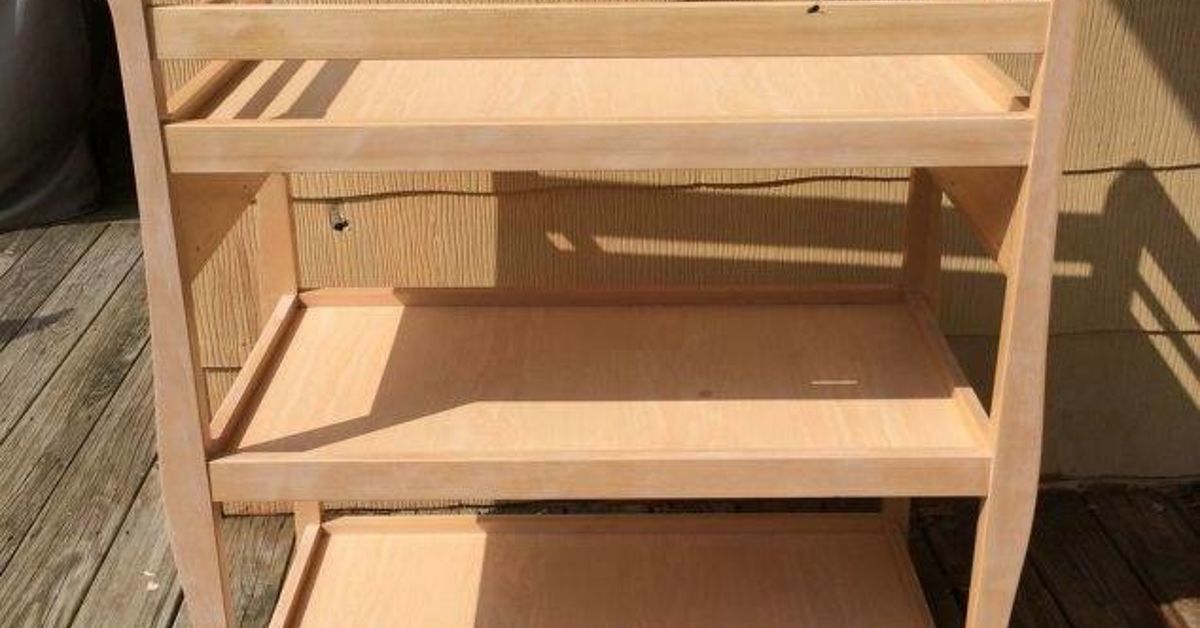
Every home has that one awkward piece of furniture sitting around like it is waiting for a second chance. In this case, it is the changing table: sturdy, shelf-happy, and emotionally ready to retire from diaper duty. The good news? With a little sanding, paint, and imagination, that old nursery workhorse can become a stylish DIY bar cart that looks far more “cocktail hour chic” than “where are the wipes?”
A changing table upcycled to a bar cart is one of those rare DIY wins that checks all the boxes. It is budget-friendly, practical, customizable, and surprisingly good-looking when finished well. Better yet, the shape already does half the work for you. Most changing tables have open shelving, a compact footprint, and a height that works beautifully for serving drinks, storing glassware, or staging a coffee-and-mocktail station.
This guide walks through how to turn a changing table into a bar cart without making it look like a changing table wearing a fake mustache. We will cover planning, prep, paint, hardware, styling, and the little decisions that make the finished piece feel intentional instead of “I found this by the curb and got brave.”
Why a Changing Table Makes a Great DIY Bar Cart
Before the makeover begins, it helps to understand why this project works so well. A changing table is already built for storage and quick access. That means bottles, glassware, mixers, napkins, cocktail tools, and decorative trays all have a natural home. Many pieces also have rails or side details that visually frame the top, which is handy when you want to keep serving items grouped in one place.
Another advantage is size. A full cabinet can feel bulky in a small apartment or dining nook, but a changing table usually fits into tighter spaces. That makes it ideal for a breakfast-area drink station, a corner entertaining setup, a patio-adjacent serving cart, or even a compact home coffee bar for people who prefer espresso to old fashioneds. No judgment. Your bar cart can be powered by bourbon, cold brew, sparkling water, or a dangerously enthusiastic collection of syrups.
And of course, there is the sustainability factor. Upcycling furniture keeps a usable piece out of the waste stream and lets you create a more personal home without spending designer-furniture money. That is good for your wallet, good for the planet, and excellent for your bragging rights.
What to Check Before You Start
1. Make sure the piece is structurally solid
Beauty is nice, but wobble is not. Check that the frame feels sturdy, the shelves are secure, and the joints are tight. If the table rocks, fix that before thinking about paint color names with words like “linen,” “sage,” or “midnight truffle.” Tighten screws, reglue loose joints, and replace damaged shelf supports if needed.
2. Know what material you are working with
Some changing tables are solid wood. Others are veneer, laminate, MDF, or a combination of all three. This matters because your prep and primer choices depend on the surface. Solid wood is usually forgiving. Laminate and slick finishes need more thoughtful prep so the paint actually sticks instead of peeling off later like a bad sunburn.
3. Think about age and safety
If the piece is old enough to predate 1978, be cautious about possible lead-based paint. That is not the moment for aggressive sanding in your garage while humming happily. Test first or use lead-safe practices and, if needed, bring in a professional. Also be realistic about use: if the surface is heavily worn, add a protective topcoat and avoid using it as a direct food-prep area. It is a bar cart, not a charcuterie chopping block.
Supplies You Will Likely Need
- Changing table
- Screwdriver or drill
- Wood filler for holes or dings
- Cleaner or degreaser
- Sandpaper or sanding sponge in medium and fine grits
- Tack cloth or damp lint-free cloth
- Bonding primer
- Furniture paint, cabinet paint, chalk paint, or spray paint
- Brushes, foam roller, or paint sprayer
- Protective topcoat or wax if your paint system needs it
- New hardware, hooks, or decorative pulls if desired
- Locking casters if you want the cart to roll
- Drop cloth and painter’s tape
How to Turn a Changing Table Into a Bar Cart
Step 1: Remove the nursery-specific features
Some changing tables have a raised changing pad surround, safety straps, or hardware that screams “baby station.” Remove anything that feels too specialized for the new job. If the top has a tray-like frame and it looks nice, keep it. That edge can help corral bottles and glassware. If it looks clunky, take it off and patch the screw holes with wood filler.
This is where the transformation begins visually. The moment the baby-specific accessories come off, the piece starts to read less nursery and more utility furniture. It is basically furniture theater. A cast change, a costume swap, and suddenly the role is completely different.
Step 2: Clean like your paint job depends on it
Because it does. Dust, oils, old polish, and mystery residue can all interfere with adhesion. Give the piece a thorough cleaning with a mild degreaser or soapy water, then let it dry fully. Skipping this step is like putting lipstick on a dusty lampshade and hoping for the best.
Step 3: Sand for grip, not for sport
You usually do not need to sand the piece down to bare wood unless the existing finish is badly failing. In most cases, a good scuff-sand is enough to dull the surface and help primer bond. Focus on glossy areas, worn spots, and edges. If there are rough patches, smooth them out. Then wipe away all dust thoroughly. Dust left behind is the sneaky villain of many “why does my paint feel weird?” moments.
Step 4: Repair flaws before painting
Fill scratches, dents, or old hardware holes with wood filler, let it dry, then sand smooth. This is especially important if you are going for a polished modern look. If you want a rustic or vintage finish, leave a little character. There is a difference between “weathered charm” and “someone definitely dropped a toy truck on this in 2014,” so edit accordingly.
Step 5: Prime the surface
Primer is the quiet overachiever of furniture makeovers. It helps paint adhere better, improves durability, and creates a more even finish, especially if you are covering stained wood, laminate, or a dark color with a lighter shade. Use a bonding primer for slick or tricky surfaces, and apply a thin, even coat. Once dry, lightly sand if needed for a smoother finish.
Step 6: Paint with patience
Now comes the fun part. Choose a finish that fits your space and your tolerance for maintenance. A satin or semi-gloss finish tends to work beautifully on a DIY bar cart because it is easier to wipe clean than a flat finish. If you love a vintage look, chalk paint can create that soft, matte effect, but it often needs sealing. If you want a smoother, more modern surface, cabinet or furniture paint is often the smarter move.
Apply thin coats and let them dry properly between rounds. Two light coats almost always beat one thick, gloopy coat. If you are using spray paint, keep the can moving and resist the urge to “just hit that one spot a little more.” That is how drips are born.
Step 7: Seal for durability
A bar cart handles bottles, glasses, condensation, citrus spills, and guests who set things down with all the grace of a bowling ball. A protective topcoat helps your hard work survive real life. Pick a compatible clear finish for your paint system, especially on the top shelf and high-touch areas. If you want a softer, aged look, wax can work, but for heavy-duty everyday use, a durable clear coat is usually the practical choice.
Step 8: Add functional upgrades
This is where your upcycled bar cart starts to feel custom. Consider adding:
- Locking casters for mobility
- A towel bar on the side
- Small hooks for bar tools
- A stemware rack under the top shelf if the design allows
- New knobs or pulls for a more finished look
- A removable tray on top to create zones
Not every piece needs all the bells and whistles. Sometimes a fresh paint color, better hardware, and a smart arrangement are enough to make the whole thing feel elevated.
Best Paint Colors and Styles for a Changing Table Bar Cart
The beauty of an upcycled furniture project is that you get to tailor it to your space. Here are a few style directions that work especially well:
Modern classic
Try black, deep navy, charcoal, or crisp white with brass or gold accents. This look feels polished and works well in dining rooms, apartments, and more formal spaces.
Warm farmhouse
Use soft sage, creamy white, muted greige, or dusty blue. Pair it with baskets, wood trays, and antique-style hardware for a cozy feel.
Bold and playful
Try emerald green, terracotta, aubergine, or teal. A bar cart is a great place to be slightly dramatic without repainting an entire room or alarming your landlord.
Vintage distressed
Layer paint, lightly sand the edges, and use aged metal accents. This works especially well if the original piece already has character and charming imperfections.
How to Style Your New DIY Bar Cart
Once the makeover is done, styling is what sells the illusion. You do not want people saying, “Cute changing table.” You want them saying, “Wait, that used to be what?”
Create zones
Use trays or baskets to separate categories. One tray for bottles, one for tools, one for glassware, and maybe a small bowl for cocktail napkins or garnishes. Grouping items makes the cart look curated instead of crowded.
Mix practical and pretty
Keep the items you actually use, but edit the visual noise. A few nice glasses, a cocktail shaker, a small plant, and one decorative object can do a lot. You do not need seventeen random bottles on display unless your design style is “airport lounge at midnight.”
Think beyond alcohol
This same setup works beautifully as a coffee bar, tea station, hot cocoa cart, brunch cart, or mocktail bar. If your household does not drink, you can still absolutely own this look. Sparkling water, syrups, mugs, and pretty glassware can be every bit as charming.
Common DIY Mistakes to Avoid
- Skipping prep: Paint does not forgive greasy, glossy, dusty surfaces.
- Using coats that are too thick: Thick paint can drip, stay tacky, and ruin a smooth finish.
- Choosing style over durability: A pretty finish is great until the first water ring appears.
- Ignoring weight and balance: If you add casters, make sure they can handle the loaded weight of the piece.
- Overdecorating: A bar cart should feel styled, not suffocated.
Budget-Friendly Ideas to Make It Look More Expensive
You do not need luxury-furniture money to get a high-end result. A few strategic details go a long way:
- Upgrade the hardware to brass, matte black, or antique bronze
- Use a small marble-look tray or wood serving board on top
- Line one shelf with peel-and-stick wallpaper for contrast
- Add glass bottles, decanters, or matching storage jars
- Use a restrained color palette instead of mixing too many finishes
The real secret is intention. A bar cart looks expensive when every element seems chosen on purpose. Even a thrift-store piece can feel designer if the finish is clean and the styling is edited well.
Is This DIY Furniture Project Worth It?
Absolutely, especially if you already have the changing table or can find one secondhand for cheap. Compared with buying a new bar cart, an upcycled table makeover can save a meaningful amount of money while giving you better storage and a one-of-a-kind result. It also lets you tailor the dimensions, finish, and function to your actual home instead of trying to force some tiny store-bought cart to hold your glassware, mixers, and dreams.
More importantly, this project turns a sentimental or forgotten piece into something useful for your current season of life. That is part of what makes upcycled furniture so satisfying. It is not just about paint. It is about giving a practical object a fresh purpose and making your home feel more like you now.
Final Thoughts on a Changing Table Upcycled to a Bar Cart
A DIY table makeover like this is proof that good furniture bones never really go out of style; they just get reassigned. With the right prep, paint, and finishing touches, a changing table can become a beautiful bar cart that feels intentional, functional, and full of personality. Whether you style it for cocktails, coffee, mocktails, or party supplies, the result is a piece that works hard and looks good doing it.
So if you have an old changing table taking up space, do not write it off. Sand it, prime it, paint it, roll it into the spotlight, and let it begin its glamorous second act. Diapers are out. Design is in.
Experiences and Lessons From Doing a DIY Table Makeover Like This
One of the most interesting things about turning a changing table into a bar cart is that the project usually feels easier in your head on day one, messier in real life on day two, and completely worth it by the time you style the final shelf. That is the honest rhythm of a furniture upcycle. You start with excitement, hit a small wall when you realize old furniture has dents, screws, glossy finish, and attitude, then get that satisfying rush when the first clean coat of paint goes on and the piece suddenly starts making sense.
Many DIYers discover that the prep stage teaches the biggest lesson. Cleaning and sanding are not glamorous, and nobody takes dramatic before-and-after photos of themselves wiping dust with a tack cloth. But this is the part that separates a makeover that lasts from one that starts chipping the minute someone sets down a sweating glass. The experience also changes how you look at secondhand furniture. Once you have transformed one piece successfully, you stop seeing scratches as flaws and start seeing them as manageable plot points.
Another common experience is surprise at how much a small design choice matters. Changing the hardware, adding wheels, choosing a warmer white instead of a cold one, or placing a tray on the top shelf can shift the whole vibe. At first, the piece may still whisper “nursery.” Then one brass accent, one bottle, one stack of coupe glasses later, it is confidently saying “hostess with excellent taste.” That moment is half decorating victory and half personal comedy, because you know exactly where the thing came from.
There is also a practical satisfaction that comes from using something you made. A purchased bar cart can be lovely, but an upcycled changing table has a different energy. It fits your space because you planned it that way. It holds what you need because you styled it yourself. It often stores more than a standard cart, which becomes obvious the first time you realize your napkins, syrups, glasses, and backup seltzer all fit without a fight. In small homes especially, this kind of makeover feels less like a craft project and more like a clever life upgrade.
Emotionally, projects like this can carry some extra meaning too. For some people, a changing table is simply a thrifted find. For others, it is a leftover piece from a season of parenting that has passed. Repurposing it can feel surprisingly rewarding. Instead of hiding it in a basement or listing it online for less than the cost of two fancy coffees, you turn it into something useful for the life you are living now. That shift gives the makeover a little more heart.
The final experience most people mention is confidence. After one successful furniture flip, other pieces around the house start looking suspiciously makeover-able. A side table becomes a possible plant stand. A bookcase starts auditioning for coffee-bar duty. Upcycling has that effect. It teaches you to look at furniture less by label and more by shape, structure, and potential. And honestly, that might be the best result of all. You do not just end up with a great DIY bar cart. You end up seeing your home with more creativity, more flexibility, and far less fear of a little sandpaper.