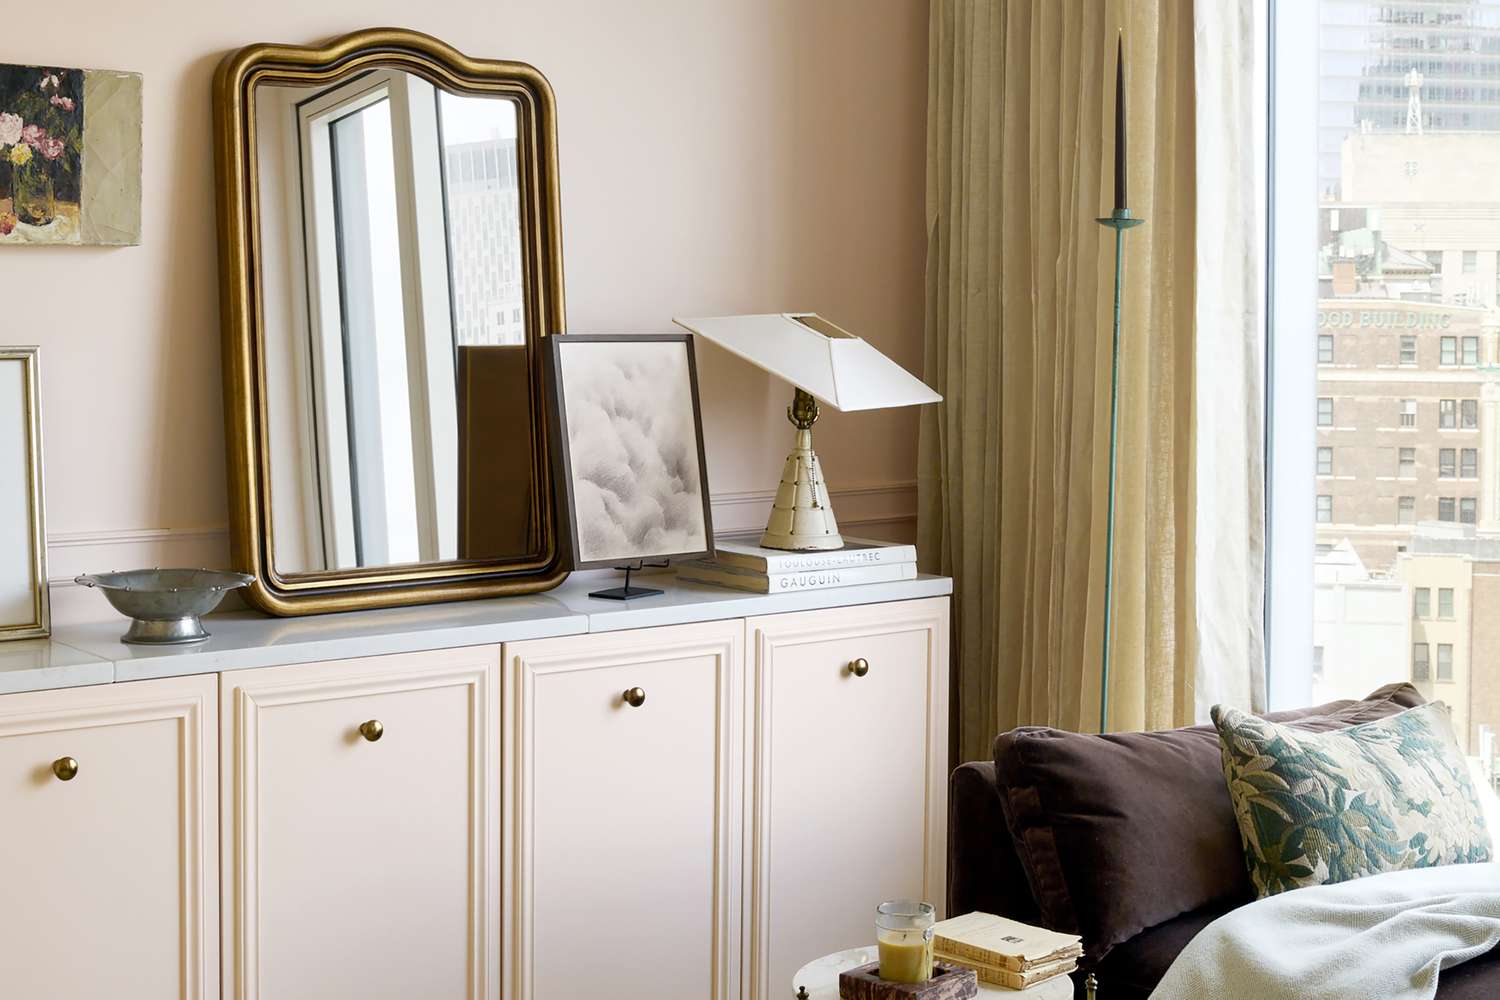
If your Pinterest boards are full of “custom built-ins,” “designer curtains,” and “moody-but-still-friendly” rooms, the 2025 REAL SIMPLE Home is basically your natural habitat. The good news is that some of its most memorable ideas are not the sort of projects that require a trust fund, a contractor named Sebastian, and three months of emotional support. They are genuinely DIY-friendly.
That is what makes this year’s inspiration so useful. Instead of serving up design ideas that look gorgeous but feel wildly impractical, the home leaned into projects regular humans can actually pull off: turning plain cabinets into faux built-ins, rescuing curtains that came up too short, dressing up a basic lampshade, making a custom-looking frame, and creating statement wall art without statement-level spending.
In other words, this is not “admire from afar” decorating. This is “clear the dining table, grab the primer, and become a little too emotionally invested in trim choices” decorating.
Below, we break down five standout DIY design projects inspired by the 2025 REAL SIMPLE Home, why they work so well, and exactly how to recreate them in your own space. Whether you live in a studio apartment, a suburban fixer-upper, or a rental with more restrictions than personality, these ideas can help your home look more custom, layered, and expensive than it really is.
Why These DIY Design Projects Work So Well
The smartest thing about these projects is that they all solve a common decorating problem. Built-ins add architectural polish to blank walls. Trim fixes curtains and makes them feel intentional. Fabric softens hard surfaces and adds texture. A custom frame makes cheap art look curated. And bold wall art fills visual dead space without draining your bank account.
Even better, each project gives you a big design payoff from relatively humble materials: IKEA cabinets, plywood, fabric remnants, trim, glue, stain, and paint. That is the real secret sauce of great DIY home decor. You are not just making something from scratch. You are changing the way the room reads.
That shift matters. A room can go from “nice starter apartment” to “who decorated this and why are they better at life than me?” with just a handful of high-impact upgrades.
1. Faux Built-Ins That Look Custom, Not Copy-Paste
Why this project is worth it
Custom built-ins are one of those design features that instantly make a room feel finished. They create storage, define a focal wall, and add the kind of architectural detail that new builds and plain boxes often lack. The problem, of course, is that real built-ins can cost real money.
The DIY version fixes that beautifully. By combining ready-made cabinets with molding, paint, and a continuous top surface, you can fake the look of expensive millwork without paying millwork prices. It is one of the best examples of a budget-friendly upgrade that still reads luxe.
How to DIY it
- Measure the wall and sketch a simple plan before buying anything. Width, height, outlet locations, and baseboard interference all matter.
- Use modular cabinets or storage units as the base. A clean-lined system works best because it gives you a blank canvas.
- Assemble the units and level them carefully. If the floor is uneven, use shims. A lopsided “built-in” is still just-in furniture with attitude.
- Add trim or molding to the doors and sides to mimic custom paneling.
- Prime, then paint everything one consistent color so the separate parts read as a single installation.
- Top the units with one long surface in wood, stone, or a painted board cut to size.
- Finish with upgraded hardware and, if desired, crown molding or a topper at the ceiling line.
Best places to use it
This project works especially well in a home office, living room media wall, dining nook, or bedroom that needs extra hidden storage. If you are short on square footage, faux built-ins can make a compact room work much harder without looking cluttered.
Pro tip
Paint is what sells the illusion. When every piece is coated in the same finish, your eye stops reading “assembled parts” and starts reading “custom feature.” That is a very satisfying optical trick for the price of primer and patience.
2. Too-Short Curtains? Add Trim and Pretend It Was the Plan All Along
Why this project is genius
Few things deflate a room faster than curtains that hover awkwardly above the floor like they are afraid of commitment. But instead of replacing them, this DIY lets you save the panels and make them look even better than the originals.
Adding fringe or decorative trim is part practical fix, part style upgrade. It gives the hem extra length, adds movement and texture, and makes standard curtains feel custom. The end result looks collected and intentional rather than “ordered the wrong size at 11:48 p.m. and hoped for the best.”
How to DIY it
- Hang the curtains first and measure how much extra length you need.
- Choose trim that matches the room’s mood. Fringe feels playful and layered; a clean banded trim feels more tailored.
- Lay the curtain flat and pin the trim in place before attaching it.
- Use fabric glue for a fast no-sew version, or sew it on for a more permanent finish.
- Steam or iron the bottom edge after the trim is attached so the hem hangs smoothly.
Why it looks designer-approved
Trim introduces contrast at exactly the point where your eye naturally lands. It turns the bottom edge into a feature instead of an afterthought. And because curtains already occupy a lot of visual real estate, even a small embellishment can transform the whole room.
Pro tip
Hang curtains closer to the ceiling and let them kiss the floor. That simple move makes windows look taller, the room feel larger, and your decorating instincts appear suspiciously advanced.
3. A Pleated Fabric Lampshade That Makes Generic Lighting Look Expensive
Why this project works
Lighting is often treated as an afterthought, but it is one of the fastest ways to add personality to a room. A plain lampshade is functional, sure, but it can also feel like the visual equivalent of unsalted crackers. Wrapping it in fabric and adding soft pleats instantly gives the piece charm, texture, and that coveted “where did you find that?” energy.
This is one of the easiest DIY home decor projects because the supply list is short and the transformation is dramatic. You are not rewiring anything. You are simply upgrading the outfit your lamp is wearing.
How to DIY it
- Start with a clean, simple shade in good condition.
- Choose lightweight fabric that folds easily and is not too bulky at the edges.
- Cut the fabric so it wraps the shade with a little extra at the top and bottom.
- Work in sections, pleating and securing with tiny dots of hot glue or fabric glue.
- Fold the excess over the top and bottom rims for a cleaner finish.
- Cover the edge with a narrow fabric strip or trim if you want a more polished look.
What fabric works best
Cotton, linen blends, and lightweight printed fabrics are usually easiest for beginners. If your room leans classic, go with a subtle stripe or floral. If it leans modern, choose a solid with visible texture. If your style is “collected but slightly dramatic,” congratulations: this project was made for you.
Pro tip
Test the fabric with the lamp on before committing. Some patterns look gorgeous in daylight and weirdly chaotic when backlit. A little preview can save you from creating a very beautiful mistake.
4. A Fabric-Wrapped Picture Frame That Makes Cheap Art Look Curated
Why it matters
Sometimes the problem is not the art. It is the frame. A basic frame can flatten the impact of a print, photo, or sketch, while a custom frame can make even an inexpensive piece feel special. The beauty of a fabric-wrapped frame is that it brings in softness, color, and texture all at once.
It also lets you tie artwork into the rest of the room. Pull fabric from a pillow, curtain, bench cushion, or wallpaper-adjacent palette and suddenly the frame feels integrated into the full design story. Very chic. Very thoughtful. Very “I totally meant to do that.”
How to DIY it
- Choose an inexpensive frame with straight edges and a removable backing.
- Cut fabric with enough overhang to wrap the front, sides, and back edges.
- Use spray adhesive or a thin coat of glue on the front surface.
- Smooth the fabric carefully to avoid bubbles or wrinkles.
- Wrap the edges like a present and secure the back with hot glue.
- If the frame includes a mat, you can wrap that too for a fully custom look.
- Reassemble and hang or lean it as part of a gallery wall.
Where it looks best
This project shines in bedrooms, reading corners, offices, and gallery walls where you want variation in texture, not just color. It is also a fantastic way to display vintage fabric scraps, leftover drapery panels, or small textiles that feel too pretty to hide in a drawer forever.
Pro tip
If your art is simple, let the frame be the statement. If your art is already bold, use a more subtle fabric so the two are not competing like rival pop stars.
5. DIY Wall Art That Fills the Room Without Emptying Your Wallet
Why this project has such a big payoff
Large-scale wall art can be painfully expensive, yet blank walls make a room feel unfinished. That is why the DIY statement-art route is so satisfying. It gives you size, drama, and texture on your terms.
A wood-based piece with repeated shapes, stain, and visible dimension can look sculptural and custom without being hard to make. The appeal is partly visual and partly psychological: oversized art tells the room to calm down and look intentional.
How to DIY it
- Start with a plywood panel cut to your preferred size.
- Lay out your design before gluing anything down. Repeated half-circles, knobs, or wood appliqués work especially well.
- Keep spacing consistent enough to feel deliberate, but not so rigid that it loses character.
- Glue the pieces in place and let everything dry fully.
- Sand rough edges if needed.
- Apply stain or paint to unify the piece and enhance the texture.
- Hang it alone so it can breathe and do its job as a focal point.
Why it feels expensive
Texture reads as luxury. Depth reads as intention. Scale reads as confidence. When you combine all three, even basic materials can look far more elevated than their price tag suggests.
Pro tip
Do not overcomplicate the composition. Statement art is strongest when it has one clear idea and enough negative space to let that idea land.
How to Make These Projects Look Cohesive in One Home
The secret to using several DIY projects in the same house is restraint. You do not need every room shouting for attention at once. Repeat one or two design threads throughout the home instead: a warm wood tone, a favorite trim color, brass accents, earthy paint, or a consistent fabric palette.
For example, you could pair faux built-ins in the office with a fabric-wrapped frame in the bedroom using the same soft olive or rust tones. Or echo a lampshade fabric in the trim on your curtains. That kind of repetition makes the whole home feel more layered and deliberate.
Good DIY design is not about making every object look handmade. It is about making every room feel considered.
Mistakes to Avoid Before You Break Out the Glue Gun
- Skipping prep work: Dust, grease, glossy finishes, and uneven measurements will come back to haunt you.
- Choosing the wrong scale: Tiny trim on oversized curtains or undersized art on a big wall will not create the impact you want.
- Using too many competing materials: Pick a lane. Texture is lovely. Chaos is less charming.
- Ignoring function: A built-in still has to open. A lampshade still has to fit. A curtain still has to hang properly.
- Rushing the finish: Most DIY projects are won or lost in the last 10 percent.
The Real-Life Experience of DIYing Projects Like These
There is a very specific emotional arc to design DIY, and if you know, you know. It begins with optimism. You spot a clever idea from a beautifully styled home, convince yourself that you too are a person who can casually create “custom architectural charm” on a Saturday, and head to the hardware store with unreasonable confidence. This is the honeymoon phase. Everyone looks great in the lighting at the paint counter.
Then comes the reality check. The cabinet is heavier than expected. The fabric has opinions. The trim you swore was cream is somehow pink once you bring it home. You measure the same wall three times and get three slightly different numbers, which feels rude, frankly. And yet, this is also the moment where the project starts becoming yours. You stop trying to copy a room exactly and start translating the idea into something that works for your layout, your budget, and your tolerance for spending six hours on a lampshade.
That is what makes these projects so rewarding. They are not just decorative upgrades. They are confidence builders. The first time you attach molding to a basic cabinet and suddenly it stops looking like flat-pack furniture and starts looking intentional, your brain does a tiny victory lap. The first time you add trim to a too-short curtain and realize the “mistake” actually looks more stylish than the original plan, you begin to understand one of the great truths of home design: personality often shows up when things do not go perfectly.
There is also something deeply satisfying about tactile work. Wrapping a frame in fabric, folding pleats into a shade, staining wood for wall artthese are slow, hands-on projects in a world that is usually too fast and too digital. You are making decisions in real time. You are seeing texture, testing color, adjusting proportions, stepping back, and trying again. It is creative problem-solving, but with prettier consequences.
And yes, the process can be messy. You may get glue where glue should never be. You may temporarily lose a screwdriver that is somehow in your back pocket. You may stand in the room afterward and obsess over whether the trim should have been one inch wider. But once the room comes together, the imperfections are often the best part. They remind you that the space was shaped by an actual person, not dropped from the sky as a showroom set.
That lived-in quality is exactly why DIY design projects resonate. They make a home feel personal. Not perfect. Not precious. Personal. The built-ins reflect what you needed to store. The fabric frame uses a pattern you genuinely love. The wall art exists because you wanted something bold but did not want to spend half a paycheck to get it. Even the curtain trim tells a storypreferably one where you laugh and say, “Those were the wrong length, but now they are my favorite thing in the room.”
So if the 2025 REAL SIMPLE Home has you itching to try one of these ideas, take that as a good sign. Start small if you want. Begin with the frame or the lampshade. Move up to curtains. Save the faux built-ins for the weekend when you are feeling brave, hydrated, and emotionally prepared to talk about primer. The point is not to recreate someone else’s home inch for inch. The point is to borrow the spark, then make it work for your life.
That is the best version of DIY: not imitation, but interpretation. And when you finish? Your room will not just look better. It will feel more like yours.
Conclusion
The best DIY design projects are the ones that make your home look more expensive, more intentional, and more personal all at once. That is exactly why these five ideas from the 2025 REAL SIMPLE Home are so compelling. They are stylish without being snobby, practical without being boring, and approachable without looking homemade in the wrong way.
If you want the biggest visual return, start with faux built-ins or statement wall art. If you want a low-risk weekend win, try the lampshade or fabric-wrapped frame. And if your curtains are currently committing crimes against proportion, congratulations: you already have your first project.
Pick one idea, do it well, and let that momentum carry you forward. Designer style does not always come from buying better things. Sometimes it comes from looking at ordinary materials and thinking, “I can make this much cooler.”