Henna hair day is a little like making brownies: it starts wholesome, ends messy, and somehow your kitchen (bathroom) looks like a crime scene in the middle. The good news? If you do it right, you’ll get glossy, dimensional color, happier-looking strands, and the smug satisfaction of saying, “Yep, I did this with a plant.”
This guide walks you through how to apply henna to hair step-by-stepmixing, dye release, application, processing, rinsing, and aftercareplus the “wish someone told me that” tips that save you from orange surprises and grout regret.
Before You Start: What Henna Actually Does (and Doesn’t)
Pure henna (made from Lawsonia inermis) stains the outer layers of the hair and binds to keratin, creating a translucent color overlay. Translation: it doesn’t “lift” color like bleach, and it won’t magically turn dark hair blonde. On darker hair, henna usually reads as a warm auburn sheen in sunlight; on lighter hair, it can look coppery, ginger, or rich red.
Also, henna is famously committed. Once it’s in, it’s not the kind of color you casually break up with next week. If you think you might want to bleach or go pastel later, plan carefully.
Safety First: The One Kind of “Henna” You Should Avoid
Let’s get this out of the way: avoid “black henna”. Products labeled that way can contain p-phenylenediamine (PPD)a dye associated with severe allergic reactions in some people. If you’re sensitive, a “quick test” can turn into a “why is my skin screaming” situation.
- Choose 100% pure henna powder (ideally lab-tested or from a trusted brand).
- Patch test any new product 24–48 hours before full application.
- If you’ve reacted to hair dye before, consider talking to a dermatologist first.
What You’ll Need (a.k.a. Your Henna “Go Bag”)
Tools
- Gloves (two pairs if you enjoy having non-rust-colored fingernails)
- Old T-shirt + old towel (unless you want “henna couture”)
- Non-metal mixing bowl + non-metal spoon/spatula
- Plastic wrap or a shower cap
- Sectioning clips
- Applicator brush or squeeze bottle (optional, but makes you feel professional)
- Petroleum jelly or thick conditioner (for your hairline/ears)
Ingredients
- Henna powder (pure, finely sifted)
- Warm distilled water or an acidic liquid (varies by method and brand guidance)
- Optional: cassia (for softer golden tones), indigo (for browns/blacks), amla (for cooler tones and curl support)
Step 1: Pick the Right Henna Plan for Your Goal
If you want red/copper warmth
Use pure henna. Expect more vibrant results on light or gray hair, and a warm sheen on dark hair.
If you want brown or black (especially for gray coverage)
You’ll usually need indigo with henna. Many people get the most reliable gray coverage using a two-step process: henna first, then indigo. It’s more work, but so is explaining why your roots are orange while your ends are “mysterious.” (More on this below.)
If you want conditioning with minimal color change
Consider cassia (sometimes called “neutral henna,” even though it isn’t henna). It can add shine and a soft golden cast on lighter hair, with minimal change on darker hair.
Step 2: Do a Strand Test (Yes, Really)
Henna results depend on your starting color, porosity, previous dye, mineral buildup, and even how warm your bathroom is. A strand test helps you predict the shade and timing before you commit your entire head.
- Collect a small section from a hidden area (nape of neck works well).
- Apply your prepared paste.
- Process for the time you’re considering (start with 1–2 hours).
- Rinse, dry, and wait 48 hours to see the final oxidized color.
Step 3: Prep Your Hair for Even Color
Henna likes clean hair. Product buildup (especially silicones and heavy oils) can block stain uptake and create patchy results.
- Clarify or shampoo thoroughly before application.
- Skip conditioner right before henna (save it for rinsing day).
- Detangle well and let hair dry to damp or dry (either can workconsistency matters more than perfection).
Step 4: Mix Henna Paste (Without Summoning Lumps)
Your goal is a texture like thick yogurt or mashed potatoes: spreadable, not drippy. Too thick and it’s hard to saturate; too thin and it slides down your neck like a tiny mudslide.
How much henna powder do you need?
Amount depends on length and density. As a rough guide:
- Short hair: ~100g
- Shoulder length: ~200g
- Mid-back/very thick hair: ~300g or more
Dye release: the “let it sit” step that matters
Many henna methods recommend letting the paste rest so dye can release before application. Some routines use room temperature rest times (often overnight) for best staining power, while others use faster methods depending on the product formulation. If your brand gives instructions, follow those first.
Basic mixing approach (works for many pure henna powders)
- Put henna powder in a glass or plastic bowl (avoid metal tools).
- Add warm liquid gradually while stirring until smooth and thick.
- Cover the bowl tightly (plastic wrap works).
- Let it rest for dye release (often 8–12 hours at comfortable room temperature).
Optional mix-ins (choose based on your hair needs)
- Amla powder: often used to support curl pattern and cool down overly warm tones.
- Cassia: can soften intensity for lighter, honeyed results.
- Indigo: used after henna (or sometimes with henna) for browns and blacks.
Step 5: Apply Henna to Hair (The Saturation Game)
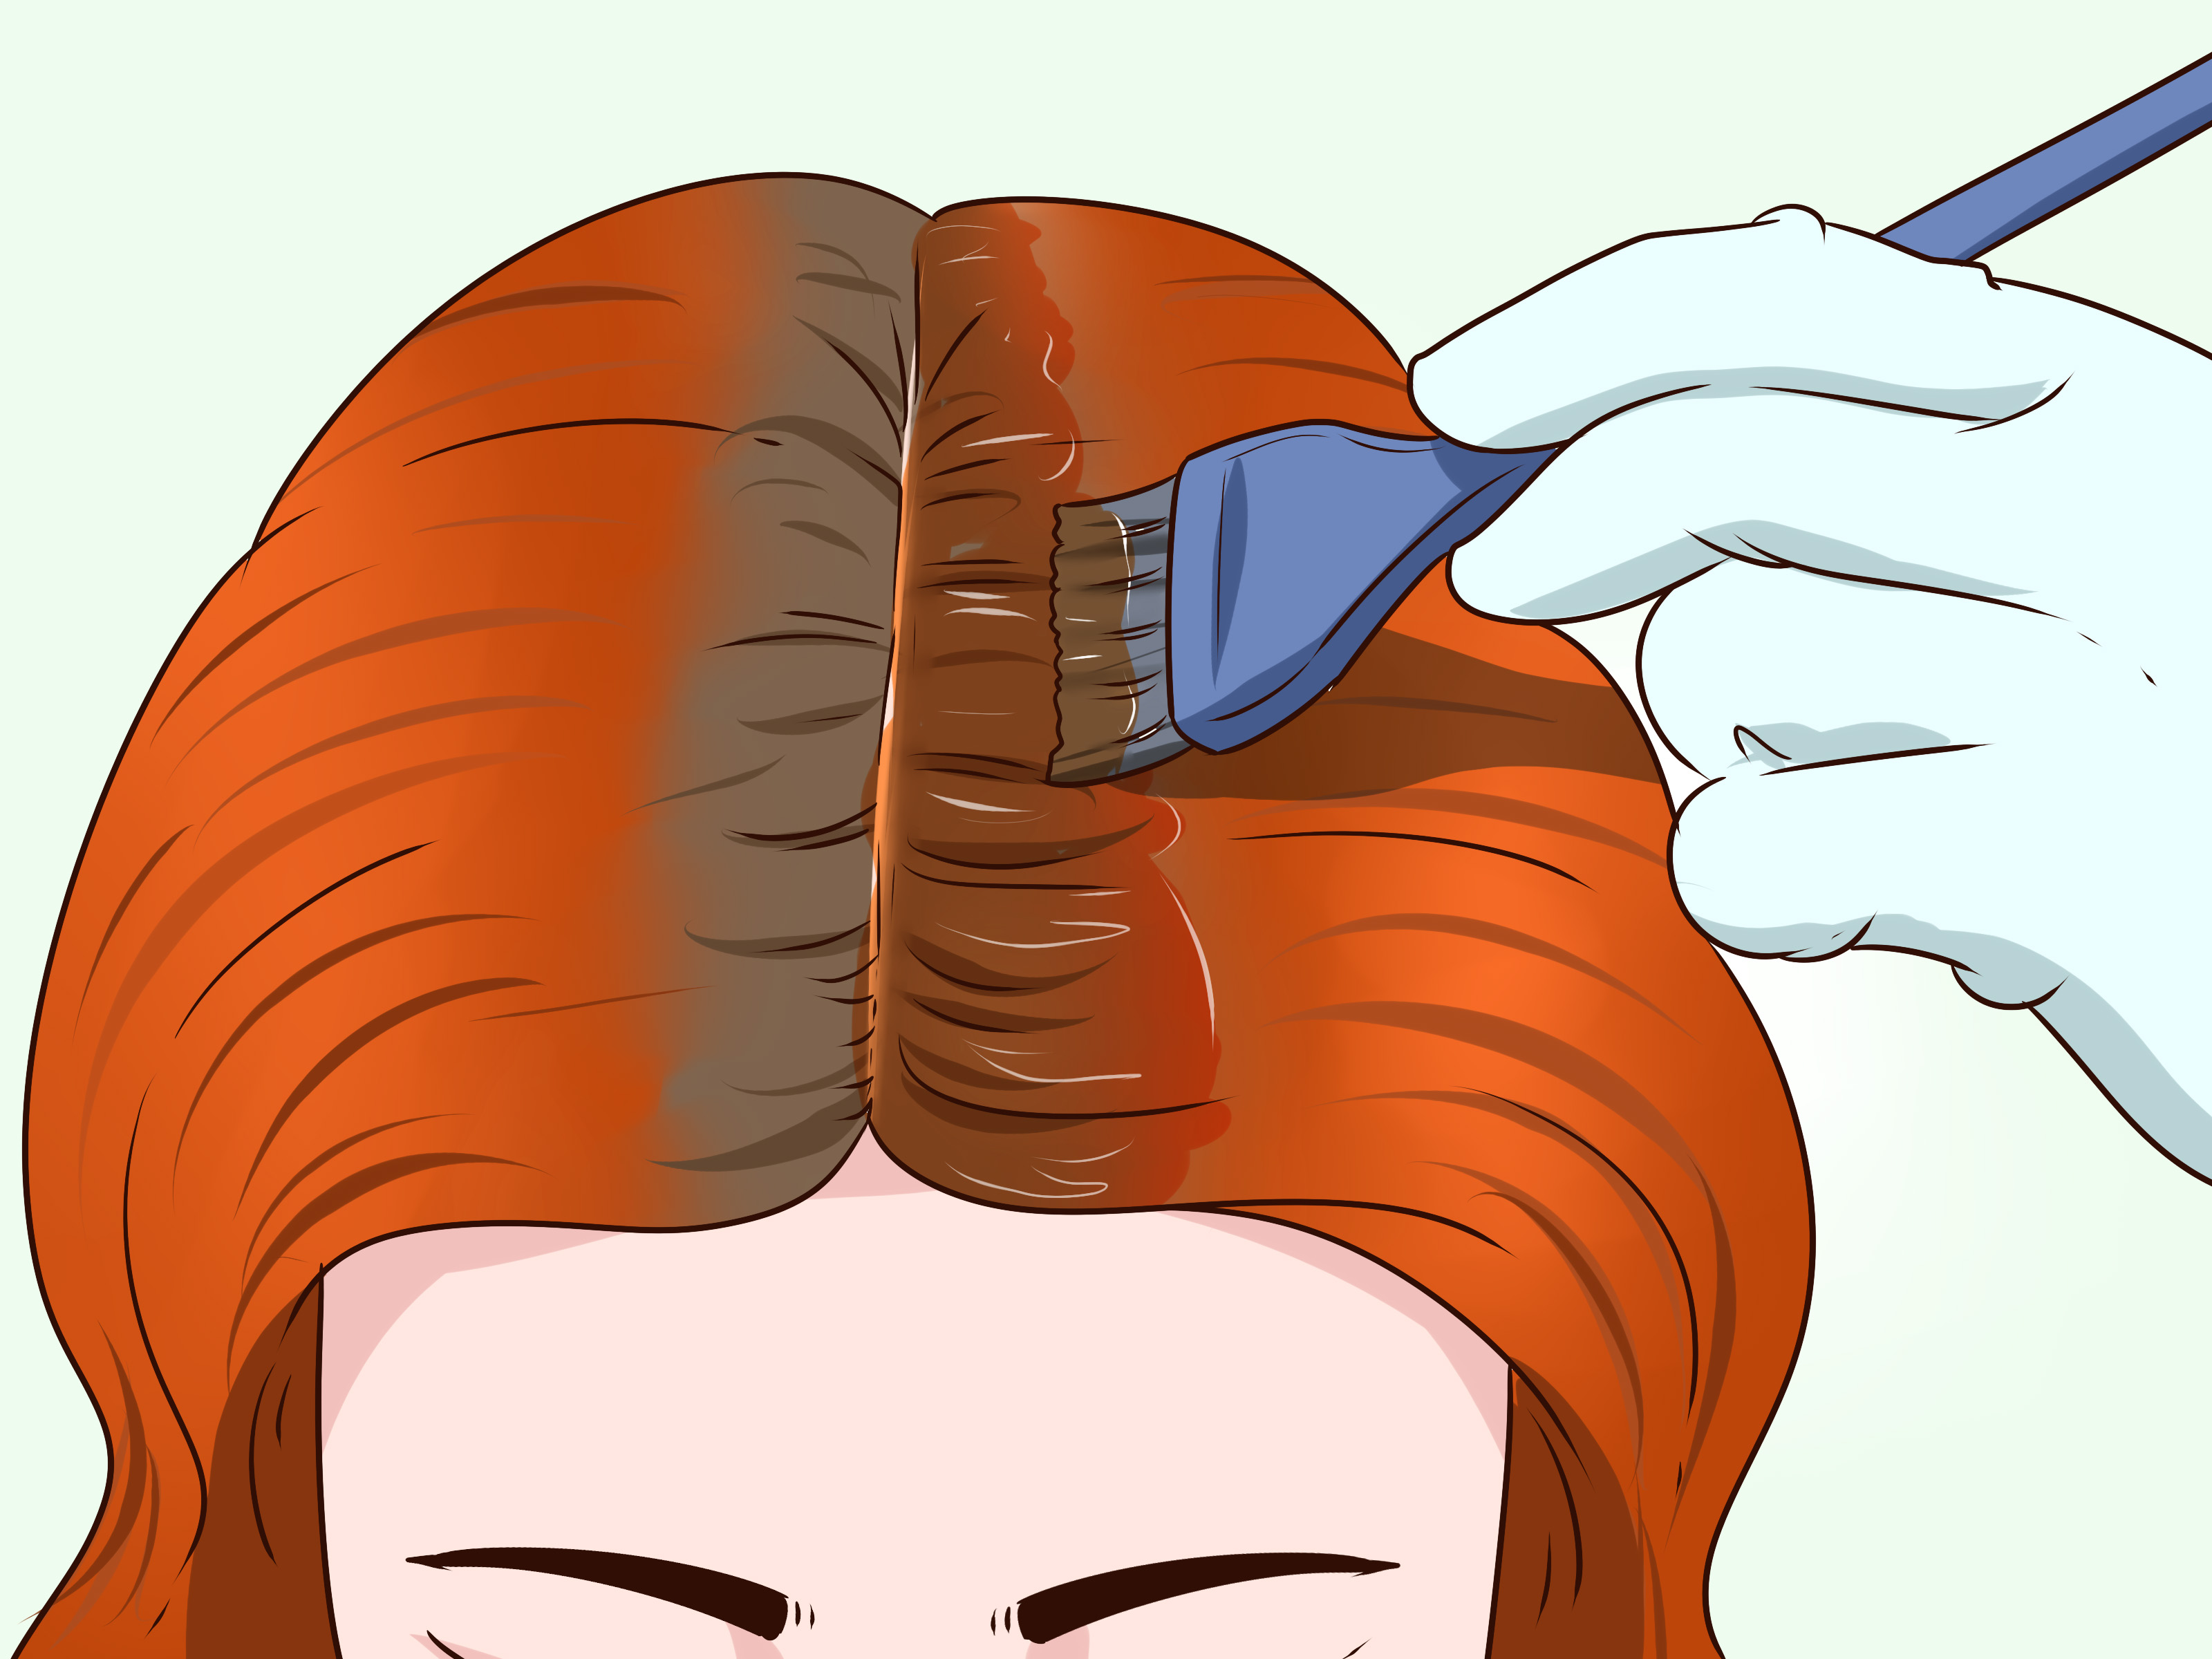
The secret to great henna results is thorough saturation. Not “a little smear here and there.” Think: frosting a cake, but the cake is your hair and the frosting is herbal mud.
Protect your skin and space
- Put petroleum jelly or thick conditioner around your hairline, ears, and neck.
- Cover counters and floors. Henna stains are enthusiastic.
- Wear gloves. Unless you’re aiming for “pumpkin hands.”
Section and apply
- Divide hair into 4–6 sections and clip them up.
- Start at the roots (especially if covering gray), then work toward the ends.
- Apply paste generously, pressing it in so every strand is coated.
- Twist each coated section into a bun as you go.
Wrap it up (heat helps, dryness hurts)
Once your hair is fully coated, wrap it with plastic wrap or a shower cap to keep it warm and moist. Henna works best when it doesn’t dry out on your head. You can also add a towel or beanie over the cap for gentle warmth.
Step 6: Processing Time (How Long to Leave Henna In)
Processing time depends on your color goal and your hair’s ability to take stain. Many routines suggest anywhere from 1 to 6 hours. Longer time usually means deeper colorup to a point.
- 1–2 hours: softer tint, glow, or first-time caution mode
- 3–4 hours: common sweet spot for richer results
- 6+ hours: often used for stubborn gray or maximum depth (watch for dryness on some hair types)
Pro tip: set a timer and do something distracting. Henna time moves differently. You’ll blink and it’s either been five minutes or you’ve aged into a Victorian ghost.
Step 7: Rinse Out Henna (Without Clogging Your Life)
Rinsing is the least glamorous part, but it’s where you win or lose the “my hair feels like straw” storyline.
Best rinse method
- Rinse with lots of warm water until most paste is out.
- Use a generous amount of conditioner to “slip” out remaining grit.
- Keep rinsing until water runs mostly clear and hair feels clean.
Many henna users skip shampoo for 24–48 hours to let the color oxidize and deepen. Expect the shade to look brighter right after rinsing, then mellow and deepen over the next two days.
Aftercare: Make the Color Look Better (and Your Hair Feel Better)
- Wait a day or two before shampooing if you want maximum depth.
- Moisturize if your hair feels dry: deep condition, then seal with a light oil if needed.
- Avoid heavy clarifying right away unless you truly have residue.
- Plan your next touch-up: many people do roots every 4–6 weeks.
Special Case: Covering Gray Hair with Henna
Gray hair can be more resistant, and pure henna can turn gray strands bright orange at first. That doesn’t mean failure; it means chemistry. If you want brown or black coverage, the classic approach is:
Two-step henna + indigo (common for brown/black on gray)
- Step 1: Apply henna paste. Process, then rinse thoroughly.
- Step 2: Mix indigo fresh (it releases fast and doesn’t “hold” well once mixed).
- Apply indigo. Process (often 1–2 hours), then rinse.
If you’re aiming for brunette shades instead of jet black, many routines adjust ratios, timing, or do a one-step mix but gray coverage is usually most predictable with the two-step method.
Troubleshooting: Fix the Most Common Henna Problems
“My color is too bright/orange!”
- Give it 48 hours. Oxidation often deepens and calms the brightness.
- For future applications, consider adding amla or using indigo (depending on your goal).
“It came out patchy.”
- Usually a saturation issue: hair wasn’t fully coated or had buildup.
- Next time, clarify first, use smaller sections, and apply more paste than you think you need.
“My hair feels dry.”
- Some people need more moisture after henna. Deep condition and follow with a leave-in.
- Don’t leave paste on so long that it dries and hardens fullykeep it wrapped.
“My curls look looser.”
Some curly and wavy hair types notice a stretched curl pattern after repeated henna because it coats and slightly weighs the strand. If you want color but prefer less loosening, many people use amla in their mix or do glosses instead of full-strength applications.
FAQ: Quick Answers You Actually Need
Should I apply henna on wet or dry hair?
Either can work. Clean hair matters most. Many people apply to damp hair for easier spreading; others prefer dry hair for more control and less dripping.
Can I use henna over chemically dyed hair?
Often yes, but results can be unpredictableespecially if hair is bleached or porous. Do a strand test first.
Can I freeze leftover henna paste?
Many henna users freeze dye-released henna paste to pause the process and use it later. (Indigo is different: it’s typically mixed fresh and used immediately.)
How long does henna hair color last?
Henna is long-lasting and fades slowly. Many people do roots every 4–6 weeks, and refresh full length less often.
Real-World Henna Hair Experiences (What People Learn the Hard Way)
First-time henna stories have a theme: everyone underestimates the mess, the timing, or the amount of paste. Sometimes all three. A super common experience is mixing what seems like “plenty,” then realizing halfway through that hair absorbs henna paste like a sponge with a mortgage. The fix is simple: mix more than you think you need, and keep extra warm water nearby to adjust texture instead of panic-stirring a dry brick of powder.
Another frequent lesson: application speed matters less than coverage. People who rush tend to get patchy roots or missed underlayers (usually the back of the headthe spot you can’t see, so it becomes a surprise party later). The experienced move is to section smaller than you think is necessary, and press the paste in like you’re trying to get conditioner through a winter coat. If you finish and still have paste left, go back and “top coat” areas that feel thin.
Then there’s the “orange panic,” especially with gray coverage. Many users report that immediately after rinsing, the color can look loudlike your hair just joined a punk band. After 24–48 hours, oxidation usually deepens and softens the tone into something richer and more natural-looking. This is why patient henna people sound so calm: they’ve learned the color has a second act.
Texture changes are also a real part of the henna learning curve. Some curly and wavy hair types mention that repeated full-strength henna can stretch curls or reduce shrinkage. The pattern isn’t universal, but it’s common enough that many long-time users adapt: they do root-only applications, switch to a “henna gloss” (mixing paste with conditioner for a gentler effect), or add amla when they want to support curl shape. People with very fine hair often love the “thicker strand” feel henna can providewhile others need to follow with deep conditioning to keep softness.
One more shared experience: rinsing is where you earn your results. New users sometimes try to shampoo aggressively right away, then wonder why hair feels rough. Seasoned henna folks tend to rinse a long time, use lots of conditioner for slip, and save shampoo for later (or use a gentle cleanser if needed). They also learn to protect drainsbecause henna paste plus plumbing is not a love story.
Finally, the most “grown-up” henna lesson: commitment. People who love henna love the shine, the dimension, and the low-chemical routine. People who regret henna often regret it because they wanted a temporary change. The experienced approach is to strand test, choose your shade plan (henna-only vs. henna + indigo), and commit like you’re naming a petbecause you’ll be seeing this color for a while.
Conclusion
Applying henna to hair is equal parts art project and self-care ritual: prep clean hair, mix the paste properly, wait for dye release if your method calls for it, saturate every section, keep it warm and covered, rinse thoroughly, and give the color time to oxidize. Do that, and you’ll get natural-looking dimension, shine, and a color story that looks expensiveeven if it happened in your bathroom with plastic wrap and determination.