A DIY tassel throw blanket is one of those rare home projects that looks expensive, feels cozy, and does not require you to own a sewing machine, a craft room, or a mysterious drawer full of “professional tools.” If you can measure fabric, cut straight-ish lines, tie knots, and resist the urge to overthink yarn, you can make a beautiful tasseled throw for your sofa, bed, reading chair, guest room, or that one chilly corner of the house everyone pretends is “fine.”
The charm of a tassel throw blanket is in the balance: soft fabric plus playful movement, clean edges plus handmade texture, practical warmth plus just enough personality to make your living room look styled instead of simply survived. Tassels and fringe have long been used in textiles because they add texture, movement, and visual interest. On a throw blanket, they create an easy designer-style finish without turning the project into a craft marathon.
This guide walks you through how to make a cozy throw blanket with tassels, how to choose the right materials, how to attach tassels securely, how to style the finished blanket, and how to avoid the little mistakes that can turn a relaxing DIY project into a yarn-based soap opera. Whether you want a no-sew fleece tassel blanket, a woven-style cotton throw, or a simple upgrade for a plain store-bought blanket, this tutorial gives you practical steps and real-world advice.
Why Make a DIY Tassel Throw Blanket?
A handmade tassel throw blanket is budget-friendly, customizable, and surprisingly forgiving. You can choose the exact color, texture, size, and tassel style you want instead of settling for whatever is sitting on a store shelf under fluorescent lighting. Want a neutral cream blanket with oversized yarn tassels? Easy. Prefer a cozy buffalo plaid throw with chunky corner tassels? Also easy. Need a last-minute handmade gift that says “I care” without saying “I panicked at 10 p.m.”? This project is your friend.
The biggest advantage is flexibility. You can start from scratch with fleece fabric, flannel, cotton, gauze, or a knit panel. You can also transform an existing blanket by adding tassels to the corners or along two edges. If you are a beginner, fleece is one of the easiest materials to use because it does not fray like many woven fabrics. That means you can create clean edges without hemming, which is excellent news for anyone whose sewing skills are currently limited to replacing a button and hoping for the best.
Best Materials for a DIY Tassel Throw Blanket
The right materials make the project easier and the finished blanket more durable. You do not need luxury supplies, but you do need materials that feel good, cut cleanly, and hold up to normal use.
1. Blanket Fabric
For a beginner-friendly throw, fleece is the easiest choice. Anti-pill fleece is especially useful because it is designed to resist the fuzzy little balls that can appear after washing and use. Standard fleece is soft, warm, and easy to cut. Luxe or heavy plush fleece can be beautiful, but it may be too bulky if you plan to layer two pieces together.
If you want a more elevated look, try cotton gauze, waffle weave cotton, lightweight flannel, or a pre-made cotton throw. These fabrics may need hemming or careful edge finishing because woven fabrics can fray. For a quick project, use an existing throw blanket and add handmade tassels to the corners. This gives you the “custom boutique” effect with much less measuring, cutting, and muttering.
2. Yarn for Tassels
Yarn is the star of the tassel show. Chunky acrylic or wool-blend yarn creates big, fluffy tassels that look modern and cozy. Cotton yarn gives a cleaner, more relaxed look and works well for lightweight throws. Avoid extremely slippery yarn for your first project because it can loosen over time. Medium-weight or bulky yarn is easier to handle and creates tassels with satisfying volume.
3. Tools You Will Need
- Throw blanket fabric or a plain store-bought throw
- Yarn for tassels
- Sharp fabric scissors or a rotary cutter
- Cutting mat, if using a rotary cutter
- Ruler or measuring tape
- Cardboard, about 5 to 7 inches wide, for wrapping tassels
- Large-eye yarn needle or tapestry needle
- Straight pins or clips
- Optional: needle and thread for extra-secure attachment
Choosing the Right Blanket Size
A standard throw blanket is often around 50 by 60 inches, which works well for sofas, chairs, and beds. If you are making a blanket from fabric yardage, two yards of fleece usually gives you a generous adult-size throw after trimming. For a child-size blanket, 1.5 yards can be enough. If you are adding tassels to a ready-made throw, measure the edges before deciding how many tassels to make.
For corner tassels only, you need four tassels. For tassels along two short edges, plan on spacing them about 5 to 7 inches apart. For a 50-inch edge, that usually means 8 to 10 tassels per side. If you love a dramatic fringe look, go closer together. If you prefer a cleaner modern finish, keep the tassels larger and farther apart.
How to Make a DIY Tassel Throw Blanket
This method works for a no-sew fleece blanket or for adding tassels to an existing throw. The steps are simple, but accuracy matters. A blanket does not need to be mathematically perfect, but if one tassel is two inches longer than the others, it will wave at you every time you walk past the sofa.
Step 1: Prepare the Blanket Base
Lay your fabric or blanket flat on a clean floor or large table. Smooth out wrinkles and line up the edges. If you are using fleece yardage, trim off uneven selvage edges. If you are layering two pieces of fleece for a thicker no-sew blanket, place the wrong sides together so the right sides face outward.
For a single-layer throw, you can leave fleece edges raw because fleece does not fray easily. For cotton, flannel, or gauze, hem the edges first or choose a pre-finished throw. Tassels look best when they are attached to a stable edge, not to fabric that is slowly unraveling like it has personal problems.
Step 2: Decide Tassel Placement
Mark your tassel positions with pins or fabric clips. For a simple design, attach one tassel to each corner. For a fuller look, add tassels along both short ends of the blanket. Space them evenly, usually 5 to 7 inches apart. Step back and look at the layout before attaching anything permanently. This is the craft version of “measure twice, avoid regret once.”
Step 3: Make the Tassels
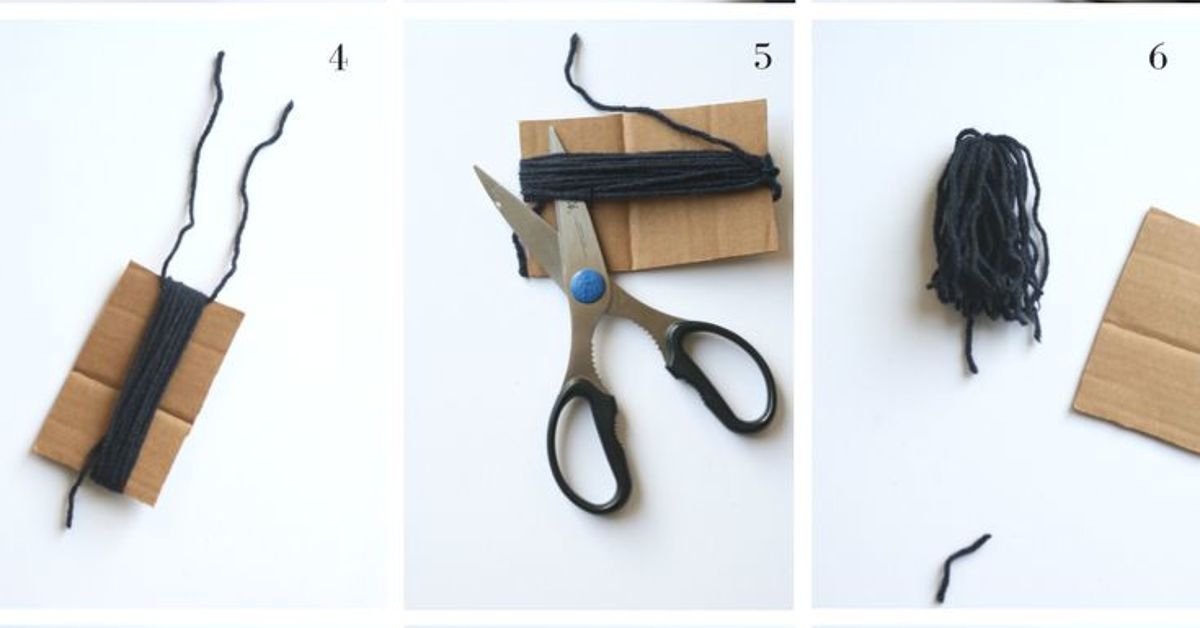
Cut a piece of cardboard to the length you want your tassels to be. A 5-inch piece makes medium tassels; a 7-inch piece creates a more dramatic look. Wrap yarn around the cardboard 20 to 40 times, depending on how thick you want each tassel. More wraps create fuller tassels. Fewer wraps create a lighter, more casual finish.
Slide a separate piece of yarn under the wrapped bundle at the top and tie it tightly. Cut through the bottom loops to release the tassel from the cardboard. Then cut another piece of yarn and wrap it around the tassel about one inch below the top knot to create the “neck.” Tie it securely, thread the ends through the center with a yarn needle, and trim the bottom evenly.
Repeat until you have the number of tassels needed. Try to wrap each tassel the same number of times so the finished blanket looks intentional, not like the tassels were made by five different relatives during a power outage.
Step 4: Attach Tassels to the Blanket
Thread the top tie of the tassel through a large-eye yarn needle. Insert the needle through the blanket edge at your marked point. Tie the tassel securely with a double knot. If the blanket will be used often, reinforce the tassel by stitching through the top of the tassel and the blanket edge several times. Hide the yarn ends inside the tassel so the attachment looks neat.
For corner tassels, attach each tassel exactly at the corner or slightly inward for a softer drape. For edge tassels, keep the spacing consistent. After all tassels are attached, lay the blanket flat and trim any uneven tassel ends. Sharp scissors are important here. Dull scissors can make yarn look chewed, and unless your decorating theme is “craft raccoon,” that is not ideal.
No-Sew Version: The Beginner-Friendly Method
If you want the easiest version of a DIY tassel throw blanket, start with one piece of anti-pill fleece and add tassels only to the four corners. This project can be completed in an afternoon and does not require sewing. Cut the fleece to your desired size, square the corners, make four chunky tassels, and tie or stitch them securely to each corner. That is it.
For a slightly more finished no-sew option, cut fringe along the short ends of the fleece and add tassels at the corners. The fringe creates movement, while the tassels create a decorative anchor. This works especially well with solid-colored fleece because the texture becomes the main design feature.
Design Ideas for a Tassel Throw Blanket
The beauty of this project is that you can match almost any home style. For a modern farmhouse look, use cream fleece with oatmeal or charcoal tassels. For a boho living room, try a woven cotton throw with oversized tassels in warm earth tones. For a kids’ room, choose bright fleece and rainbow tassels. For a holiday gift, use plaid fleece with deep red, forest green, or ivory yarn.
You can also play with contrast. A navy blanket with ivory tassels looks crisp and classic. A beige blanket with tonal beige tassels feels calm and expensive. A blush throw with rust-colored tassels adds warmth without feeling too sweet. If your room already has patterned pillows, a solid throw with textured tassels is usually the safest choice. If your furniture is neutral, a patterned blanket can bring personality without requiring a full room makeover.
Common Mistakes to Avoid
Using Weak Yarn
Very thin yarn can look limp unless you use many wraps. If you want bold tassels, choose bulky or medium-weight yarn. The tassel should feel full enough to hang nicely, not like it skipped breakfast.
Skipping the Test Tassel
Make one tassel first before cutting yarn for the entire project. Check the length, thickness, and color against the blanket. This small test prevents you from making 24 tassels and then realizing they look strangely like tiny mop heads.
Attaching Tassels Too Loosely
Tassels need secure knots. If the blanket will be washed or used regularly, reinforce the attachment with a few stitches. Decorative blankets can get away with lighter attachment, but everyday throws need strength.
Ignoring Washability
If the blanket is machine washable but the tassels are delicate, washing becomes complicated. Choose yarn that can handle the same care routine as the blanket, or make the tassels removable with small ties. For fleece throws, cold water, gentle cycles, and low or air drying help preserve softness and reduce pilling.
How to Wash and Care for a Tassel Throw Blanket
Always check the care label on the fabric or base blanket first. In general, fleece and many synthetic throws do best when washed separately in cold water on a gentle cycle with a small amount of mild detergent. Too much detergent can cling to fibers and make the blanket feel less soft. High heat can also damage fleece and some yarns, so tumble dry on low or air dry when possible.
Before washing, inspect the tassels. Tighten any loose knots and place the blanket in a mesh laundry bag if the tassels are long or delicate. After washing, gently shake out the tassels and comb them with your fingers. Trim any stray strands only after the blanket is fully dry. A little maintenance keeps the throw looking handmade in the good way, not handmade in the “it survived a tumbleweed incident” way.
Where to Use Your DIY Tassel Throw Blanket
A tassel throw blanket is one of the easiest pieces to style because it works almost anywhere. Drape it over the back of a sofa for a casual layered look. Fold it neatly across the foot of a bed to add hotel-style polish. Place it over a reading chair to make the corner feel inviting. Roll it in a basket with other throws for a cozy family room setup.
For photos or staging, let the tassels show. The tassels are the jewelry of the blanket, and hiding them is like wearing earrings under a ski mask. Arrange the throw so the tassels hang over an edge, spill from a basket, or frame the corner of a chair. Texture photographs beautifully and makes even simple rooms feel warmer.
Budget Tips for Making a Tassel Throw Blanket
This project can be very affordable if you shop strategically. Watch for fabric sales, use leftover yarn, or upgrade a plain blanket you already own. A basic store-bought throw can look custom with four oversized tassels. If you crochet or knit, save leftover yarn from other projects and use it for multicolor tassels. Scraps can become the best part of the design.
For gifting, buy fleece in bulk or during seasonal sales and make several blankets at once. Choose a neutral blanket base and personalize each one with different tassel colors. Add a ribbon and a small care card, and suddenly you have a thoughtful handmade gift that looks far more expensive than it was. This is the kind of craft math everyone can support.
Experience Notes: What I Learned Making DIY Tassel Throw Blankets
The first thing you learn when making a DIY tassel throw blanket is that tassels look simple, but they reward patience. The first tassel may come out slightly uneven. The second one usually looks better. By the fourth, you begin to feel like a tiny textile factory with excellent taste. The key is consistency: use the same cardboard template, wrap the yarn the same number of times, and tie the neck of each tassel at the same distance from the top.
One practical experience is that chunky tassels look best on medium or heavy blankets. If the blanket is very lightweight, oversized tassels can pull at the corners and make the throw hang awkwardly. In that case, smaller tassels or lighter cotton yarn work better. For a thick fleece blanket, however, large tassels look fantastic. They balance the plush texture and make the blanket feel intentionally designed.
Another lesson is that color choice matters more than expected. Matching tassels create a calm, expensive look. Contrasting tassels create a playful, handmade look. Neither is wrong, but they give completely different moods. A cream blanket with cream tassels feels soft and minimal. A gray blanket with mustard tassels feels cheerful and modern. A plaid blanket with black tassels feels cozy and cabin-ready. Before making all the tassels, place a few yarn options on the blanket and look at them in daylight. Indoor lighting can trick you, especially with beige, gray, and white tones.
Attachment strength is also worth taking seriously. A tassel that looks secure after one knot may loosen after a few uses, especially if kids, pets, or blanket-hogging adults are involved. Double knots are good; a few hidden stitches are better. When attaching tassels to fleece, do not place the knot too close to the edge. Move slightly inward so the fabric has enough strength to hold the tassel without stretching.
Trimming is the most satisfying step, but it is also the easiest to overdo. Trim slowly. Hold the tassel straight, cut a little, shake it out, then cut again. If you try to perfect it in one dramatic snip, you may end up with tassels that look like they gave themselves bangs. Sharp scissors make a noticeable difference. Fabric scissors or dedicated craft scissors give a cleaner edge than everyday kitchen scissors.
From a decorating perspective, tassel blankets are surprisingly versatile. One handmade throw can soften a leather sofa, warm up a minimalist bedroom, or add texture to a plain reading chair. The best styling trick is to avoid folding the blanket too perfectly. A relaxed drape usually looks more natural. Let one tassel corner fall over the side of a chair or sofa. That little bit of movement makes the room feel lived-in and cozy.
Finally, this project is excellent for gifting because it feels personal without requiring advanced skills. You can choose colors based on someone’s home, favorite season, or personality. A neutral tassel throw works for almost anyone. A bright one works for the friend who believes beige is a personal insult. Add a handwritten note explaining that it is handmade, washable, and meant for naps, movie nights, and emergency couch comfort. That final detail turns a simple blanket into something memorable.
Conclusion
A DIY tassel throw blanket is simple, stylish, and wonderfully useful. It is beginner-friendly enough for a first craft project but customizable enough for experienced makers who want a polished home décor piece. With the right fabric, sturdy yarn, even spacing, and secure knots, you can create a cozy throw that looks boutique-worthy without the boutique price tag.
Whether you make a no-sew fleece version, upgrade a plain blanket, or design a full tasseled edge, the process is relaxing and rewarding. The finished blanket adds warmth, texture, and personality to any room. Best of all, every tassel says, “Yes, I made this,” but in a classy waynot in a “glue gun chaos at midnight” way.