Note: This publish-ready article is written in clean HTML body format and is based on practical woodworking, kitchen organization, plate display, finishing, and wall-mounting guidance from reputable U.S. home improvement and DIY sources.
A DIY wood plate rack is one of those home projects that looks fancy enough to make guests say, “Where did you buy that?” but is secretly simple enough to build without needing a workshop that smells like sawdust, ambition, and emotional damage. With a few boards, dowels, basic tools, and a weekend afternoon, you can create a beautiful wall-mounted plate rack that stores dishes, displays favorite plates, and gives your kitchen that warm, custom-built charm usually reserved for magazine spreads and people who always know where their measuring tape is.
Whether your kitchen leans farmhouse, cottage, traditional, rustic, or “I found this cabinet on the curb and made it work,” a wooden plate rack adds both function and personality. It keeps everyday plates within reach, turns pretty dishware into decor, and frees up cabinet space for less glamorous thingslike mismatched food containers that have somehow multiplied in the dark.
Why Build a DIY Wood Plate Rack?
A plate rack is more than a shelf with good posture. It is a smart kitchen storage solution that combines display, organization, and wall decor in one compact project. Instead of stacking plates in a cabinet where they hide like shy pancakes, a wood plate rack lets them stand vertically or lean safely behind a rail.
Many traditional plate racks use shelves with front retaining rails or dowels. These rails prevent dishes from sliding forward, while the shelf depth supports the base of each plate. A well-designed rack can hold dinner plates, salad plates, cutting boards, shallow bowls, trays, cookbooks, or decorative ceramics. For small kitchens, this is especially helpful because vertical wall space is often underused.
Another reason to build your own is customization. Store-bought racks may be too wide, too narrow, too modern, too expensive, or mysteriously designed for plates the size of coasters. When you make your own, you control the dimensions, wood species, finish, color, shelf spacing, and mounting method.
Best Wood for a Plate Rack
For a beginner-friendly wood plate rack project, pine, poplar, and common boards are popular choices. Pine is affordable and easy to cut, though it can dent more easily. Poplar is slightly harder, smoother, and great for painted finishes. Oak, maple, and walnut are stronger hardwood options if you want a richer stained look, but they cost more and may require sharper tools.
If you plan to paint the rack, poplar is a strong choice because it has a tight grain and takes paint beautifully. If you prefer a rustic farmhouse look, pine can be charming, especially when stained, whitewashed, or lightly distressed. For a natural wood plate rack, choose boards that are straight, dry, and free from major knots near screw points.
Recommended Size and Design
The best size depends on your wall space and plate collection. A practical beginner rack might measure about 30 to 36 inches wide, 30 to 40 inches tall, and 4 to 5 inches deep. This size works well above a counter, in a breakfast nook, near a dining area, or on a blank kitchen wall that has been begging for a purpose.
Simple Wall-Mounted Plate Rack Dimensions
Here is a flexible example plan:
- Width: 32 inches
- Height: 34 inches
- Depth: 4 inches for decorative plates or 5 inches for everyday dinner plates
- Shelf spacing: 10 to 12 inches between shelves
- Rail height: 2 to 3 inches above each shelf surface
- Dowel diameter: 3/8 inch or 1/2 inch
Before cutting wood, measure your largest plate. Add at least 1 inch of clearance above the plate so it can slide in and out comfortably. If your dinner plates are 10.5 inches tall, give that row about 11.5 to 12 inches of vertical space. This tiny step prevents future you from muttering unkind things at past you.
Tools and Materials
Materials
- Two 1×4 boards for the side pieces
- Three or four 1×4 boards for shelves
- 1×2 boards or narrow trim for front rails
- 3/8-inch or 1/2-inch wood dowels
- Wood glue
- 1 1/4-inch wood screws or brad nails
- Sandpaper in 120-grit and 220-grit
- Wood filler
- Paint, stain, clear coat, or furniture wax
- Wall anchors, screws, or a French cleat for mounting
Tools
- Tape measure
- Pencil
- Miter saw, circular saw, or handsaw
- Drill and drill bits
- Level
- Clamps
- Sander or sanding block
- Stud finder
- Safety glasses
Step-by-Step: How to Build a DIY Wood Plate Rack
Step 1: Choose the Wall Location
Start by choosing where the rack will live. Good locations include above a sideboard, near open shelving, beside a pantry, or on an empty kitchen wall. Avoid placing it directly where cabinet doors will hit it or where traffic is too tight. Plates are sturdy, but they do not enjoy being body-checked by a backpack.
Use a stud finder to locate wall studs. A plate rack can become heavy once loaded with dishes, so secure mounting is essential. If you cannot hit studs, use heavy-duty wall anchors rated for the expected weight. For the strongest installation, a French cleat is excellent because it distributes weight across the wall and makes the rack easier to hang level.
Step 2: Measure Your Plates
Measure the diameter and thickness of the plates you want to store. Most dinner plates are around 10 to 11 inches wide, while salad plates are often 7 to 9 inches. If you want to display cutting boards or platters, measure those too. Do not guess unless you enjoy rebuilding things with a dramatic sigh.
Step 3: Cut the Side Pieces
Cut two side boards to the same height, such as 34 inches. These side pieces form the vertical frame of the rack. If you want a traditional cottage look, you can round the top corners or cut a gentle arch. For a clean modern plate rack, leave the sides straight and simple.
Step 4: Cut the Shelves
Cut shelves to the desired width. For a 32-inch-wide rack with two 3/4-inch side boards, shelves should be about 30 1/2 inches long if they sit between the sides. If the shelves overlap the side boards, cut them to the full width instead. Both designs work; the between-the-sides method looks tidy, while the full-width method is often easier for beginners.
Step 5: Add Plate Rails
The rail is what keeps plates from sliding forward. You can use 1×2 boards, decorative trim, quarter-round molding, or dowels. For a classic plate display rack, attach a narrow front rail across each shelf, positioned about 2 to 3 inches above the shelf surface. This creates a pocket that supports the plate.
If using dowels, drill matching holes into the side pieces and slide the dowel through before final assembly. Keep dowels level and evenly spaced. A 3/8-inch dowel works for smaller racks, while a 1/2-inch dowel adds more strength and visual weight.
Step 6: Dry Fit Everything
Before gluing or screwing, assemble the parts without fasteners. Check that shelves are level, rails are aligned, and plates fit comfortably. This is the woodworking version of trying on jeans before removing the tags. It saves regret.
Step 7: Assemble the Frame
Apply wood glue to shelf ends, clamp the parts together, and secure them with screws or brad nails. Drill pilot holes before driving screws near board ends to reduce splitting. Keep checking for square as you assemble. If your rack twists out of shape, your plates may lean like they are listening to gossip from the next room.
For extra strength, you can add a back panel made from beadboard, plywood, or thin tongue-and-groove boards. A back panel makes the rack more rigid and gives it a finished, built-in look. Beadboard works especially well for farmhouse or cottage kitchens.
Step 8: Fill, Sand, and Smooth
Fill nail holes, screw heads, and small gaps with wood filler. After it dries, sand the entire rack with 120-grit sandpaper, then finish with 220-grit for a smoother surface. Slightly round sharp edges so the rack feels handmade in a charming way, not handmade in a “this might snag my sweater” way.
Step 9: Paint or Stain
For a painted wood plate rack, apply primer first, especially if using pine or poplar. Then add two light coats of paint, sanding lightly between coats if needed. White, cream, sage green, navy, black, and warm gray are popular choices for kitchen plate racks.
For a stained finish, test the stain on scrap wood first. Softwoods like pine can absorb stain unevenly, so a pre-stain wood conditioner may help create a smoother appearance. Finish with a clear protective topcoat if the rack will be handled often.
If plates will touch the rack regularly, let paint or finish cure fully before loading dishes. Dry-to-the-touch is not the same as fully cured. The first means you can touch it. The second means your plates will not become unwilling participants in a sticky finish experiment.
Step 10: Mount the Plate Rack Securely
Hold the rack against the wall and mark the mounting points. Use a level. Then use screws into studs whenever possible. A French cleat is one of the best methods for heavier racks because it provides strong support and makes removal easier later.
After mounting, gently tug the rack to test stability before adding plates. Start with lighter plates and gradually load the rack. Keep heavier dishes on lower shelves for balance and safety.
Design Ideas for a Custom Wood Plate Rack
Farmhouse White Plate Rack
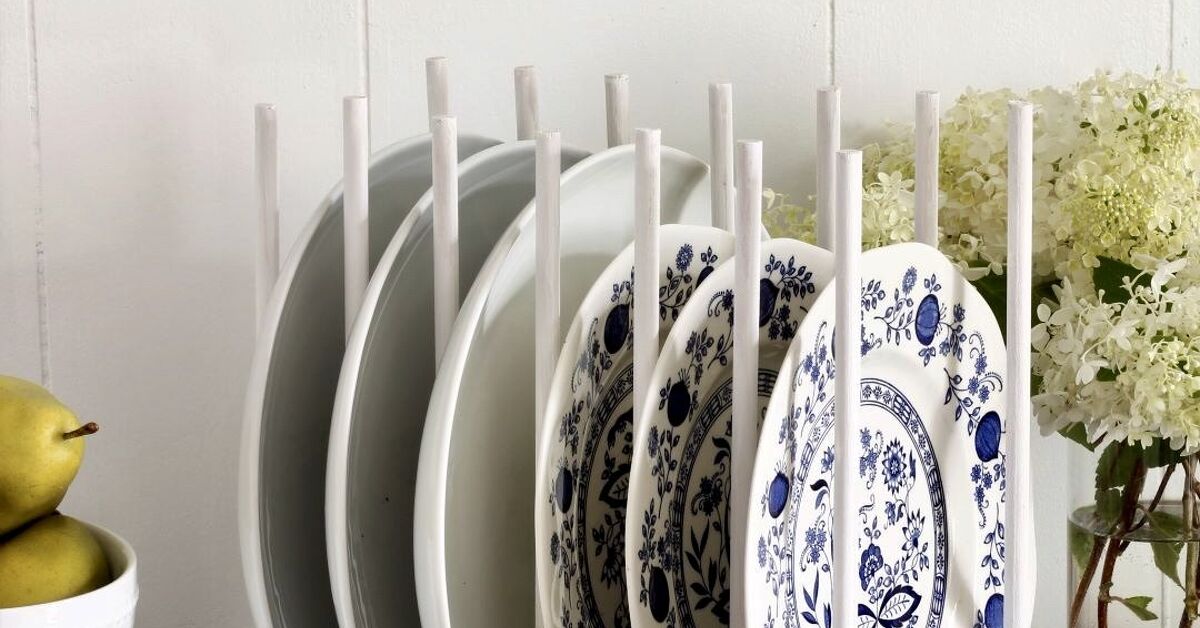
A white painted plate rack with beadboard backing is a timeless farmhouse choice. Pair it with blue-and-white plates, ironstone, cutting boards, or vintage ceramic pieces. Light distressing on the edges can make it look older without making it look like it lost a fight with a driveway.
Natural Wood Plate Rack
For a warmer style, use oak, walnut, or stained pine. A natural wood rack looks beautiful in rustic, organic modern, and traditional kitchens. It also pairs nicely with handmade pottery, neutral dishes, and woven baskets.
Built-In Cabinet Plate Rack
If you have an open cabinet or unused upper cabinet space, you can build a plate rack insert. This style uses vertical dowels or dividers to hold plates upright. It is excellent for everyday storage and gives cabinets a custom kitchen look without a full remodel.
Decorative Display Rack
A decorative rack does not need to hold everyday dishes. Use it for seasonal plates, heirloom china, small framed art, trays, or cookbooks. This turns the rack into wall decor that can change throughout the year.
Common Mistakes to Avoid
Making the Shelves Too Shallow
A shallow rack may look sleek, but plates need enough shelf depth to sit safely. For most dinner plates, 4 to 5 inches is a comfortable depth. Smaller decorative plates can work with less, but always test before final assembly.
Skipping the Plate Rail
A plate rack without a retaining rail is just a shelf with confidence issues. The rail is what keeps plates from tipping forward. Add a dowel, trim strip, or raised lip on every shelf that will hold plates.
Ignoring Wall Strength
Dishes are heavier than they look. A fully loaded rack needs secure mounting. Whenever possible, attach to studs or use a French cleat. Lightweight picture hangers are not enough for a rack full of ceramic plates.
Not Allowing Finish to Cure
Fresh paint may feel dry quickly, but it often needs more time to harden. Waiting before loading the rack helps prevent marks, sticking, and finish transfer.
How to Style a DIY Wood Plate Rack
Start with your largest plates in the back or on the lowest shelf. Add smaller plates, bowls, or cutting boards in front if your rack has enough depth. Keep colors balanced. If your plates are patterned, leave some breathing room so the display does not look like a ceramic parade got stuck in traffic.
For a clean look, stick with one color family, such as white dishes with wood accents. For a collected look, mix vintage plates, transferware, pottery, and small artwork. Odd numbers often look natural in styling, so groups of three or five pieces can work well.
You can also use the top shelf for small plants, spice jars, candles, pitchers, or framed recipe cards. Just avoid overloading it. The goal is charming storage, not a stress test.
Maintenance Tips
Dust the rack regularly with a soft cloth. If it is painted, wipe with a slightly damp cloth and avoid harsh cleaners. For stained or natural wood racks, use a gentle wood-safe cleaner when needed. Check mounting screws once or twice a year, especially if the rack holds heavy dishes.
If the finish gets scratched, lightly sand the damaged area and touch it up with matching paint or stain. One benefit of a DIY project is that repairs are usually simple because you know exactly how it was built. You are not at the mercy of mysterious factory finishes or instructions translated by a toaster.
Budget-Friendly Tips
A DIY wood plate rack can be very affordable. Use common pine boards, leftover trim, scrap dowels, or reclaimed wood. Check your garage before buying everything new. Many plate racks can be made from basic lumber and simple hardware.
To save money, paint the rack with leftover cabinet or wall paint. Use existing screws if they are the correct length and type. If you want a decorative back, beadboard paneling or thin plywood can create a high-end look without a high-end bill.
Extra Experience: Lessons Learned From Building a DIY Wood Plate Rack
The first real lesson of building a DIY wood plate rack is that plates are bossier than they look. They seem innocent sitting in a cabinet, but the moment you build storage for them, they demand proper spacing, a safe lean angle, and enough clearance to slide in without clanking against the shelf above. Before cutting a single board, bring your actual plates to the planning table. Not imaginary plates. Not “standard” plates. Your plates. The big dinner plate from the set you bought on sale may be wider than expected, and that one oversized platter may need its own row like a celebrity with a private dressing room.
Another helpful experience is to mock up the rack with painter’s tape on the wall. Tape the outside dimensions first, then mark shelf lines. Step back and look at it from the kitchen entrance, dining area, and the spot where you usually stand wondering what to eat. A rack that seems perfectly sized on paper may look too small on a large wall or too bulky above a narrow counter. The tape test costs almost nothing and can prevent a design that feels awkward later.
When choosing wood, straight boards matter more than fancy boards. A slightly warped board can make the entire rack harder to square. At the store, hold each board at eye level and look down its length. If it curves, twists, or waves like it is auditioning for modern dance, put it back. Choose the straightest boards you can find, even if you have to sort through the pile like a very determined raccoon.
During assembly, clamps are your quiet best friends. They hold shelves in place, reduce slipping, and make the finished rack look more professional. If you do not have many clamps, assemble one section at a time and let the glue set before moving on. Rushing the build usually creates gaps, uneven rails, or shelves that are just tilted enough to annoy you forever.
One practical trick is to sand before final assembly whenever possible. It is much easier to sand shelf edges, dowels, and trim pieces while they are separate. Once the rack is assembled, tight corners become annoying little dust caves. Pre-sanding saves time and gives the finish a cleaner look.
Paint choice also affects the final result. A satin or semi-gloss finish is easier to wipe clean than flat paint, especially in a kitchen. If you love the look of matte paint, consider sealing it with a clear protective coat after it cures. Kitchens involve steam, fingerprints, flour dust, and the occasional mysterious splash. A plate rack lives in that world, so durability matters.
Finally, do not overload the rack on day one. Add plates gradually and watch how the rack behaves. If anything shifts, creaks, or feels loose, remove the dishes and reinforce the mounting. A beautiful rack should make your kitchen feel calmer, not turn every cup of coffee into a suspense scene. Built carefully, a DIY wood plate rack becomes one of those satisfying projects that looks custom, works hard, and quietly reminds you that yes, you made that.
Conclusion
A DIY wood plate rack is a practical and beautiful project that can improve kitchen storage, show off favorite dishes, and add custom character to your home. With basic lumber, dowels or trim, secure wall mounting, and a finish that suits your style, you can build a rack that feels both useful and decorative. The key is thoughtful measuring, strong construction, and enough patience to let the finish cure before loading it with plates.
Whether you paint it farmhouse white, stain it warm walnut, or build it into a cabinet, a handmade plate rack proves that good storage does not have to be boring. Sometimes it just needs wood, a few screws, and someone brave enough to finally use the drill.