Some Christmas decorations whisper. Others gently sparkle from a respectable distance. And then there are DIY metal salvage marquee letters spelling JOY, glowing like they just landed from the North Pole’s backstage dressing room. This project is for the holiday decorator who loves a little shine, a little thrift-store treasure hunting, and a lot of “Wait, you made that?” energy.
DIY Christmas JOY marquee letters are a brilliant mix of rustic salvage style, vintage theater charm, and festive metallic glamour. The gold and silver finish gives the letters that “found object turned fabulous” look, while the lights make the whole display feel warm, nostalgic, and slightly dramaticin the best way. Think farmhouse Christmas meets old Hollywood meets your craft table after one ambitious cup of coffee.
This guide walks through how to create Christmas JOY metal salvage marquee letters using dimensional letters, metallic paint, simple tools, and safe decorative lighting. The approach is inspired by common marquee-letter craft methods: cutting or opening letters, planning bulb placement, drilling or punching holes, painting in thin coats, and installing LED lights securely. DIY marquee tutorials often recommend measuring bulb spacing before cutting and choosing lights based on the size of the letters, while holiday sign projects emphasize sanding, painting, and securing lights from the back for a clean finish.
Why “JOY” Works So Well for Christmas Marquee Decor
The word JOY is short, bold, and instantly seasonal. It fits beautifully on a mantel, entryway console, buffet table, porch shelf, or under the Christmas tree. Unlike longer phrases such as “Merry Christmas,” “Let It Snow,” or “Please Stop Eating the Cookie Dough,” the three-letter layout is easy to build and easy to display.
Marquee letters also have a built-in advantage: they look impressive even when the construction is simple. The lights create rhythm, the metallic paint adds dimension, and the salvage-inspired finish hides tiny mistakes. That last part is important. If one corner looks a little dented or imperfect, congratulationsyou have achieved “vintage industrial character.”
Gold and Silver: The Perfect Holiday Metal Mix
Gold and silver are classic Christmas colors because they play well with almost every style. Gold brings warmth, candlelight, and old-world elegance. Silver adds frost, sparkle, and winter-night coolness. Together, they make DIY metal salvage marquee letters feel layered rather than flat.
You can paint all three letters one color, but mixing finishes gives the project more personality. For example, paint the J and Y in aged silver and the O in antique gold. Or paint the outside edges silver and lightly mist gold across the front for a champagne-metal effect. The goal is not perfection; the goal is “this looks expensive, but I absolutely attacked it with spray paint in the garage.”
Supplies You’ll Need
Main Materials
- Dimensional paper mache, wood, or lightweight metal letters spelling J-O-Y
- Metallic spray paint in gold and silver
- Spray primer suitable for your letter material
- Battery-operated or plug-in LED string lights
- Sandpaper or sanding block
- Craft knife or utility knife
- Drill with a bit sized for your light sockets, or a nail and hammer for smaller holes
- Ruler or measuring tape
- Pencil or marker
- Painter’s tape or duct tape
- Drop cloth, cardboard, or newspaper for painting
- Clear sealer, optional but helpful
Safety Gear
- Safety glasses
- Work gloves
- Dust mask or respirator for sanding and spray painting
- Hearing protection if cutting wood with power tools
For a true salvage look, you can start with thrifted letters, old sign pieces, dented metal craft letters, or clearance-bin decor that needs a second chance. The best DIY materials are often the ones that look slightly rejected by society. That is where the magic begins.
Step 1: Choose the Right Letters
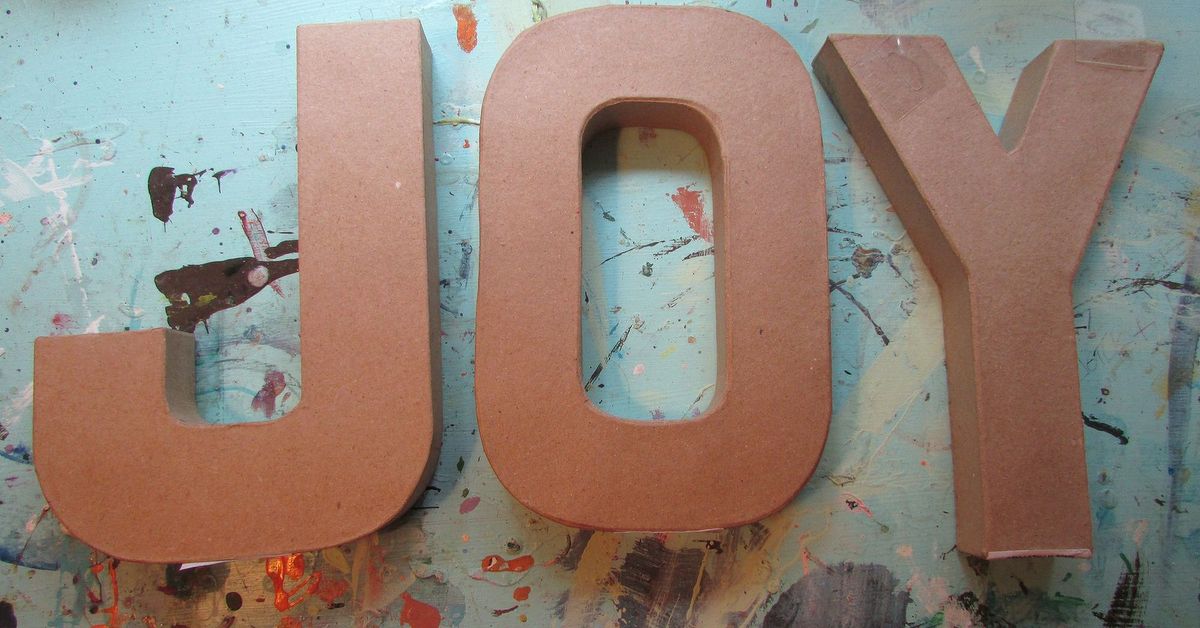
Dimensional paper mache letters are beginner-friendly because they are lightweight, easy to cut, and widely available at craft stores. Wood letters are stronger and more durable, especially if you want a larger display. Metal letters give the most authentic salvage feel, but they require more care when drilling and handling sharp edges.
If you plan to display your Christmas JOY marquee letters indoors, paper mache or wood will usually work well. For covered outdoor use, choose sturdier materials and weather-appropriate paint. If the letters will be fully outdoors, use exterior-rated materials, outdoor-rated lights, and a display location protected from heavy rain or snow.
Step 2: Plan the Light Placement
Before you drill anything, place your lights on the front of each letter and experiment with spacing. This is the “measure twice, avoid emotional damage later” stage. For a balanced marquee look, the bulbs should be evenly spaced and centered along the thickest parts of each letter.
Mark each bulb location lightly with pencil. The O is usually the easiest because it naturally creates a circle or oval pattern. The J and Y need more planning because their curves and branches can make spacing look uneven if you rush. A ruler helps, but do not panic if every bulb is not mathematically perfect. Real marquee signs have charm because they are visual, not robotic.
DIY marquee-letter builders often recommend checking bulb size before drilling because sockets are narrower than bulbs; if you space holes only by socket width, the finished bulbs may crowd each other.
Step 3: Cut or Open the Letters
If you are using paper mache letters, carefully cut away the front face with a craft knife. Work slowly around the edges and keep your fingers out of the knife’s path. Inside, you may find cardboard supports. Remove any pieces that block the light path, but leave enough structure so the letters do not collapse like a sad gingerbread house.
For wood or metal letters, you may not need to open the front. Instead, drill holes through the face and insert lights from the back. This creates a clean marquee effect and keeps wires hidden. If your letters are shallow, battery-powered LED light strands may be easier to tuck behind the display.
Step 4: Drill the Marquee Holes
Use a drill bit slightly larger than the light socket. Test on scrap material first if possible. Drill slowly and steadily, especially on thin wood or metal. For paper mache, a nail, awl, or craft knife can create smaller openings, but a drill gives cleaner, more consistent holes.
After drilling, lightly sand each hole to remove rough edges. This step makes the project look cleaner and helps the lights sit properly. It also reduces the chance of tearing paper mache or scratching paint later.
Step 5: Add a Salvage Metal Texture
The “metal salvage” look comes from texture, not just color. If your letters are paper mache or wood, you can fake aged metal with a few easy tricks. Lightly sand corners and edges before painting. Add a slightly uneven primer coat. After the metallic paint dries, dab on a darker glaze, watered-down black acrylic paint, or brown craft paint, then wipe most of it away. The remaining shadow settles into corners and makes the letters look older.
Another method is dry brushing. Dip a stiff brush lightly into silver or gold paint, wipe most of it off, then skim it across edges and raised areas. This creates highlights that mimic worn metal. If your letters look too shiny, knock down the finish with a soft sanding sponge or a matte clear coat.
Step 6: Prime Before Painting
Primer helps paint stick and improves coverage, especially when working with bare metal, lightly rusted metal, or porous paper mache. Rust-Oleum’s clean metal primer guidance, for example, recommends primer before painting bare or lightly rusted metal for better durability and corrosion protection, while general spray-paint guidance emphasizes primer, light coats, and proper drying time.
Set the letters on cardboard or a drop cloth in a well-ventilated area. Spray primer in light passes rather than one heavy coat. Heavy coats drip, bubble, and generally behave like toddlers denied candy. Allow the primer to dry according to the product instructions before moving to metallic paint.
Step 7: Paint Gold and Silver Layers
Shake the spray paint can thoroughly. Apply a very light first coat, often called a tack coat, then follow with several thin coats. Spray from about 10 to 12 inches away, moving smoothly past the edges of the letters. Alternating directions between coats helps create even coverage.
For a realistic metal salvage look, do not aim for one flat, flawless color. Try these combinations:
- Antique Gold: Gold base, brown glaze in the corners, soft silver dry-brushed edges.
- Frosted Silver: Silver base, white misting, charcoal shadow around bulb holes.
- Mixed Metal: Silver base with a light gold overspray across the center.
- Vintage Marquee: Gold face, silver sides, darkened seams.
Let each coat dry fully. Rushing spray paint is how holiday crafts become sticky for three Decembers in a row.
Step 8: Install the Lights
Once the paint is completely dry, insert the LED light sockets through the holes from the back. Secure loose wires with tape so they do not hang visibly between letters. If the bulbs have removable covers, remove the covers before inserting the sockets, then pop the covers back on from the front.
LED lights are a smart choice because they use less energy than traditional incandescent decorative light strings; ENERGY STAR notes that certified decorative light strings consume significantly less energy than conventional incandescent strands. They also tend to stay cooler, which is helpful when lights are near paper, wood, greenery, ribbon, or other holiday materials.
Step 9: Style the JOY Letters
Now comes the fun part: making the display look intentional instead of like three glowing letters escaped from a craft room.
On a Mantel
Place the letters in the center, then add cedar garland, mercury-glass ornaments, pinecones, and taper candles nearby. Keep real flames safely away from the letters and greenery. Battery candles are a stress-free alternative.
On an Entryway Table
Set the letters on a console table with a bowl of ornaments, a small tabletop tree, and wrapped gift boxes. This creates a welcoming glow for guests and delivery drivers who are now emotionally invested in your decorating style.
Under the Tree
Use the JOY marquee letters as part of the tree base display. They look beautiful nestled among wrapped presents, faux snow, and oversized ornaments.
On a Covered Porch
For a porch display, make sure the lights and extension cords are rated for outdoor use. The Home Depot’s illuminated holiday sign guidance specifically recommends outdoor-rated lights for outdoor marquee-style displays.
Important Holiday Lighting Safety Tips
Holiday lights are cheerful, but they still deserve respect. The U.S. Consumer Product Safety Commission advises checking light sets for broken sockets, frayed wires, bare wires, and loose connections before use. It also recommends turning off lights when leaving the house or going to bed.
The National Fire Protection Association reports that electrical problems are involved in nearly half of home Christmas tree fires, which is a good reminder to inspect cords, avoid overloaded outlets, and keep decorative lighting away from heat sources. Lowe’s holiday lighting guidance also cautions against using indoor lights outdoors because indoor strands are not designed for weather exposure.
Use LED lights in good condition, avoid pinching cords behind heavy furniture, and never staple through wires. If you use an extension cord, choose the right rating for the location. And yes, turning the lights off before bed may feel less magical, but so does explaining to the fire department that the culprit was a handmade letter O.
Common Mistakes to Avoid
Using Too Many Bulbs
More bulbs do not always mean better design. Crowded lights can make the letters hard to read. Leave breathing room so the word JOY remains clear.
Skipping Primer
Metallic paint looks best over a prepared surface. Without primer, paint can soak unevenly into paper mache or scratch off metal too easily.
Painting in Heavy Coats
Heavy spray-paint coats cause drips and tackiness. Thin layers create a smoother, more professional finish.
Forgetting the Back
If the letters sit on a mantel, the back may not show. But if the display is near a mirror or window, visible wires can ruin the illusion. Tape and tuck cords neatly.
Ignoring Scale
Tiny letters on a giant mantel can look lonely. Huge letters on a narrow shelf can look like they are trying to escape. Measure your display space before shopping.
Creative Variations for Your Christmas JOY Marquee Letters
Once you understand the basic method, you can personalize the project endlessly. Add faux rust around the edges for a weathered warehouse style. Glue small bells or star charms around the letter openings. Wrap the base of each letter with thin garland. Dust the finished display with artificial snow spray, but use it carefully and follow the product label.
You can also change the color palette. Champagne gold and brushed nickel feel elegant. Bright gold and mirrored silver feel glamorous. Dark pewter with warm white bulbs feels rustic and cozy. Rose gold with silver highlights feels modern and feminine. If your Christmas tree already has a theme, let the letters echo that palette so the whole room feels connected.
Budget-Friendly Tips
This project can be surprisingly affordable if you shop smart. Look for letters during craft-store sales, check thrift stores for old signs, and reuse LED lights from previous holidays. Clearance aisles are excellent sources for slightly odd decor that can be transformed with paint. A scratched red letter from last season can become a gorgeous silver marquee piece after sanding and priming.
You do not need expensive tools. A simple drill, craft knife, sandpaper, and spray paint can do most of the work. The most important “tool” is patience, which unfortunately is not sold in cans next to the primer.
How to Store the Letters After Christmas
When the season ends, remove batteries if your lights are battery-operated. Wrap cords loosely so wires do not kink. Place tissue paper or bubble wrap between letters to protect the metallic finish. Store the display in a sturdy box labeled clearly, preferably not under the box of mysterious tangled lights from 2014.
If bulbs are removable, store a few spare bulbs or covers in a small bag taped to the inside of the storage box. Future you will be grateful. Future you may still eat cookies for breakfast in December, but at least future you will know where the replacement bulbs are.
Experience Notes: What Making Christmas JOY Marquee Letters Feels Like in Real Life
Making Christmas JOY metal salvage marquee letters is one of those projects that starts with confidence, moves briefly through “What have I done?” and ends with you proudly turning off every other light in the room so the letters can have their moment. The best part is that the project does not require perfection. In fact, it looks better when it has a little roughness. A tiny dent, an uneven edge, or a slightly darker corner makes the letters feel like they have history.
The planning stage is where most people learn the first big lesson: bulb placement matters. It is tempting to start drilling immediately because enthusiasm is a powerful and dangerous creature. But laying the bulbs across the letters first saves time. The letter O usually behaves beautifully, like the responsible sibling. The J can be a little dramatic around the curve. The Y likes to make you decide whether symmetry is a real thing or just a rumor. Marking everything before drilling keeps the final word balanced.
Painting is where the personality appears. Gold can look too shiny at first, almost like a trophy from a Christmas karaoke contest. Silver can look too cold if used alone. But when the two metals overlap, the finish becomes richer. A soft gold mist over silver gives the letters warmth. A little silver brushed over gold makes the edges look worn and authentic. The magic is in the layers. If one layer looks bad, wait for it to dry and add another. Spray paint is forgiving, but only if you let it breathe.
Installing the lights is oddly satisfying. Each bulb clicks or slides into place, and suddenly the project shifts from “painted letters” to “actual holiday decor.” The first test glow is the payoff. There is always a small pause when the lights come on, especially if the room is dim. The gold and silver catch the glow, the shadows deepen around the bulb holes, and the word JOY starts doing exactly what it promised.
In a home, these letters tend to become conversation starters. Guests ask where they came from. Children want to touch the bulbs. Someone will inevitably suggest making another set spelling NOEL, PEACE, or SNACKS. The display works because it feels handmade but polished. It has the charm of salvage decor without requiring you to haul home an actual rusty theater sign from an alley.
The most practical experience-based tip is to keep the wiring simple. Battery lights are easy for mantels and tabletops because there is no visible cord trailing to an outlet. Plug-in lights are brighter and better for larger displays, but they need careful cord management. Either way, test the lights before installing them. Nothing tests holiday patience like finishing a beautiful marquee letter and discovering the middle bulbs are on vacation.
Another helpful tip is to style the letters with restraint. The marquee already shines, so it does not need to be buried under every ornament you own. A little greenery, a few metallic ornaments, and perhaps a ribbon are enough. Let the word JOY remain readable. After all, if the display becomes too crowded, it may accidentally say “Jungle Ornament Yelling,” and that is a different craft entirely.
Ultimately, this project feels special because it combines creativity, nostalgia, and practicality. It turns basic letters into a glowing holiday centerpiece. It lets you reuse materials, experiment with finishes, and create something that looks custom. Most importantly, it adds a warm, handmade focal point to the room. And during Christmas, a little handmade glow goes a long way.
Conclusion
Christmas JOY DIY metal salvage marquee letters in gold and silver are the kind of holiday project that delivers big visual impact without requiring professional skills. With dimensional letters, metallic paint, safe LED lights, and a little patience, you can create a glowing Christmas decoration that feels vintage, festive, and completely personal.
The secret is balance: plan your bulb spacing, use primer, build color in thin metallic layers, and style the finished letters where they can shine. Whether you place them on a mantel, entry table, porch shelf, or under the tree, these handmade JOY letters bring warmth and sparkle to the season. They are budget-friendly, customizable, and charmingly imperfectthe exact spirit of DIY Christmas decorating.
Note: This article synthesizes practical craft, paint, lighting, and holiday safety information from real DIY marquee tutorials, home improvement guides, paint manufacturers, and U.S. safety organizations, including marquee-letter projects, illuminated sign guides, spray-paint preparation advice, metal-primer guidance, LED efficiency information, and holiday lighting safety recommendations.