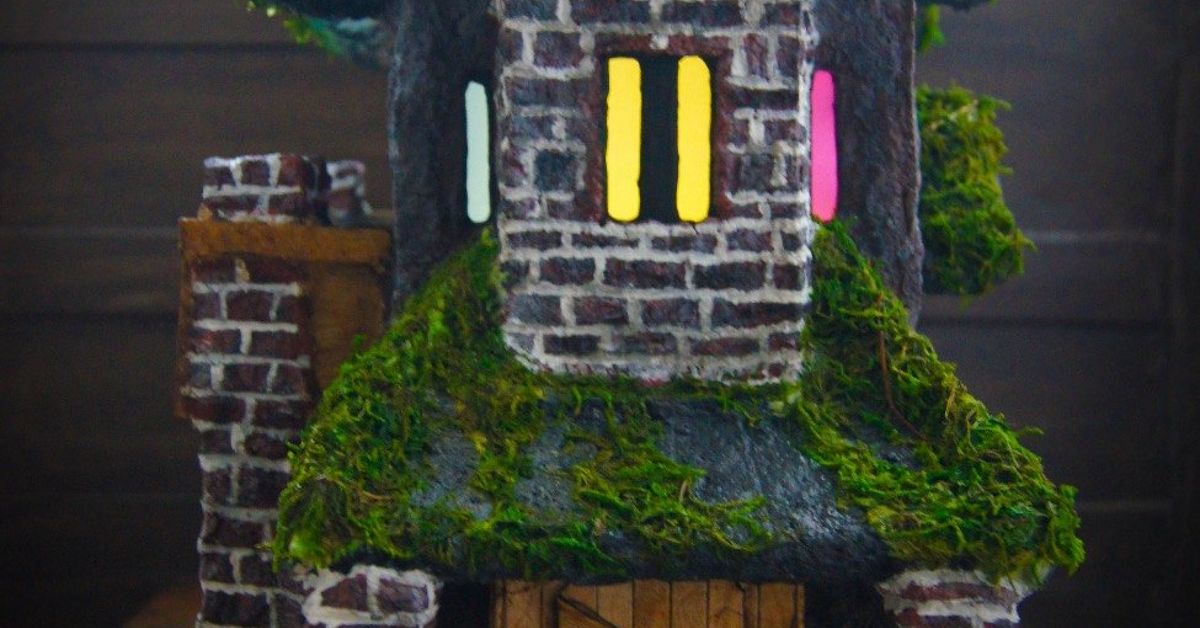
Some Halloween decorations scream. Others cackle. This one glows from the windows like a tiny ghost realtor is hosting an open house at midnight. A light-up DIY haunted house out of paper clay is the perfect mix of spooky, charming, and “wait, you made that?” It looks like a boutique Halloween village piece, but you can build it with simple craft supplies, patience, and a willingness to let your roofline be crooked on purpose.
This project uses paper clay, also called paper mâché clay, to create a lightweight haunted house with cut-out windows, creepy texture, aged paint, and battery-powered lights tucked safely inside. Unlike ceramic clay, paper clay does not require a kiln. Unlike cardboard alone, it has dimension, strength, and that deliciously lumpy old-mansion texture that says, “Yes, this house has opinions.”
Below, you will learn how to plan the shape, build the base, mix or choose paper clay, sculpt siding and shingles, carve windows, paint dramatic shadows, and add LED lighting. The result is a handmade Halloween decoration you can display on a mantel, bookshelf, entry table, or party buffet.
Why Paper Clay Is Perfect for a DIY Haunted House
Paper clay is ideal for Halloween crafts because it is forgiving. You can press it, patch it, sand it, carve it, and add more later if your haunted house suddenly needs a tower, chimney, or suspiciously dramatic front porch. The paper fibers help give the clay body and reduce weight, which matters when you are building a small structure instead of a solid sculpture.
For this project, you can use store-bought air-dry paper clay or make a homemade paper mâché clay mixture. Store-bought clay is cleaner and easier for beginners. Homemade paper clay is budget-friendly and great for larger builds, especially if you already have white glue, shredded paper, and joint compound on hand. Either option works, but homemade mixtures vary, so always test a small piece before covering the entire house.
The key is to keep the walls relatively thin. Thick clay dries slowly and may crack. A haunted house does not need fortress walls unless the ghosts are expecting a siege. A strong cardboard or foam board armature underneath gives the structure shape, while the clay provides texture and detail.
Materials You Will Need
Basic Structure
- Cardboard, chipboard, recycled cereal boxes, or foam board
- Craft knife or precision blade
- Cutting mat
- Ruler and pencil
- Hot glue gun or strong craft glue
- Painter’s tape or masking tape
Paper Clay Supplies
- Store-bought paper clay or air-dry clay
- Optional homemade paper clay ingredients: damp shredded paper, PVA glue, premixed joint compound, and a small amount of mineral oil
- Small bowl of water for smoothing
- Plastic scraper, old gift card, or palette knife
- Toothpicks, skewers, sculpting tools, or a dull pencil
Painting and Finishing
- Acrylic paint in black, gray, brown, white, purple, green, orange, and deep blue
- Small paintbrushes and a dry brush
- Matte sealer or decoupage sealer
- Fine sandpaper or sanding sponge
- Optional: glitter, moss, mini bats, tiny pumpkins, gauze, or faux spiderwebs
Lighting
- Battery-operated LED tea lights or low-voltage fairy lights
- Tracing paper, vellum, or parchment-style craft paper for glowing windows
- Small piece of black cardstock to hide the battery pack
Safety note: Use battery-powered LED lights only. Do not place real candles, flame tea lights, incense, or hot bulbs inside a paper clay haunted house. Paper, cardboard, paint, and craft sealers are not meant to babysit fire. They will resign dramatically.
Step 1: Sketch Your Haunted House Design
Start with a quick sketch. It does not need to be architectural. In fact, if it looks too perfect, tilt something. Haunted houses thrive on bad posture. Draw a tall skinny house, a squat Victorian mansion, a crooked cottage, or a three-story tower with one window that appears to be judging the neighborhood.
Plan where the light will escape. Windows are the star of this DIY haunted house decoration, so include several shapes: arched windows, tiny attic windows, a cracked front door, and maybe one round window in a tower. Leave enough solid wall space between openings so the structure stays strong.
Think about access, too. You need a way to place and remove the LED tea light or battery pack. The easiest method is to leave the back open or create a removable back panel. If you want the house to look finished from every angle, make the bottom open so you can lift the house over the light.
Step 2: Build the Cardboard Armature
Cut the front, back, sides, and roof pieces from cardboard or foam board. A good starter size is about 8 inches tall, 5 inches wide, and 3 inches deep. That is big enough for detail but small enough to dry without becoming a full-time roommate.
Cut out windows before assembling the walls. Use a craft knife and go slowly. For extra personality, make the windows uneven. A slightly crooked window looks spooky. A perfectly symmetrical window looks like it has a homeowners association.
Glue the walls together with hot glue or strong craft glue. Reinforce inside corners with strips of masking tape. Add the roof last. A steep roofline gives the piece a gothic look, while a sagging roof makes it feel abandoned. If you want a chimney, glue on a small cardboard rectangle or rolled paper tube.
Step 3: Add Window Inserts Before the Clay
Cut pieces of vellum, tracing paper, or parchment-style craft paper slightly larger than each window opening. Glue them on the inside of the house. These inserts diffuse the LED light, creating that warm, eerie glow instead of a harsh flashlight beam.
You can tint the window paper with watered-down orange, yellow, purple, or green acrylic paint. Orange gives a classic jack-o’-lantern glow. Purple looks haunted and theatrical. Green suggests the basement laboratory is up to something medically questionable.
If you want silhouettes, cut tiny bats, ghosts, or crooked curtains from black cardstock and glue them behind the windows. When the lights turn on, the shadows appear like spooky residents are moving in. No rent. No references. Very suspicious.
Step 4: Apply Paper Clay in Thin Layers
Take small pieces of paper clay and press them onto the cardboard walls. Keep the layer thin, about 1/8 inch when possible. Smooth it with damp fingers or a palette knife. Do not soak the cardboard; a little moisture helps, but too much can warp the base.
Work one wall at a time. Press the clay around window openings and trim away excess with a craft knife or toothpick. The edges do not need to be perfect. Ragged edges look like old plaster, cracked stone, or the kind of maintenance issue ghosts definitely ignore.
For siding, drag a toothpick horizontally through the clay. For stone, press irregular shapes with a dull pencil. For stucco, stipple the surface with a stiff brush. For wooden boards, add vertical grooves and tiny nail marks. Texture is what transforms a cardboard box into a miniature haunted estate with “character,” which is real estate language for “probably cursed.”
Step 5: Sculpt the Roof, Shingles, and Spooky Details
The roof gives your haunted house its personality. Cover the roof with a thin layer of clay, then add shingles by pressing short overlapping lines with a toothpick or the edge of a craft stick. Make some shingles cracked, lifted, or missing. A roof that looks too tidy will ruin the whole “abandoned by humans, embraced by bats” vibe.
Add details while the clay is still workable. Try a crooked chimney, cracked steps, a warped front door, tiny shutters, skull-shaped stones, or a small sign that says “Go Away” in shaky letters. You can also roll thin clay snakes for trim around windows and doors. Press them gently into place with damp fingers.
For extra drama, sculpt a tiny porch roof or balcony. Keep these pieces lightweight. If a detail sticks out far from the wall, support it with a small cardboard base underneath. Paper clay is strong when dry, but gravity is persistent and has no holiday spirit.
Step 6: Let It Dry Slowly and Evenly
Drying is where many air-dry clay projects go from “masterpiece” to “ancient desert floor.” Place the haunted house in a well-ventilated area and let it dry naturally. Avoid hair dryers, heaters, or direct hot sun. Fast drying can make the outside shrink before the inside is ready, which leads to cracks.
Turn the piece occasionally if possible, or lift it slightly on small blocks so air can move underneath. Depending on the clay thickness, humidity, and size, drying may take one to three days or longer. The house should feel dry, firm, and room temperature. If it feels cool to the touch, moisture may still be inside.
Small cracks are not a disaster. This is a haunted house, not a luxury condo inspection. Fill cracks with a little wet clay, smooth the patch, and let it dry again. You can also turn cracks into design features by painting them dark later.
Step 7: Sand and Clean the Surface
Once dry, lightly sand rough edges, window frames, and any sharp bumps. Wear a dust mask if sanding produces powder, and wipe the piece with a dry cloth afterward. Do not over-sand the texture. The bumps, dents, and weird little ridges are doing important spooky work.
Check that the LED light still fits inside. If the bottom opening is too small, carefully trim the cardboard or clay edge. If you left the back open, make sure the house stands upright. You can glue it to a small cardboard, wood, or foam board base for stability.
Step 8: Paint the Haunted House Base Colors
Begin with a black or very dark gray base coat. This creates instant depth in cracks and grooves. Let it dry completely. Next, dry-brush gray, brown, or dusty blue over the raised areas. Dry-brushing means loading a brush with paint, wiping most of it off on a paper towel, then lightly dragging it across the texture. It catches the high spots and leaves the shadows dark.
For a classic haunted mansion, use charcoal walls, black trim, and a deep purple roof. For a witch cottage, try mossy green walls, brown shingles, and orange windows. For a ghostly abandoned chapel, paint the house pale gray and wash it with watered-down black paint.
Paint the window frames dark so the glowing inserts stand out. Add tiny highlights with off-white paint on corners, roof edges, and raised stones. A little highlight makes the whole miniature look more detailed, even if half the detail was created by accidentally poking the clay with a toothpick while looking for snacks.
Step 9: Add Aging, Shadows, and Halloween Personality
This is the fun part. Use watered-down black paint as a wash and brush it into cracks, under rooflines, around windows, and below the chimney. Wipe off the excess with a paper towel. The wash settles into low areas and makes the house look older.
Add green-brown streaks under windows to mimic mildew. Dab orange around the front steps for pumpkin glow. Paint a tiny moon on the roof, bats across the siding, or a ghost peeking through the attic window. If you want a more elegant Halloween decoration, keep the palette limited to black, gray, cream, and warm amber light.
Mini accessories help set the scene. Glue moss around the base, add a twig fence, scatter tiny clay pumpkins, or stretch a whisper of faux cobweb across the porch. Use restraint with glitter unless your haunted house is being operated by a vampire who also owns a craft store.
Step 10: Seal the House
When the paint is completely dry, brush on a matte sealer or decoupage sealer. Thin coats are better than one heavy coat. Seal the front, sides, roof, and base. Avoid soaking the window paper. A matte finish keeps the house looking old and moody, while gloss can make it look wet or candy-coated.
This project is best for indoor display or a covered porch where it will not get rained on. Paper clay and cardboard are not weatherproof by nature. If you want outdoor Halloween decorations, place the haunted house inside a lantern, cloche, shadow box, or covered display area.
Step 11: Add the Lights
Place a battery-operated LED tea light inside the house, or tuck in a short strand of fairy lights. If using fairy lights, tape the battery pack to the back or hide it behind a cardstock tombstone. Make sure the switch is easy to reach. Future you will appreciate not having to perform haunted-house surgery every evening.
Turn off the room lights and test the glow. If one window is too bright, add another layer of vellum behind it. If the light is too dim, use a warmer or brighter LED. For a flickering effect, choose flicker-style LED tea lights. They imitate candlelight without the fire risk, which is exactly the kind of responsible sorcery we like.
Common Mistakes and How to Fix Them
The Clay Cracked
Cracks usually mean the clay was too thick, dried too fast, or was applied over a flexible base. Fill cracks with fresh clay and let the repair dry slowly. For hairline cracks, paint them dark and pretend they were always part of the haunted architecture. Confidence is a craft supply.
The Cardboard Warped
Too much water can bend cardboard. Use less water when smoothing clay and apply clay in thin sections. If the base has already warped, glue the house onto a sturdy platform and disguise the uneven edge with moss, stones, or a tiny graveyard.
The Windows Look Messy
Trim dried clay carefully with a craft knife, then paint the edges black. Add thin clay trim around the windows to hide uneven cuts. Haunted windows should look imperfect, but they should still glow clearly.
The Light Is Too Harsh
Add vellum, tracing paper, or parchment behind the windows. You can also paint the inside walls black to reduce reflection. Warm white LEDs usually look more atmospheric than cool white lights, which can make the house feel like a ghost is being interrogated.
Creative Variations
Once you understand the basic method, you can make a whole haunted village. Build one tall mansion, one crooked witch cottage, one tiny mausoleum, and one suspiciously cheerful pumpkin shop. Use different roof shapes and paint palettes so each piece has its own personality.
You can also turn the house into a Halloween centerpiece. Place it on a cake stand with black gauze, mini pumpkins, and battery candles. For a mantel display, make two smaller houses and arrange them with paper bats flying up the wall. For a kids’ craft version, pre-cut the cardboard structure and let children add clay texture and paint under supervision.
If you own a cutting machine, you can cut windows and silhouettes more precisely. If you prefer a rustic handmade look, stick with scissors and a craft knife. The best haunted houses look like they were built during a thunderstorm by someone with a dramatic cape and questionable blueprints.
Experience Notes: What I Learned Making a Light-Up Paper Clay Haunted House
The first thing this project teaches you is that crooked is not a flaw; it is a design strategy. When making a light-up DIY haunted house out of paper clay, the temptation is to measure everything perfectly. Then the clay softens an edge, the roof tilts slightly, and one window looks like it has seen a ghost. That is when the project gets good. A haunted house should feel alive, even if that life is probably undead.
One useful experience is to build the structure smaller than you think you need. Paper clay adds bulk. A house that starts at a neat 8 inches tall can feel much larger once the roof, chimney, base, and porch are added. Smaller houses also dry more evenly and are easier to light with one LED tea light. If you plan to make several, build them in different heights so the final village has rhythm.
Another lesson is to test the lighting early. Before adding clay, place the LED inside the cardboard shell and turn off the room lights. You will immediately see whether the window placement works. Sometimes a window near the roof glows beautifully, while a lower window gets blocked by the tea light casing. Fixing that before clay is easy. Fixing it after painting requires the emotional strength of a pumpkin in November.
Texture also matters more than perfection. A plain wall can look flat after painting, but a wall with scratches, grooves, dents, and raised trim catches dry-brushed highlights. Even simple marks from a toothpick can look like old boards or cracked plaster. The best results often come from layering: dark base coat, lighter dry-brush, black wash, then tiny highlights. Each layer adds depth without requiring advanced painting skills.
Drying requires patience. It is tempting to speed things up, especially when the house looks finished and you want to paint it immediately. Resist. Let the clay dry naturally. A slow dry gives you a stronger surface and fewer cracks. If cracks appear anyway, use them. Paint them black, add green moss nearby, or turn them into lightning-shaped damage from a mysterious attic incident.
Finally, the display makes the magic. A single paper clay haunted house looks cute on its own, but it becomes memorable when staged with shadow, height, and surrounding props. Put it on old books. Add a black cloth. Place paper bats behind it. Hide the battery pack. Dim the room. Suddenly, your handmade Halloween decoration looks like it belongs in a tiny foggy neighborhood where every doorbell plays organ music.
The best part is that no two houses turn out the same. Your fingerprints, brush marks, uneven roofline, and handmade details become part of the charm. That is the real reward of a DIY Halloween craft: you are not just making décor. You are making a small glowing story, one crooked window at a time.
Note: This project is intended for indoor or protected decorative use with battery-operated LED lights only. Never use open flames inside or near paper clay, cardboard, paper, dried moss, faux webs, or painted craft decorations.