Your Subaru Outback may be ready for muddy trails, snowy highways, and heroic trips to the warehouse store, but its cabin air filter has a less glamorous assignment: catching dust, pollen, soot, leaves, and assorted airborne nonsense before it reaches your face.
As the filter fills with debris, airflow from the vents may weaken, the fan may become noisier, and the interior can develop an odor that suggests a gym bag has quietly joined the HVAC system. Fortunately, replacing a Subaru Outback cabin air filter is one of the easiest maintenance jobs most owners can perform at home.
On many 2010 and newer Outback models, the filter sits directly behind the glove compartment and can be replaced without conventional tools. The process usually takes about 10 to 20 minutes, including the time spent removing old receipts and mystery charging cables from the glove box.
What Does a Subaru Outback Cabin Air Filter Do?
The cabin air filter cleans outside air before that air passes through the heating, ventilation, and air-conditioning system. It is different from the engine air filter, which protects the engine’s intake system. One helps the passengers breathe more comfortably; the other helps the engine breathe. Swapping the two would be both difficult and deeply unhelpful.
Depending on its design, a cabin filter may capture pollen, road dust, plant material, soot, mold spores, and other small particles. Activated-carbon filters add a layer intended to reduce certain odors and gases. High-efficiency filters may capture finer particles, although denser media can sometimes reduce airflow slightly if the HVAC system was not designed around that specific filter.
Signs the Cabin Air Filter May Need Replacement
A filter does not have to resemble an archaeological excavation before it deserves retirement. Common warning signs include:
- Weak airflow even when the fan is set to a high speed
- A musty, dusty, or stale odor from the vents
- More dust collecting on the dashboard and interior surfaces
- Increased fan noise or a faint whistling sound
- Slower windshield defogging or defrosting
- Visible dirt, leaves, insects, or damaged pleats on the filter
A clogged filter will not usually prevent the vehicle from running, but it can make the climate-control system work harder to move air. That becomes especially noticeable during a hot summer afternoon or a cold morning when the windshield needs to clear quickly.
How Often Should You Change an Outback Cabin Air Filter?
The correct interval depends on the model year, maintenance schedule, driving environment, and filter type. Subaru’s maintenance information for some model years calls for HVAC filter replacement at approximately 12-month or 12,000-mile intervals. Other recommendations commonly fall between 12,000 and 30,000 miles.
The owner’s manual and warranty-and-maintenance booklet for your exact Outback should be the final authority. Mileage alone does not tell the complete story. An Outback driven mostly on clean suburban roads may keep its filter usable longer than one frequently exposed to gravel roads, wildfire smoke, heavy traffic, construction dust, or spring pollen.
A practical approach is to inspect the filter at least once a year or during a routine oil-change visit. Replace it sooner when it looks heavily loaded, smells unpleasant, or noticeably restricts airflow. A cabin air filter is inexpensive enough that waiting until it becomes a compressed brick of leaves is not a particularly rewarding economy plan.
What You Need Before Starting
For most newer Subaru Outbacks, the required equipment list is pleasantly brief:
- A replacement cabin air filter made for the exact model year
- A flashlight or phone light
- Work gloves, if desired
- A small vacuum with a narrow attachment
- A clean microfiber cloth
- A Phillips screwdriver for certain older models
Verify filter compatibility using the Outback’s year, engine, trim, or vehicle identification number. Filters that look almost identical can differ slightly in width, depth, frame shape, or tab position. “Almost fits” is not an official filter size.
Choosing Between Standard, Carbon, and High-Efficiency Filters
A standard particulate filter is usually the most affordable option and works well for ordinary dust and pollen. An activated-carbon cabin filter can be useful for drivers who regularly encounter traffic fumes, smoke, or unpleasant outdoor odors. A high-efficiency filter may appeal to allergy-sensitive passengers, provided it is approved for the vehicle and does not create excessive airflow resistance.
OEM and reputable aftermarket filters can both work well. The most important factors are correct fitment, solid construction, properly sealed edges, and clear orientation markings.
How to Change a Subaru Outback Cabin Air Filter in 9 Steps
Step 1: Confirm the Model Year and Replacement Filter
Before opening the glove box, compare the new filter’s part number with the application information for your Subaru Outback. If the old filter is accessible, compare its general dimensions and frame design with the replacement.
Do not rely only on an online photograph. Product images are sometimes generic, and generic photographs have never had to explain why the glove box will not close.
Read the markings printed on the new filter. Determine whether its arrow is labeled AIR FLOW or UP. These labels do not mean the same thing, a distinction that becomes important during installation.
Step 2: Park Safely and Turn Off the Vehicle
Park the Outback on a level surface, apply the parking brake, turn off the ignition, and switch off the climate-control fan. Open the front passenger door to create enough working room.
There is normally no need to disconnect the battery for this basic procedure. However, avoid switching on the blower while the filter is removed. An uncovered blower intake is an excellent place for loose debris to begin an unwanted career inside the HVAC system.
Step 3: Empty and Open the Glove Compartment
Remove everything from the glove compartment. This prevents registration papers, pens, napkins, sunglasses, and ancient restaurant coupons from making a dramatic escape when the compartment is lowered.
Open the glove box fully. On most modern Outbacks, the filter housing is directly behind it, but the glove box must first be released from its normal stopping position.
Step 4: Disconnect the Glove-Box Damper
Look along the right side of the glove compartment for a small damper arm, cord, or retaining link. This component allows the glove box to open slowly instead of dropping like a tiny dashboard drawbridge.
Gently detach the damper from its pin or mounting point. Use your fingers rather than pliers unless model-specific instructions say otherwise. The plastic can become brittle with age, especially in vehicles exposed to years of heat and sunlight.
Remember how the damper was attached. Taking a quick phone photo can save several minutes of staring at a plastic hook later.
Step 5: Release the Glove-Box Stops
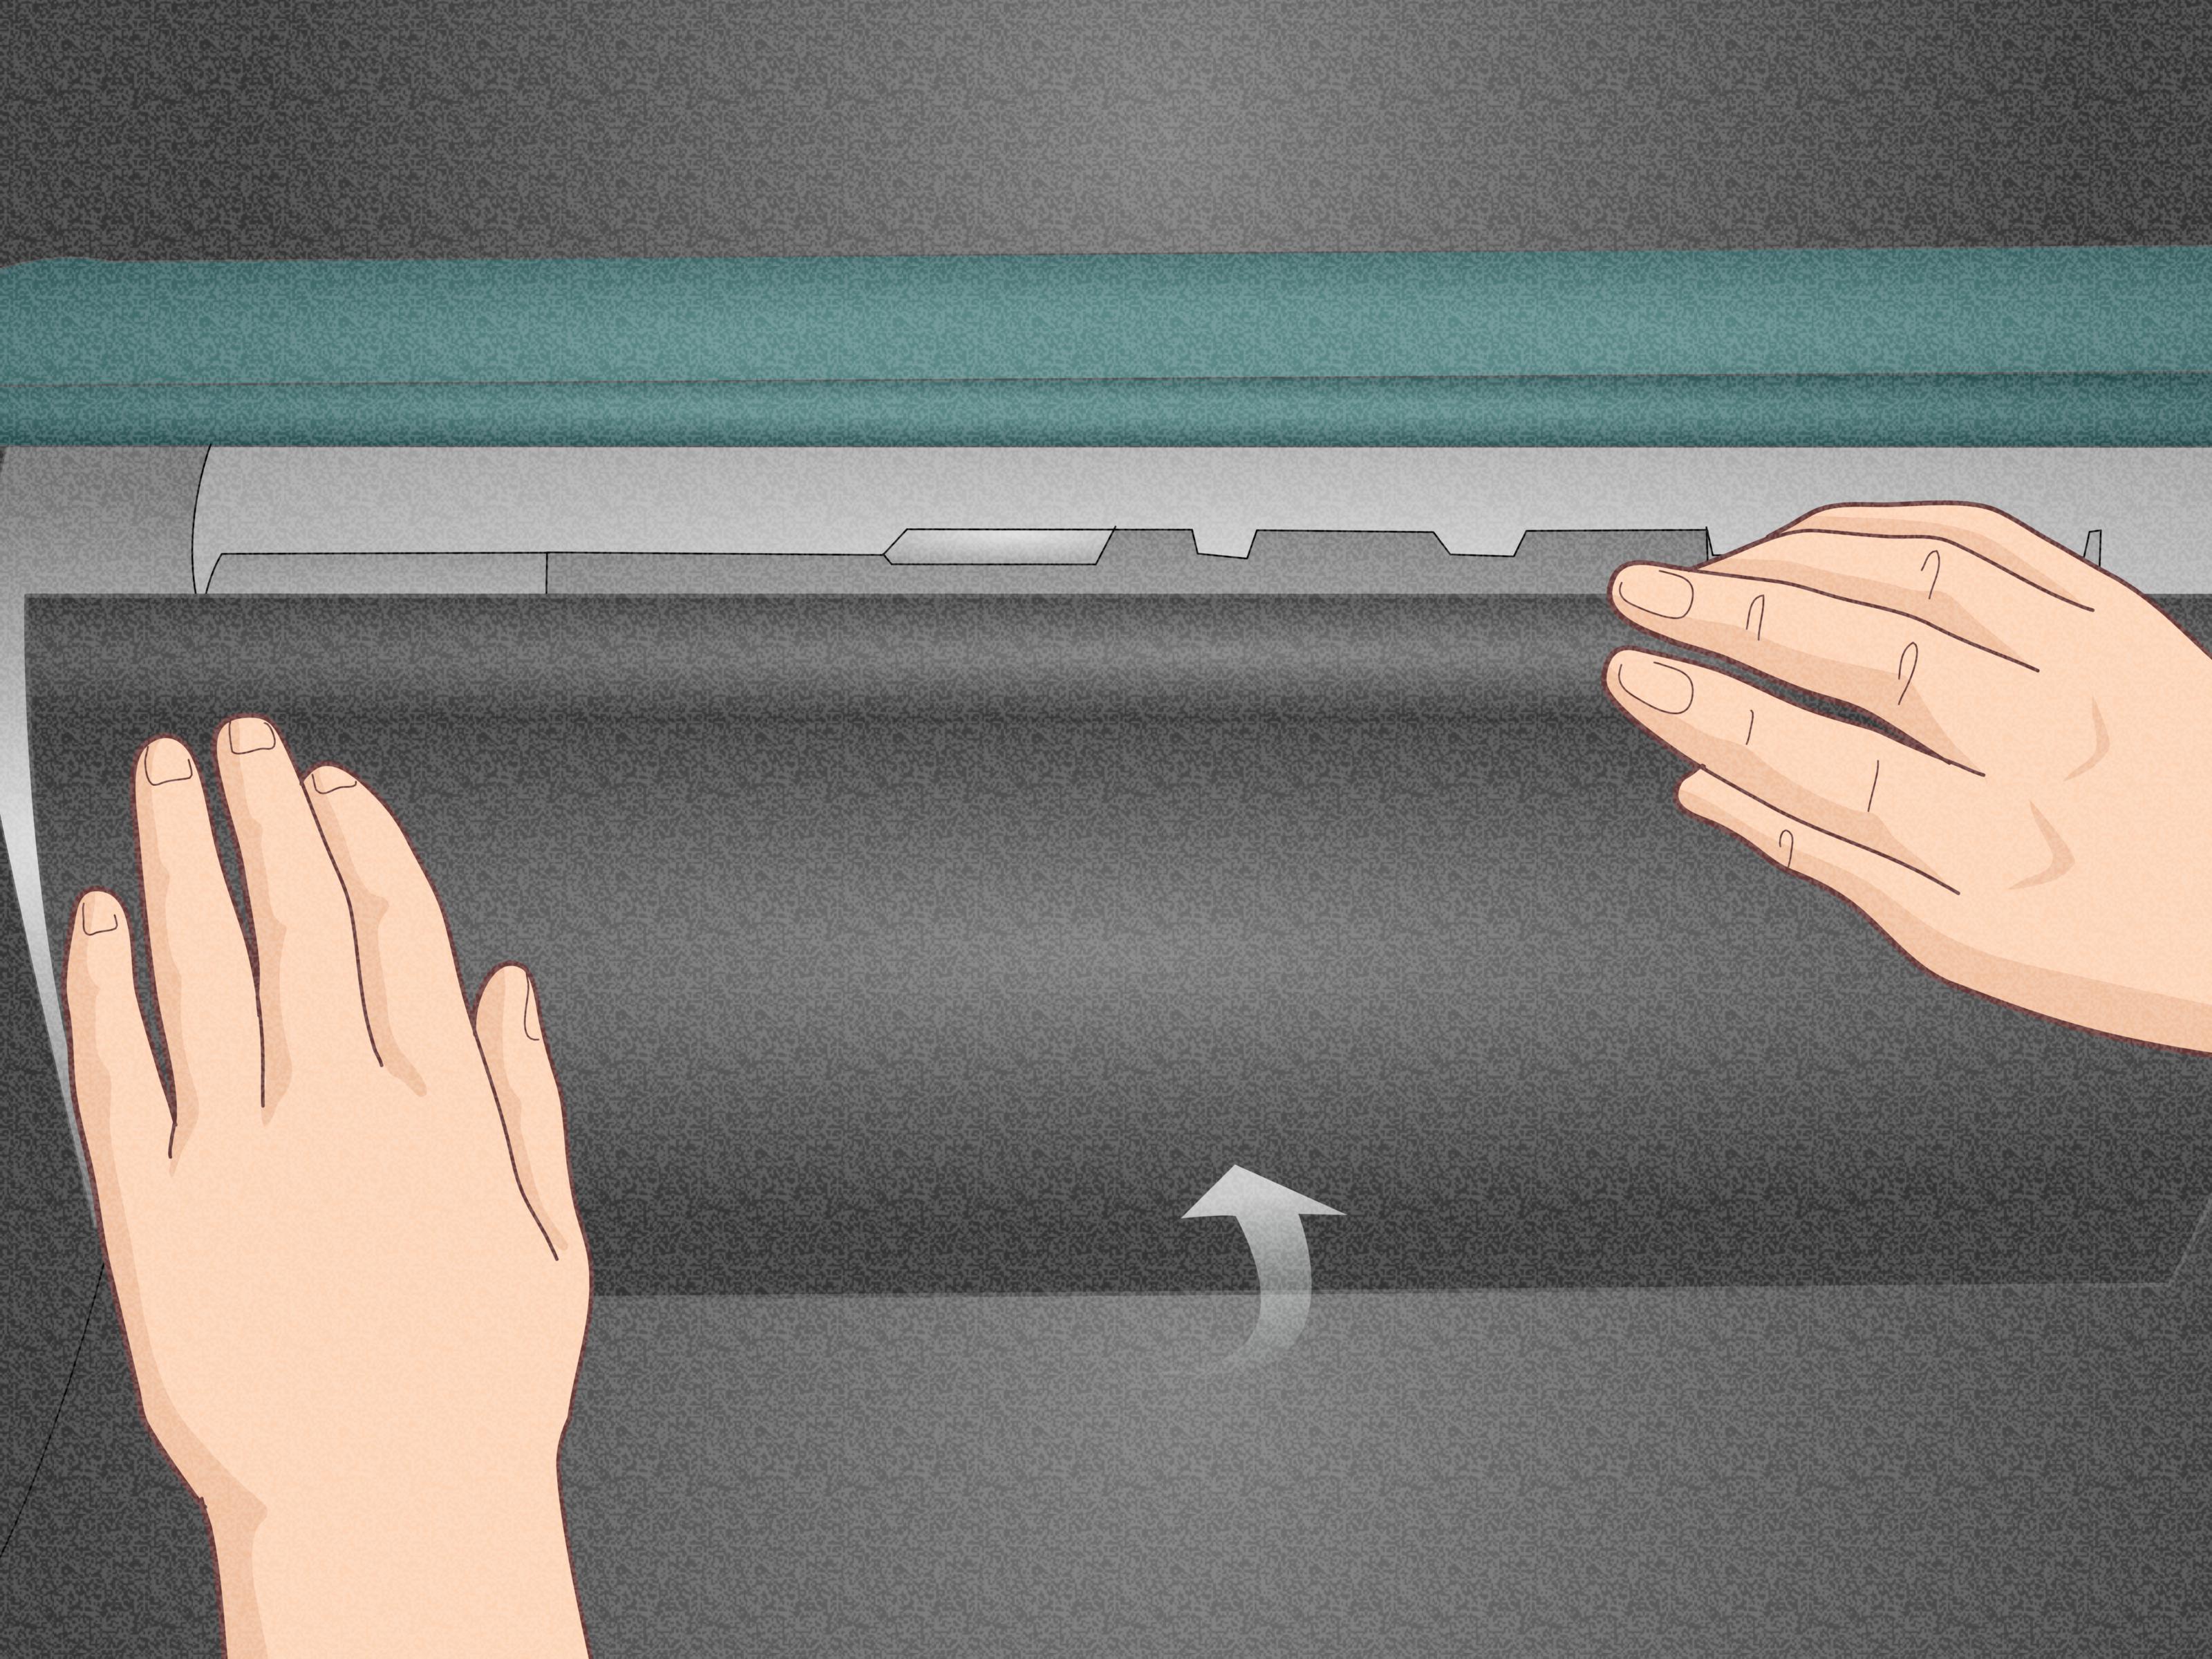
The glove compartment is generally held in its normal range of movement by molded stops on both sides. Press the left and right walls inward so those stops can pass beyond the dashboard opening.
It may help to press one side inward first, lower it slightly, and then release the other side. Use steady pressure instead of aggressively folding the plastic. The glove box is flexible; it is not auditioning for a gymnastics team.
Once the stops clear the opening, allow the glove box to swing downward. On some models it may remain attached at its lower hinges. Other versions may allow or require the compartment to be lifted free.
Step 6: Locate and Open the Filter Housing
Behind the lowered glove box, find the rectangular cabin air filter cover. It is typically centered in front of the HVAC housing and secured by small tabs or clips.
Press the locking tabs and pull the cover straight outward. Do not force the cover sideways, because its thin plastic clips can snap. Older Outbacks may have an additional access panel or multiple Phillips fasteners that must be removed first.
Place the cover somewhere clean and note its installed position. Some covers include an orientation mark that can help during reassembly.
Step 7: Remove the Old Filter and Record Its Direction
Slide the old cabin filter slowly out of the housing. Keep it as level as possible so accumulated leaves and grit do not fall into the blower area.
Before throwing it away, examine the arrow and installation direction. Taking a photograph is useful, but do not blindly copy an old installation. A previous owner or technician may have installed that filter incorrectly.
Inspect the pleats for dirt, discoloration, moisture, damage, leaves, or signs of pests. A slightly gray filter may still pass air, while a filter packed with debris or showing damaged media should be replaced immediately. A wet filter also deserves attention because water intrusion can encourage odors and may indicate a drainage or sealing problem.
Step 8: Clean the Housing and Install the New Filter
Use a small vacuum to remove loose leaves and debris near the filter opening. Wipe accessible surfaces with a dry or barely damp microfiber cloth. Do not push dirt deeper into the HVAC case, spray cleaner directly into the housing, or insert tools near the blower wheel.
Install the new filter according to its markings:
- If the filter is labeled AIR FLOW, the arrow should point in the direction air moves through the housing. On many modern Outbacks, airflow travels downward toward the blower.
- If the filter is labeled UP, that arrow identifies physical orientation and should point upward.
- If the filter’s instructions specify another orientation for your model year, follow those instructions.
This difference explains why an original Subaru filter may show an upward-pointing arrow while an aftermarket filter installed in the same vehicle has an airflow arrow pointing downward. The arrows may describe different things rather than disagreeing.
Slide the new filter straight into the slot without crushing or sharply bending the pleats. The frame should sit evenly, and the cover should fit without being forced. If the filter buckles, protrudes, or prevents the cover from latching, stop and verify the part number and orientation.
Step 9: Reassemble the Glove Box and Test the HVAC System
Reinstall the filter cover until its tabs click securely. Raise the glove compartment, squeeze its sides inward, and guide the stops back through the dashboard opening. Reconnect the damper arm to its original pin or hook.
Open and close the glove box several times. It should move smoothly, remain aligned, and lower in a controlled manner. Return its contents only after confirming that the compartment is working correctly.
Start the Outback and run the fan through several speeds. Check for normal airflow, unusual vibration, rattling, or whistling. A fresh filter may produce a noticeable improvement in vent output, particularly when the old filter was badly clogged.
Record the date and mileage in a maintenance log or write them on the filter frame if the manufacturer permits it. Future you will appreciate the note, especially after present you forgets whether the filter was changed last spring or sometime during the previous geological era.
Common Cabin Air Filter Replacement Mistakes
Confusing “UP” With “AIR FLOW”
This is the most common source of uncertainty. An UP arrow tells you which side faces upward. An AIR FLOW arrow tells you the direction of moving air. Always read the word printed next to the arrow instead of treating every arrow as identical.
Buying a Filter Based Only on Vehicle Generation
Subaru may make small production changes, and aftermarket catalogs are not immune to errors. Confirm the year, trim, and fitment details. When possible, compare the new filter with the old one before completing the installation.
Forcing the Glove-Box Stops
The glove-box sides usually need to flex inward, but excessive pressure can crack aged plastic. Work patiently, especially in cold weather, when interior trim is less flexible.
Dumping Debris Into the Blower
A dirty filter can carry an impressive collection of leaves and grit. Pull it out slowly and keep the dirty side from tipping downward. Vacuuming around the opening is better than blowing compressed air into the housing.
Trying to Wash a Disposable Filter
Most paper or fiber cabin filters are designed for replacement, not washing. Water can deform the media, damage electrostatic properties, and encourage odor-producing growth. Only clean a filter when its manufacturer clearly identifies it as washable and provides specific cleaning instructions.
Troubleshooting After Installation
The Glove Box Will Not Close
Check that the lower hinges are seated correctly, the side stops are back inside the opening, and the damper arm is not trapped behind the compartment. Also make sure no glove-box contents have fallen behind it.
The Filter Cover Will Not Latch
The replacement filter may be backward, incompletely seated, or slightly too large. Remove it and compare its dimensions with the original. Never use the cover as a device for compressing the filter into submission.
Airflow Is Still Weak
Confirm that the new filter is not folded or excessively restrictive. If the filter is installed correctly, weak airflow may be related to the blower motor, evaporator contamination, blocked ductwork, a malfunctioning air door, or another HVAC problem that requires diagnosis.
The Musty Smell Remains
A new filter removes the old contaminated media, but it cannot automatically clean the evaporator, drain pan, carpets, or ducts. Persistent odor may be caused by moisture buildup, a clogged evaporator drain, water intrusion, spilled liquids, or organic material elsewhere in the system.
Real-World Experiences and Lessons From Outback Filter Changes
The first surprise many owners encounter is how easy the job is compared with the price sometimes quoted for professional replacement. A service estimate can make the filter sound as though it lives beneath the transmission. On many newer Outbacks, it is actually waiting behind the glove compartment, protected by a cover and several pieces of mildly stubborn plastic.
The second surprise is the condition of the old filter. A driver may notice only a small reduction in airflow because performance declined gradually over several months. Once the filter is removed, the pleats may reveal leaves, seeds, insects, dark dust, and enough pollen to establish a small botanical research station. Installing a clean filter can make the fan feel stronger even though no mechanical component has changed.
Glove-box contents often become the most time-consuming part of the project. Emptying the compartment beforehand is not merely advice written by someone who enjoys organization. Lowering a full glove box can send paperwork behind the dashboard, where retrieving it becomes a second repair job. A small container placed on the passenger seat keeps everything together and prevents the vehicle registration from disappearing into another dimension.
The damper arm is another memorable detail. It looks insignificant, which makes it easy to forget during reassembly. When left disconnected, the glove box may drop open too quickly. When routed incorrectly, it can prevent the compartment from closing. A photograph taken before removal is faster than attempting to reconstruct the arrangement from memory while kneeling beside the passenger door.
Arrow confusion creates more anxiety than almost any other part of the change. Owners frequently compare an OEM filter marked “UP” with an aftermarket filter marked “AIR FLOW” and assume one manufacturer printed the arrow incorrectly. In reality, one mark can describe filter orientation while the other describes airflow direction. Reading the label beside the arrow usually resolves the mystery.
Another practical lesson is to remove the old filter slowly. Pulling it out quickly may dump dirt into the blower housing. Once debris reaches the blower wheel, the fan can produce a ticking or fluttering sound. A careful removal, followed by gentle vacuuming around the accessible opening, avoids turning a ten-minute maintenance task into an afternoon of dashboard archaeology.
Drivers in different environments also have very different replacement experiences. A lightly used Outback in a clean coastal area may show only moderate discoloration after a year. A vehicle driven on gravel roads, through heavy construction, during wildfire season, or beneath pollen-heavy trees can clog a filter much sooner. That is why visual inspection is more useful than treating mileage as an unbreakable law.
Filter type can change the result as well. A basic particulate filter often provides strong airflow at a low cost. Carbon media may reduce traffic and outdoor odors, while a dense high-efficiency filter may capture smaller particles. The most expensive option is not automatically the best for every driver. Correct fit, adequate airflow, and replacement at a sensible interval matter more than impressive packaging.
Finally, keeping a simple maintenance record makes the next replacement easier. Cabin filters are forgettable parts because they remain invisible until something smells odd or airflow fades. Recording the installation date, mileage, brand, and part number turns the next purchase into a quick lookup rather than a guessing contest in the parts-store aisle.
Conclusion
Changing a Subaru Outback cabin air filter is a beginner-friendly maintenance task that can improve vent airflow, reduce dust, and help the interior smell fresher. For most newer models, the process requires little more than emptying the glove box, releasing its stops and damper, opening the filter housing, and installing the correct replacement in the proper direction.
The key details are simple: verify exact fitment, handle the glove-box components gently, remove the dirty filter without spilling debris, and distinguish between an “UP” arrow and an “AIR FLOW” arrow. Follow the maintenance schedule for your specific model year and inspect the filter more frequently in dusty, smoky, or high-pollen conditions.
Once completed, the job is straightforward enough to repeat annually without turning the garage into a full-service repair shop. Your Outback gets cleaner HVAC airflow, your passengers get a more pleasant cabin, and your glove box finally gets cleaned. Everyone wins, except the collection of expired coupons.