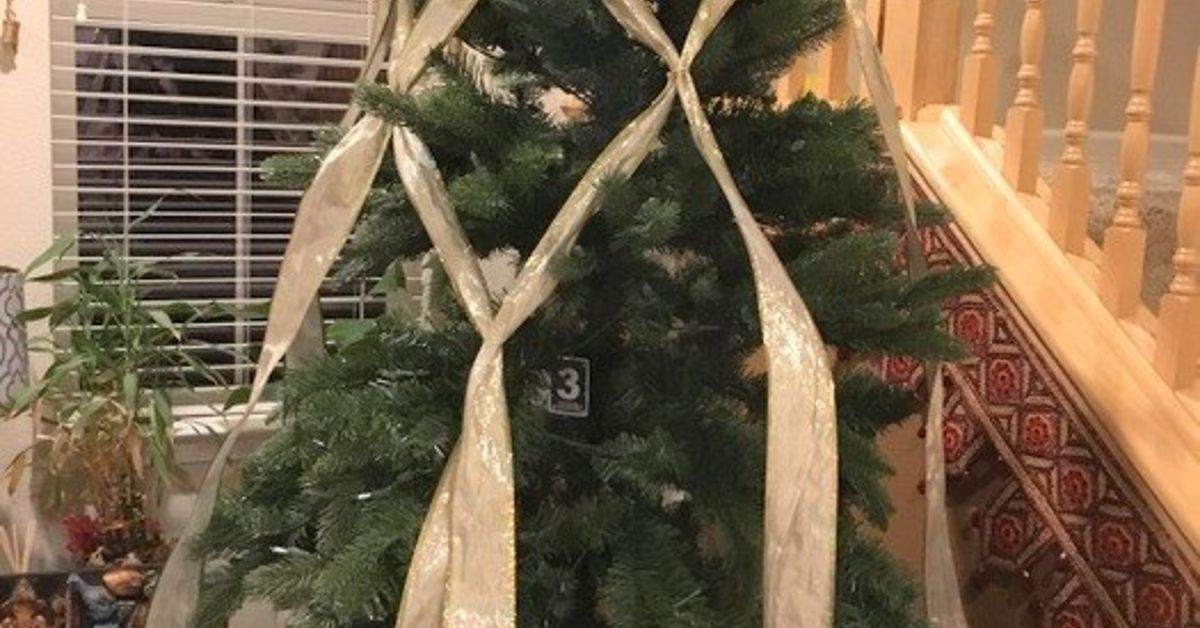
A criss cross ribbon draped Christmas tree is what happens when your tree decides it is not merely standing in the living roomit is making an entrance. Instead of wrapping ribbon around the tree in a simple spiral, this style uses diagonal strips that cross over one another, creating a polished lattice effect. The result looks designer, festive, and surprisingly expensive, even if your ribbon came from a craft store sale bin and your tree has one suspiciously bald side facing the wall.
The beauty of this Christmas tree ribbon idea is that it gives structure to the entire design. Lights sparkle through the openings, ornaments sit naturally between the ribbon lines, and the whole tree feels intentional rather than “I decorated this while eating cookies and arguing with the tree stand.” Whether your holiday style is classic red velvet, rustic farmhouse plaid, icy winter white, champagne gold, or candy-cane cheerful, the criss cross ribbon method can be adapted to fit almost any home.
This guide explains how to create the look from start to finish, including ribbon selection, tree preparation, step-by-step draping, common mistakes, safety tips, styling examples, and real-world experience from decorating trees that did not always cooperate. Because yes, ribbon has a personality. Sometimes it is elegant. Sometimes it behaves like a festive garden hose.
What Is a Criss Cross Ribbon Draped Christmas Tree?
A criss cross ribbon draped Christmas tree is a decorated tree where ribbon is arranged in diagonal lines that intersect across the front and sides of the tree. Instead of one continuous ribbon circling the tree like a garland, the ribbon is usually cut into manageable strips or draped in sections from top to bottom. Each strip crosses another strip, forming diamond or X-shaped patterns.
This style works especially well because it gives the eye a clear path to follow. Traditional trees often rely on ornaments alone, which can look busy if colors, shapes, and sizes are scattered randomly. The ribbon acts like a visual framework. It pulls the color palette together, adds movement, fills empty spaces, and makes the tree look full without requiring 700 ornaments and a small personal loan.
The look can be dramatic or subtle. Wide velvet ribbon creates a grand, formal tree. Plaid ribbon gives the design a cozy cabin feel. Metallic mesh adds sparkle and volume. Thin satin ribbon can create a delicate, boutique-style finish. The criss cross pattern is flexible, which makes it useful for real trees, artificial trees, flocked trees, slim trees, and even tabletop Christmas trees.
Why the Criss Cross Ribbon Method Works So Well
The criss cross ribbon technique is popular because it solves several decorating problems at once. First, it hides gaps. If your artificial Christmas tree has a few thin areas, wide ribbon can cover them beautifully. If your real tree has one side that looks like it got into a disagreement with gravity, ribbon can help balance the shape.
Second, the ribbon creates rhythm. A Christmas tree looks more professional when the decorations are layered with purpose. Lights go deep into the tree, ribbon creates movement, large ornaments add structure, smaller ornaments add detail, and picks or florals provide texture. The criss cross pattern makes those layers easier to organize because it divides the tree into natural sections.
Third, it allows your theme to shine. A red-and-gold tree feels classic. A black-and-white buffalo plaid tree feels farmhouse. Champagne and ivory feel elegant. Pink velvet and pearl ornaments feel romantic. Navy, silver, and white feel wintry and refined. The ribbon becomes the “outfit” of the tree, while ornaments become accessories. And as anyone who has ever dressed up for a holiday party knows, accessories matterbut the outfit sets the mood.
Best Ribbon Types for a Criss Cross Christmas Tree
For this technique, wired ribbon is the easiest choice. The wire edges help the ribbon hold soft waves, loops, and folds. Non-wired ribbon can still work, but it is harder to shape and may hang flat unless pinned carefully. If you want the ribbon to look dimensional, wired ribbon is your friend.
Recommended Ribbon Widths
For a standard 6- to 8-foot tree, ribbon that is 2.5 inches wide is the most versatile. It is wide enough to show up but not so wide that it overwhelms the branches. For a dramatic tree, 4-inch ribbon can look luxurious, especially on larger or fuller trees. For accent layers, 1- to 1.5-inch ribbon can be added over wider ribbon to create contrast.
Ribbon Materials That Look Great
Velvet ribbon is rich, soft, and elegant. Satin ribbon gives a smooth and traditional look. Burlap or linen ribbon works beautifully for rustic and farmhouse themes. Mesh ribbon adds volume and sparkle, making it useful for trees that need extra fullness. Plaid ribbon is cheerful and classic, while metallic ribbon brings a festive glow under warm white lights.
How Much Ribbon Do You Need?
The amount depends on tree size, ribbon width, and how full you want the pattern to look. For a 7.5-foot tree, plan on roughly 30 to 50 feet of ribbon for a moderate criss cross design. If you want a fuller, more dramatic look, you may need 60 feet or more. It is better to buy slightly extra than to discover halfway through that your tree is wearing a ribbon vest instead of a ribbon gown.
Supplies You Will Need
You do not need a professional decorator’s toolbox to create a criss cross ribbon draped Christmas tree. You only need a few practical supplies and a little patience.
- Wired ribbon in one to three coordinating styles
- Sharp scissors
- Floral wire, pipe cleaners, ornament hooks, or twist ties
- Christmas lights, if the tree is not pre-lit
- Large, medium, and small ornaments
- Optional floral picks, berries, pinecones, bells, or bows
- A tree topper and tree skirt or collar
Choose fasteners that blend into the tree. Green floral wire works well on traditional trees, white pipe cleaners are helpful for flocked trees, and ornament hooks can work in a pinch. Avoid using tape. Tape does not hold well on branches, and it has the festive charm of an office supply emergency.
Prepare the Tree Before Adding Ribbon
Good ribbon placement starts before the ribbon ever touches the tree. If you are decorating an artificial Christmas tree, fluff every branch. Pull tips outward, separate layers, and shape the branches so they look natural. This step may feel boring, but it makes a huge difference. A well-fluffed tree gives the ribbon something to rest on and helps prevent flat, sagging sections.
If you are using a real Christmas tree, rotate it until the best side faces the room. Trim any stray branches that throw off the shape. Make sure the tree is secure in the stand before decorating. A tree that leans after the ornaments go on is not charming; it is a holiday thriller.
Add lights before ribbon unless your tree is pre-lit. Lights should be distributed from the inside out so the tree glows with depth. Once the lights are finished, step back and look for dark spots. Fixing light gaps is much easier before ribbon and ornaments are added.
How to Create a Criss Cross Ribbon Draped Christmas Tree
Step 1: Choose Your Starting Point
Begin near the top of the tree, slightly below the topper area. You can start with two ribbon strips that angle downward in opposite directions, forming the first X shape. Secure the top ends to sturdy branches using floral wire, pipe cleaners, or twisted artificial branch tips.
Step 2: Cut Ribbon Into Manageable Strips
Instead of wrestling with one giant spool, cut the ribbon into sections. For a medium tree, strips between 24 and 48 inches are usually easy to handle. Longer strips create more sweeping movement, while shorter strips give better control. Cut the ends at an angle or in a V shape for a finished look.
Step 3: Create the First Diagonal Line
Take one ribbon strip and drape it diagonally downward across the tree. Tuck the ribbon slightly into the branches every 8 to 12 inches so it looks woven into the tree instead of pasted on top. Let the ribbon puff gently between anchor points. The goal is soft movement, not a ribbon that looks like it has been strapped down for takeoff.
Step 4: Add the Opposite Diagonal
Place a second ribbon strip diagonally in the opposite direction so it crosses the first strip. Secure the crossing point with a small piece of floral wire or by tucking both ribbons into a deep branch. This creates the criss cross effect. Continue building X shapes as you move down the tree.
Step 5: Keep the Pattern Loose and Natural
The best criss cross ribbon trees do not look measured with a ruler. Keep the pattern balanced but not stiff. Let some intersections sit higher or lower. Let the ribbon dip slightly between branches. Natural variation makes the tree feel warm and handmade, not like a geometry assignment wearing ornaments.
Step 6: Continue Around the Tree
After finishing the front, work around the sides. If the tree sits in a corner, you do not need to decorate the hidden back as heavily. However, continue enough ribbon around the visible sides so the design does not abruptly stop. A tree should not look fabulous from the front and confused from the side.
Step 7: Add Ornaments After the Ribbon
Once the ribbon is in place, add large ornaments first. Place them deeper inside the tree to create depth and cover anchor points. Then add medium ornaments in the open spaces between ribbon lines. Finish with smaller ornaments near the branch tips. This layering method makes the tree look full, balanced, and intentional.
Design Ideas for Different Holiday Styles
Classic Red and Gold
Use red velvet ribbon crossing over gold mesh or satin ribbon. Add gold ball ornaments, red berries, warm white lights, and a traditional star topper. This look is timeless and works beautifully in formal living rooms, entryways, and dining spaces.
Farmhouse Plaid
Choose buffalo plaid ribbon, burlap ribbon, wood ornaments, pinecones, and small galvanized bells. Add warm lights and a woven tree collar. The result feels cozy, casual, and perfect for anyone who wants their Christmas tree to look like it owns a flannel shirt.
Winter Wonderland
Use white, silver, champagne, or pale blue ribbon on a flocked tree. Add snowflake ornaments, clear glass baubles, pearl garlands, and frosted berry picks. This style works especially well with a criss cross pattern because the ribbon lines create soft contrast against snowy branches.
Modern Minimalist
Use one ribbon color, such as ivory, taupe, charcoal, or champagne. Keep ornaments simple and repeat the same shapes throughout the tree. This approach is clean, calm, and elegant. It is also helpful if your home already has a strong interior design style and you do not want the tree yelling “holiday parade” from the corner.
Candy Cane Cheer
Use red-and-white striped ribbon, glossy red ornaments, white snowballs, peppermint picks, and playful candy ornaments. Keep the criss cross pattern bold and visible. This is a great choice for family rooms, kids’ spaces, kitchens, or anywhere holiday joy is allowed to be slightly ridiculous.
Common Mistakes to Avoid
The first mistake is pulling the ribbon too tight. Tight ribbon flattens the branches and makes the tree look wrapped instead of draped. Leave room for soft loops and dimension.
The second mistake is using too many ribbon styles. One main ribbon and one accent ribbon are often enough. Three can work if they share a color palette, but four or five may look chaotic unless you are going for “craft store exploded, but make it festive.”
The third mistake is ignoring scale. A large tree needs wider ribbon and bigger ornaments. A slim tree needs lighter ribbon and smaller details. When decorations match the size of the tree, the final design feels balanced.
The fourth mistake is placing all ornaments at the tips of the branches. Put some ornaments deep inside the tree. This hides gaps, reflects light, and creates a layered designer look.
The fifth mistake is forgetting the bottom of the tree. The base matters. A tree skirt, woven basket, metal collar, or wrapped gift boxes can make the entire display feel finished.
Safety Tips for a Decorated Christmas Tree
A beautiful tree should also be safe. If you use a live tree, keep it watered and away from heat sources such as fireplaces, radiators, and space heaters. Dry trees become fire hazards quickly, and no ribbon design is worth that risk.
Inspect light strands before placing them on the tree. Do not use lights with cracked sockets, frayed wires, or loose connections. Follow the manufacturer’s instructions for how many strands can be connected. Turn off Christmas tree lights before leaving the house or going to bed.
Keep candles away from the tree. Flameless candles offer glow without the danger. Also make sure ribbon, paper ornaments, and fabric decorations are not pressed against hot bulbs or electrical connections. Most modern LED lights stay cooler than older incandescent lights, but caution still belongs on the holiday checklist.
How to Store Ribbon After Christmas
Good ribbon can last for years if it is stored properly. Remove it gently from the tree instead of yanking it out. Smooth each strip with your hands and roll it loosely around a cardboard tube, ribbon spool, or wrapping paper tube. Secure the roll with a soft tie rather than tape. Store ribbon in a dry container away from moisture, heat, and crushing weight.
If a ribbon strip becomes wrinkled, reshape it by hand before storing. Wired ribbon is forgiving. A few gentle bends can bring it back to life. Think of it as holiday hair: slightly dramatic, but manageable with patience.
Personal Experience: What Decorating a Criss Cross Ribbon Tree Teaches You
After decorating several Christmas trees with the criss cross ribbon method, one lesson becomes clear very quickly: the tree is not the boss, but it will try to negotiate. The first time many people attempt this look, they imagine the ribbon falling perfectly into place, crossing neatly like a magazine photo. In reality, the first strip may sag, the second strip may twist, and one intersection may look less like an elegant X and more like a ribbon traffic jam. That is normal.
The best experience comes from treating the ribbon as a flexible design element, not a math problem. Start at the top, create a few crossings, then step back. That “step back” moment is essential. Up close, every fold looks enormous. From across the room, the tree often looks far better than expected. Decorating a tree is a little like editing a photo: zooming in too much makes you panic over details nobody else will notice.
One useful trick is to place the ribbon before opening every ornament box. When ornaments come first, the ribbon has to fight for space. When ribbon comes first, it becomes the roadmap. Large ornaments can hide wire ties, floral picks can soften intersections, and smaller ornaments can fill the diamond-shaped gaps. This order makes the whole process feel calmer.
Another lesson is that ribbon choice matters more than people think. Cheap ribbon can still look beautiful, but extremely flimsy ribbon is difficult to control. Wired ribbon saves time because it holds curves and creates volume. Textured ribbon also photographs better because it catches light and shadow. Velvet looks rich. Plaid feels cheerful. Mesh fills space. Satin looks smooth but may need more careful anchoring.
Color planning also prevents frustration. A criss cross ribbon pattern is highly visible, so the ribbon color becomes the main design statement. If the ribbon clashes with ornaments, the tree may feel restless. A simple palette of two or three main colors is easier to style. For example, red ribbon with gold and green ornaments feels classic. Ivory ribbon with champagne and pearl ornaments feels soft and elegant. Black-and-white plaid with red berries feels farmhouse without trying too hard.
The most satisfying part of this decorating style is how forgiving it becomes once ornaments are added. Small imperfections disappear behind baubles, greenery picks, bows, and lights. A slightly uneven crossing can look charming. A gap can become the perfect spot for a large ornament. A ribbon tail that seems too long can be tucked deeper into the branches. The tree slowly transforms from “work in progress” to “holiday centerpiece,” and suddenly everyone assumes you knew what you were doing all along.
For families, this method is also practical. Adults can handle ribbon placement first, then children can add ornaments inside the open spaces. The ribbon provides boundaries without making the tree feel too formal. It also helps spread ornaments more evenly because each criss cross section becomes a small decorating zone. No more twenty ornaments on one heroic branch.
In the end, the criss cross ribbon draped Christmas tree is less about perfection and more about creating a warm, festive focal point. It gives your tree shape, movement, and personality. It turns simple ribbon into architecture. And when the lights glow at night, the crossed ribbon lines create shadows and highlights that make the whole room feel finished. That is the magic of this design: it looks fancy, but it is friendly. It welcomes creativity, hides mistakes, and makes your Christmas tree look like it dressed up for the season.
Conclusion
A criss cross ribbon draped Christmas tree is one of the easiest ways to make a holiday tree look polished, full, and thoughtfully designed. By choosing wired ribbon, preparing the branches, placing ribbon after lights, and layering ornaments around the pattern, you can create a tree that feels elegant without being fussy. The technique works for classic, rustic, modern, whimsical, and glamorous themes, making it a reliable decorating idea year after year.
Most importantly, do not chase perfect symmetry. A Christmas tree should feel joyful, personal, and alive with tradition. The ribbon gives structure, but your ornaments, memories, colors, and little creative choices give it heart. If one ribbon crossing refuses to behave, tuck in a bow, add a shiny ornament, and carry on like a professional. That is basically the secret to holiday decoratingand possibly life.