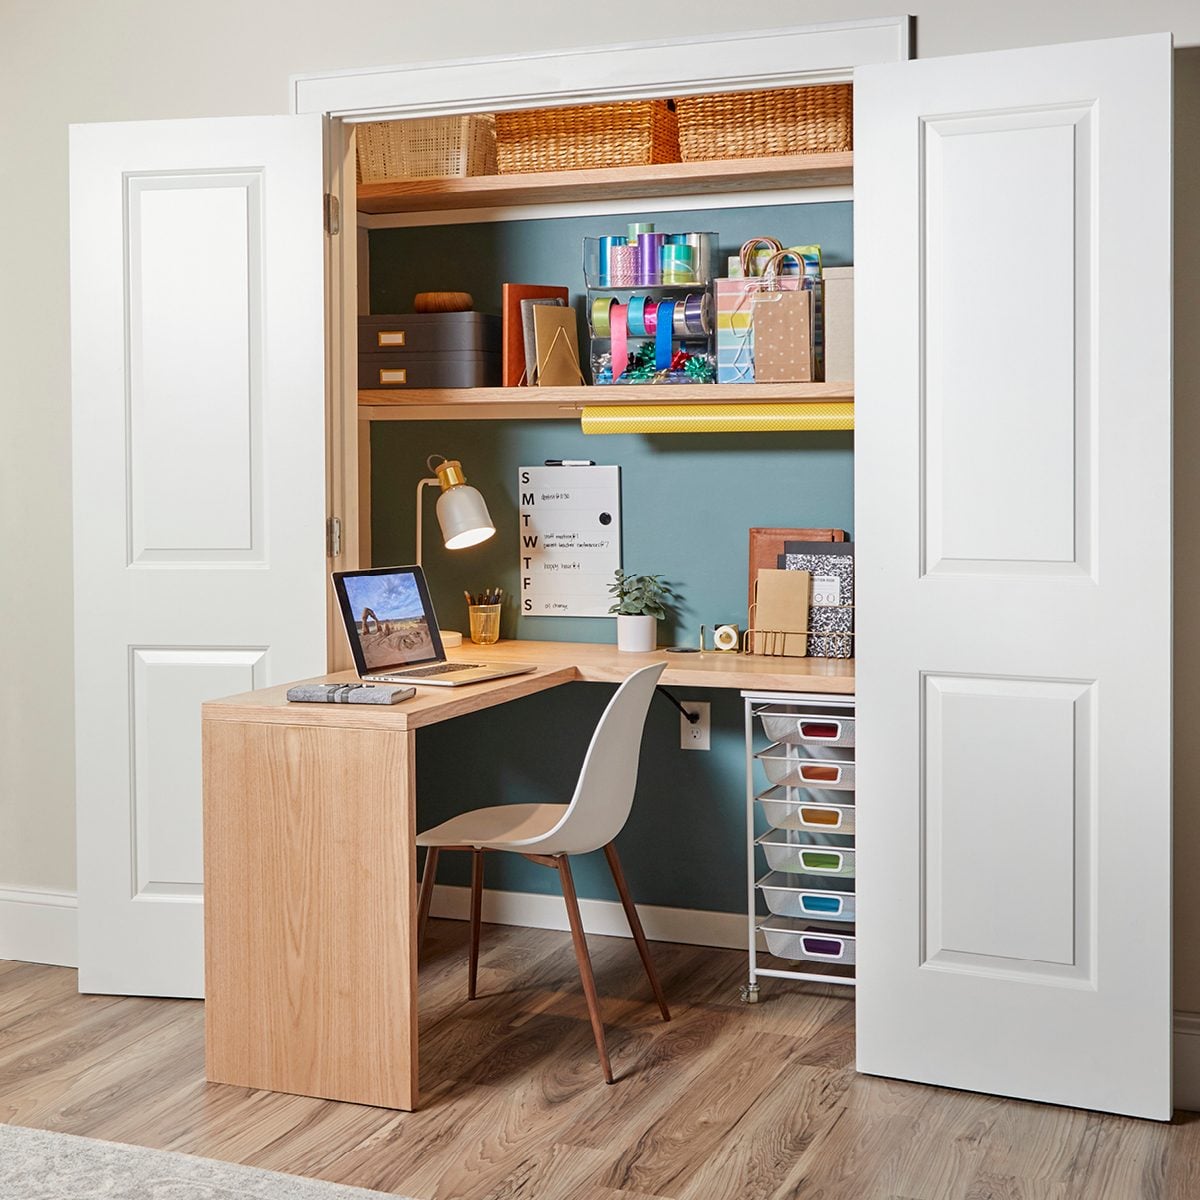
Some people have a walk-in closet. Some have a reach-in closet. And some have a mysterious little nook that currently stores one lonely vacuum, three tangled charging cords, and a sweater you forgot you owned in 2022. Good news: that awkward space can become a surprisingly polished fold-out closet desk.
A DIY fold-out closet desk is one of the smartest small-space projects you can build because it gives you something rare in modern life: a real workspace that can disappear when your workday ends. Open the doors, drop the desktop, answer emails like a productivity wizard. Fold it back up, close the doors, and suddenly your “office” stops staring at you while you eat dinner.
This project works especially well in bedrooms, hall closets, spare-room closets, and underused linen closets. The basic idea is simple: mount a sturdy desk surface inside the closet, support it with folding hardware or legs, build upward with shelves and storage, and make the whole thing look intentional instead of “weekend panic project with leftover screws.”
Below is a practical, in-depth guide to planning, building, and finishing your own fold-out closet desk, with design advice, safety notes, and real-world tips that make the difference between “cute on Pinterest” and “actually nice to use every day.”
Why a Fold-Out Closet Desk Is Worth Building
The biggest advantage is obvious: it saves space. But the real win is how it helps your home behave better. A fold-out desk gives you a dedicated work surface without permanently sacrificing square footage. When the desk is closed, the room feels calmer, cleaner, and less like you’re one Slack notification away from a nervous breakdown.
It also helps with boundaries. That matters more than people think. If your laptop lives on the dining table, your brain never really clocks out. A closet office solves that problem beautifully. Open doors means “work mode.” Closed doors means “I am no longer available for spreadsheets or surprise Zoom calls.”
And from a design perspective, this project is flexible. You can make it modern with painted plywood and matte black hardware, cozy with oak tones and warm lighting, or super practical with melamine, bins, and zero decorative drama. It can be dressed up or stripped down depending on your budget and patience level.
Before You Build: Plan the Space Like a Sane Person
Before you cut wood, buy hinges, or fall in love with a paint color called something like “Tranquil Mushroom Fog,” measure the closet carefully. A fold-out desk only feels custom when the proportions make sense.
Measure the width, depth, and door swing
Start with the inside width of the closet, then measure the depth from the back wall to the inside edge of the doors. You want enough room for the folded desk, the hardware, and your knees when the desk is open. Also check how the doors behave. Standard hinged doors, bifolds, and sliding doors all affect how much clearance you have.
For many DIY builds, a desktop depth between 20 and 24 inches feels comfortable for a laptop, notebook, and coffee mug. If the closet is shallow, a 18- to 20-inch-deep desk can still work well, especially with a monitor arm or laptop stand. If you plan to use a full monitor, keyboard, mouse, and paperwork, lean toward the deeper end.
Decide whether the desk will fold down or fold up
Most people say “fold-out” when they mean a desktop that folds down into working position and folds back up when not in use. That’s the most practical version for a closet because it acts like a drop-front surface. You can support it with folding shelf brackets, hinged side supports, or foldable legs.
A flip-up design can work too, but it is usually less intuitive inside a closet and can feel more cabinet-like than desk-like. For everyday use, fold-down is typically the winner.
Locate studs before you do anything bold
This is the part where your project either becomes sturdy or becomes a cautionary tale. The desk support system needs to anchor into wall studs whenever possible. Drywall alone is not where you want to place your trust, your laptop, your elbows, and your morning coffee.
Use a stud finder, verify the stud centers, and mark them clearly. If your closet walls are weird, older, or full of surprises, drill small pilot holes in hidden areas to confirm what’s behind the drywall. Houses love drama. Prepare accordingly.
Materials and Tools You’ll Likely Need
Your exact shopping list depends on the style you choose, but most fold-out closet desk builds use some version of the following:
- 3/4-inch plywood, hardwood panel, or furniture board for the desktop
- 1×2 or 1×3 boards for wall cleats, trim, or face framing
- Heavy-duty folding shelf brackets, drop-front desk hardware, or folding legs
- Wood screws in appropriate lengths
- Construction adhesive or wood glue
- Sandpaper in medium and fine grits
- Primer and paint or polyurethane finish
- Stud finder, drill/driver, level, tape measure, square, and saw
- Edge banding or trim if you want a cleaner furniture-style finish
- LED strip or puck lighting if the closet is dark
- Cable grommet, power strip, or cord organizer for a neater setup
If you want the easiest route, buy high-quality folding brackets rated for work surfaces and mount them into studs. If you want a more furniture-like look, build a drop-front panel with concealed storage above it. Both approaches work; one just makes you feel more like a cabinetmaker.
Step-by-Step: How to Build a Fold-Out Closet Desk
Step 1: Empty the closet and prep the walls
Remove old rods, shelf supports, random anchors, and any trim that gets in the way. Patch holes, sand rough spots, and paint before installation if you can. Painting a closet after the desk is installed is possible, but it is about as fun as painting behind a refrigerator.
If you want the closet to feel less like a closet, this is the time to add personality. A bold paint color, peel-and-stick wallpaper on the back wall, or a paneled backdrop can make the finished desk look built-in instead of improvised.
Step 2: Mark the finished desk height
Most desks feel comfortable around standard desk height, so mark a line where the open desk surface should land. Then sit in the chair or stool you plan to use and test the height with a scrap board or cardboard template. That quick mock-up can save you from building a desk that feels weirdly high, oddly low, or perfect for a Victorian schoolchild.
Also check legroom. You want enough open space underneath so your knees, feet, and chair can fit naturally. A desk that looks pretty but forces you into a shrimp-shaped posture is not a success.
Step 3: Install the wall cleats or support frame
If your design uses a fixed rear support, install wall cleats into the studs first. These cleats act as the backbone of the desk system. Keep them level, predrill your holes, and fasten them securely. If the closet side walls line up with studs, you can add side cleats as well for extra support.
Some builders create a simple rectangular frame between side supports; others use two side cabinets or cube organizers to carry part of the load. Both methods work. The cleanest DIY approach is often a stud-mounted rear cleat plus two folding brackets beneath the front half of the desktop.
Step 4: Cut and finish the desktop
Cut the desktop to size based on your closet dimensions. Sand the edges thoroughly because no one enjoys resting their wrists on splinters. If you want a polished look, add edge banding or hardwood trim to the front edge.
At this stage, drill a cable hole if you want one. That tiny detail makes a big difference later. It is much easier to plan where cords go now than to stare at a spaghetti nest of cables later and pretend it adds “creative energy.”
Prime and paint the desktop, or seal it with polyurethane if you want the wood grain to show. A satin or semi-gloss finish tends to hold up well to daily use and is easier to wipe clean.
Step 5: Add the folding hardware
This is the make-or-break step. If you are using folding shelf brackets, follow the manufacturer’s mounting requirements carefully and anchor them where the structure can actually carry the load. If you are using hinged support arms or folding legs, dry-fit everything before final installation.
The open desk should feel stable, level, and resistant to wobble. Test it gently before you commit your expensive equipment to it. Lean on it a little. Set a few heavy books on it. Open and close it multiple times. If anything flexes more than it should, reinforce it now instead of explaining later why your printer staged a dramatic exit.
Step 6: Build storage above and around the desk
A fold-out closet desk works best when you use the vertical space. Add one or two shelves above the desk for books, bins, and office supplies. A slim upper shelf can hold decor and a task light, while a deeper shelf can store paper, chargers, and the documents you keep swearing you will file.
Pegboards, small wall organizers, file pockets, and hooks on the inside of the closet doors also work beautifully. The goal is to keep the desktop clear enough that opening the desk takes five seconds instead of a full excavation.
Step 7: Add lighting and power
Closets are not famous for excellent lighting. Add under-shelf LED strips, puck lights, or a compact task light so the desk is pleasant to use. If the closet already has an outlet, great. If not, think through your safest option before installation. Extension cords should not become permanent spaghetti architecture.
If you need new wiring or an additional outlet, bring in a licensed electrician. There is “confident DIY energy,” and there is “I accidentally turned my closet into a plot twist.” Know the difference.
Step 8: Style it so it looks intentional
Once the structure is done, finish the space with a few controlled details: a chair or stool that tucks away easily, matching storage bins, a small pinboard, framed art, or a compact monitor arm. Keep it edited. A fold-out closet desk is at its best when it feels efficient, not overstuffed.
Common Mistakes to Avoid
- Mounting into drywall only: This is the classic DIY mistake. If the desk will carry weight, give it real structure.
- Choosing weak hardware: Decorative hinges are not the same thing as load-bearing support hardware.
- Ignoring door clearance: Always test how the desk opens with the doors fully open.
- Making the desk too deep: A giant desktop sounds great until it blocks movement and feels clumsy in a tight closet.
- Forgetting lighting: Even a well-built desk feels miserable in a dim cave.
- Neglecting cord management: One power strip and a few clips can rescue the entire project.
- Overdecorating: This is still a small workspace, not a museum gift shop.
Easy Upgrades That Make the Desk Feel Custom
If you want the finished project to feel high-end, focus on little upgrades rather than complicated construction tricks. Use a solid wood front edge on the desktop. Paint the inside of the closet a contrasting color. Add brass or matte black hooks. Use matching baskets or magazine files. Install a soft-close magnetic catch if the desk folds into a cabinet-style face.
You can also leave part of the closet functional for storage. For example, keep a narrow hanging rod on one side for jackets or bags, or add a lower cubby for a printer. A fold-out closet desk does not have to eliminate every bit of closet utility. The best designs often blend workspace and storage instead of forcing the closet into an identity crisis.
What This Project Usually Costs
A simple DIY fold-out closet desk can be fairly budget-friendly if you use paint-grade plywood and straightforward hardware. Costs rise when you choose hardwood panels, premium brackets, custom lighting, and fancy built-ins. In general, the hardware and structural parts matter more than spending extra on decorative finishes.
If your budget is tight, spend money first on the support system, then on the desktop surface, then on lighting. You can always upgrade paint, bins, and accessories later. Nobody has ever said, “I wish this desk were less sturdy, but more emotionally expensive.”
Composite DIY Experience: What Building One Actually Feels Like
Based on common DIY experiences with fold-out closet desks, the project usually starts with optimism and a tape measure. You stand in front of the closet thinking, “This will be easy.” Then you discover the walls are not perfectly square, one stud is not where you expected, and the closet floor has a subtle slope that apparently developed during the Roosevelt administration.
The first real lesson is that measuring a closet is different from measuring open space. Closets hide weirdness. Door trim steals inches. Baseboards interfere with side panels. Existing shelves are rarely level. If you are building one yourself, you quickly learn that dry-fitting everything matters. The desktop that looked perfect on paper can suddenly feel too deep once you imagine a chair, your knees, and an actual human body in front of it.
The second lesson is that the hardware determines the mood of the entire project. When the brackets or support arms feel solid, the desk feels professional. When the hardware feels flimsy, the whole setup suddenly gives “temporary science fair display.” Most DIYers find that once the supports are mounted into solid backing or studs, the project becomes dramatically more satisfying. That is the moment when the desk stops being an idea and starts feeling like furniture.
Another very real experience is the surprise pleasure of the finishing stage. At first, it feels like a carpentry project. By the end, it becomes a lifestyle project. The paint color changes the mood. A warm LED strip makes the closet feel intentional instead of improvised. A corkboard, shelf, or small piece of art makes the space feel like somewhere you want to sit. It is amazing how quickly a formerly ignored closet can become the most hardworking square footage in the room.
There is also a practical emotional payoff that people do not always expect. Once the desk folds away, the room feels tidier even when life is not. That visual reset matters. You can leave the laptop charger, notebook, and mouse tucked into the setup, close the doors, and get your room back. For anyone working from home in a small house or apartment, that is not just convenient; it is sanity-saving.
Most builders also mention at least one “wish I had thought of that earlier” moment. Usually it is power access, cable routing, shelf spacing, or chair storage. Maybe the stool does not tuck in quite as neatly as planned. Maybe the top shelf sits a bit too low for the monitor. Maybe the power strip should have been mounted on the side wall instead of tossed in the back like a guilty secret. None of these issues ruin the project, but they do teach you that a successful small-space build depends on daily use, not just good looks.
And finally, there is the deeply satisfying moment when someone sees the finished closet with the doors closed and assumes it is just a normal storage space. Then you open it, lower the desk, switch on the light, and reveal a compact, organized workstation like a magician whose specialty is plywood and practical problem-solving. That reveal alone is worth at least half the sawdust.
Conclusion
Building a fold-out closet desk is one of those DIY projects that punches above its weight. It does not require a giant room, a luxury budget, or a contractor convoy to make a meaningful difference in your home. With solid mounting, thoughtful measurements, good hardware, and a little design restraint, you can turn a neglected closet into a hardworking desk that looks clean, functions well, and disappears when you need your space back.
In other words, it is practical, stylish, and just smug enough to make you feel brilliant every time you fold it open. That is a very good kind of DIY.