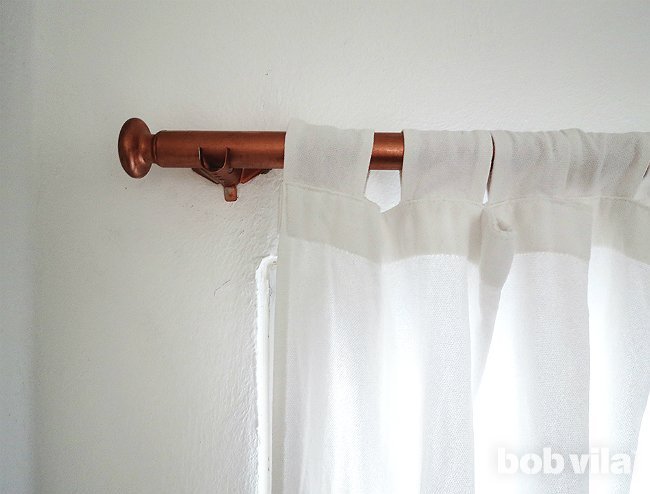
Buying curtain rods should be simple. You walk into a store, pick a rod, pay a reasonable amount of money, and go home feeling like a capable adult. Then you see the price tag, the finials, the brackets, the rings, the extra-long size upgrade, and suddenly the window has become a luxury appliance. Good news: you can make your own DIY curtain rods with basic materials, a few tools, and a finish that looks far more expensive than it is.
This guide walks you through a practical, stylish way to build homemade curtain rods using materials such as wooden dowels, electrical conduit, metal pipe, or PVC conduit. The approach is inspired by the classic Bob Vila spirit: simple hardware-store supplies, smart measuring, and a finished result that makes guests say, “Where did you buy those?” while you casually pretend not to be proud.
Whether you want a warm wood look, a faux copper finish, matte black modern rods, or industrial pipe-style hardware, this DIY curtain rod project can be customized for bedrooms, living rooms, rentals, offices, sunrooms, and awkward windows that refuse to cooperate with standard store sizes.
Why Make DIY Curtain Rods?
DIY curtain rods are popular for three big reasons: cost, customization, and style. Store-bought rods are convenient, but they often become expensive when you need extra length, multiple windows, heavy-duty hardware, or decorative finials. Making your own set allows you to control the length, color, diameter, and overall look.
A homemade curtain rod is also useful for wide windows, paired windows, or rooms where several rods must match. Instead of hunting through three stores for the same finish in different lengths, you can build every rod from the same material and paint them together. It is oddly satisfying, like meal prepping, but for windows.
Best Materials for Homemade Curtain Rods
Wooden Dowels
Wooden dowels are one of the easiest materials for DIY curtain rods. A 1-inch dowel works well for lightweight to medium-weight curtains, and it can be stained, painted, or spray-painted to imitate metal. Dowels are easy to cut with a hand saw or miter saw, and they pair nicely with wooden drawer knobs used as finials.
Electrical Conduit
Electrical metallic tubing, often called EMT conduit, is a favorite budget choice because it is lightweight, straight, inexpensive, and available in long lengths. It works especially well for wide windows because you can create a long rod without paying extra-long curtain rod prices. With primer and spray paint, conduit can look like black iron, brass, pewter, bronze, or copper.
Metal Pipe
Metal pipe is heavier and more industrial-looking. It is a great option for loft-style rooms, rustic spaces, and heavy drapes. Because pipe weighs more than wood or conduit, it requires stronger brackets and more careful anchoring. The reward is a rod that looks bold, substantial, and ready to outlive the sofa.
PVC or PVC Conduit
PVC is lightweight, affordable, and simple to cut. It is not the best choice for very heavy curtains, but it can work beautifully for decorative panels, sheers, or lightweight cotton curtains. Once painted, PVC can look surprisingly polished. The trick is to use a paint formulated to bond with plastic or to prime it first.
Tools and Supplies You’ll Need
For a basic wooden dowel curtain rod, gather a 1-inch wooden dowel, two wooden drawer knobs or finials, sandpaper, a saw, measuring tape, pencil, contact adhesive or wood glue, curtain rod brackets, screws, wall anchors, a drill, a level, primer, spray paint or stain, and curtain rings if needed.
For a conduit or pipe version, you will need the rod material, end caps or finials, pipe cutter or hacksaw, sanding block or metal file, degreaser or rubbing alcohol, primer, spray paint, mounting brackets, screws, anchors, drill, level, and measuring tape.
Do not skip the level. A crooked curtain rod is one of those tiny home details that slowly starts talking to you every time you enter the room. “Look at me,” it whispers. “I am tilted.” Save yourself.
Step 1: Measure the Window Correctly
Start by measuring the width of the window, including the outside edges of the trim. For a fuller, more designer-style look, extend the rod beyond the window frame. A common rule is to add 4 to 6 inches beyond the frame on each side, or even more for wide windows and thick curtain panels. This allows the curtains to stack outside the glass when open, which lets in more daylight and makes the window look larger.
Next, decide how high to mount the rod. Many decorators recommend placing the rod 4 to 6 inches above the window frame, or closer to the ceiling when the room allows. Hanging curtains higher can make ceilings feel taller and the room look more polished. Just make sure your curtain panels are long enough to touch, skim, or nearly kiss the floor.
Measure twice, write the numbers down, and then measure again because windows enjoy causing drama. If you are installing multiple rods in the same room, check each window individually. Even windows that look identical can be slightly different.
Step 2: Choose the Rod Length
Your DIY curtain rod should be long enough to cover the window and extend past the frame. For example, if your window is 48 inches wide and you want the rod to extend 6 inches on each side, cut the rod to about 60 inches before adding finials. If your finials are large, consider how much visual length they add.
For very wide windows, add a center support bracket. As a general rule, rods wider than about 4 feet benefit from a middle bracket, especially if the curtains are lined, blackout, velvet, or otherwise heavier than a polite summer breeze.
Step 3: Cut the Rod
For wood, mark the dowel with a pencil and cut it using a hand saw, circular saw, or miter saw. Sand the cut ends until they are smooth. For conduit or metal pipe, use a pipe cutter or hacksaw, then smooth sharp edges with a file. For PVC, use a PVC cutter or fine-tooth saw.
Cut slowly and keep the end as square as possible. A clean cut makes the finials or end caps sit neatly. If the end is a little imperfect, do not panic. That is what finials, paint, and strategic confidence are for.
Step 4: Add Finials or End Caps
Finials are the decorative ends of the curtain rod. They keep curtain rings from sliding off and make the whole project look intentional instead of “I found a stick and believed in it.”
For wooden rods, wooden drawer knobs are an easy finial solution. Choose knobs slightly larger than the rod diameter. Apply strong adhesive to the end of the dowel and the back of the knob, press them together, and let the glue cure according to the product instructions. If the knob has a screw, you can also drill a pilot hole into the dowel and screw it in for extra strength.
For conduit or pipe rods, use matching end caps, cabinet knobs, corks, wood balls, or threaded pipe fittings depending on the style. Spray-painting all pieces together creates a unified finish.
Step 5: Prep the Surface
Before painting, clean the rod. Wood should be sanded smooth and wiped free of dust. Metal conduit or pipe should be cleaned with rubbing alcohol or a degreaser to remove oil and residue. PVC should be lightly scuffed with fine sandpaper so primer can grip the surface.
This step is not glamorous, but it matters. Paint sticks better to clean, dull surfaces than to dust, grease, and wishful thinking.
Step 6: Paint, Stain, or Finish the Rod
Now comes the fun part. For a classic look, stain a wooden dowel and seal it with clear polyurethane. For a modern look, use matte black spray paint. For a warm metallic finish, use brass, bronze, or copper spray paint. For a softer farmhouse style, paint the rod white, cream, or muted gray.
Use thin, even coats rather than one heavy coat. Heavy spray paint can drip, bubble, or create a texture best described as “sad orange peel.” Let each coat dry before applying the next. Paint the brackets and finials at the same time if you want everything to match.
Step 7: Mark the Bracket Placement
Hold the bracket in place at your measured height and width. Mark the screw holes with a pencil. Use a level to make sure the brackets line up. For multiple windows in the same room, create a cardboard template so each bracket lands in the same place. This saves time and helps the whole room look professionally finished.
If you can drill into wall studs, do it. Studs provide the strongest support. If the bracket locations do not line up with studs, use wall anchors rated for the weight of your rod and curtains. Heavy curtains need stronger anchors than lightweight sheers.
Step 8: Drill Pilot Holes and Install Anchors
Drill pilot holes at the pencil marks. Pilot holes help prevent cracking and make screws easier to drive. If you are using drywall anchors, choose the correct drill bit size from the anchor package. Insert the anchors so they sit flush with the wall, then attach the brackets with screws.
Do not hammer random screws directly into drywall and hope for the best. Drywall is not a motivational speaker; it will not rise to the occasion. Use the proper anchors.
Step 9: Hang the Curtains
Slide your curtains, rings, clips, or grommets onto the rod. Place the rod onto the brackets and tighten any set screws if your brackets include them. Step back and check the height, width, and overall balance. Adjust the panels so the fabric falls evenly.
For the most tailored look, curtains should skim the floor, lightly touch it, or puddle slightly if that is your chosen style. Short curtains can work in kitchens and bathrooms, but in living rooms and bedrooms, floor-length curtains usually look more finished.
Design Ideas for DIY Curtain Rods
Faux Copper Curtain Rod
Use a wooden dowel or metal conduit and paint it with copper spray paint. Pair it with white linen curtains, green velvet panels, or warm neutral drapes. Copper adds character without feeling too flashy.
Matte Black Modern Rod
Paint conduit or pipe matte black for a clean, contemporary look. This finish works with almost any curtain color and looks especially sharp against white walls.
Natural Wood Curtain Rod
Stain a wooden dowel in walnut, oak, or maple tones. This is perfect for Scandinavian, rustic, coastal, or organic modern interiors.
Industrial Pipe Rod
Use black steel pipe, elbows, and flanges for a dramatic industrial rod. Mount the flanges directly to the wall and thread the rod between them. This option is sturdy, stylish, and slightly “converted warehouse,” even if the room is mostly laundry baskets.
Common Mistakes to Avoid
The first mistake is making the rod too narrow. When the rod ends at the window frame, curtains block light even when open. Extend the rod wider to create a brighter, larger-looking window.
The second mistake is mounting the rod too low. Low rods can make the ceiling feel shorter. Hanging the rod higher helps draw the eye upward and gives the room a more finished look.
The third mistake is using weak anchors. A beautiful rod is not very beautiful when it is lying on the floor with two chunks of drywall still attached. Match the anchors to the wall type and curtain weight.
The fourth mistake is ignoring curtain weight. A thin PVC rod may be fine for sheers, but it can sag under lined blackout curtains. Heavy panels need a thicker rod, strong brackets, and often a center support.
How Much Do DIY Curtain Rods Cost?
The cost depends on your material. A wooden dowel rod with basic brackets and painted drawer-knob finials can be very affordable. Conduit rods are also budget-friendly, especially for wide windows. Pipe rods cost more but provide a sturdy, high-impact style. In many cases, DIY rods are cheaper than buying decorative rods, especially when you are outfitting several windows at once.
The biggest savings usually appear when you need custom lengths. Store-bought rods can jump in price as they get longer. A DIY version lets you buy long materials and cut them to the exact size.
Safety and Practical Tips
Wear eye protection when cutting wood, metal, or PVC. Work in a ventilated area when spray-painting. Let painted rods cure fully before sliding curtain rings across the finish. If you are installing rods above your head, use a stable ladder and avoid balancing on furniture unless you enjoy making emergency room small talk.
For children’s rooms, keep cords, tiebacks, and long fabric out of unsafe reach. If the curtains will be opened and closed daily, choose rings or grommets that glide easily. A rod that looks good but fights you every morning is not a design feature; it is a tiny domestic feud.
of Real-Life DIY Curtain Rod Experience
The best thing about making your own curtain rods is that the project teaches you how much visual power lives in small details. A room can have nice paint, decent furniture, and a respectable rug, but if the curtains are hanging too low on a flimsy rod, the whole space can look unfinished. Once you install a rod higher and wider, the window suddenly looks intentional. The ceiling feels taller. The curtains look more expensive. The room stops wearing sweatpants.
In real DIY experience, the measuring stage is where most people either win the project or quietly create tomorrow’s problem. It is tempting to hold the rod up, squint, and say, “That looks about right.” Sometimes that works. More often, one bracket ends up higher than the other, and then you spend the evening discovering how visible a quarter inch can be. A cardboard template is a simple trick that makes a big difference. Cut a piece of cardboard to the bracket position, mark the screw holes, and use the same template on each side of the window. It feels almost too easy, which is how good hacks should feel.
Painting is another area where patience pays. Spray paint can make a $6 piece of conduit look like a boutique metal rod, but only if you apply light coats. The first coat may look patchy. That is normal. Do not keep spraying until it looks perfect while wet. That is how drips happen. Let it dry, add another coat, and slowly build the finish. Metallic paints especially look better with restraint. Think “elegant hardware,” not “robot banana.”
One practical lesson: curtain weight matters more than beginners expect. Lightweight sheers can hang from almost anything. Blackout curtains, lined linen panels, and velvet drapes are heavier and less forgiving. If the rod is long, add a center bracket. If the wall is drywall, use anchors. If you can hit a stud, celebrate quietly and use it. A strong installation is invisible when done right, but very visible when done wrong.
Another real-world tip is to hang the curtains before judging the rod. A bare rod may look too high or too wide at first, especially if you are used to seeing rods installed close to the window trim. Once the fabric is up, the proportions usually make sense. The curtains soften the wall, frame the window, and make the extra width look deliberate.
DIY curtain rods are also a great confidence-building project. They are not complicated, but they involve enough skills to make you feel handy: measuring, cutting, sanding, painting, drilling, anchoring, and styling. By the end, you have something useful, visible, and custom. Best of all, every time someone compliments the curtains, you get to say, “Thanks, I made the rods,” which is basically the homeowner version of a mic drop.
Conclusion
Making your own DIY curtain rods is one of the smartest upgrades for anyone who wants custom style without custom prices. With a wooden dowel, conduit, pipe, or PVC, you can create rods that fit your exact window size and match your room’s personality. The secret is not complicated: measure carefully, extend the rod beyond the window, mount it high enough to flatter the room, use strong brackets and anchors, and finish the rod with paint or stain that looks intentional.
Whether you choose a faux copper dowel, a matte black conduit rod, a natural wood finish, or an industrial pipe design, homemade curtain rods can turn plain windows into polished focal points. Your curtains get better support, your room gets better proportions, and your wallet gets to keep a little dignity. That is a DIY win worth hanging onto.
Note: This publish-ready article is original, fully rewritten, and based on practical home-improvement guidance synthesized from reputable U.S. DIY and décor resources. Source links and citation markers have been intentionally excluded from the HTML body for clean web publishing.