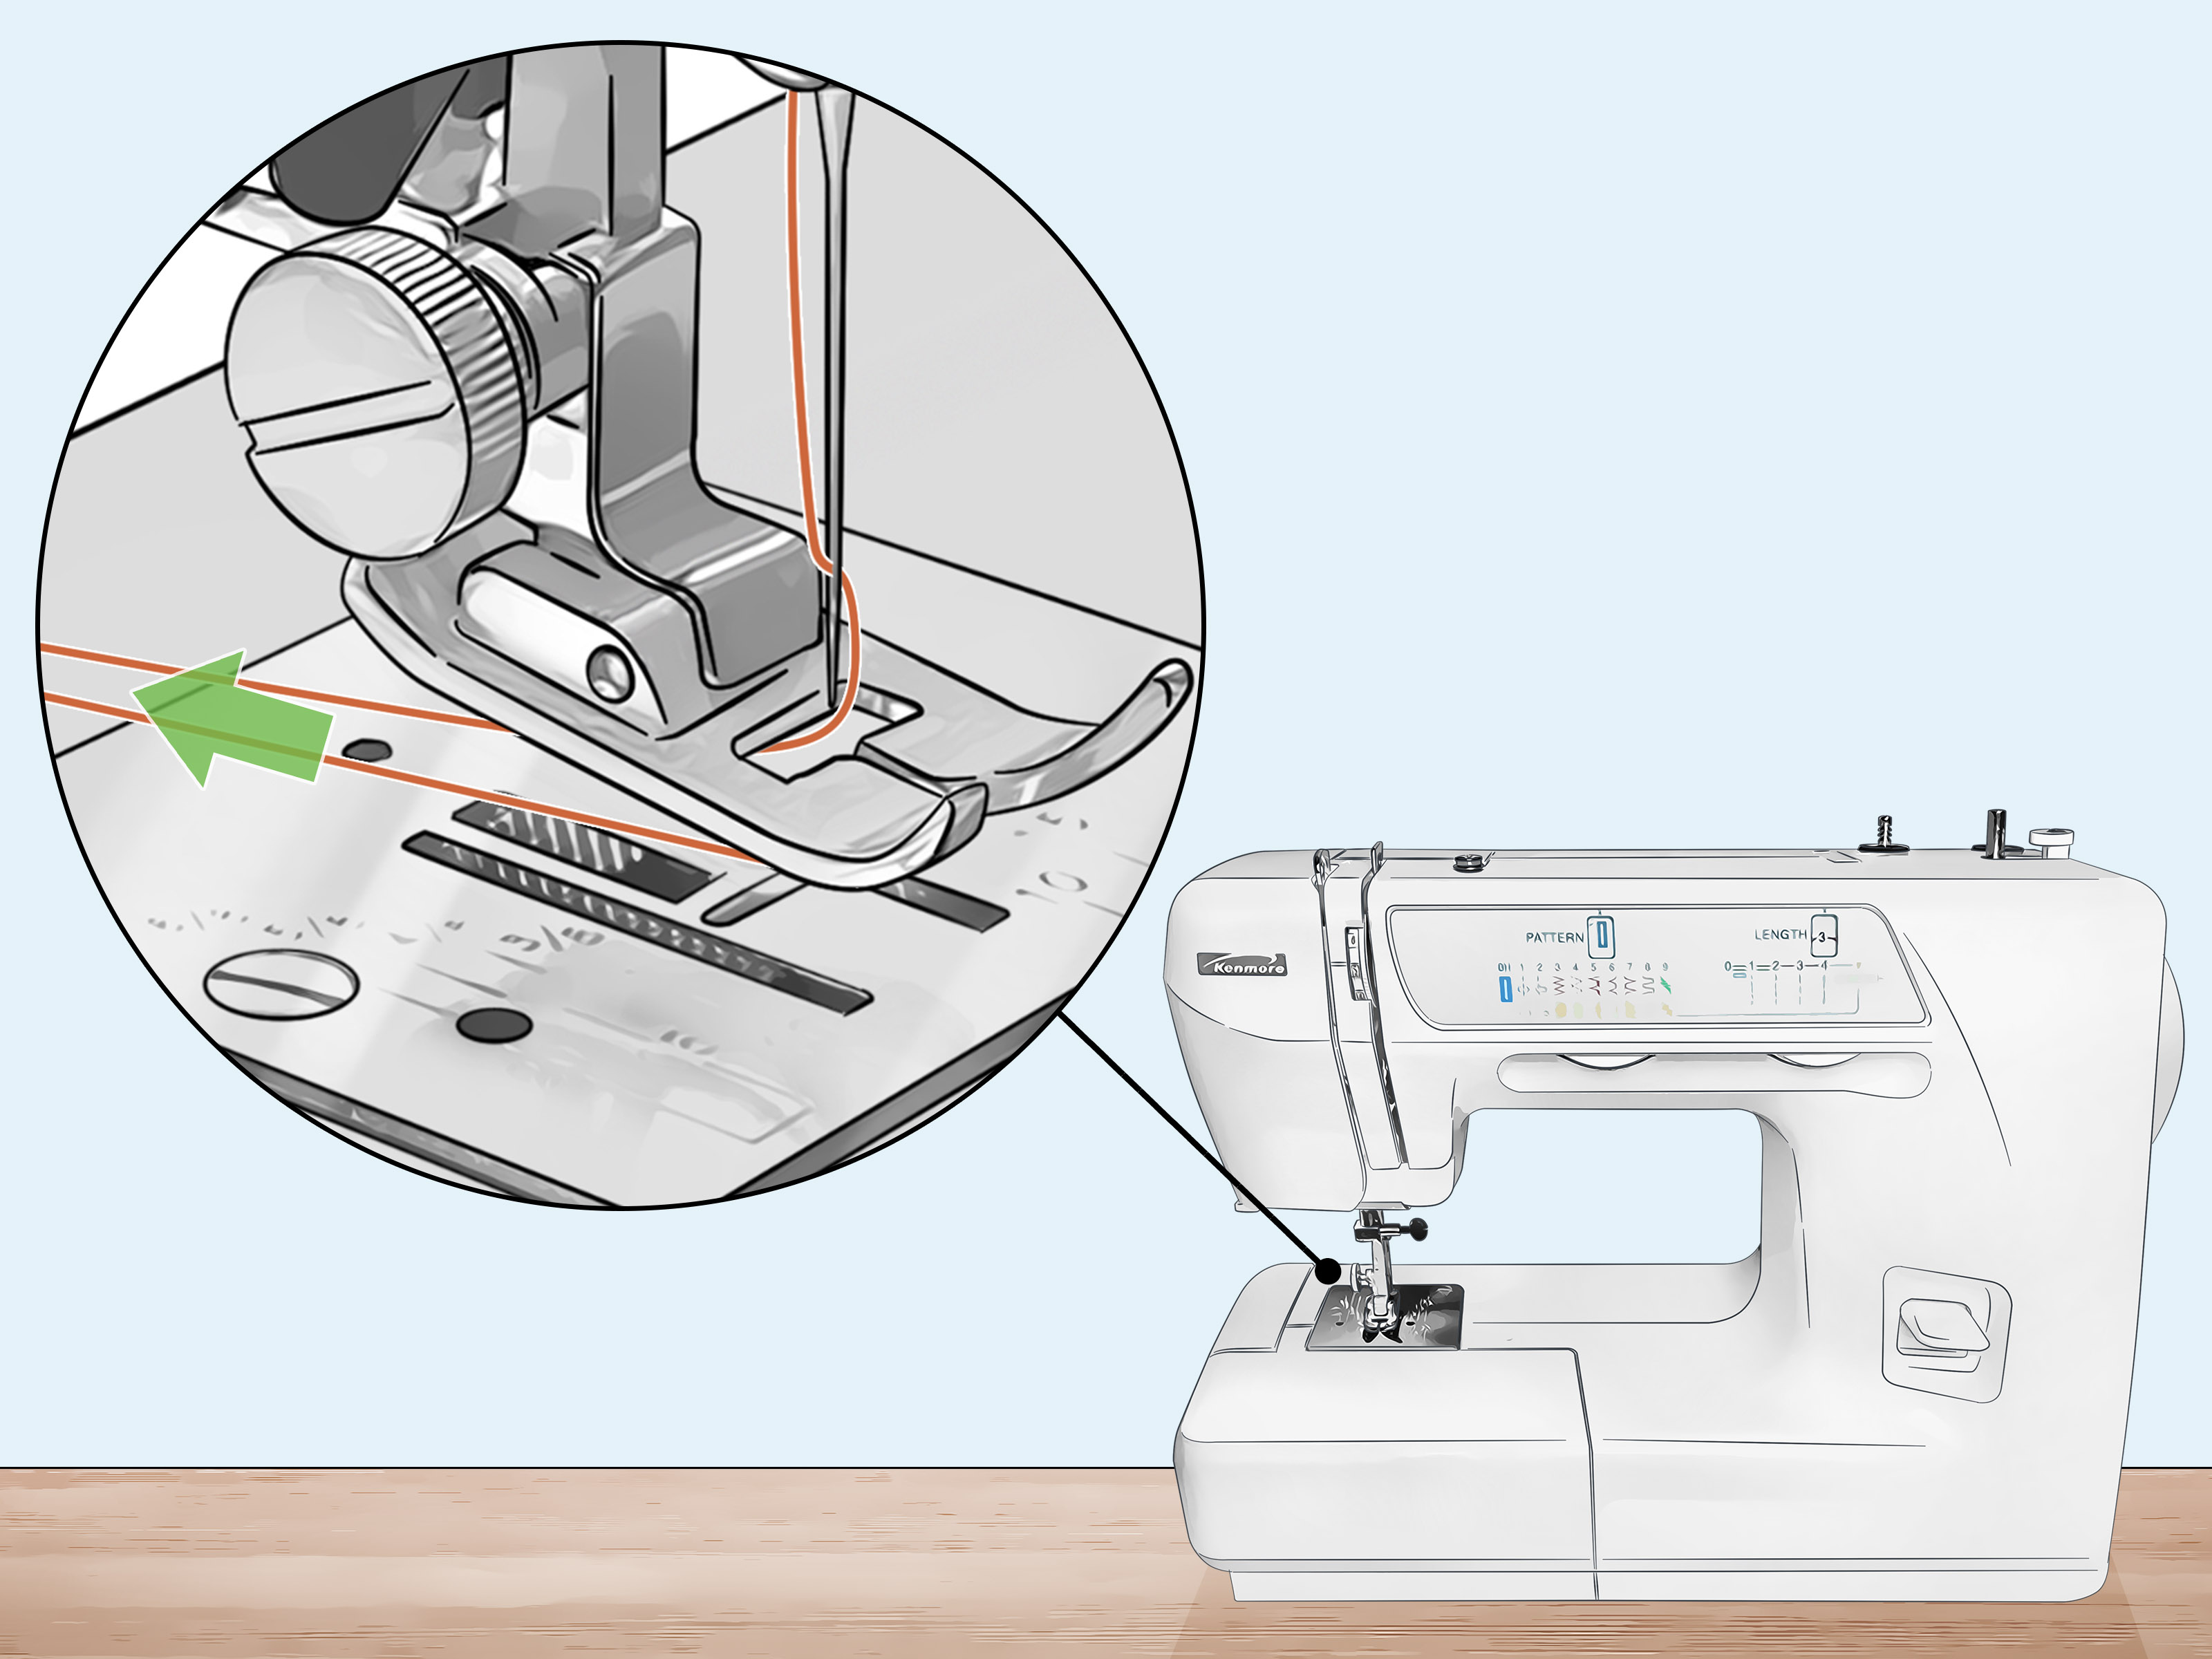
Note: Kenmore sewing machines vary by model, especially between vintage front-loading machines and newer drop-in bobbin models. The steps below follow the threading path used on many common Kenmore mechanical and computerized machines, but your exact model manual should always be the final referee. Sewing machines are charming little divas; they like things done their way.
Learning how to thread a Kenmore sewing machine is one of those skills that feels mysterious for about ten minutes and then suddenly becomes as normal as tying your shoes. The first time, however, it can look like you are guiding thread through a tiny obstacle course designed by a very organized spider. There is a spool pin, a thread guide, a tension area, a take-up lever, a needle bar guide, a needle eye, a bobbin, and possibly a small voice in your head asking, “Am I doing this backward?”
The good news is that most Kenmore machines follow a logical threading route. Once you understand the order, the process becomes simple: wind the bobbin, place the bobbin correctly, thread the upper machine, bring up the bobbin thread, and test your stitches. Whether you have a Kenmore 385, a vintage Kenmore 158, or another popular model, the basic principles are similar. This guide walks you through the process in a clear, practical, and slightly less intimidating way.
Before you begin, remember this golden rule: a sewing machine must be threaded with the presser foot raised and the needle in its highest position. This opens the tension discs and positions the take-up lever where it can actually catch the thread. Skip that step and your Kenmore may reward you with thread nests, skipped stitches, or a dramatic clunk that makes everyone in the room look over.
What You Need Before Threading a Kenmore Sewing Machine
Before threading, gather a few basic supplies. You do not need a professional sewing studio, a fancy chair, or a cat judging your fabric choices from the table, though many sewing rooms seem to include at least one of those things.
Basic Supplies
- A spool of quality all-purpose sewing thread
- A compatible Kenmore bobbin
- A fresh or properly installed needle
- Sharp scissors or thread snips
- A scrap piece of fabric for testing
- Your Kenmore sewing machine manual, if available
Use the correct bobbin type for your machine. Many Kenmore machines use Class 15 bobbins, but not all of them do. Some models require specific metal or plastic bobbins. Using the wrong bobbin may seem harmless, but it can cause uneven stitches, bobbin case problems, thread jams, and enough frustration to make you consider hand-sewing a king-size quilt out of pure stubbornness.
Step 1: Turn Off the Machine and Raise the Needle
Safety first. Turn off your Kenmore sewing machine before threading. This prevents accidental stitching while your fingers are near the needle. Next, turn the handwheel toward you until the needle reaches its highest point. On most Kenmore machines, you should always turn the handwheel toward yourself, not away from yourself, because turning it backward can interfere with stitch formation.
Raise the presser foot lever. This step matters more than beginners realize. When the presser foot is up, the tension discs open so the thread can slide fully between them. If the presser foot is down while threading, the thread may sit outside the tension discs, which leads to loose stitches, loops on the underside of the fabric, or a machine that behaves like it just woke up cranky from a nap.
Step 2: Place the Thread Spool on the Spool Pin
Put your thread spool on the spool pin. Depending on your Kenmore model, the spool pin may stand vertically or lie horizontally. If your machine uses a horizontal spool pin, add the spool cap if your model includes one. The thread should unwind smoothly without jerking, catching, or twisting around the pin.
If your thread keeps snagging, inspect the spool for a rough notch. Some thread spools have a small slit used to hold the thread end. That slit is helpful during storage but annoying during sewing if the thread catches on it. Turn the spool around or use a spool cap to help the thread feed smoothly.
Step 3: Wind the Bobbin Correctly
The bobbin supplies the lower thread. A well-wound bobbin is firm, even, and smooth. A poorly wound bobbin looks like a tiny bird tried to build a nest during a windstorm. Guess which one your sewing machine prefers?
To wind the bobbin, guide the thread from the spool through the bobbin winding tension guide or disc. On many Kenmore models, this guide is located on top of the machine. Then pass the thread through a small hole in the bobbin from the inside to the outside, place the bobbin on the bobbin winder spindle, and push the spindle toward the bobbin stopper. Hold the thread tail gently and start winding.
After a few turns, stop and trim the thread tail close to the bobbin. Continue winding until the bobbin is filled evenly. Do not overfill it. A bobbin that is too full may not rotate properly inside the case. Once the bobbin is full, cut the thread, push the bobbin winder back to its normal position, and remove the bobbin.
Step 4: Insert the Bobbin
This is where Kenmore machines differ most. Some models have a front-loading bobbin case, while others have a top-loading drop-in bobbin. Check your machine style before continuing.
For Front-Loading Kenmore Machines
Open the shuttle cover and remove the bobbin case. Hold the bobbin so the thread unwinds in the direction shown in your manual. In many front-loading Kenmore machines, the bobbin is placed into the case so the thread pulls off smoothly and passes through the slot under the tension spring. Pull out about three to four inches of thread.
Hold the bobbin case by its latch and insert it into the shuttle until it clicks into place. That click is important. If the bobbin case is not seated correctly, the machine may jam, rattle, or refuse to pick up the bobbin thread.
For Top-Loading Kenmore Machines
Remove the bobbin cover plate. Drop the bobbin into the bobbin holder in the direction shown by the diagram on the machine. Many drop-in systems require the thread to travel through a front slot and then along a guide path so it enters the bobbin tension area correctly. Leave several inches of thread available, then replace the clear bobbin cover if your model uses one.
Do not skip the bobbin tension slot. If the bobbin thread is not seated in that tiny groove, your stitches may look loose, uneven, or loopy underneath. It is a small step with a big personality.
Step 5: Thread the Upper Part of the Kenmore Machine
Now it is time to thread the upper machine. Keep the presser foot raised and the needle at its highest position. Pull the thread from the spool and guide it through the upper thread guide. On many Kenmore machines, this first guide is a small metal hook or channel near the top of the machine.
Next, bring the thread down through the right side of the threading channel and into the tension area. Pull it around the check spring or tension guide, then bring it back up on the left side toward the take-up lever. The take-up lever is the moving metal arm that rises and falls as the machine sews. It must be threaded correctly, usually from right to left.
After the thread passes through the take-up lever, bring it down again toward the needle. Slide the thread behind the needle bar thread guide. This small guide keeps the thread aligned as it enters the needle. Finally, thread the needle from front to back on most Kenmore models. If the thread end is fuzzy, trim it with sharp scissors before trying again. A clean thread end is the difference between “easy” and “why is this thread suddenly made of spaghetti?”
Step 6: Bring Up the Bobbin Thread
Once the upper thread and bobbin are in place, you need to bring the bobbin thread up through the needle plate. Hold the upper thread lightly with your left hand. With your right hand, turn the handwheel toward you one complete turn. The needle will go down and come back up, catching the bobbin thread along the way.
Gently pull the upper thread. A loop of bobbin thread should appear through the needle plate. Use a small tool, scissors tip, or your fingers to pull the bobbin thread fully upward. Then pull both the upper and bobbin threads under the presser foot and toward the back of the machine. Leave about four to six inches of thread tail.
This thread tail helps prevent the machine from pulling thread back into the needle area when you begin sewing. If the threads are too short, the needle may unthread itself after the first stitch, which is the sewing-machine version of walking out of the room mid-conversation.
Step 7: Test the Threading on Scrap Fabric
Never test new threading on your real project first. Use a scrap piece of fabric similar to your project fabric. Select a straight stitch, lower the presser foot, hold the thread tails gently for the first few stitches, and sew a short line.
Check the stitches on both sides. Balanced stitches should look even, with the upper and bobbin threads meeting neatly inside the fabric layers. If loops appear on the underside, the upper thread may not be seated in the tension discs. If loops appear on top, the bobbin may not be threaded correctly or the bobbin tension path may have been missed.
Common Threading Mistakes on Kenmore Sewing Machines
Threading problems are common, especially if you are new to sewing or returning to a machine after years away. The machine is not broken just because it protests. Sometimes it simply wants you to redo the threading path with the presser foot raised.
Threading With the Presser Foot Down
This is probably the most common mistake. When the presser foot is down, the tension discs are closed. The thread cannot settle into the tension mechanism properly, so the machine may create loose, loopy stitches.
Missing the Take-Up Lever
If the take-up lever is not threaded, the machine may stitch for a moment and then jam or break thread. Always make sure the lever is at the top and the thread passes fully through it.
Using the Wrong Bobbin
A bobbin that almost fits is not the same as a bobbin that fits. Kenmore machines can be particular about bobbin size and style. Use the bobbin type recommended for your model.
Threading the Needle From the Wrong Direction
Most Kenmore machines are threaded from front to back, but some vintage machines may vary. If your machine refuses to pick up the bobbin thread, confirm the needle threading direction in your manual.
Forgetting to Raise the Bobbin Thread
If the bobbin thread is not brought up before sewing, the machine may tangle at the start. Pull both threads under the presser foot and toward the back before beginning.
Troubleshooting: Why Your Kenmore Machine Will Not Sew After Threading
If your Kenmore sewing machine is threaded but still misbehaving, do not panic. Sewing machines are mechanical, not magical, even if they sometimes sound like they are casting spells under the needle plate.
The Thread Keeps Breaking
Check for a dull or bent needle, rough thread, incorrect threading, or tension that is too tight. Also inspect the needle plate and bobbin area for burrs or lint buildup. Cheap thread can also break easily, especially on older machines with metal guides.
The Machine Skips Stitches
Skipped stitches often happen when the needle is inserted incorrectly, the needle is dull, the machine is threaded wrong, or the fabric and needle are not a good match. For knit fabric, use a ballpoint or stretch needle. For denim, use a denim needle. The needle is small, but it has strong opinions.
The Bobbin Thread Will Not Come Up
Make sure the needle is threaded correctly, the bobbin is inserted in the correct direction, the bobbin case is seated properly, and the bobbin thread tail is long enough. Turn the handwheel toward you while gently holding the upper thread.
There Are Loops Under the Fabric
Loops underneath usually point to an upper threading issue. Rethread the top of the machine with the presser foot raised. Make sure the thread passes through the tension area and take-up lever.
The Fabric Will Not Move
Check that the feed dogs are raised and the stitch length is not set to zero. Also confirm that the presser foot is lowered before sewing. A machine cannot feed fabric properly if the presser foot is floating in the air like it is on vacation.
Best Threading Tips for Kenmore Beginners
Threading gets easier with repetition. The first few times, move slowly and follow the guides printed on the machine or shown in your manual. Many Kenmore models include small arrows or numbered threading diagrams. These markings are not decoration; they are tiny road signs for your thread.
- Always thread with the presser foot raised.
- Always turn the handwheel toward you.
- Use a fresh needle when troubleshooting.
- Match the needle size to the fabric.
- Use good-quality thread for smoother feeding.
- Clean lint from the bobbin area regularly.
- Test on scrap fabric before sewing your project.
If you are using an older Kenmore machine, give it a little extra patience. Vintage Kenmore sewing machines are known for being sturdy and reliable, but they may need cleaning, oiling, or a new needle before they perform well. A machine that has been sitting in a closet for ten years may not wake up ready to hem curtains at full speed.
How to Thread a Kenmore Sewing Machine for Different Projects
The basic threading path stays the same, but your setup may change depending on the project. For lightweight cotton, all-purpose polyester thread and a universal needle usually work well. For denim, canvas, or upholstery fabric, use a heavier needle and stronger thread. For knits, choose a stretch or ballpoint needle to reduce skipped stitches.
If you are topstitching, use a longer stitch length and test tension first. If you are sewing delicate fabric, reduce speed and use a fine needle. The threading path is only one part of the equation; the needle, thread, tension, and fabric all work together. Think of them as a tiny sewing band. If one musician plays out of tune, everyone notices.
Experience Section: Real Lessons From Threading a Kenmore Sewing Machine
The first practical lesson about threading a Kenmore sewing machine is this: most threading “problems” are not actually machine problems. They are sequence problems. A Kenmore machine wants the steps in the correct order. Raise the presser foot, raise the needle, guide the thread through the upper guide, seat it in the tension area, catch the take-up lever, pass the needle bar guide, thread the needle, then bring up the bobbin thread. When you follow that order, the machine usually behaves beautifully. When you skip around, the machine starts creating modern art with thread.
One common experience is the mysterious thread nest under the fabric. Many beginners assume the bobbin is the villain because the mess appears underneath. In reality, the upper thread is often the problem. If the upper thread misses the tension discs or take-up lever, it cannot control the stitch properly. The result is a pile of loops under the fabric that looks like a tiny bowl of noodles. The fix is simple: remove the fabric, cut the tangled thread carefully, lift the presser foot, and rethread the upper path from the beginning.
Another lesson is that the bobbin must be wound evenly. A loosely wound bobbin may sew for a few inches and then suddenly cause uneven tension. If the bobbin looks lumpy or soft, rewind it. Do not try to “use it up” just because there is thread on it. Sewing machines are not impressed by thrift when the bobbin is wobbling around like a wheel on a shopping cart.
It also helps to develop a small pre-sewing ritual. Before starting any project, check the needle, thread path, bobbin direction, stitch setting, and thread tails. This takes less than a minute and prevents many headaches. On Kenmore machines, especially older mechanical models, the handwheel test is useful. After threading, turn the handwheel slowly toward you and watch the needle pick up the bobbin thread. If it catches smoothly, you are probably ready to sew. If it does not, something is off, and it is better to discover that before your fabric is under the presser foot.
Many sewers also learn that speed is not your friend at the beginning. When testing a freshly threaded Kenmore machine, sew slowly for the first few inches. Hold both thread tails gently behind the presser foot, then let go once the stitches are established. This prevents the thread from being pulled into the bobbin area. Once the stitch line looks balanced, you can increase speed. Your machine may be capable of racing, but your first seam does not need to qualify for the Indianapolis 500.
Finally, the best experience-based advice is to stop and rethread whenever the machine acts strange. Do not keep sewing through skipped stitches, thread loops, or snapping thread. A complete rethread often solves the issue faster than adjusting tension dials, changing stitch settings, or glaring at the machine with deep emotional disappointment. Kenmore sewing machines are dependable, but they reward clean threading, correct bobbins, and patient setup. Once you learn the rhythm, threading becomes less of a chore and more of a quick handshake with your machine before the real sewing begins.
Conclusion
Threading a Kenmore sewing machine is not difficult once you understand the path. Start with the machine turned off, raise the presser foot, raise the needle, wind and insert the bobbin properly, thread the upper machine through each guide, bring up the bobbin thread, and test on scrap fabric. The process may feel detailed at first, but each step has a purpose.
The biggest secret is consistency. Thread your Kenmore the same careful way every time, and you will avoid most beginner problems. When stitches go wrong, return to the basics: needle, thread, bobbin, tension path, and presser foot position. Sewing is much more fun when the machine is not eating thread for breakfast.