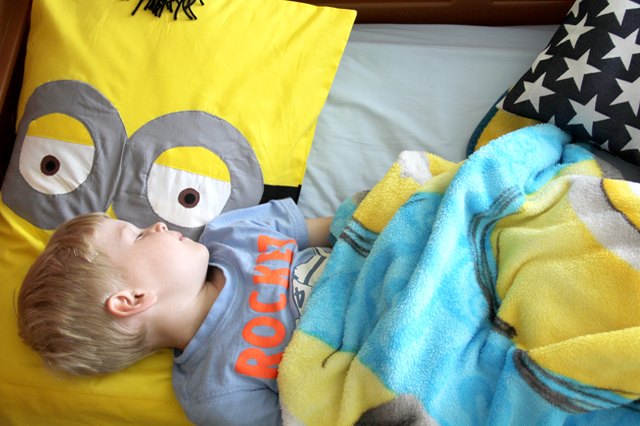
A handmade Minion pillowcase can brighten a child’s room before anyone even turns on the light. It is cheerful, practical, beginner-friendly, and just mischievous enough to look as though it might whisper “banana” after bedtime. Better yet, the design is built from rectangles, circles, strips, and simple curved lines. You do not need advanced pattern-making skills or a sewing machine with its own engineering degree.
This tutorial shows how to sew a standard-size Minion-inspired pillowcase from washable cotton. The finished case has a yellow body, flat goggle-and-eye appliqué, optional facial details, and a clean folded cuff. The same construction works for a one-eyed or two-eyed character.
Why This Is a Good Beginner Sewing Project
Most pillowcase construction uses straight seams, which is why sewing educators commonly recommend pillowcases as learn-to-sew projects. Decorative appliqué can then be added as the maker gains confidence.
The Minion face is forgiving. An eye that sits slightly off center does not ruin the project; it simply gives the character more enthusiasm. The real goals are secure stitching, a comfortable sleeping surface, and enough room for the pillow.
Finished Size and Fabric Plan
For a standard U.S. bed pillow, cut two yellow cotton rectangles measuring 31 inches by 21 inches. After sewing the seams and cuff, the case will fit a typical standard pillow. A published Minion pillowcase pattern uses these same body dimensions with a 1/2-inch construction seam.
Measure your pillow before cutting. Add about 1 inch to the width of both pieces for an unusually plump insert. For a longer queen or king pillow, extend the pattern according to the actual pillow length while preserving the seam and cuff allowances.
Materials and Tools
- 1 yard of yellow quilting cotton, at least 42 inches wide
- 1/4 yard of gray cotton for the goggles
- 1/8 yard of black cotton for the strap, pupils, mouth, and hair
- One white fat quarter for the eye or eyes
- Brown fabric scraps for the irises
- Lightweight paper-backed fusible web
- Coordinating all-purpose thread
- Sewing machine with a universal needle
- Fabric scissors or a rotary cutter, ruler, and mat
- Iron, fabric marker, pins or clips, and a seam ripper
- Bowls, cups, or spools to use as circle templates
Beginner sewing kits typically contain the same essentials used here: measuring tools, marking pencils, pins, needles, thread, and scissors.
Choose Comfortable, Washable Fabric
Quilting cotton is easy to cut, press, and stitch, making it a practical choice for both the body and appliqué. Use soft, tightly woven fabric rather than stiff upholstery cloth. Prewash, dry, and press every washable fabric before cutting so the pieces shrink before assemblynot after the goggles have been carefully aligned.
How to Make a Minion Pillowcase Step by Step
1. Cut the Main Pieces
Cut two yellow rectangles, each 31 by 21 inches. Choose one short edge as the pillow opening and mark it lightly on the wrong side. Label one piece “front” and the other “back.” Press both pieces and square the corners.
2. Test the Face With Paper Templates
Lay the front rectangle right side up with the opening edge at the bottom. Make paper circles for the eye, iris, pupil, and goggle. A useful starting point is a 4-inch white eye, a 1- to 1 1/2-inch brown iris, a 1/2-inch black pupil, and a gray goggle ring about 7 inches across.
Place the eye area roughly 9 to 11 inches below the closed top edge. For two eyes, move the rings close enough that they nearly touch. Photograph the paper layout from above; a camera often reveals crooked placement before scissors make the decision permanent.
3. Sew the Black Goggle Strap
Cut one black strip measuring 3 by 21 inches. Fold each long edge 1/2 inch toward the wrong side and press, creating a finished strip about 2 inches tall. Center it horizontally behind the planned eye position, then topstitch close to both folded edges.
4. Assemble the Eye Appliqué
Cut the white eye circle or circles, the smaller brown irises, and the black pupils. Center each pupil on an iris and each iris on a white eye. A yellow half-circle may be layered over the top to create a sleepy eyelid.
Use fusible web or temporary fabric adhesive to hold the shapes. Stitch the smallest pieces first: pupil, iris, and eyelid. Appliqué guides recommend securing shapes before edge stitching; a close zigzag or blanket stitch can cover raw edges and reduce fraying.
Test the stitch on scraps. A short, medium-width zigzag usually works well, while an overly dense stitch may pucker thin cotton.
5. Add the Gray Goggle Ring
Cut a gray ring for each eye. The outer diameter should be about 7 inches, while the inner opening should be slightly smaller than the white eye so the ring overlaps its raw edge.
Place the eye over the black strap and position the gray ring on top. Fuse or baste the layers, then sew around both the inner and outer edges. Work slowly around curves. Stop with the needle down, lift the presser foot, rotate the fabric slightly, and continue.
6. Add the Mouth and Hair
Cut a simple black crescent for the mouth. Add a flat red tongue or white fabric teeth if desired, sewing every layer securely. For hair, use black fabric triangles or short satin-stitched lines near the closed top edge.
Keep details flat on a pillowcase intended for sleeping. Buttons, beads, thick knots, and loose yarn can feel uncomfortable against the face and may not tolerate repeated washing well.
7. Inspect and Press the Face
Check every appliqué edge and restitch any section that lifts when rubbed gently. Remove basting threads, trim thread tails, and press from the wrong side with a pressing cloth. Decorating the flat panel now is much easier than trying to maneuver a finished pillowcase around the machine.
8. Sew the Pillowcase Body
Place the front and back pieces right sides together. Pin the two long sides and the closed short edge, leaving the marked opening unsewn. Stitch those three sides with a 1/2-inch seam allowance and backstitch at both ends.
Finish the raw edges with a serger, zigzag stitch, or pinking shears. Beginner and one-yard pillowcase patterns commonly use straightforward seams with finished raw edges for a fast, durable result.
Clip excess fabric from the closed corners without cutting the stitches. Turn the case right side out, shape the corners gently, and press.
9. Form the Opening Cuff
Fold the open raw edge 1/2 inch toward the wrong side and press. Fold it inward again by 4 inches, enclosing the raw edge. Pin evenly and topstitch close to the inner fold, about 3 3/4 inches from the finished opening.
10. Check the Fit and Wash the Case
Insert the pillow and confirm that the case slides on without straining the seams. Remove the pillow and wash the case according to the fabric and fusible-web care instructions. The wash test confirms that the markings disappear, the appliqué remains secure, and the face stays smooth.
Easy Design Variations
- One-eyed Minion: Use one large centered eye for fewer curved seams.
- Blue overalls: Add a blue lower band and bib-shaped appliqué.
- Printed back: Use licensed character cotton on the back or inside cuff. U.S. craft retailers sell licensed character fabric for sewing projects.
- Hand appliqué: Turn a 1/4-inch allowance under and sew small stitches near the folded edge.
Common Problems and Quick Fixes
The Eye Fabric Puckers
Reduce stitch density, loosen the upper tension slightly, and use tear-away stabilizer behind the yellow panel. Guide the fabric gently instead of pulling it.
The Goggle Ring Looks Uneven
Fold the paper template into quarters to check symmetry before tracing. Trim fabric rings gradually rather than attempting one giant corrective snip.
The Pillowcase Is Too Tight
Measure the pillow’s thickness as well as its length and width. A lofty insert usually needs extra pattern width.
The Face Looks Crooked
Mark vertical and horizontal centerlines on the front panel. Rulers are less charming than instinct, but they are considerably better at geometry.
Care Instructions
Turn the pillowcase inside out before washing to reduce abrasion on the appliqué. Use a cycle appropriate for the chosen fabrics, avoid excessive dryer heat, and press from the wrong side. Repair loose stitching promptly; a ten-minute touch-up is better than discovering an escaped iris in the laundry.
Experience Notes: What Makers Usually Learn From This Project
The first surprise in making a Minion pillowcase is that the pillowcase itself is the easy part. Two rectangles, three seams, one cuffdone. The face is where time quietly disappears. A maker may begin at 2:00 p.m. thinking, “I will just add an eye,” and look up later surrounded by seven bowls, four gray rings, and a brown circle that has somehow attached itself to a sleeve.
The most useful experience-based lesson is to create the entire face in paper first. Paper templates allow you to test one eye versus two, move the goggles higher or lower, and decide whether the mouth looks cheerful or mildly alarmed. Photographing the layout with a phone is helpful because the camera often reveals crooked placement that the eye overlooks at close range.
Another common lesson is that fusible web is an assistant, not a substitute for stitching. It keeps circles from drifting and makes curved appliqué far less frustrating, but a pillowcase receives regular handling and washing. Sewing around every shape produces a cleaner, more durable result. The work also becomes easier when the smallest pieces are stitched first. Attach the pupil to the iris, the iris to the white eye, and only then place the completed eye beneath the gray ring.
Thread choice affects the personality of the project more than expected. Matching thread hides wobbles and gives the face a polished look. Contrasting black stitching creates a cartoon outline but announces every uneven turn. Beginners usually enjoy the project more when they use matching thread for the first version and save dramatic outlining for the sequel.
Curves teach patience. The smoothest goggle rings are rarely sewn at full speed. Experienced makers stop every inch or so with the needle lowered, raise the presser foot, rotate the fabric a few degrees, and continue. This rhythm feels slow for the first circle and surprisingly natural by the second. It is also why a two-eyed Minion can become an accidental sewing lesson disguised as bedroom décor.
Placement should account for comfort, not just appearance. A wonderfully detailed face can become annoying if thick seams, knots, buttons, or beads sit where a cheek rests. Flat cotton appliqué and well-trimmed thread tails make the pillowcase both cute and usable. Decorative yarn hair may be entertaining for a display cushion, but flat hair is usually the better decision for everyday bedding.
The cuff is another moment when practical experience helps. Pressing the first 1/2-inch fold before making the wider 4-inch fold produces a straighter opening and encloses the raw edge neatly. Skipping the iron may save two minutes and cost fifteen minutes of wrestling with a wandering hem. In sewing, the iron is not the glamorous member of the team, but it may be the one doing most of the quality control.
Finally, the finished pillowcase tends to be more forgiving than the construction process suggests. Small asymmetries add expression, and children often notice the bright yellow color and giant goggles long before they inspect stitch length. The best result is not a factory-perfect copy; it is a washable, comfortable pillowcase with secure seams and a face that makes someone grin. That is a respectable achievement for one yard of yellow cotton and an afternoon spent negotiating with circles.
Conclusion
Learning how to make a Minion pillowcase combines a basic sewing pattern with playful appliqué. Cut accurate yellow rectangles, assemble the eyes in layers, secure every raw edge, and finish the opening with a wide folded cuff. The pattern is simple enough for an ambitious beginner and flexible enough for one eye, two eyes, overalls, sleepy eyelids, or a spectacularly silly smile.
Note: This is a fan-inspired craft tutorial intended for personal creative use. For children’s bedding, keep decorative features flat, firmly stitched, and free from loose buttons, beads, or other small detachable pieces.