Decorative lanterns have a sneaky way of making a room feel warmer, cozier, and far more expensive than it actually is. Unfortunately, the prettiest store-bought versions can also make your wallet quietly back away from the checkout counter. The solution is hiding in an unexpected place: the picture-frame aisle at Dollar Tree.
With a handful of inexpensive frames, a reliable adhesive, paint, and a flameless candle, you can create stylish lanterns that look right at home on a mantel, dining table, entryway console, or covered porch. No power saw is required. No advanced woodworking skills are necessary. You will not even need to pretend you understand lumber dimensions.
This tutorial explains how to make two different Dollar Tree frame lanterns. The first is a streamlined black lantern with a modern industrial feel. The second is a white farmhouse lantern with faux windowpanes and a removable decorative lid. Both projects are beginner-friendly, easy to personalize, and designed for indoor decorative use.
Why Picture Frames Make Surprisingly Good Lanterns
A rectangular picture frame already has most of the features needed for a lantern wall. It is straight, lightweight, decorative, and fitted with a clear panel. Join four matching frames at their vertical edges, and they naturally form a box.
Using premade frames also eliminates the most intimidating parts of traditional lantern construction. You do not have to cut narrow strips of wood, build perfectly square corners, or install individual glass panes. The frames provide the structure while the glass or clear plastic inserts create the familiar lantern appearance.
Another advantage is flexibility. Dollar Tree frame styles and inventory can vary, but that simply gives you more design choices. Black frames create an industrial or contemporary look. Brown frames can resemble stained wood. White frames work beautifully with farmhouse, cottage, coastal, and wedding décor.
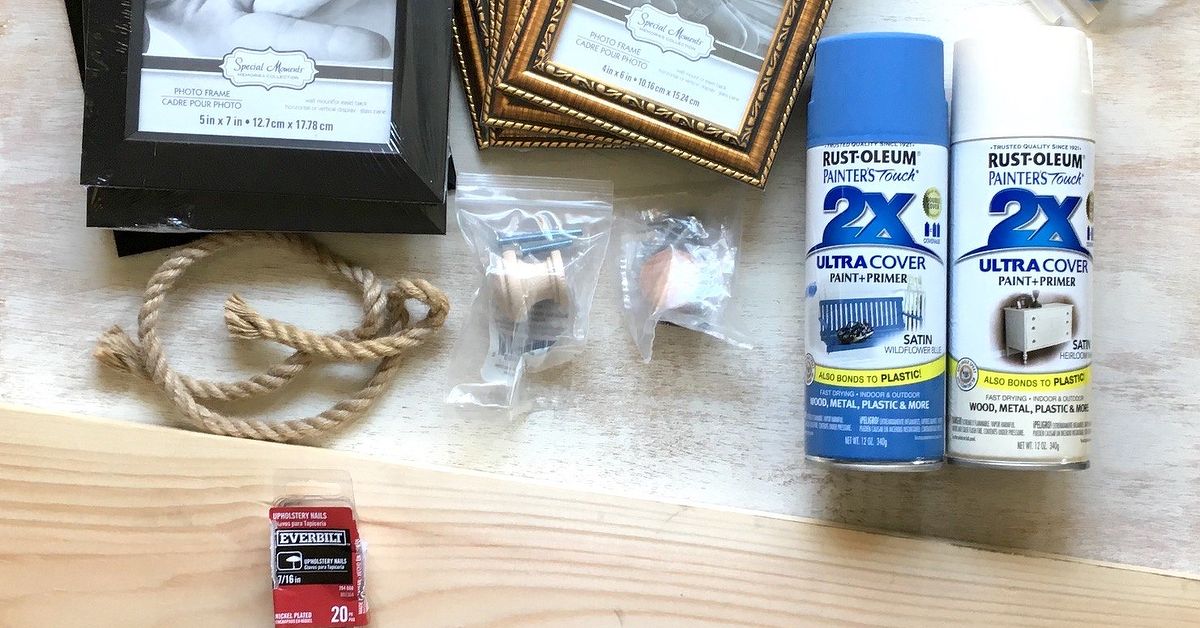
Supplies for Both Dollar Tree Frame Lanterns
You may already have several of these supplies in your craft cabinet. Choose four frames of the same size and design for each lantern so that the edges line up properly.
- Eight matching 5-by-7-inch picture frames, four per lantern
- Flameless LED candles or battery-operated fairy lights
- Hot glue gun and glue sticks
- Clear multipurpose craft adhesive, such as E6000
- Rubbing alcohol or glass cleaner
- Lint-free cloth or paper towels
- Painter’s tape
- Small paintbrush or foam brush
- Craft paint, chalk-style paint, or spray paint
- Fine-grit sandpaper
- Protective work gloves
- Drop cloth, cardboard, or kraft paper
For the farmhouse lantern, you will also need wooden craft sticks, a small wood plaque or sturdy foam-board base, several small wood blocks, and a short piece of rope or thick jute.
A Quick Word About Adhesive
Hot glue is convenient because it grabs quickly and allows you to continue assembling the project within minutes. However, it may release from very smooth glass, plastic, or glossy frame surfaces if the lantern is twisted or carried frequently.
A flexible multipurpose adhesive generally creates a more durable connection, but it requires patience. E6000 instructions recommend applying it to clean, dry surfaces and allowing at least 24 hours of curing time, with maximum strength potentially taking up to 72 hours.
For the best combination, use small dots of hot glue to hold the pieces in position and a thin line of multipurpose adhesive for long-term strength. Work in a well-ventilated area, follow the product label, and avoid applying so much adhesive that it squeezes across the visible surfaces.
Lantern One: Simple Black Dollar Tree Frame Lantern
This first design is the easiest of the two. Its clean black outline gives it the appearance of a miniature metal lantern, even though the structure is made from lightweight picture frames.
Additional Materials
- Four matching black frames
- One square wood plaque or thick craft-board base
- Black craft paint, if the base does not match
- Optional metal ring, drawer pull, or decorative finial
Step 1: Inspect and Prepare the Frames
Remove the cardboard backs, paper inserts, easel stands, hanging hardware, and loose tabs from all four frames. Set the glass or clear plastic panels aside carefully.
Before doing anything permanent, stand the empty frames upright and place their long edges together. Make sure they are equal in height and reasonably flat. Budget frames occasionally have tiny variations, so rotate them until you find the arrangement with the fewest gaps.
Step 2: Clean the Surfaces
Wipe the frame edges and clear panels to remove dust, fingerprints, and manufacturing residue. A little rubbing alcohol on a lint-free cloth works well on nonpainted bonding areas. Let everything dry completely before applying adhesive.
If the edges are extremely glossy, lightly scuff only the areas that will be glued. Do not sand the visible front unless you plan to repaint the entire lantern.
Step 3: Secure the Clear Panels
Return each glass or plastic panel to its frame. Apply tiny dots of hot glue along the hidden inner lip to prevent the panel from rattling. Use as little glue as possible. Large blobs can be seen through the front and tend to announce, “Yes, I was made during a craft night.”
Allow the glue to cool before moving the frames. If a panel is cracked or feels dangerously thin, replace it with clear craft plastic rather than using damaged glass.
Step 4: Join the Four Sides
Lay two frames face down with their long edges touching. Run a narrow line of multipurpose adhesive along one edge, then press the frames together at a 90-degree angle. Add two or three small dots of hot glue to hold the corner while the stronger adhesive cures.
Attach the third and fourth frames in the same manner. Finally, connect the first and fourth frames to close the box. Use painter’s tape around the lantern to keep the walls square while the adhesive sets.
Check the shape from above. The opening should resemble a square rather than a diamond that has recently received bad news. Make adjustments before the adhesive begins to firm up.
Step 5: Add the Base
Center the frame box on a square wood plaque or sturdy craft-board base. Mark the position lightly with a pencil, apply adhesive along the bottom frame edges, and return the lantern to the marked area.
Paint the base black before assembly if necessary. A slightly oversized base gives the lantern a finished silhouette and makes it more stable on a table or shelf.
Step 6: Style the Lantern
Place a flameless pillar candle inside for a classic look. You can also coil warm-white fairy lights around moss, smooth stones, pine cones, or faux eucalyptus. Leave the top open for easy access, or create a simple removable top from painted craft board.
A small metal ring or drawer pull attached to the top can imitate the handle of a traditional lantern. Treat it as decoration rather than a functional carrying handle unless it is mechanically secured.
Lantern Two: White Farmhouse Windowpane Lantern
The second Dollar Tree frame lantern has more detail but remains simple enough for a relaxed afternoon project. Wooden craft sticks create faux windowpanes, while a stacked removable lid gives the piece a polished farmhouse shape.
Additional Materials
- Four matching 5-by-7-inch frames
- Eight wooden craft sticks or paint stir sticks
- White or cream chalk-style paint
- Antique wax or brown paint for distressing
- One square wood plaque for the bottom
- Two or three graduated wood blocks for the lid
- One small metal coupling, napkin ring, or wooden bead
- Short piece of rope or thick jute
Step 1: Disassemble and Paint
Remove the backs and clear panels from the four frames. Lightly sand glossy areas, wipe away the dust, and place the frames on a protected work surface.
Apply one or two thin coats of white or cream paint. Thin coats reduce drips and preserve the shape of the frame molding. Chalk-style paint creates a soft matte finish, but surface preparation still matters. Cleaning away dust and oils helps the paint adhere more evenly.
Paint the wood base, craft sticks, lid blocks, and decorative top pieces at the same time. Let all components dry thoroughly.
Step 2: Create Faux Windowpanes
Measure the inside opening of a frame. Cut one craft stick to fit vertically and another to fit horizontally. Position them in a cross so the opening resembles a four-pane window.
Glue the vertical stick first, followed by the horizontal stick. Repeat this process on the other three frames. Use the first completed frame as a template so all four crosses sit at approximately the same height.
If cutting thick stir sticks is difficult, score them several times with a craft knife on a protected surface and snap them carefully. Standard craft sticks can usually be trimmed with heavy-duty scissors or small pruning snips.
Step 3: Reinstall the Clear Panels
Clean both sides of each panel before returning it to the frame. Once secured, fingerprints trapped inside the lantern will somehow become the only thing you can see.
Run a thin bead of hot glue along the hidden frame lip and press the panel into place. Add a second narrow bead around the back edge if needed. Allow the glue to cool before standing the frame upright.
Step 4: Assemble the Lantern Box
Join the four frames using the same method as the black lantern. Combine a slower-curing multipurpose adhesive with small hot-glue anchors, then wrap the assembly loosely with painter’s tape.
Place the lantern on a level surface while it cures. Measure diagonally across the top opening in both directions. When the measurements are similar, the lantern is square. When they are wildly different, the lantern is attempting abstract art.
Step 5: Attach the Bottom
Center the assembled frame box on the painted wood plaque. Glue it in place and add a thin bead of adhesive along the interior seam for extra support.
Do not overload the lantern with heavy rocks or thick glass containers. Dollar-store frames are ideal for lightweight decorative projects, not for testing the structural limits of modern engineering.
Step 6: Build a Removable Farmhouse Lid
Stack two or three wood blocks from largest to smallest, gluing them together to form a stepped top. Attach a small metal coupling, wooden bead, or napkin ring at the center.
Thread a short loop of rope through the top accent and secure the ends underneath. The completed lid should rest on the lantern rather than being permanently attached. A removable lid makes it easier to change batteries and update the display throughout the year.
Step 7: Add a Distressed Finish
For gentle farmhouse aging, lightly sand the corners and raised details after the white paint dries. Concentrate on places that would naturally receive wear instead of sanding random patches across every surface.
You can also dry-brush a tiny amount of brown or gray paint along the edges. Wipe most of the paint from the brush before touching the frame. The goal is “charming vintage find,” not “lantern rescued from a swamp.”
Safe Lighting for DIY Frame Lanterns
Use flameless LED candles or battery-powered fairy lights inside these lanterns. Picture frames, adhesives, paint, wood, rope, moss, and faux greenery are all unsuitable materials to place around an open flame.
U.S. fire-safety guidance recommends battery-operated candles as an alternative to burning candles, particularly when combustible decorations are nearby. Never place a real candle inside a homemade frame lantern.
Choose LED lights with timers when possible. A timer can create a warm evening glow without requiring you to open the lantern every night. Check the battery compartment periodically and remove batteries before storing the lantern for an extended period.
Seasonal Decorating Ideas
Spring
Fill the base with preserved-looking moss, speckled decorative eggs, miniature flowers, and a small LED candle. Pale green, white, and soft yellow accents keep the display fresh without turning it into an explosion at the Easter craft aisle.
Summer
Create a coastal arrangement with faux sea glass, shells, jute, and warm fairy lights. The black lantern can take on a modern nautical style, while the white version naturally suits a breezy cottage theme.
Fall
Add miniature pumpkins, acorns, pine cones, dried-looking leaves, or wood beads. Amber fairy lights provide warmth without the hazards associated with a burning candle near dry decorative material.
Winter
Use bottle-brush trees, faux snow, small ornaments, bells, or sprigs of artificial evergreen. Keep loose faux snow away from battery compartments and switches.
Weddings and Special Events
Frame lanterns can serve as centerpieces for rustic weddings, bridal showers, anniversary dinners, or holiday parties. Add table numbers printed on translucent vellum, coordinate the paint with the event colors, or place a small flower arrangement inside each lantern.
Common Problems and Easy Fixes
The Frames Keep Leaning
Assemble the lantern around a square box or container wrapped in parchment paper. The temporary form holds the walls upright until the adhesive gains strength. Remove it after the joints are stable.
The Corners Have Visible Gaps
Small gaps can be filled with paintable caulk, wood filler, or an additional decorative strip of narrow craft wood. Paint the repair to match the frame.
The Glass Rattles
Add tiny dots of clear adhesive at the hidden corners. Avoid filling the entire channel because excess adhesive makes future repairs difficult.
The Paint Scratches Easily
Allow the paint to dry fully and apply a compatible clear topcoat or furniture wax. Test the finish on the back of one frame first, especially when working with plastic or laminated frames.
The Lantern Feels Flimsy
Strengthen the interior corners with narrow craft sticks painted to match. A sturdy base also reduces twisting when the lantern is moved.
My Experience Making Dollar Tree Frame Lanterns
The first time I tried making a picture-frame lantern, I assumed the project would be almost suspiciously easy. Four frames, some glue, one candle, done. In my imagination, the finished lantern appeared on the table within 20 minutes while cheerful craft music played in the background.
Reality introduced itself when I discovered that two of my “matching” frames had slightly rounded edges and the other two were completely flat. They looked identical from the front, but when placed side by side, the corners refused to meet evenly. The lesson was immediate: test-fit every frame before removing hardware, painting, or applying glue.
On the second attempt, I arranged the frames around a small cardboard box. That simple support made an enormous difference. Instead of balancing one slippery corner while another corner drifted away, I could press each frame against a square form. Painter’s tape held the walls together, and the lantern finally stopped behaving like a newborn giraffe.
I also learned that more glue does not necessarily create a better project. My first heavy bead of hot glue squeezed through a seam and hardened into a shiny bump on the front. Trying to remove it pulled away part of the frame finish. Later joints turned out much cleaner when I used a thin line of multipurpose adhesive and only two small hot-glue dots as temporary clamps.
The black lantern was the fastest design. Because the frames already had a smooth dark finish, it required almost no painting. Once assembled on a square base, it looked surprisingly close to a lightweight metal lantern. Warm fairy lights reflected in the glass and made the simple frame molding look more substantial.
The farmhouse version required more patience, but it was also more satisfying. Adding the craft-stick windowpanes changed the appearance completely. Without them, the structure still looked like four picture frames glued together. With them, it began to resemble a purpose-built decorative lantern.
Getting the windowpane pieces centered was the fussiest part. Measuring every frame independently produced tiny differences, so I eventually made a cardboard spacing guide. I placed the guide inside each opening, lined up the sticks, and glued them in the same position. That small step made the four sides look far more consistent.
The removable lid became my favorite feature. I initially considered gluing it down because permanent assembly seemed neater. Fortunately, I resisted. Being able to lift the top makes changing batteries, rearranging greenery, and cleaning the glass much easier. It also allows the lantern to change with the seasons rather than becoming a one-holiday decoration that spends eleven months in a storage bin.
For everyday styling, I prefer a single flameless candle surrounded by a modest amount of greenery. Filling every empty inch can hide the lantern’s structure and make the display look cluttered. A little negative space allows the light to reflect off the clear panels and emphasizes the windowpane details.
I also stopped carrying the lantern by its rope loop. The loop looks convincing, but unless it is screwed into a solid lid, it is decorative. Supporting the lantern from the base protects the glued frame joints and prevents an exciting but unwanted demonstration of gravity.
The biggest surprise was how adaptable the finished lanterns became. The black one worked with modern décor, Halloween decorations, and winter greenery. The white farmhouse lantern looked equally appropriate with spring flowers, fall pumpkins, and Christmas trees. A project that begins with inexpensive picture frames can become one of those rare decorations that earns a place in the house throughout the year.
Final Thoughts
These two Dollar Tree frame lanterns prove that attractive home décor does not require specialized tools or a large budget. The black version is quick, clean, and modern, while the white windowpane design offers farmhouse character and more opportunities for customization.
The most important steps are choosing truly matching frames, preparing the surfaces, keeping the structure square, and allowing the adhesive to cure completely. Add a flameless candle, decorate the interior with lightweight seasonal accents, and you will have a centerpiece that looks far more expensive than its humble picture-frame origins.
Note: These lanterns are decorative craft projects intended for flameless LED lights only. Do not use real candles, fuel-burning lights, or high-heat bulbs inside them.