Constructing an isosceles triangle sounds like the kind of thing that belongs in a dusty geometry textbook guarded by a very serious protractor. Good news: it is much friendlier than that. Once you understand the idea behind an isosceles triangletwo sides are equalyou can build one with a compass, straightedge, ruler, or protractor using several reliable methods.
This guide explains 4 ways to construct an isosceles triangle, including methods based on a given base and side length, a base and altitude, a base and base angle, and an apex angle with equal legs. Whether you are doing homework, teaching geometry, preparing for an exam, or simply trying to prove that your compass is not just a pencil with commitment issues, these constructions will help you draw accurate isosceles triangles with confidence.
What Is an Isosceles Triangle?
An isosceles triangle is a triangle with at least two sides of equal length. Those equal sides are often called the legs, and the third side is usually called the base. The angle between the two equal sides is the vertex angle or apex angle, while the two angles touching the base are called base angles.
The most famous property of an isosceles triangle is simple but powerful: the base angles are congruent. In plain English, if two sides of the triangle are equal, the two angles opposite those sides are also equal. Geometry loves symmetry almost as much as students love a problem that does not require six pages of algebra.
Another useful fact: in an isosceles triangle, the line drawn from the apex to the midpoint of the base is also an altitude, a median, and an angle bisector. That one line does three jobs. If it had a résumé, it would be hired immediately.
Tools You May Need
Depending on the method, you may use a few classic geometry tools:
- Compass: for drawing arcs and copying equal lengths.
- Straightedge or ruler: for drawing line segments.
- Protractor: for measuring or copying angles when allowed.
- Pencil: because construction marks are part of the process, not evidence of panic.
- Eraser: optional, but emotionally comforting.
In traditional compass-and-straightedge construction, you should not rely on measurement marks on the ruler. A straightedge draws straight lines, while the compass transfers lengths. In classroom work, however, many teachers allow a ruler and protractor for practical drawing. Always follow the instructions your assignment gives you.
Before You Start: Know What Information Is Given
The construction method depends on what information you already have. An isosceles triangle can be constructed from different sets of data, such as:
- The length of the base and the length of each equal side.
- The base and the altitude.
- The base and one base angle.
- The apex angle and the length of the equal sides.
Also remember the triangle inequality. If the equal side length is too short compared with the base, the two sides will never meet. For example, if the base is 10 cm and each equal side is 4 cm, the triangle cannot exist because 4 + 4 is less than 10. The compass arcs will look at each other across the page and refuse to cooperate.
Way 1: Construct an Isosceles Triangle Using the Base and Equal Side Lengths
This is one of the most common and reliable methods. It works when you know the length of the base and the length of the two equal sides. It is often called an SSS construction, because all three side lengths are known: side, side, side.
Example
Construct an isosceles triangle with a base of 8 cm and two equal sides of 6 cm each.
Steps
- Draw a straight line segment and label the endpoints A and B. This will be the base of the triangle.
- Make the segment AB equal to the given base length. In this example, AB = 8 cm.
- Set your compass to the equal side length. Here, set it to 6 cm.
- Place the compass point on A and draw an arc above the base.
- Without changing the compass width, place the compass point on B and draw another arc above the base.
- Mark the intersection of the two arcs as C.
- Use a straightedge to draw segments AC and BC.
You have now constructed triangle ABC. Since AC and BC were drawn using the same compass width, AC = BC. Therefore, triangle ABC is an isosceles triangle.
Why This Method Works
A compass creates points that are a fixed distance from a center. When you draw an arc from A with radius 6 cm, every point on that arc is 6 cm from A. When you draw another arc from B with the same radius, every point on that arc is 6 cm from B. The point where the arcs intersect is exactly 6 cm from both A and B. That means AC and BC are equal, so the triangle is isosceles.
Common Mistake
Do not change the compass width between the two arcs. If you accidentally move it, the triangle may become scalene, which is geometry’s polite way of saying, “Nice try, but those sides are not equal.”
Way 2: Construct an Isosceles Triangle Using the Base and Altitude
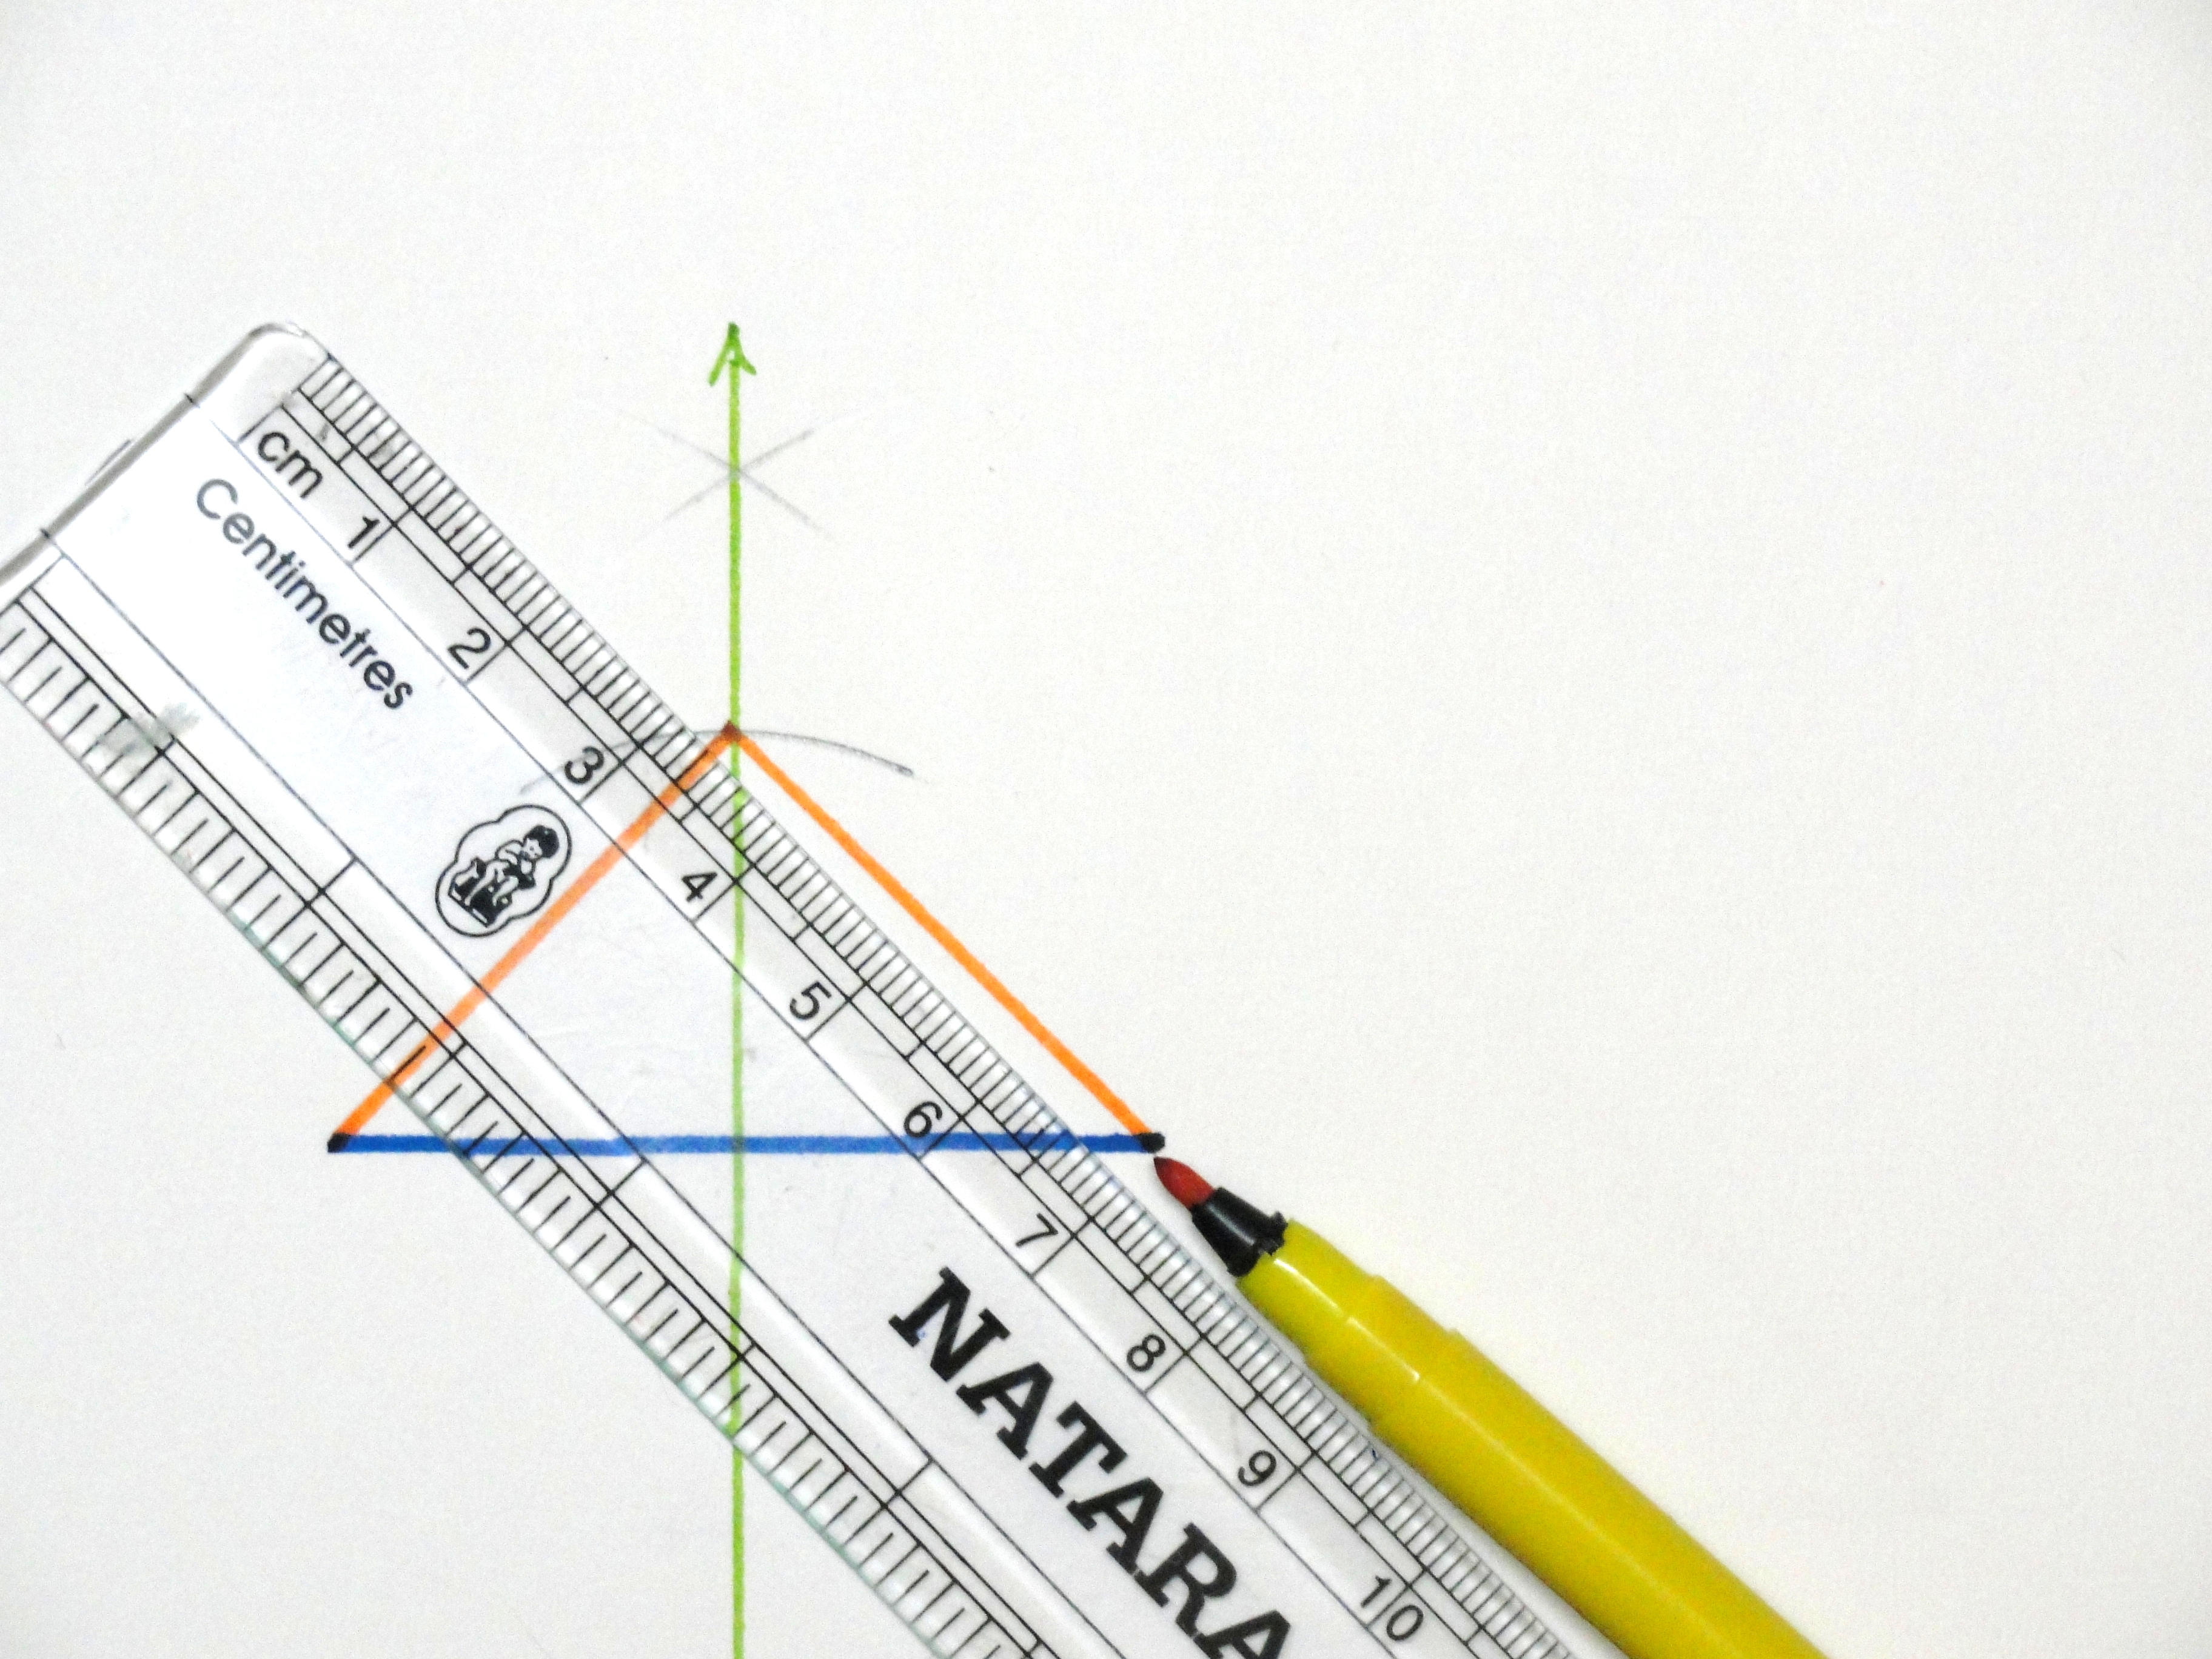
This method is perfect when you are given the base and the height of the triangle. The altitude of an isosceles triangle runs from the apex straight down to the midpoint of the base. Because of the triangle’s symmetry, that altitude is also the perpendicular bisector of the base.
Example
Construct an isosceles triangle with base AB = 10 cm and altitude = 7 cm.
Steps
- Draw the base segment AB with the given length. In this example, AB = 10 cm.
- Construct the perpendicular bisector of AB. To do this, set your compass to a width greater than half of AB.
- Place the compass point on A and draw arcs above and below the segment.
- Without changing the compass width, place the compass point on B and draw arcs that intersect the first pair of arcs.
- Draw a straight line through the two arc intersections. This line is the perpendicular bisector of AB.
- Let the perpendicular bisector meet AB at point M. M is the midpoint of the base.
- Measure the given altitude along the perpendicular bisector from M and mark the point as C. In this example, MC = 7 cm.
- Connect C to A and C to B.
The result is triangle ABC, an isosceles triangle with base AB and altitude MC.
Why This Method Works
The perpendicular bisector divides the base into two equal parts and meets the base at a right angle. Any point on the perpendicular bisector is the same distance from A and B. Since C lies on that line, CA = CB. That guarantees an isosceles triangle.
Helpful Tip
This method is especially useful for drawing tall, narrow isosceles triangles or short, wide ones. Change the altitude and you change the personality of the triangle. A taller altitude gives you a dramatic mountain peak; a shorter altitude gives you something that looks like a polite rooftop.
Way 3: Construct an Isosceles Triangle Using the Base and Base Angle
If you know the base and one base angle, you can construct the triangle by building equal angles at both ends of the base. This method uses the fact that the base angles of an isosceles triangle are congruent.
Example
Construct an isosceles triangle with base AB = 9 cm and base angles of 50 degrees.
Steps Using a Protractor
- Draw segment AB equal to the given base length.
- Place the protractor at point A and mark a 50-degree angle above the base.
- Draw a ray from A through that angle mark.
- Place the protractor at point B and mark a 50-degree angle above the base, opening toward A.
- Draw a ray from B through that angle mark.
- Label the point where the two rays meet as C.
- The triangle ABC is complete.
Steps Using Compass-and-Straightedge Angle Copying
If you are not allowed to use a protractor, you can copy the given angle at both endpoints using a compass-and-straightedge construction. First draw the base AB. Then copy the given base angle at A and again at B so the two rays lean toward each other. Their intersection becomes the apex C.
Why This Method Works
If two angles in a triangle are equal, the sides opposite those angles are equal. In triangle ABC, if angle A equals angle B, then side BC equals side AC. That makes the triangle isosceles.
Common Mistake
Make sure both angle rays are drawn on the same side of the base. If one ray goes above AB and the other goes below AB, your triangle will not close correctly. It may look like the geometry equivalent of two people walking away from the same conversation.
Way 4: Construct an Isosceles Triangle Using the Apex Angle and Equal Leg Length
This method starts from the top of the triangle instead of the base. Use it when you know the vertex angle and the length of each equal side.
Example
Construct an isosceles triangle with an apex angle of 40 degrees and equal sides of 7 cm.
Steps
- Mark a point and label it C. This will be the apex of the triangle.
- At point C, construct the given apex angle. In this example, construct a 40-degree angle.
- The two rays of the angle will become the directions of the equal sides.
- Set your compass to the equal side length. Here, set it to 7 cm.
- Place the compass point on C and mark a point on one ray. Label it A.
- Without changing the compass width, mark a point on the other ray. Label it B.
- Draw segment AB to form the base.
Because CA and CB were marked using the same compass radius, CA = CB. Therefore, triangle ABC is isosceles.
Why This Method Works
The construction directly creates two congruent sides from the same vertex. The angle between those equal sides becomes the apex angle. Once you connect the endpoints of those sides, the third side becomes the base.
When to Use This Method
This is the best method when the triangle’s “top angle” matters more than its base length. It is common in geometry problems involving symmetry, roof designs, decorative patterns, and technical drawings where a central angle controls the shape.
How to Check Your Isosceles Triangle
After construction, it is smart to verify your work. Geometry teachers appreciate neatness, but they adore proof. Here are a few ways to check that your triangle is truly isosceles:
- Measure the equal sides: Use a ruler to confirm that the two legs match.
- Check the base angles: Use a protractor to confirm that the base angles are equal.
- Draw the altitude: In a correct isosceles triangle, the altitude from the apex should hit the midpoint of the base at a right angle.
- Use compass comparison: Set the compass to one leg and compare it with the other without changing the width.
If your measurements are slightly off, do not panic. Pencil thickness, compass slipping, and tiny hand movements can cause small errors. The goal is accurate construction, not building a triangle that NASA can use to land a rover.
Real-World Uses of Isosceles Triangles
Isosceles triangles are not trapped inside math worksheets. They appear in architecture, design, engineering, art, road signs, bridges, roof frames, logos, and decorative patterns. Their symmetry makes them visually balanced and structurally useful.
For example, the triangular front of a simple roof often resembles an isosceles triangle. Many truss systems use repeated triangular shapes because triangles are stable. Designers also like isosceles triangles because they create direction and balance. A triangle pointing upward can suggest strength, movement, or focus. A triangle pointing downward can create contrast or visual tension.
In classrooms, constructing an isosceles triangle helps students understand more than drawing. It teaches congruence, symmetry, angle relationships, perpendicular bisectors, and logical reasoning. Every compass arc is a small argument: “This point must be here because it is the same distance from these two endpoints.” That is geometry at its bestprecise, visual, and surprisingly satisfying.
Common Errors and How to Avoid Them
Using an Equal Side That Is Too Short
If the equal sides are not long enough to meet above the base, no triangle can be formed. Always check that twice the equal side length is greater than the base length.
Forgetting to Keep the Compass Width Fixed
Many construction errors happen because the compass width changes between arcs. Tighten the compass if possible, and handle it gently. A compass is a geometry tool, not a tiny metal crab.
Drawing Rays in the Wrong Direction
When constructing from base angles, the two rays should lean toward each other. If they lean away, they will never meet, and your triangle will become a philosophical problem.
Confusing Altitude with Side Length
The altitude is the height from the apex to the base. It is not the same as the equal side length unless the triangle has very specific dimensions. Keep height and leg length separate.
Which Construction Method Should You Choose?
Choose the method based on the information in the problem:
- If you know the base and equal sides, use Way 1.
- If you know the base and height, use Way 2.
- If you know the base and base angle, use Way 3.
- If you know the apex angle and equal side length, use Way 4.
The beauty of these four methods is that they all lead to the same core idea: symmetry. Whether you begin with a base, a height, an angle, or a pair of equal sides, the final triangle must contain two matching sides or two matching base angles. That is the isosceles triangle’s whole personalitybalanced, dependable, and not trying too hard.
Practice Problems
Try these constructions to strengthen your skills:
- Construct an isosceles triangle with base 6 cm and equal sides 5 cm.
- Construct an isosceles triangle with base 8 cm and altitude 4 cm.
- Construct an isosceles triangle with base 10 cm and base angles of 45 degrees.
- Construct an isosceles triangle with apex angle 60 degrees and equal sides 7 cm.
After each construction, check the equal sides, base angles, or altitude. The more you practice, the more natural the process becomes. Eventually, compass arcs will stop looking like random pencil rainbows and start looking like proof.
Experience Notes: What Constructing Isosceles Triangles Teaches You
Working with isosceles triangle constructions teaches a lesson that is bigger than one shape: accuracy comes from relationships, not guessing. Beginners often try to “eyeball” the triangle, especially when it looks symmetrical enough. But geometry is not impressed by vibes. A triangle that looks balanced may still have sides that differ by several millimeters. The compass solves that problem because it transfers distance exactly. When both equal sides are made from the same compass setting, the construction has a reason behind it.
One of the best learning experiences comes from drawing the same triangle in more than one way. For example, construct an isosceles triangle using a base and two equal sides. Then construct another one using the same base and the correct altitude. If both methods are accurate, the triangles should match. This comparison helps students see that geometry is interconnected. Side lengths, angles, midpoints, and perpendicular lines are not separate topics living in different neighborhoods. They work together.
Another useful experience is intentionally making a mistake and observing what happens. If you change the compass width between arcs in the first method, the apex shifts, and the equal sides disappear. If you draw the altitude slightly off the midpoint in the second method, one side becomes longer than the other. These small errors are not failures; they are excellent teachers. They show why each step matters. Geometry becomes less about memorizing directions and more about understanding cause and effect.
Students also tend to develop better hand control through construction practice. Holding a compass steady, drawing light arcs, labeling points clearly, and using a straightedge carefully are small skills, but they build mathematical discipline. A neat construction is easier to read, easier to check, and easier to explain. When your page is organized, your reasoning usually becomes more organized too.
Teachers often find that isosceles triangles are a great bridge between drawing and proof. At first, the student sees a triangle. Then the student sees equal sides. Then the student notices equal base angles. Finally, the student understands why the altitude from the apex also bisects the base. That gradual discovery makes the topic satisfying. The triangle is simple enough to draw, but rich enough to reveal important geometry ideas.
In real projects, the same thinking applies. Whether someone is sketching a roof frame, creating a symmetrical logo, planning a craft pattern, or designing a model bridge, the isosceles triangle is useful because it gives balance. Construction practice trains your eye to recognize symmetry and trains your hand to create it. That is why this little triangle deserves respect. It may have only three sides, but it carries a lot of mathematical muscle.
Conclusion
There are several dependable ways to construct an isosceles triangle, and the best method depends on what information you are given. If you know the base and equal sides, use compass arcs from both endpoints. If you know the base and altitude, build the perpendicular bisector and place the apex on it. If you know the base and base angle, construct equal angles at both ends of the base. If you know the apex angle and equal leg length, start from the top and mark off the matching sides.
Each method reinforces the same essential truth: an isosceles triangle is built on equality and symmetry. Once you understand that, the construction process becomes logical instead of mysterious. Your compass is not just drawing arcs; it is proving that two distances are equal. Your straightedge is not just connecting points; it is completing a shape whose properties can be checked, explained, and trusted.
Note: This article synthesizes standard Euclidean geometry construction principles commonly taught in U.S. geometry courses, including compass-and-straightedge methods, perpendicular bisectors, angle construction, and isosceles triangle properties.