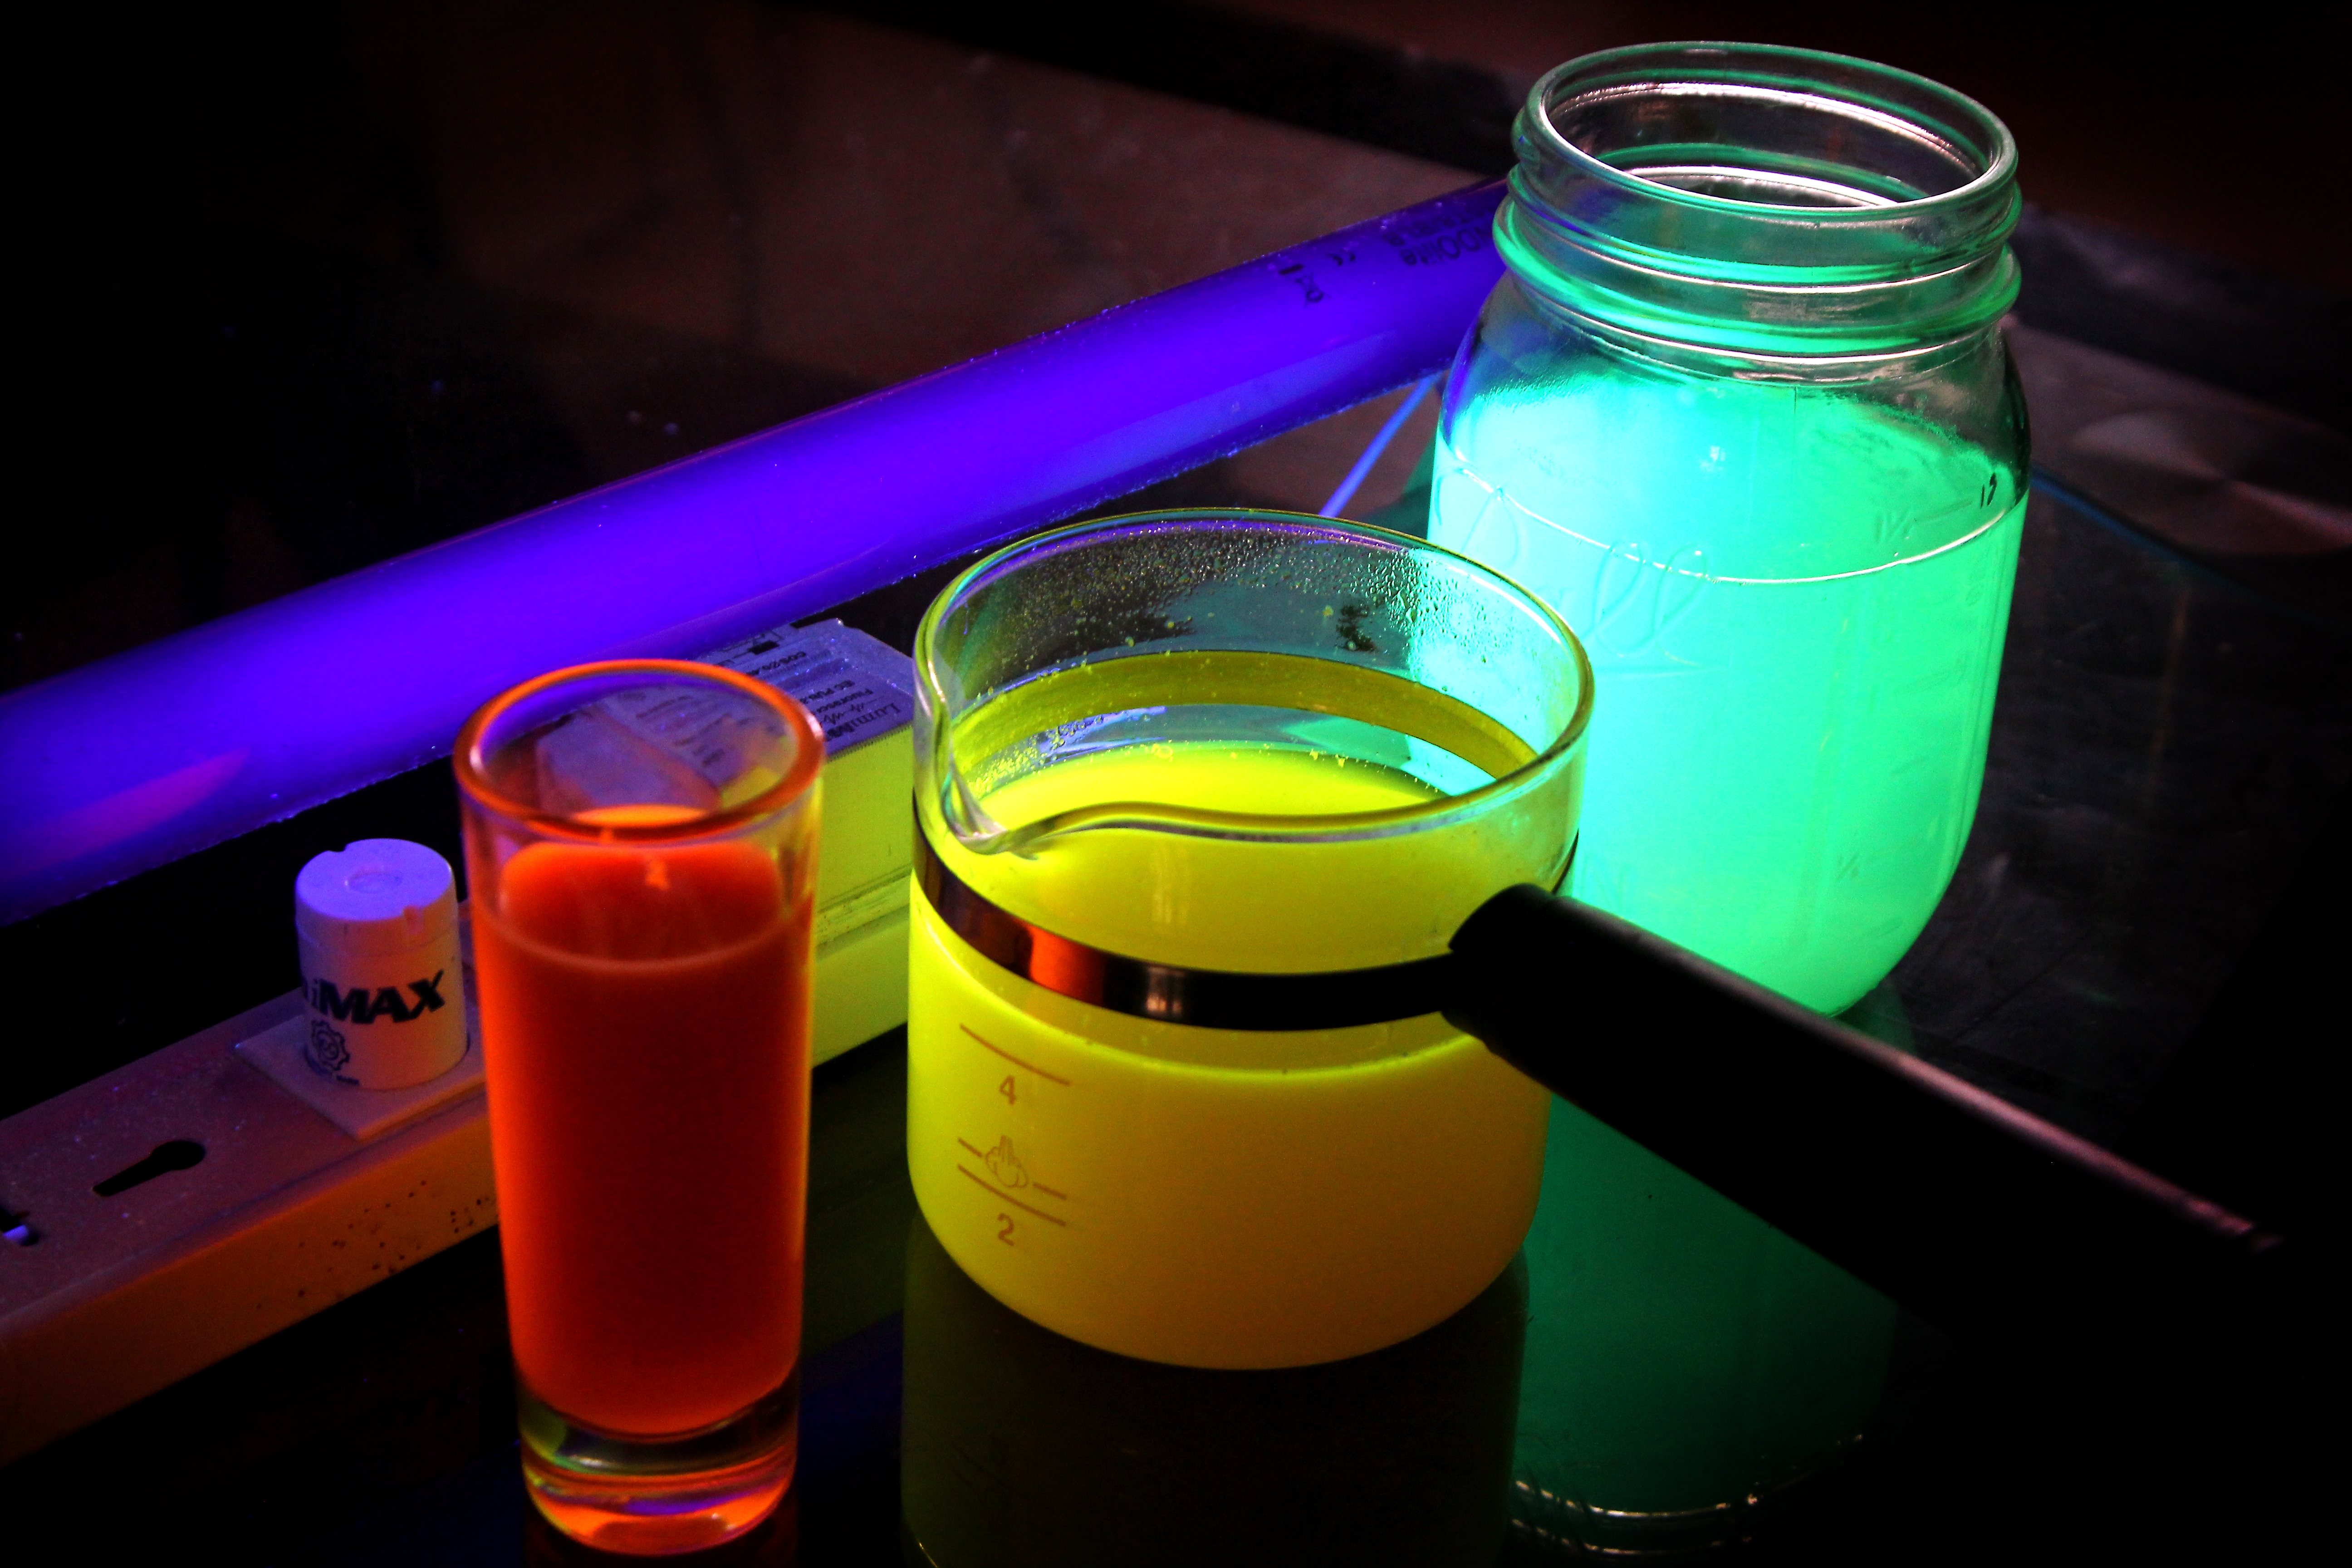
Glow in the dark fluid sounds like something a cartoon scientist pours into a beaker right before the lab starts humming, bubbling, and possibly growing eyebrows. In real life, the safest versions are much friendlier: glowing water bottles, UV-reactive party jars, Halloween decorations, science-fair demos, and craft projects that look wildly impressive without requiring a secret underground laboratory.
Before we dive in, here is the most important glow-up truth: not all “glow” is the same. Some liquids fluoresce, which means they shine only when a black light or ultraviolet light hits them. Tonic water is the classic example. Other materials are phosphorescent, meaning they absorb light first and then continue glowing for a while in the dark. Glow-in-the-dark pigment works this way. Glow sticks use chemiluminescence, a chemical reaction sealed safely inside a plastic tube.
This guide focuses on safe, beginner-friendly ways to make glow in the dark fluid for decoration, learning, and creative projects. No dangerous chemical recipes, no opening glow sticks, and no “please explain this stain to your parents” science. Just practical methods that look cool, teach real science, and keep the chaos at a reasonable level.
What Makes a Liquid Glow?
To make a glowing liquid, you need a material that interacts with light in a special way. Many glowing fluids work because of fluorescent compounds. These compounds absorb invisible ultraviolet light and release visible light, often in bright blue, green, yellow, or neon colors. That is why some liquids look ordinary in daylight but suddenly become magical under a black light.
Other glow fluids rely on tiny glow pigments. These pigments “charge” under sunlight or a bright lamp, then slowly release the stored energy as visible light. The result is a soft glow that continues after the lights go out. It is usually less intense than a black-light effect, but it has that classic spooky-nightlight vibe.
For home projects, the safest glow fluids usually fall into four categories: tonic water, UV-reactive dye, washable fluorescent craft color, and glow powder suspended in a clear liquid or gel. Each method has a different look, cost, brightness level, and best use.
Safety First: The Glow Should Be Dramatic, Not the Cleanup
Glow projects are fun, but a few simple rules make them much safer. First, do not drink any glow fluid unless it is clearly made only from food-safe ingredients and has not touched craft materials. Tonic water is a beverage, but once you add paint, dye, glitter, glue, or pigment, it becomes a decoration, not a snack. Your stomach is not a craft drawer.
Second, do not cut open glow sticks to pour out the liquid. The chemicals inside are generally considered low in toxicity in small accidental exposures, but they can irritate the skin, mouth, and eyes. Glow sticks are designed to stay sealed. Use them as sealed lights near or behind bottles, not as ingredients.
Third, use black lights responsibly. Long-wave black lights used for parties and decorations are common, but you should avoid staring directly into UV lights, keep them away from eyes, and follow the manufacturer’s instructions. If the lamp feels hot, flickers, or looks damaged, retire it from show business immediately.
Finally, protect surfaces. Use trays, old towels, gloves for craft pigments, and containers with tight lids. Glowing fluid has a talent for finding white shirts, beige carpet, and the one table your family actually cares about.
Method 1: Make Blue Glow Fluid with Tonic Water
Tonic water is the easiest and cleanest way to make a glowing liquid. Under a black light, it glows a beautiful blue because it contains quinine, a naturally fluorescent compound. In normal lighting, tonic water looks almost like plain sparkling water. Under UV light, it suddenly becomes “tiny swimming pool from outer space.”
What You Need
- Tonic water
- A clear glass, jar, vase, or plastic bottle
- A black light or UV flashlight
- Optional: clear glass beads, ice cubes, or waterproof decorations
How to Make It
Pour tonic water into a clear container and place it in a dark room. Shine a black light on it, and the liquid should glow bright blue. For a stronger visual effect, use a tall jar or bottle and place the black light close to the container without touching the liquid.
You can add clear glass beads or decorative plastic shapes to make the liquid sparkle and scatter the light. If you are using tonic water for a party display, place several bottles at different heights. The setup looks polished, but the effort level is basically “poured beverage into jar,” which is a rare and beautiful thing.
Best Uses
Tonic water glow fluid is great for science demonstrations, Halloween tables, party centerpieces, and photography. It is also one of the best ways to explain fluorescence because the effect is immediate and easy to see.
Helpful Tips
Use regular tonic water rather than flavored or colored versions if you want the cleanest blue glow. Diet tonic water may also glow, but different brands can vary in brightness. Do not add bleach or cleaning products. Some science demonstrations show how chemicals can affect fluorescence, but for a home article and general audience, plain tonic water is safer and plenty impressive.
Method 2: Make Neon Glow Fluid with UV-Reactive Water Dye
If you want a brighter, bolder color than tonic water blue, UV-reactive water dye is a strong choice. These dyes are often used for fountains, leak detection, event effects, and art displays. Under black light, they can glow green, blue, orange, pink, or yellow depending on the product.
What You Need
- UV-reactive water dye labeled for water use
- Water
- A clear bottle, bowl, vase, or jar
- A black light
- Gloves and a protected work surface
How to Make It
Fill your container with water. Add a very small amount of UV-reactive dye according to the product directions. Stir gently or seal the bottle and shake it. Turn off the room lights, switch on the black light, and adjust the amount of dye if needed.
The key is to start small. Concentrated dye can be powerful, and adding too much may make the liquid look muddy instead of glowing. Think of it like hot sauce: you can always add more, but once the bottle becomes radioactive-looking soup, there is no elegant reverse button.
Best Uses
This method is excellent for party decorations, stage props, glow-themed photo shoots, sensory bottles for older kids with supervision, and dramatic table displays. It is also useful when you want colors beyond blue.
Helpful Tips
Choose products that clearly say they are non-toxic and intended for water-based use. Even then, do not drink the liquid. Label the container as decorative. If you use the fluid outdoors, avoid dumping dyed water into gardens, storm drains, ponds, or natural waterways unless the product specifically says it is safe for that use and you follow local rules. When in doubt, dispose of it down an indoor drain with plenty of water, based on the product label.
Method 3: Make Craft Glow Fluid with Washable Fluorescent Paint
Washable fluorescent craft paint can turn plain water into a vivid glow fluid under black light. This method is popular for jars, stage decorations, classroom art projects, and spooky props. It does not usually glow by itself in total darkness unless the paint is also labeled glow-in-the-dark, but under UV light it can look spectacular.
What You Need
- Washable fluorescent craft paint
- Warm water
- A clear jar or plastic bottle with a lid
- A spoon or stir stick
- A black light
- Optional: clear glue for a thicker texture
How to Make It
Add warm water to your container, leaving a little space at the top. Add a small squeeze of washable fluorescent paint. Stir until the color spreads evenly. For a thicker, lava-lamp-style look, mix in a little clear school glue. Seal the lid tightly and test it under a black light.
If the color looks weak, add a tiny bit more paint. If it looks too cloudy, dilute it with more water. The goal is a bright translucent liquid, not a jar of neon pudding. Neon pudding may sound exciting, but visually it blocks light instead of spreading it.
Best Uses
This is a strong option for decorative bottles, glow party signs, Halloween props, and art projects. It is especially good when you want a rich color that can be seen even before the black light turns on.
Helpful Tips
Use washable paint if children are involved, but remember that washable does not mean edible. Keep the lid closed and do not use glass containers for rough play or outdoor games. If you want to make several colors, mix each one separately so the shades stay clean. Red, orange, green, and yellow fluorescent paints often look especially bold under black light.
Method 4: Make True Glow-in-the-Dark Fluid with Glow Pigment
If you want a fluid that glows after the lights go out without needing a black light shining on it, use glow-in-the-dark pigment powder. This type of pigment absorbs light and releases it slowly. The result is usually a soft green, aqua, or blue glow, depending on the pigment.
What You Need
- Non-toxic glow-in-the-dark pigment powder for crafts
- Clear hair gel, clear school glue, mineral oil, or water-based gel
- A clear container with a tight lid
- A spoon or craft stick
- Gloves and a dust mask if handling fine powder
- A bright lamp or sunlight for charging
How to Make It
Pour a clear gel or liquid base into your container. Add a small amount of glow pigment and stir slowly until the powder is evenly suspended. Seal the container, then place it near a bright light or in sunlight for several minutes. Move it into a dark room and watch the glow appear.
Clear gel often works better than plain water because it keeps the pigment suspended longer. In water, the powder may settle to the bottom, which can still look cool but less like glowing fluid and more like a tiny alien beach.
Best Uses
This method is ideal for glow jars, fairy bottles, night decorations, Halloween displays, and calming sensory-style bottles for older children with adult supervision. It is also the best option when you want a glow effect without leaving a black light on.
Helpful Tips
Buy pigment labeled non-toxic and suitable for crafts. Do not inhale the powder, and do not use it in food, drinks, bath products, or cosmetics unless it is specifically approved for that purpose. Different pigments have different brightness levels and glow times. Green and aqua pigments usually glow brighter and longer than purple or red ones.
Which Glow Fluid Method Is Best?
The best method depends on your goal. For a fast science demo, tonic water wins. It is simple, clean, and surprisingly beautiful. For bright party colors, UV-reactive water dye is usually the most dramatic. For low-cost craft projects, fluorescent washable paint gives a bold effect under black light. For a true glow after the lights go out, glow pigment in clear gel is the top choice.
If you are making a classroom demonstration, choose tonic water because it clearly shows fluorescence. If you are decorating a Halloween table, use UV-reactive dye or fluorescent paint. If you are making a calm night display, choose glow pigment. If you are making a drink, stop and rethink the plan: decorative glow fluid and beverages should not mingle like awkward relatives at Thanksgiving.
Creative Ideas for Using Glow in the Dark Fluid
Glow Jars
Fill small jars with different glow fluids and place them along a table, windowsill, or party backdrop. Use plastic jars for children’s events. Add waterproof stars, beads, or tiny plastic shapes for extra visual texture.
Science Fair Demonstrations
Compare tonic water, plain water, fluorescent paint water, and glow pigment gel. Explain the difference between fluorescence and phosphorescence. This makes a strong science project because viewers can see the results instantly.
Halloween Potion Bottles
Use old-style bottles, labels, and cork-like caps to create “witch potion” decorations. Add names like “Moon Slime,” “Goblin Soda,” or “Definitely Not Grandma’s Lemonade.” Place a black light nearby for maximum drama.
Photo and Video Backgrounds
Glow fluids look fantastic in dark photography. Place bottles behind a subject, use reflective surfaces, and experiment with black light angles. Keep liquids sealed and away from electronics, because cameras love light but hate surprise showers.
Common Mistakes to Avoid
One common mistake is expecting every glow fluid to shine without help. Tonic water, fluorescent dye, and fluorescent paint usually need a black light. They do not glow strongly in total darkness by themselves. Glow pigment, on the other hand, needs to be charged under light first.
Another mistake is using too much colorant. More dye does not always mean more glow. A liquid can become so dark or cloudy that light cannot travel through it well. Start with a small amount, test, and adjust.
People also forget about the container. Clear glass gives a crisp look, but plastic is safer for kids and events. Frosted containers can soften the glow, while colored containers may block it. A clean, transparent bottle usually gives the brightest result.
Finally, avoid mixing random household chemicals. The internet contains plenty of dramatic science content, but not every experiment belongs in a kitchen, classroom, or party room. You can create amazing glow effects without playing chemical roulette.
The Science Behind the Glow
Fluorescence happens when a substance absorbs energy from ultraviolet light and quickly releases some of that energy as visible light. That is why tonic water glows blue under black light. The quinine molecules absorb UV light, become energized, and then release light that our eyes can see.
Phosphorescence is similar but slower. Glow-in-the-dark pigment stores energy and releases it gradually. That delayed release is why glow stars on ceilings keep shining after bedtime, quietly judging your sleep schedule.
Chemiluminescence is different. It produces light from a chemical reaction. Glow sticks use this process, but the reaction is sealed inside the stick for safety and convenience. Since the liquid can irritate skin and eyes, it should stay inside the plastic tube where it belongs.
Real-Life Experience: What Actually Works Best?
After experimenting with different glow fluid ideas for parties, classroom-style demonstrations, and home decorations, the biggest lesson is simple: lighting matters more than people expect. A weak black light can make even good fluorescent materials look disappointing. A stronger, properly placed black light can turn a plain bottle of tonic water into the star of the table. The liquid is only half the show; the light is the other half wearing sunglasses indoors.
Tonic water is the most reliable beginner method. It is easy to find, easy to pour, and easy to explain. The blue glow feels clean and scientific, which makes it perfect for demonstrations. However, it is not the brightest choice for large decorations. If the room has too much regular light, tonic water can look shy. It performs best in a dark room with the black light close to the bottle.
UV-reactive dye gives the strongest “wow” effect. A small amount can color a large container, and the glow can be intense. It is the method I would choose for a party display, photo shoot, or haunted-house table. The main lesson is to dilute carefully. When too much dye is added, the liquid can become visually heavy. The glow still exists, but it loses that clean, jewel-like shine. Starting with less dye makes the final result look more professional.
Fluorescent washable paint is the most flexible craft option. It is forgiving, colorful, and fun for creative projects. It works especially well in plastic bottles because you can shake the mixture and create swirling effects. The downside is that paint can settle, streak, or make the liquid cloudy. That is not always bad. For monster slime jars or Halloween potions, cloudy liquid can actually look better. For elegant centerpieces, dye or tonic water usually looks cleaner.
Glow pigment is the most magical but also the most misunderstood. People expect it to glow like a flashlight, but most glow pigments create a softer light. The best results come from charging the bottle under a bright lamp or sunlight before displaying it in a very dark space. Gel bases work better than water because they slow the settling of the pigment. When done well, the effect is dreamy, like bottled moonlight. When done poorly, it looks like sand at the bottom of a jar taking a nap.
One practical trick is to test every glow fluid before the event. Make a small sample, turn off the lights, and check it from the distance guests will actually see it. Something that looks bright from six inches away may disappear from across the room. This is especially important for party decorations, where room lighting, table color, and bottle shape can change the final effect.
Another useful experience-based tip is to use labels. If a glowing bottle is decorative, label it clearly and keep it away from food and drinks. At parties, people get curious. Curious people pick things up. Very curious people ask whether they can drink the glowing alien liquid. The answer should be easy to see before anyone asks.
For cleanup, sealed containers are your best friend. Avoid wide bowls unless the display will stay supervised. Bottles with screw-on lids are safer, easier to move, and less likely to create a glowing puddle that looks amazing for three seconds and annoying for twenty minutes.
Overall, the best setup combines methods. Use tonic water for blue science-style bottles, UV dye for bright centerpiece colors, fluorescent paint for playful props, and glow pigment for soft after-dark effects. Together, they create layers of glow: some bright under black light, some softly shining on their own, and all much safer than risky chemical recipes.
Conclusion
Making glow in the dark fluid is a fun mix of science, art, and just enough theatrical nonsense to make any table look more interesting. The safest and most useful methods are simple: tonic water for blue fluorescence, UV-reactive dye for bold neon color, washable fluorescent paint for crafts, and glow pigment for a true lights-off effect.
The secret is choosing the right method for your purpose. Need an easy science demo? Use tonic water. Want a party that looks like a friendly alien landed near the snack table? Use UV dye. Making Halloween props? Fluorescent paint has your back. Want a soft glow without a black light? Glow pigment is the winner.
Keep everything labeled, sealed, and away from mouths and eyes. Avoid opening glow sticks or mixing random chemicals. With those simple rules, you can create glowing bottles, jars, potions, displays, and experiments that look impressive without turning your kitchen into a cautionary tale.