Note: Publication-ready HTML body only. External source links are omitted as requested.
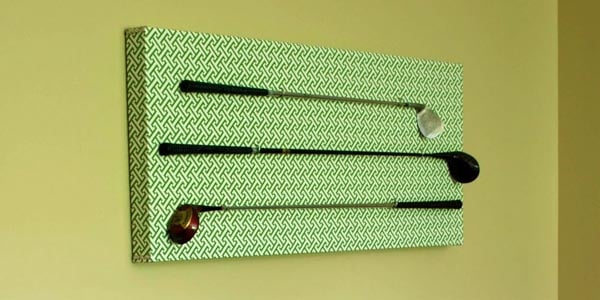
There comes a moment in every golfer’s life when an old club stops being equipment and starts becoming evidence. Evidence of heroic drives, suspiciously expensive slices, missed three-foot putts, and at least one round where the sand trap felt like permanent residence. Instead of letting those retired clubs gather dust behind the water heater, turn them into a bold piece of DIY golf club art display.
This project combines upcycled golf clubs, a custom wall panel or shadow-box-style frame, and a layered palette called 33 Shades of Green. The result can look polished enough for a home office, relaxed enough for a game room, and personal enough to become the conversation starter that prevents guests from asking why you own four different kinds of cheese boards.
You do not need professional woodworking skills, a giant workshop, or a handicap that makes strangers applaud. You need a few retired clubs, a good design plan, basic tools, and the willingness to treat golf memorabilia like art instead of garage clutter.
Why a DIY Golf Club Art Display Works So Well
Golf clubs are naturally sculptural. Putters have clean lines, irons have interesting faces and grooves, woods have rounded forms, and old wooden-shaft clubs carry instant vintage character. The United States Golf Association recognizes woods, irons, and putters as distinct club forms, which makes them useful for building visual contrast in one display.
The secret is not simply hanging a club on the wall and calling it “sports decor.” The secret is composition. Think of each club as a line in a painting: one may point upward, another may cross the middle, while a short putter creates balance near the lower edge. Add golf balls, scorecards, vintage tees, course maps, tournament photos, or a small brass plate, and suddenly the arrangement tells a story.
A dimensional display also has a practical advantage. Shadow boxes and deep frames are made for items that would look awkward in a flat picture frame. They help protect keepsakes while giving the project enough depth to feel intentional rather than like a golf bag exploded against the wall.
Choose the Right Golf Clubs Before You Cut, Paint, or Mount
Start with clubs that have sentimental value but no longer need to stay in your active bag. That may include a bent old iron from your first set, a wooden driver inherited from a relative, a chipped putter from college, or a club that has spent ten years punishing you for believing in a “safe layup.”
Good candidates for golf club wall art
- Vintage wooden woods with leather grips or aged patina
- Old irons with distinctive club numbers
- Putters with unusual shapes or classic brass heads
- Broken clubs that still have attractive shafts or heads
- Duplicate clubs from outdated beginner sets
- Clubs tied to a tournament, favorite course, family member, or memorable trip
Before permanently altering anything, pause for one important question: could the club have collector value? A rare antique club, signed memorabilia, or a truly unusual vintage piece may be better preserved in its original condition. For ordinary retired clubs, however, upcycling is an excellent way to keep useful materials in circulation. The Environmental Protection Agency’s waste-management hierarchy places reducing and reusing materials ahead of recycling and disposal.
For this project, a set of three to five clubs is usually enough. More than that can turn your wall art into a metal thicket. Less than that can still work beautifully when the clubs are paired with a bold painted background and a few meaningful golf accessories.
Materials for the DIY Golf Club Art Display Project
Your materials can be simple or elaborate depending on the final look. A rustic version may use reclaimed wood and visible hardware. A modern version may use a black frame, clean white mat board, and carefully spaced clubs. A golf clubhouse-inspired version may lean into deep greens, brass accents, and vintage scorecards.
Basic supplies
- Three to five retired golf clubs
- A plywood panel, reclaimed wood board, or deep shadow-box frame
- Wood trim for a frame, if building one from scratch
- Measuring tape, pencil, level, and painter’s tape
- Wood screws, black cabinet screws, or mounting brackets
- Heavy-duty construction adhesive or epoxy rated for metal and wood
- Sandpaper in medium and fine grits
- Wood stain, paint, or clear protective finish
- Spray primer and spray paint for metal accents, if desired
- Golf balls, tees, scorecards, course maps, photos, or small plaques
- Wall anchors or a French cleat hanging system
If you are repainting metal club heads, do not skip surface preparation. Loose paint and rust should be removed, bare metal should be cleaned and sanded, and a metal-compatible primer should be used before applying paint. Thin, even coats usually look far more professional than one enthusiastic coat that resembles frosting on a birthday cake.
33 Shades of Green: Build a Golf-Inspired Color Story
The “33 Shades of Green” idea does not mean you must buy thirty-three cans of paint and turn your garage into a questionable paint store. It means using green in layers: dark greens for structure, midtone greens for depth, pale greens for light, and a few neutral shades so the entire display does not look like it was designed by a very fashionable frog.
Green changes dramatically depending on its undertones and the light in a room. Blue-leaning greens tend to feel cooler and cleaner, while yellow-leaning greens generally feel warmer and earthier. Testing samples near the finished display location is especially important because daylight, wall color, flooring, and nearby furniture all influence what the green actually looks like.
1. The Fairway Greens: fresh, bright, and playful
Use these shades for small stripes, stenciled lines, golf-ball borders, or a light center panel: mint, celery, pistachio, lime mist, soft chartreuse, tennis-ball green, spring leaf, meadow green, pale jade, fresh grass, and light apple green.
2. The Course Greens: balanced shades for the main background
These work well for the primary painted panel: sage, eucalyptus, fern, moss, clover, garden green, muted emerald, olive leaf, willow green, loden, and dusty green-gray.
3. The Clubhouse Greens: deep and dramatic finishing colors
Use these for trim, lettering, borders, or the outer frame: hunter green, forest green, pine, billiard green, deep ivy, bottle green, racing green, blackened emerald, dark olive, charcoal green, and near-black green.
For an easy palette, choose one shade from each family. For example, use pale jade as a background wash, moss as the main panel color, and deep ivy for the trim. Add natural wood, matte black hardware, or antique brass to keep the display grounded. Green pairs beautifully with warm wood and neutral finishes because it feels connected to the landscape without demanding attention from every corner of the room.
How to Make the Golf Club Wall Art, Step by Step
Step 1: Pick a story before picking a layout
The strongest golf wall art has a theme. You might build a “First Tee to 18th Green” display using one club from each stage of your golfing life. You might create a tribute to a favorite course using a scorecard, small map, and club from a memorable round. Or you may simply want a bold game-room piece that says, “Yes, golf is serious. No, I will not explain the rules of a scramble again.”
Lay all your pieces on the floor first. Arrange the clubs diagonally, vertically, or in a fan shape. Take photos of each layout with your phone. The camera quickly reveals when one club is too heavy on one side, when an object looks random, or when the whole composition resembles crossed swords in a medieval golf tournament.
Step 2: Build or prepare the background panel
A 24-by-36-inch panel works well for three clubs. A 36-by-48-inch panel gives you room for five clubs, golf balls, scorecards, and a title plate. Use cabinet-grade plywood, stained pine boards, reclaimed lumber, or a premade deep frame.
Sand rough edges, wipe away dust, and apply your paint or stain. For a layered green background, paint the main panel in a midtone moss or sage. Then add a darker border, thin lighter stripes, or a subtle painted grid that resembles a putting green. Let each layer dry completely before adding the next.
Step 3: Refresh the clubs without erasing their character
Clean each club with a damp cloth and mild soap. Remove loose grime, but do not aggressively polish every scratch away. A few nicks and worn grips can make the display feel authentic. If the shafts are severely rusted, lightly sand only the rough spots and decide whether you want to preserve the aged finish or repaint it.
Try one of these approaches:
- Vintage look: Preserve patina, clean the grips, and use a dark wood backdrop.
- Modern look: Paint shafts matte black and use a white, sage, or charcoal-green panel.
- Color-blocked look: Paint club heads in three related greens while leaving shafts metallic.
- Luxury clubhouse look: Use dark green, brass hardware, black trim, and cream-colored labels.
Step 4: Attach clubs securely
Use more than glue alone. For lighter pieces, adhesive can help prevent shifting, but screws, brackets, U-clamps, or custom-cut wood blocks should carry the real load. Small black conduit straps can hold shafts neatly while blending into a dark background. For club heads, use a discreet bracket behind the head or a small support block underneath.
Pre-drill holes in the panel to reduce splitting. Place the heaviest clubs near the center or lower third of the composition. Make sure the heads do not extend so far from the panel that they create a surprise forehead encounter for anyone walking past.
Step 5: Add personal golf memorabilia
Once the clubs are secure, add smaller objects with restraint. A few well-chosen pieces beat twenty random golf balls every time. Consider framing a scorecard behind acrylic, mounting one vintage glove, adding a small brass plate with a favorite course name, or displaying three golf balls labeled “Drive,” “Approach,” and “Hope.”
You can also create a subtle putting-green effect by attaching a narrow strip of artificial turf along the lower edge. Just keep it narrow. Too much turf can make the entire project look like a miniature golf course escaped from a family entertainment center.
Step 6: Hang the display like real wall art
A finished golf club display can be heavier than it appears, especially when it includes a solid wood panel and metal clubs. For large or weighty pieces, a French cleat is a dependable option because it spreads weight across a broad mounting surface and can be fastened into wall studs. Heavy artwork should use hardware matched to the wall type and load rather than relying on one lonely picture hook doing its best.
Hang the art at eye level in a home office, media room, hallway, mudroom, garage lounge, or golf-themed bar area. Before drilling, hold the panel against the wall with painter’s tape marking the edges. Step back. Squint. Pretend you are a gallery curator who has never lost six balls in one round. Then mount it.
Three Style Directions for Upcycled Golf Club Decor
Rustic Fairway Wall Art
Use reclaimed wood, natural patina, handwritten labels, vintage scorecards, and worn leather grips. The best colors are olive, moss, warm cream, and dark brown. This approach works especially well in cabins, farmhouse interiors, basement lounges, and spaces with exposed brick or wood beams.
Modern Golf Gallery Piece
Choose a clean black frame, simple graphic background, matte black shafts, and a sharp green accent stripe. Mount only one driver, one iron, and one putter. Keep accessories minimal. This style looks strong in contemporary offices, apartments, and media rooms where you want golf art without the visual clutter of a pro shop display.
Vintage Clubhouse Statement
Use deep hunter green, antique brass, cream lettering, and old-style typography. Add a framed course map or reproduction scorecard. This look is ideal for anyone who appreciates the quiet drama of a classic clubhouse, even if their actual golf game has more plot twists than a crime series.
Safety and Finishing Tips
Wear eye protection when drilling, sanding, cutting wood, or working around metal. Wood dust can irritate the eyes and respiratory system, so work in a ventilated area, clean up dust carefully, and use suitable protection for the task.
Be especially cautious if you are refinishing very old painted items. Consumer safety guidance warns that sanding or scraping old paint can create hazardous lead dust. When a surface’s history is uncertain, avoid dry sanding old paint indoors and consider professional testing or safer refinishing options.
Finally, give the project a last stability test before hanging it. Gently lift the display, inspect every mounting point, and make sure no club head or accessory shifts. Good wall art should create memories, not a dramatic insurance claim.
Maker Experience: What 33 Shades of Green Teaches You About Golf Decor
The first surprising thing about making a DIY golf club art display is that the project rarely goes exactly as planned, and that is usually the point where it becomes better. On paper, three clubs, a green panel, and a few golf balls sound straightforward. In real life, one club is longer than you remembered, one grip has the personality of a sticky old soda can, and the “perfect” shade of green suddenly looks like canned peas under your basement lights.
That is why the most satisfying part of this project is the testing stage. Lay the clubs on the panel without attaching them. Move the putter two inches to the left. Tilt the old driver until its head creates a better silhouette. Add a scorecard, remove it, and add it again after realizing the empty space needs something. The arrangement slowly stops looking like equipment and starts looking like a memory map.
Many makers discover that the most meaningful objects are not necessarily the prettiest ones. A scratched seven iron may carry more personality than a shiny club from a bargain bin. A faded course map may feel more valuable than an expensive plaque. Even an old ball with a scuff mark can earn its place if it came from a round you still talk about years later. Golf is full of objects that become important because of the stories attached to them.
The color experiment is another unexpectedly enjoyable part. A display built around a single dark green can look elegant, but adding lighter tones changes the mood completely. Sage softens a serious room. Moss makes wood tones feel richer. Bright chartreuse can add a playful wink when used only in a narrow stripe or small label. The trick is treating green as a family rather than one paint-chip decision. You are not choosing one color; you are building a landscape.
There is also something oddly calming about working with old golf clubs. Their weight, shape, and worn details make the project feel less like a craft and more like preservation. You are keeping a piece of a hobby visible in everyday life. The display becomes a reminder that leisure matters, stories matter, and even a terrible round can become a good anecdote once enough time has passed.
When the finished art finally goes on the wall, the best reaction is not always “Wow, that must have taken forever.” Sometimes it is a friend pointing at one club and asking where it came from. That question opens the door to a course, a tournament, a family trip, a lucky shot, or a legendary disaster involving water, trees, and a ball that was never seen again. That is when the project succeeds. It is not merely golf wall art. It is a story display with a handicap.
Final Thoughts
A DIY golf club art display is a smart way to preserve old equipment, celebrate favorite rounds, and add personality to a room without filling it with generic sports posters. Use a few meaningful clubs, choose a confident green palette, mount everything securely, and let the imperfections stay visible. Those scratches, faded grips, and tiny dents are not flaws. They are proof that the clubs had a life before becoming art.
Whether you choose rustic reclaimed wood, a clean modern panel, or a dark clubhouse-inspired frame, the 33 shades of green give your project depth and character. Build it with humor, hang it with care, and enjoy the rare golf-related accomplishment that cannot be ruined by a bad swing.