A DIY industrial pipe sofa table is the kind of project that makes you feel wildly competent after one afternoon with lumber, pipe fittings, and a drill. It is practical, stylish, sturdy, and just a little bit smug in the best possible way. Store-bought console tables can be expensive, oddly sized, or made from mystery materials that feel like they were assembled by a committee of cardboard enthusiasts. Building your own lets you choose the exact length, height, depth, wood tone, pipe finish, and personality.
This project is especially useful behind a couch, along a hallway, in an entryway, or against a blank wall that currently says, “I gave up decorating in 2017.” A pipe sofa table can hold lamps, baskets, books, plants, charging stations, framed photos, and the occasional coffee mug you swear you are about to take to the kitchen. The industrial look works because it mixes strong metal lines with warm wood grain, giving your living room that “urban loft meets responsible adult” feeling.
The best part? You do not need to be a professional woodworker. If you can measure carefully, sand patiently, and resist the urge to eyeball everything like a pirate reading a treasure map, you can build a beautiful industrial console table.
What Is an Industrial Pipe Sofa Table?
An industrial pipe sofa table is a narrow console-style table built with a wood tabletop and a base made from black iron pipe, galvanized pipe, or decorative steel pipe components. It usually sits behind a sofa, but it can also work in an entryway, dining room, office, or hallway. The design is slim, strong, and customizable, which is why pipe furniture has stayed popular in DIY circles.
Unlike traditional furniture legs, pipe legs are assembled from threaded parts: flanges, elbows, tees, nipples, caps, and straight pipe sections. These pieces screw together to form a rigid base. The wood top adds warmth and gives the table a finished, home-friendly look. The result is a piece that feels rugged without looking like it escaped from a warehouse during lunch break.
Best Size for a DIY Pipe Sofa Table
Before buying materials, measure your sofa. A sofa table usually looks best when it is slightly lower than the back of the sofa or roughly level with it. If your sofa back is 32 inches high, a finished table height of about 30 to 31 inches is usually comfortable. For length, aim for a table that is about two-thirds to three-quarters the length of the sofa. For depth, 10 to 14 inches is ideal for most living rooms because it gives you usable surface area without creating a traffic jam behind the couch.
Sample Dimensions
For a standard living room sofa, a great beginner-friendly size is:
- Length: 60 inches
- Depth: 12 inches
- Finished height: 30 inches
- Wood thickness: 1 to 1.5 inches
- Pipe size: 3/4-inch black iron pipe or decorative furniture pipe
These dimensions create a slim, sturdy table that can hold lamps, small baskets, books, and decor without overpowering the sofa. If you have a long sectional, increase the length to 72 inches or even 84 inches. If you live in a small apartment, a 42- to 48-inch table may be plenty.
Materials and Tools You Will Need
Materials
- One wood board or glued-up tabletop, about 60 inches by 12 inches
- 3/4-inch black iron pipe or galvanized pipe
- Four floor flanges for attaching the base to the tabletop
- Four pipe caps or adjustable feet for the bottom of the legs
- Pipe tees and elbows, depending on your base design
- Wood screws sized to fit the tabletop thickness
- Sandpaper in 120-, 180-, and 220-grit
- Wood stain, paint, or clear finish
- Polyurethane, polycrylic, hard wax oil, or another protective topcoat
- Mineral spirits or a degreasing cleaner for metal parts
- Felt pads or rubber feet to protect flooring
Tools
- Tape measure
- Drill and drill bits
- Sander or sanding block
- Clamps
- Speed square
- Wrench or pipe wrench
- Saw, if cutting your own tabletop
- Safety glasses and work gloves
- Drop cloth or cardboard for finishing
If you do not own a saw, many home improvement stores can cut boards to length. That is not cheating. That is outsourcing one dusty part of the job like a very practical genius.
Choosing the Right Wood Top
The tabletop is the first thing people notice, so choose wood that fits your style and budget. Pine is affordable and easy to find, but it can dent more easily. Poplar paints well and offers a smoother surface. Oak, maple, and walnut cost more but bring beautiful grain and better durability. Butcher block is another excellent option if you want a thicker, more polished look.
For a rustic industrial pipe sofa table, reclaimed wood can look fantastic. Just inspect it carefully for nails, screws, rot, soft spots, and insect damage. Character is charming; structural weakness is not. There is a difference between “beautiful old barn board” and “this plank has seen things and may crumble during brunch.”
If your tabletop is made from multiple boards, glue and clamp them carefully, then add support cleats underneath if needed. Keep in mind that solid wood expands and contracts with seasonal humidity changes. Avoid locking a wide solid wood top too tightly across its width. For larger tops, tabletop fasteners or slightly elongated screw holes can help reduce the risk of splitting over time.
Choosing Pipe: Black Iron vs. Galvanized
Black iron pipe gives the classic industrial look right away. It has a darker, raw-metal appearance that pairs beautifully with walnut, espresso, dark oak, or natural wood finishes. Galvanized pipe has a silver coating and can work well for a brighter farmhouse-industrial style. You can also spray paint galvanized pipe black, but painted metal may chip if it gets bumped often.
For most DIY console tables, 3/4-inch pipe is the sweet spot. It looks substantial without becoming visually bulky. Half-inch pipe can work for very small tables, while 1-inch pipe creates a heavier, chunkier look. If your table is long, add a lower stretcher pipe between legs to reduce wobble and create a more finished frame.
Step-by-Step: How to Build a DIY Industrial Pipe Sofa Table
Step 1: Measure Your Sofa and Space
Measure the height of your sofa back, the length of the sofa, and the walkway behind it. Write everything down. Do not trust your memory unless your memory also knows where you left the tape measure last week.
Decide on your final dimensions. A 60-inch long, 12-inch deep, 30-inch tall table is a great starting point. Make sure the table will not block outlets, vents, doors, curtains, or foot traffic.
Step 2: Plan the Pipe Base
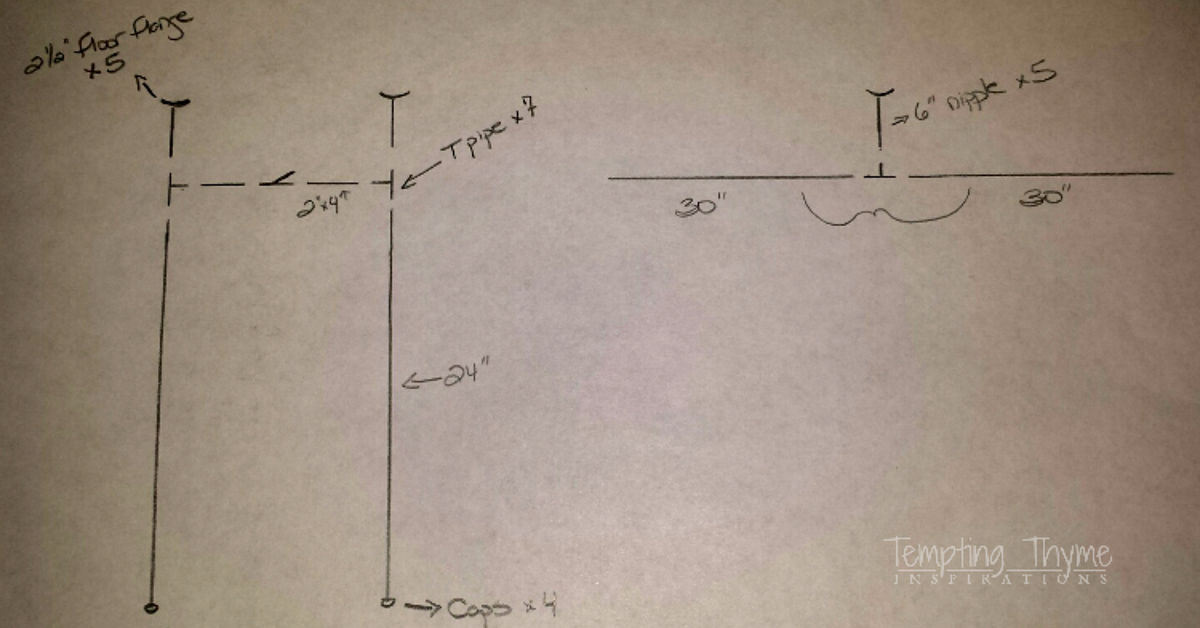
A simple H-leg design works beautifully. Each side of the table has two vertical pipe legs connected by a horizontal pipe near the bottom. Floor flanges attach the top of each leg to the underside of the wood. Pipe caps or feet finish the bottom.
For extra stability, you can add a long stretcher pipe between the two side frames. This is especially helpful for tables longer than 60 inches. The stretcher also gives the table a stronger industrial profile.
Step 3: Dry Fit the Pipes
Before cleaning, painting, or attaching anything, assemble the pipe base loosely on the floor. Thread the fittings by hand, check the height, and make sure the flanges sit flat. Pipe threads do not always tighten to the exact same angle, so you may need to loosen one joint and tighten another until the frame lines up correctly.
This is the part where the pipe base may look slightly crooked and you may question your life choices. Stay calm. Dry fitting exists because metal parts are stubborn little puzzles.
Step 4: Clean the Metal Parts
Black iron and galvanized pipe often come with oil, dust, or residue from manufacturing and shipping. Wipe every piece with mineral spirits or a suitable degreaser, then let the parts dry completely. Cleaning matters because paint and clear finishes stick better to a clean surface.
If you want the natural black pipe look, you can seal the pipe with a clear protective spray to reduce rub-off. If you prefer matte black, bronze, or aged steel, use a metal-friendly spray paint in a well-ventilated area and follow the label directions.
Step 5: Prepare the Wood Top
Cut your tabletop to size if needed. Sand the surface with 120-grit sandpaper, then move to 180-grit and finish with 220-grit for a smooth touch. Always sand with the grain. Sanding across the grain can leave scratches that show up dramatically once stain is applied, like tiny wooden regrets.
Ease the edges slightly with sandpaper or a router. Sharp edges dent more easily and feel less finished. A small roundover or softened corner makes the table look intentional rather than “I cut a board and ran out of enthusiasm.”
Step 6: Stain or Finish the Tabletop
Apply stain, paint, or clear finish according to the product instructions. If you are using pine or another softwood, consider applying wood conditioner before staining to reduce blotchiness. Dark walnut, espresso, weathered oak, and natural clear finishes all work well with industrial pipe furniture.
After the stain dries, apply a protective topcoat. A sofa table holds lamps, keys, books, drinks, and decor, so the surface needs protection. Use polyurethane for durability, polycrylic for a clearer water-based finish, or hard wax oil for a soft, hand-rubbed look.
Step 7: Attach the Pipe Base
Turn the tabletop upside down on a padded surface. Position the pipe base where you want it, usually a few inches in from each end. Use a tape measure and speed square to make sure the base is centered and straight.
Mark the flange holes with a pencil. Drill pilot holes before driving screws. Pilot holes reduce the chance of splitting the wood and make the screws easier to install. Use screws that are long enough to hold securely but not so long that they pop through the top and announce themselves to your guests.
Step 8: Level and Protect the Feet
Flip the table upright and check for wobble. If one leg is slightly high, adjust the pipe joints or add felt pads. Rubber feet or felt pads protect floors and help keep the table stable.
Place the table behind the sofa and check the height. The tabletop should feel useful without towering over the couch. If it looks too tall, swap out vertical pipe sections for shorter ones. One advantage of pipe furniture is that many parts can be changed without rebuilding the entire project.
Design Ideas for Your Industrial Console Table
Rustic Farmhouse Style
Use a stained pine or reclaimed wood top with black iron pipe legs. Add woven baskets underneath and a warm table lamp on top. This look is cozy, practical, and very good at pretending you always keep the living room clean.
Modern Industrial Style
Choose a smooth butcher block top, matte black pipe, and a clear satin finish. Keep the styling minimal with a lamp, a ceramic bowl, and one leafy plant. The result feels clean, bold, and not overly rustic.
Compact Apartment Style
Build the table only 8 to 10 inches deep and 42 to 48 inches long. Use it as a behind-couch charging station, plant ledge, or narrow entry table. Add a cord management tray underneath to hide power strips and cables.
Extra Storage Style
Add a lower wood shelf between the pipe legs. This gives you space for baskets, books, board games, or folded blankets. Just make sure the shelf is attached securely and does not interfere with the sofa placement.
Common Mistakes to Avoid
Skipping the dry fit is one of the biggest mistakes. Pipe fittings rarely line up perfectly on the first try, so assemble everything before paint or final installation.
Using screws that are too long is another classic problem. Measure your tabletop thickness and choose screws carefully. A screw tip poking through the top is not a design feature.
Forgetting to clean the pipe can lead to greasy hands, poor paint adhesion, and smudges on the finished wood. Clean first, finish second, celebrate third.
Making the table too deep can crowd the space behind the sofa. A slim depth is usually better for living rooms. You want a table, not a wooden obstacle course.
Ignoring wood movement can cause issues on wider solid wood tops. If your tabletop is wide or made from multiple boards, allow a little room for seasonal movement rather than fastening every point like you are trying to restrain a wild animal.
How Much Does a DIY Industrial Pipe Sofa Table Cost?
The cost depends on the wood, pipe size, and finish. A simple pine and black pipe table may cost around $90 to $180 if you already own basic tools. A butcher block or hardwood top can push the price higher, sometimes into the $200 to $350 range. Still, the result is custom-sized, stronger than many budget furniture options, and built exactly for your space.
To save money, look for project panels, remnant butcher block, reclaimed wood, or pre-cut boards. Pipe fittings can add up quickly, so design the base before shopping. Every extra tee, elbow, and flange is small, charming, and surprisingly good at attacking your budget.
Maintenance Tips
Dust the table regularly with a soft cloth. Clean spills quickly, especially if the top is stained wood. Avoid harsh cleaners that can damage the finish. If the pipe base loosens over time, tighten the fittings gently. If the tabletop starts to look dry or worn after years of use, lightly sand and recoat it.
For homes with kids, pets, or high-traffic living rooms, check the table occasionally for wobble. A narrow sofa table can be stable, but it should not be treated like gym equipment. It is furniture, not a jungle gym audition.
Conclusion
A DIY industrial pipe sofa table is one of those rare projects that combines style, function, and bragging rights. It solves real living room problems by adding storage, display space, lighting support, and visual balance behind a couch. It also gives you full control over size and finish, which is perfect if store-bought tables are too short, too long, too flimsy, or too expensive.
With a simple wood top, a sturdy pipe base, careful measuring, and patient finishing, you can build a custom sofa table that looks like it belongs in a boutique furniture shop. Better yet, when someone asks where you bought it, you get to casually say, “Oh, I made that,” while pretending not to enjoy the applause.
Experience Notes: What Building a DIY Industrial Pipe Sofa Table Teaches You
The first thing you learn while building a DIY industrial pipe sofa table is that measuring is not a boring step. It is the step that saves your project from becoming a very stylish mistake. A table that is one inch too tall can look awkward behind the couch, and a table that is too deep can make the walkway feel cramped. The smartest move is to mock up the dimensions with painter’s tape, cardboard, or scrap wood before committing to the final build. It feels silly for five minutes and saves frustration for years.
The second lesson is that pipe fittings have their own personality. Two elbows from the same bin may not tighten to the exact same angle. One flange may sit flatter than another. A tee fitting may stop threading right before it faces the direction you want, because apparently it has dreams of becoming abstract sculpture. That is why dry fitting is so important. Assemble the base, adjust it, walk around it, and check it from multiple angles before attaching it to the tabletop.
Another useful experience is learning how much the finish changes the mood of the table. Raw pine with black pipe feels casual and farmhouse-friendly. Dark walnut stain feels richer and more dramatic. A natural maple or butcher block top makes the whole piece look cleaner and more modern. The pipe may provide the industrial attitude, but the wood decides whether the table whispers “cozy cabin” or “downtown loft with suspiciously good lighting.”
You also discover that sanding is not optional. It is tempting to rush because unfinished wood can look smooth enough at first glance. But once stain touches rough patches, glue marks, or cross-grain scratches, every shortcut becomes visible. Working through the grits creates a surface that feels better, accepts finish more evenly, and looks more professional. The difference between “homemade” and “handcrafted” is often twenty extra minutes of sanding.
Finally, the project teaches confidence. A pipe sofa table is approachable, but it still gives you real furniture-building experience: planning, measuring, finishing, assembling, leveling, and problem-solving. You end with a useful piece of furniture and a better understanding of how materials behave. Even better, every small imperfection becomes part of the story. Maybe one pipe leg needed an extra felt pad. Maybe the stain came out darker than expected. Maybe you learned that your garage lighting lies. That is all part of the charm. The finished table is not just decor; it is proof that you can build something sturdy, attractive, and genuinely useful with your own hands.