If your outdoor space is roughly the size of a yoga mat, a parking spot, or your landlord’s patience, a vertical garden from soda bottles can be a genuinely smart solution. It is budget-friendly, beginner-friendly, and oddly satisfying in the way all good DIY projects are. You get to recycle plastic bottles, save floor space, grow herbs or leafy greens, and create something that looks surprisingly stylish once the plants fill in. In other words, it is gardening with a tiny footprint and big main-character energy.
The beauty of a soda bottle vertical garden is that it combines three useful ideas in one setup: container gardening, vertical gardening, and upcycling. Instead of spreading out across a yard, your plants grow upward on a fence, wall, balcony railing, or wooden frame. Instead of buying fancy planters, you turn empty soda bottles into small growing containers. Instead of staring at a sad blank wall, you get a living feature that can hold basil, parsley, lettuce, pothos, strawberries, or flowers.
And no, it does not require a master carpenter, a greenhouse, or a spiritual connection with compost. You just need a good plan, the right plants, and enough common sense not to hang ten heavy wet bottles from a flimsy nail and call it landscape architecture.
Why Build a Vertical Garden from Soda Bottles?
Before we start cutting plastic like caffeinated raccoons, it helps to understand why this project works so well. Traditional container gardening already solves a lot of problems: poor soil, limited ground space, and easy plant access. Vertical gardening takes that convenience and stacks it upward, making it especially useful for patios, apartment balconies, tiny backyards, school gardens, and rental properties.
Soda bottles add another layer of practicality. They are lightweight, easy to cut, widely available, and simple to hang. Each bottle becomes a mini planter. When arranged in rows or columns, the result is a compact garden that can fit into spaces where a regular raised bed would never stand a chance.
Here are a few reasons this project has lasting appeal:
It saves space
When growing room is limited, going vertical allows you to use walls and fences rather than valuable floor space.
It is affordable
You can build the entire system with recycled bottles, string or wire, potting mix, and a few simple tools.
It is customizable
You can make a sleek grid, a cascading herb wall, or a cheerful mix of edible and ornamental plants.
It makes watering and harvesting easier
Plants are elevated, visible, and easier to reach than crops sprawled across the ground.
It is a great reuse project
Instead of tossing bottles in the recycling bin and hoping for the best, you give them a second life with actual purpose.
What You Will Need
One reason this DIY vertical garden is so popular is that the supply list is refreshingly short. You do not need expensive specialty gear, though you may want gloves if you prefer not to wrestle plastic edges barehanded.
Basic materials
- 8 to 20 empty soda bottles, ideally all the same size for a cleaner look
- Sharp utility knife or heavy scissors
- Drill, awl, or heated nail for making holes
- Strong twine, paracord, wire, or zip ties
- Potting mix, not garden soil
- Small plants or seeds
- Marker and ruler
- Hooks, screws, or a sturdy support frame
- Optional: gravel-free drainage screen, coffee filters, or landscape fabric scraps to keep soil from washing out
Best bottle size
Two-liter bottles are the easiest to work with because they give roots more room. Smaller bottles can work for very shallow-rooted plants, but they dry out faster and offer less stability. If you want fewer headaches, bigger bottles win.
Choose the Right Location First
This is the step people love to ignore right before wondering why their basil looks like it is reconsidering its life choices.
Most edible plants need a good amount of sunlight. Herbs such as basil, thyme, and oregano typically prefer full sun, while leafy greens like lettuce and some salad crops can tolerate a bit less, especially in hotter weather. So before you build anything, watch your space for a day. Count how many hours of direct sun the wall, fence, or railing gets.
A good location should be:
- Strong enough to support the weight of wet soil and bottles
- Convenient to water
- Easy to access for planting and harvesting
- Appropriate for the plants you want to grow
- Protected from brutal wind if possible
If the wall gets intense afternoon sun, expect the bottles to heat up and dry out more quickly. In very hot climates, morning sun with light afternoon shade can make the system easier to manage.
How to Build a Vertical Garden from Soda Bottles Step by Step
Step 1: Wash and prep the bottles
Rinse each soda bottle thoroughly and remove labels if you want a cleaner finish. Let them dry completely. If the bottles once held sugary drinks, wash them well so you do not accidentally build a luxury insect resort.
Step 2: Mark the planting window
Lay the bottle horizontally and draw a rectangle on one side. This will become the opening where your plant grows. Leave enough plastic at the ends and along the bottom to keep the bottle sturdy. A window about 4 to 6 inches long works well for a two-liter bottle.
Step 3: Cut the opening
Using a utility knife or strong scissors, carefully cut along your outline. Smooth or trim any sharp bits. You want a generous opening for planting, but not such a huge one that the bottle turns into a floppy plastic taco.
Step 4: Add drainage holes
This part matters a lot. Poke or drill several small holes along the bottom side of the bottle so excess water can escape. Without drainage, roots can sit in soggy soil, which is a fast track to root rot, yellow leaves, and disappointment.
Step 5: Make hanging holes
Create two holes near each end of the bottle, positioned so you can thread cord or wire through them. You can hang bottles individually, but most people build them into vertical columns or horizontal rows. Keep the holes even so the bottle hangs level instead of looking permanently seasick.
Step 6: Add a soil barrier if needed
If your drainage holes are a little too enthusiastic, place a small piece of landscape fabric, mesh, or even a coffee filter inside before adding soil. This helps keep potting mix from escaping while still allowing water to drain.
Step 7: Fill with potting mix
Use a lightweight, high-quality potting mix made for containers. Do not shovel in garden soil from the yard. Yard soil is too heavy, compacts easily, drains poorly in containers, and may bring weed seeds or disease along for the ride. Fill the bottle most of the way, leaving enough space for the plant’s root ball.
Step 8: Plant your seeds or transplants
For seeds, sow according to the packet directions. For transplants, loosen the roots gently and nestle them into the potting mix. Press the soil in lightly so the plant feels secure, but do not cram it in like luggage before a budget airline flight.
Step 9: Hang the bottles securely
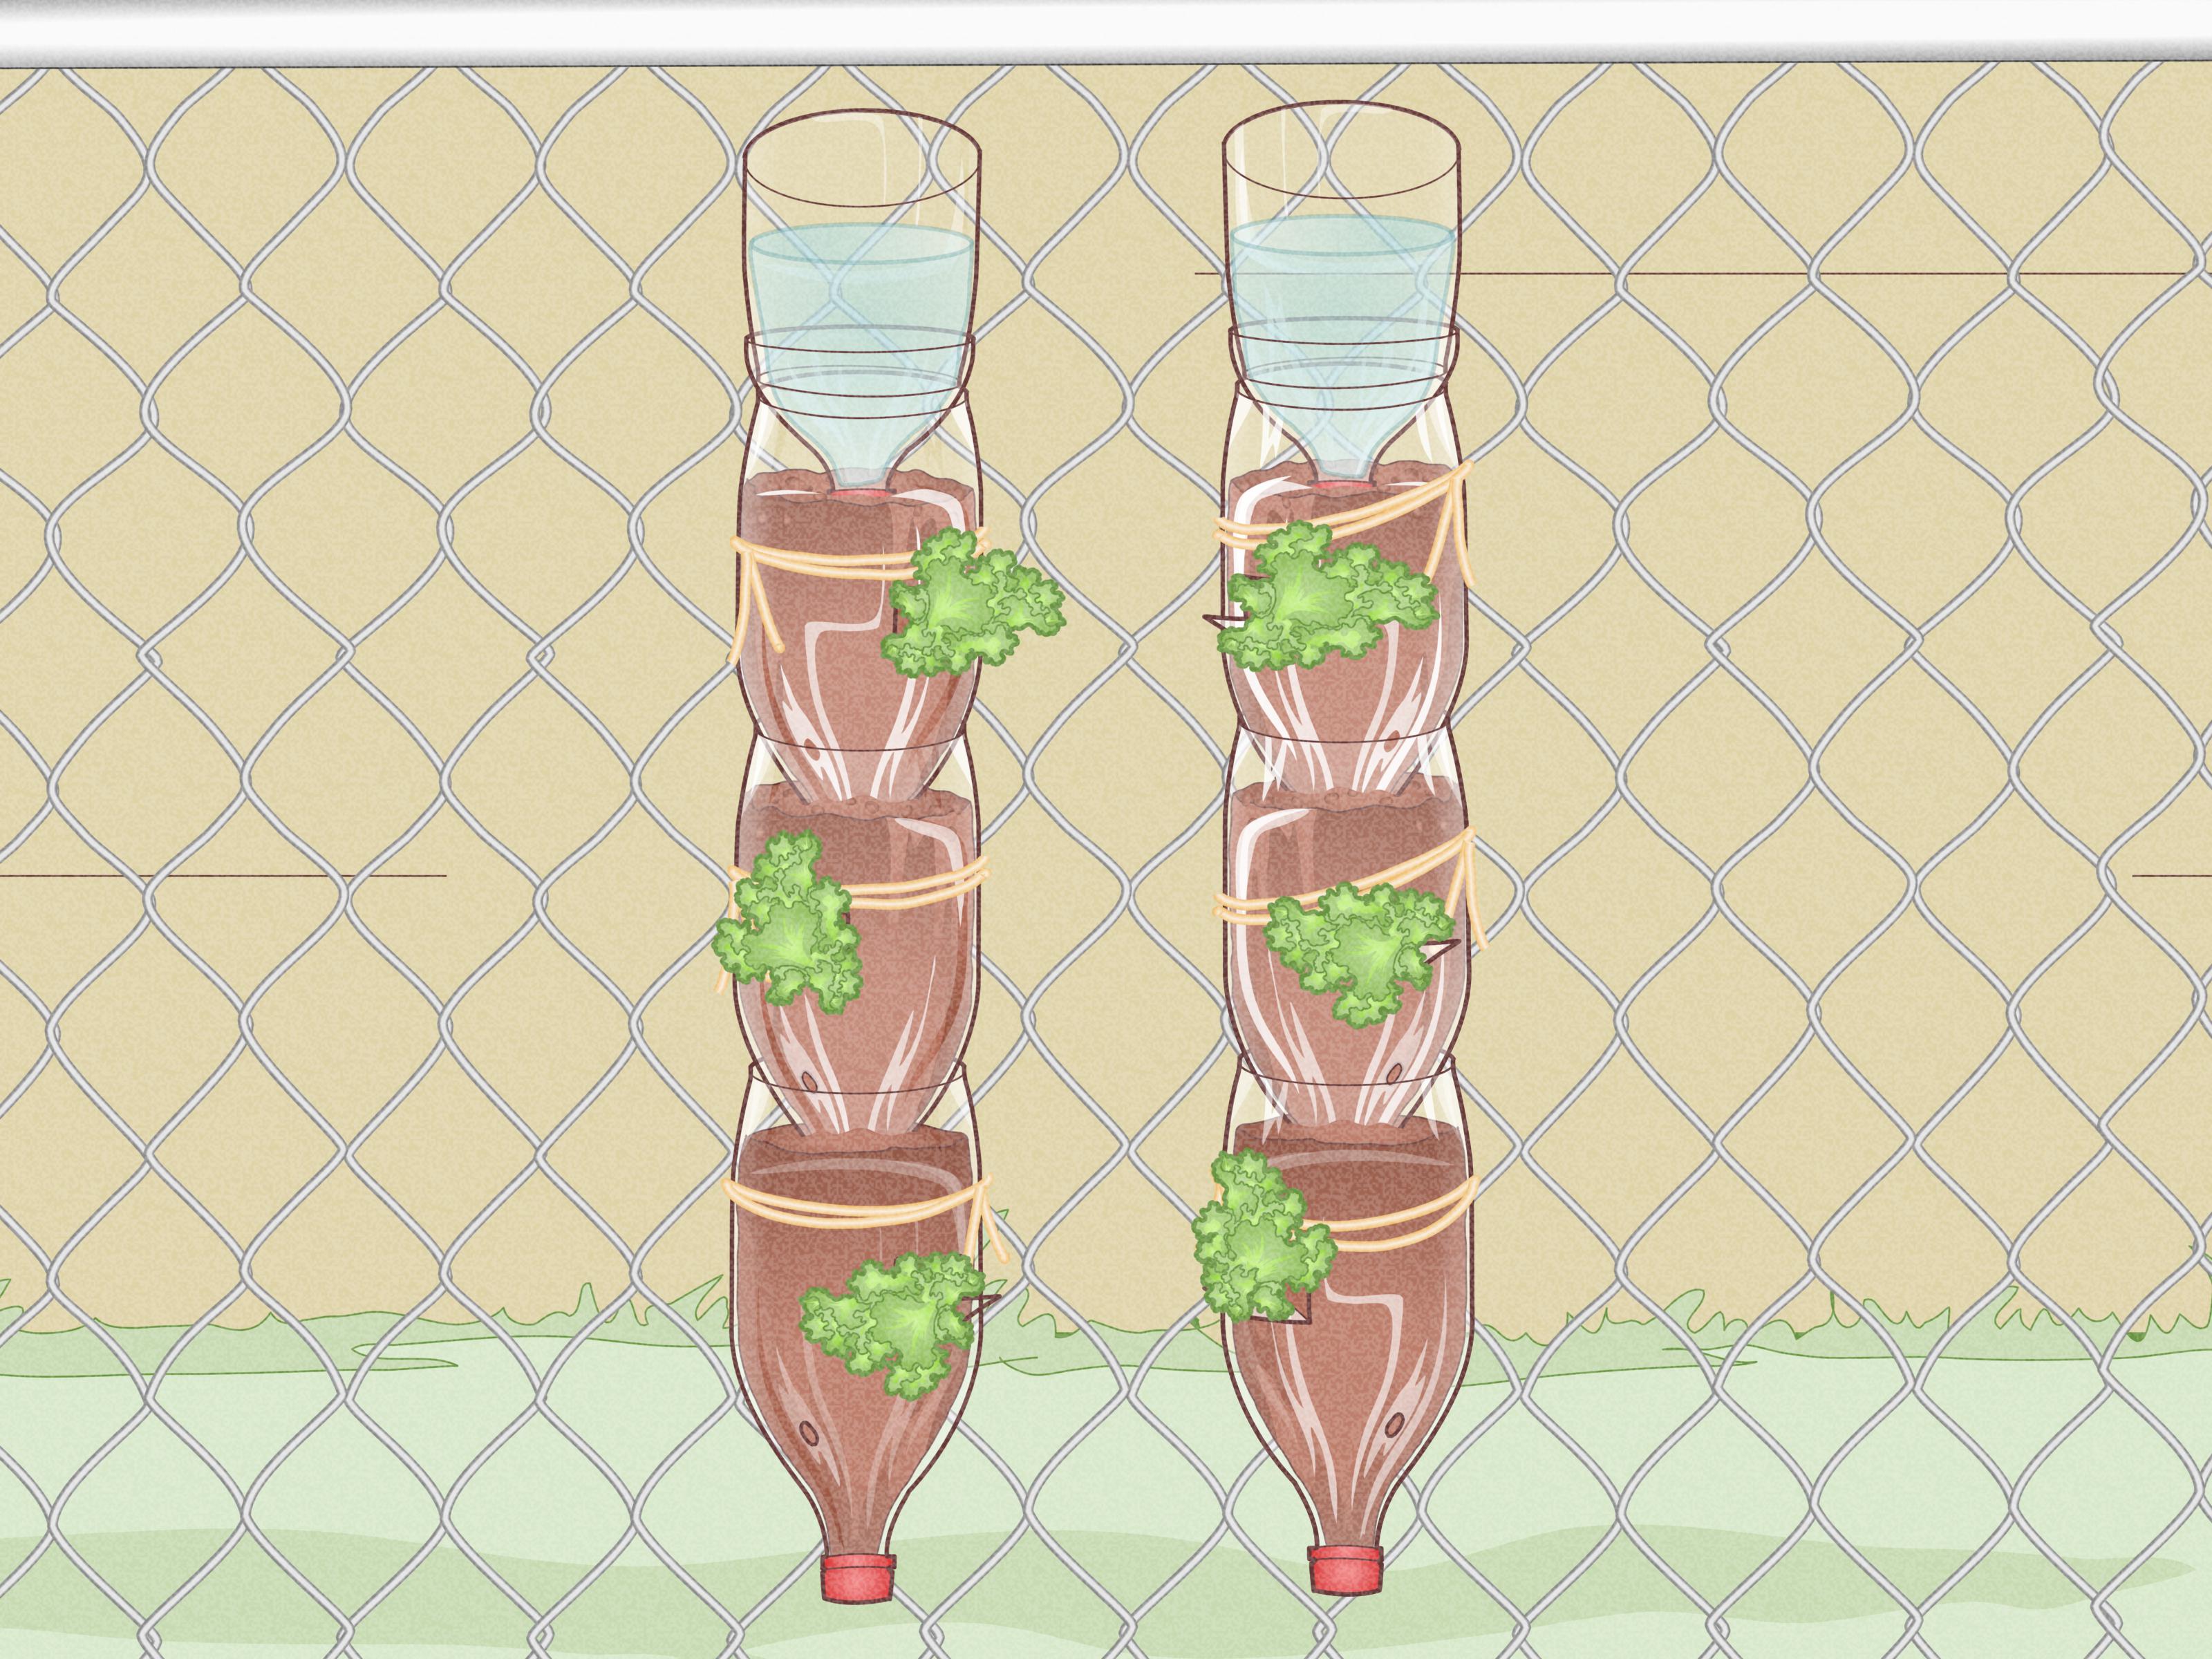
Attach the finished bottles to a sturdy support. This could be a wooden frame, chain-link fence, pallet, railing, or wall-mounted hook system. Leave enough space between bottles for airflow and plant growth. Remember that wet soil is heavy, and multiple bottles add up fast, so use hardware that can handle the load.
Step 10: Water gently and check drainage
Water each bottle slowly until moisture starts to drain out the bottom holes. If water pools inside, add more drainage. If soil spills everywhere, adjust your barrier material. The first watering is basically your garden’s dress rehearsal.
Best Plants for a Soda Bottle Vertical Garden
The ideal plants are compact, lightweight, and not outrageously demanding. A soda bottle is still a small container, so think herbs, greens, and flowers rather than corn, pumpkins, or tomatoes with delusions of grandeur.
Great edible choices
- Lettuce
- Arugula
- Spinach
- Parsley
- Cilantro
- Basil
- Chives
- Thyme
- Mint, in its own section so it does not get bossy
- Small strawberries
Great ornamental choices
- Pothos
- Spider plant babies
- Succulents in bright, dry spots
- Small annual flowers like alyssum or lobelia
- Trailing plants for a cascading effect
If you are growing herbs together, group plants with similar water and sun needs. Rosemary and oregano usually prefer drier conditions than parsley and basil, so they make awkward roommates.
How to Keep Your Bottle Garden Alive
Building the garden is the fun weekend project. Keeping it alive is the real relationship test.
Water consistently
Small containers dry out quickly, especially when mounted vertically in sun and wind. Check moisture often. In hot weather, you may need to water daily. Water until it drains, but do not let the bottles stay soggy.
Feed lightly
Because containers lose nutrients faster than in-ground beds, give plants a diluted liquid fertilizer every couple of weeks or use a slow-release fertilizer according to label directions. More fertilizer is not more love.
Harvest often
Many herbs and leafy greens respond well to regular harvesting. Snipping basil, parsley, and lettuce encourages fresh growth and keeps the garden productive.
Rotate or replace tired plants
Some crops are quick and cheerful rather than long-term companions. When lettuce bolts or cilantro gives up in summer heat, replace it with something better suited to the season.
Watch the support system
Over time, cords can stretch and hardware can loosen. Check the structure regularly, especially after rain or strong wind.
Common Mistakes to Avoid
Even a simple DIY vertical garden can go sideways if you skip the basics. Here are the big mistakes to dodge:
- Using garden soil: It is too heavy and drains poorly in containers.
- Skipping drainage holes: Roots need both water and air.
- Overcrowding plants: Tiny containers do not support giant root systems.
- Mounting on a weak surface: Wet bottles weigh more than you think.
- Ignoring sunlight needs: A shady wall will not produce sun-loving herbs.
- Forgetting maintenance: Vertical gardens are compact, not self-aware.
Design Ideas to Make It Look Better Than “I Zip-Tied Some Trash to a Fence”
Function matters, but style is allowed. In fact, style helps this project feel intentional instead of accidental.
Keep bottle sizes consistent
Uniform bottles create a cleaner, more organized appearance.
Paint or wrap the bottles
You can paint the outside of the bottles, leaving the planting window open, or wrap them with jute for a softer look. Just do not block drainage holes.
Use a repeating pattern
Alternate herbs and flowers, or create rows by color, texture, or use. One row for salad greens, one for herbs, one for trailing ornamentals.
Add labels
Plant tags help you remember what is where, which is especially useful when baby cilantro and baby parsley insist on looking like cousins.
Real-World Experience: What This Project Is Actually Like
The first time many people build a vertical garden from soda bottles, they assume the hardest part will be cutting the bottles. It is not. The hardest part is realizing that a wall full of tiny planters behaves very differently from one large container. Each bottle has less soil, dries out faster, and leaves less room for error. That sounds dramatic, but it is actually the best lesson the project can teach: small systems reward attention.
One of the most common beginner experiences is discovering that “lightweight and clever” also means “thirsty.” A bottle garden can look fantastic on day one, mildly optimistic on day three, and personally offended by day five if the weather turns hot and windy. Gardeners who succeed with this setup usually adapt quickly. They switch to a better potting mix, water more consistently, and choose plants that are naturally suited to compact containers.
Another real-life lesson is that not every plant belongs in a bottle. New gardeners sometimes start with whatever seedlings happen to be on sale, then act surprised when a large pepper plant tries to root through six cubic inches of soil like a bear in a sleeping bag. The better strategy is to treat soda bottles as mini planters. They are ideal for salad greens, herbs, strawberry runners, and decorative plants with modest root systems. Once that mental shift happens, the project becomes much easier and much more fun.
There is also the visual payoff, which is bigger than most people expect. A blank fence with plastic bottles attached can look a little “science fair meets recycling day” at first. But after two or three weeks, once the foliage fills out, the whole thing starts to feel lush and intentional. Basil softens the edges. Lettuce rounds out the openings. Trailing plants spill over the sides and make the structure look less homemade in the best possible way. Suddenly, what started as repurposed soda bottles becomes a legitimate vertical feature.
People also tend to enjoy how interactive the project is. Kids can help wash bottles, mark cut lines, and plant seeds. Apartment gardeners can build a small version on a balcony rail. Teachers can turn it into a lesson on recycling, plant growth, and water management. Even experienced gardeners often admit that bottle gardens are strangely satisfying because they combine creativity with practicality. It is part garden, part DIY project, part experiment, and part low-stakes obsession.
Then there is the maintenance rhythm. A bottle garden encourages quick check-ins. You notice dry soil faster. You spot pests earlier. You harvest more often because the plants are right at eye level instead of hiding in a crowded bed behind your squash. For many people, that convenience becomes the reason they stick with gardening in the first place. The setup invites daily interaction, and daily interaction makes gardeners better.
Of course, experience also teaches humility. Maybe one row gets too much sun. Maybe one bottle drains too slowly. Maybe mint behaves like mint and starts acting like it signed the lease. That is normal. The smartest gardeners do not treat the first build as a final masterpiece. They treat it as version one. They adjust the spacing, swap out plants, improve the hanging system, and make the next round better.
In that sense, a soda bottle vertical garden is more than a cheap way to grow herbs. It is a reminder that gardening does not have to start with a giant yard, expensive raised beds, or a beautiful potting shed worthy of a magazine spread. Sometimes it starts with a few empty bottles, a sunny wall, and the stubborn belief that fresh basil should be within arm’s reach.
And honestly, that is a pretty great place to start.
Final Thoughts
Learning how to build a vertical garden from soda bottles is one of those rare DIY projects that checks nearly every box. It is inexpensive, practical, eco-conscious, visually appealing, and beginner-friendly. It helps you grow food or flowers in a small space, reuse materials you already have, and create a garden that feels personal instead of store-bought.
The key is to treat it like real container gardening, not a shortcut. Use proper drainage. Choose a quality potting mix. Match the plants to the sunlight. Build a support system that is actually sturdy. Then keep an eye on watering and maintenance, because vertical bottle gardens reward consistency.
Do it right, and those empty soda bottles stop being clutter and start becoming a productive little wall of green. Which is not a bad glow-up for something that used to hold root beer.