Some DIY projects begin with a grand plan, a spreadsheet, and a solemn trip to the hardware store. This one can begin with a dusty vintage frame, a roll of chicken wire, and the thrilling realization that your necklaces are currently living in a knot that looks like it has its own legal department.
A vintage frame chicken wire jewelry organizer is one of those rare crafts that checks every box: it is affordable, practical, stylish, customizable, and forgiving enough that you do not need a woodworking diploma or a garage full of mysterious clamps. With a little paint and a few basic tools, an old picture frame can become a wall-mounted jewelry display that keeps earrings visible, necklaces untangled, bracelets within reach, and your dresser from looking like a tiny accessories tornado landed on it.
Even better, this project leans into the charm of imperfection. A chipped corner? Character. A slightly wavy frame? Vintage soul. A paint color you chose at 11 p.m. because it was called “Antique Whisper”? Absolutely part of the journey.
Why This DIY Jewelry Organizer Works So Well
The magic of this project comes from combining three simple elements. A vintage frame provides structure and style. Chicken wire creates an open grid for hanging earrings, hooks, and small accessories. Paint ties the whole thing together so it looks intentional instead of “I found this in the garage and panicked.”
Unlike a traditional jewelry box, a framed chicken wire organizer lets you see your collection at a glance. That matters more than it sounds. When jewelry is hidden in drawers, it becomes easy to forget what you own. Studs disappear into velvet valleys. Necklaces tangle into shiny spaghetti. Bracelets migrate into handbags for reasons science has yet to explain.
A wall-mounted jewelry organizer turns storage into display. Dangly earrings can hook directly through the chicken wire. Necklaces can hang from small S-hooks, cup hooks, or decorative knobs attached along the bottom. Bracelets can rest on hooks, ribbon loops, or even a small dowel added across the frame. The result is part organizer, part wall art, and part daily reminder that yes, you do own that cute pair of gold hoops.
What You’ll Need
Before you start, gather your supplies. The exact list depends on your frame size and personal style, but most versions of this DIY chicken wire jewelry holder use the same basic materials.
Basic Supplies
- A vintage picture frame, window frame, cabinet door frame, or thrifted wooden frame
- Chicken wire or poultry netting
- Wire cutters or tin snips
- Work gloves
- Safety glasses
- Staple gun and staples
- Sandpaper or sanding sponge
- Primer, if needed
- Paint, chalk paint, spray paint, or furniture paint
- Paintbrush or small roller
- Small hooks, S-hooks, knobs, or cup hooks
- Hanging hardware
Optional extras include ribbon, fabric backing, decorative trim, wood glue, clear topcoat, felt pads, or tiny labels if you enjoy organizing with the intensity of a museum curator.
Choosing the Right Vintage Frame
The best frame for this project is sturdy, deep enough to accept staples, and large enough to hold the jewelry you actually wear. A tiny frame may look adorable, but it will not solve much if your earring collection has been quietly multiplying since 2017.
Look for frames at thrift stores, flea markets, estate sales, yard sales, antique malls, or even in your own attic. Wood frames are usually easiest to paint and staple into. Ornate frames bring a romantic, cottage-style look. Simple rectangular frames feel modern farmhouse. Gold frames can become glam with very little effort. Dark wood frames look beautiful with black chicken wire and brass hooks.
Skip frames that are cracked beyond repair, heavily warped, too fragile, or made from material that will not hold staples securely. If the frame has glass, remove it carefully and set it aside for another project. You will also want to remove backing boards, old nails, hanging wires, and any mystery dust that may have been collecting since the Clinton administration.
A Quick Safety Note Before You Sand
Vintage pieces are charming, but older painted items can come with safety concerns. If your frame has old paint, especially if it may date from before 1978, avoid aggressive sanding until you know whether lead-based paint could be present. Use a lead test kit or choose a safer frame with a known finish. If paint is peeling or powdery, it is better to seal, test, or pass on the piece than create dust you do not want in your home.
For newer frames or unfinished wood, light sanding is usually enough. The goal is not to erase every mark. The goal is to smooth rough spots and give the paint something to grip. Wipe the frame clean afterward so the paint does not have to fight dust for custody of the surface.
How to Make a Vintage Frame Chicken Wire Jewelry Organizer
Step 1: Clean and Prep the Frame
Start by wiping the frame with a damp cloth. If it is greasy or grimy, use mild soap and water, then let it dry completely. Remove old hardware that gets in the way. Tighten loose corners with wood glue if needed, and clamp or tape them until dry.
Lightly sand glossy surfaces so primer and paint can adhere. If your frame has carved details, use a sanding sponge or fold sandpaper around your finger to reach the grooves. Do not aim for perfection. A few dents and nicks are what separate “vintage charm” from “flat-pack furniture with commitment issues.”
Step 2: Prime If Needed
Primer is useful if the frame is bare wood, dark wood, glossy, stained, or made from a material that might bleed through the paint. It also helps when you are painting a dark frame a light color. A thin coat of primer can save you from needing six coats of white paint and questioning every decision that led you here.
Let the primer dry according to the product directions. If the surface feels rough, sand lightly and wipe away dust before painting.
Step 3: Paint the Frame
This is where the personality arrives. For a farmhouse jewelry organizer, try soft white, cream, sage green, charcoal, or muted blue. For a vintage glam look, go with gold, champagne, matte black, dusty rose, or deep emerald. If you love cottage style, lightly distress the edges after painting so the old finish peeks through.
Apply thin coats instead of one thick coat. Thick paint can drip, pool in carved details, and make the frame look like it lost a fight with a frosting knife. Two light coats usually look cleaner and last longer. Let each coat dry fully before adding another.
If the organizer will live in a bathroom or humid area, consider using a protective clear topcoat once the paint has cured. Moisture and jewelry storage are not always best friends, especially for delicate metals, so a bedroom, closet, or vanity area is often a better location.
Step 4: Cut the Chicken Wire
Put on gloves and safety glasses before handling chicken wire. The cut edges can be sharp, and they do not care how cute your project is. Lay the frame face down and roll the chicken wire over the back. Cut the wire slightly larger than the opening so you have enough overlap to staple it securely to the frame.
If the wire curls from being rolled, gently flatten it with gloved hands. You can also place books or boards over it for a little while. The goal is to reduce springiness so the finished organizer sits neatly against the frame instead of trying to become a farm-themed trampoline.
Step 5: Attach the Chicken Wire
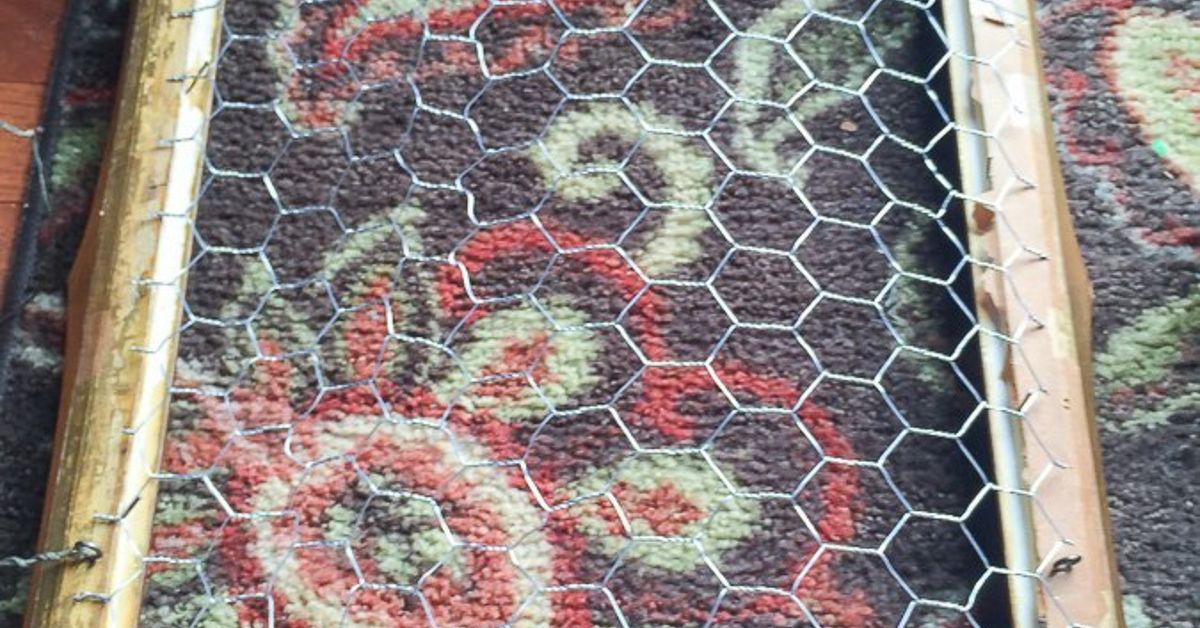
With the frame face down, position the chicken wire over the opening. Pull it taut, but do not stretch it so hard that the pattern warps. Staple one side first, then move to the opposite side and pull gently before stapling. Continue around the frame, alternating sides to keep tension even.
Use enough staples to hold the wire firmly. Once attached, trim excess wire and bend any sharp ends inward so they do not scratch the wall or your hands. For extra protection, you can cover the back edges with felt strips, ribbon, or a thin strip of fabric secured with hot glue.
Step 6: Add Hooks, Knobs, or Extras
Chicken wire is excellent for earrings, but necklaces need a little more support. Add small cup hooks along the bottom of the frame or screw decorative knobs into the lower rail. If your frame is thin, attach a narrow piece of wood across the back or bottom first, then install hooks into that.
S-hooks can hang directly from the chicken wire and work well for bracelets, rings on small loops, or lightweight necklaces. For heavier statement necklaces, use sturdier hooks attached to the wooden frame. This keeps the wire from sagging and helps the whole organizer last longer.
Step 7: Hang It Securely
Install hanging hardware that matches the weight of your organizer. A lightweight frame may only need a sawtooth hanger, while a heavier frame with lots of jewelry may need D-rings and wall anchors. Hang it where you naturally get ready: near a vanity, inside a closet, next to a mirror, or above a dresser.
Before loading it up, give it a gentle test tug. The organizer should feel stable, not dramatic. Jewelry deserves a beautiful display, not a surprise floor meeting.
Best Jewelry to Store on Chicken Wire
This type of organizer is especially good for dangly earrings, hoop earrings, lightweight necklaces, bracelets, brooches, hair clips, and charms. Earrings can hook right through the wire openings, making pairs easy to match. Necklaces can hang from hooks beneath the frame, which helps reduce tangles.
Stud earrings can be trickier because they need backs. To store studs, add a narrow strip of cork, felt, ribbon, or mesh fabric across part of the frame. You can also attach a small wooden tray or mini dish below the frame for rings, studs, and tiny pieces that like to vanish when you blink.
Avoid hanging very heavy jewelry directly on the chicken wire. Large metal statement necklaces, heavy beaded pieces, and oversized cuffs should go on frame-mounted hooks or a separate jewelry stand. Chicken wire is charming and useful, but it is not a weightlifting coach.
Design Ideas for Different Decor Styles
Farmhouse Style
Use a distressed white or weathered gray frame with silver chicken wire. Add simple black hooks or antique bronze cup hooks. This version looks great in a bedroom, mudroom, or walk-in closet with wood tones and woven baskets.
Boho Vintage
Choose a carved frame in warm terracotta, mustard, olive, or faded coral. Add brass hooks and hang a few small charms or tassels along the bottom. The look feels collected, colorful, and relaxed.
Modern Glam
Paint the frame matte black, glossy white, or metallic gold. Use black chicken wire or spray the wire to match the hardware. Pair it with crystal knobs or sleek brass hooks for a boutique-style jewelry display.
Cottagecore Charm
Go for pale blue, buttercream, soft green, or blush pink. Add floral ribbon across one corner or line the back with a subtle fabric print. This style works beautifully for delicate earrings, lockets, pearls, and romantic vintage pieces.
Common Mistakes to Avoid
The first mistake is using a flimsy frame. If the frame bends easily, it may not hold staples well. The second mistake is not wearing gloves while cutting wire. Chicken wire edges can be sharp, and craft-related finger injuries are not the charming handmade detail anyone wants.
Another common problem is attaching the wire too loosely. Loose wire sags once jewelry is added. Pull it taut as you staple, but keep the hexagon pattern even. Also, avoid overloading the center with heavy pieces. Spread jewelry across the frame so weight is balanced.
Finally, do not rush the paint. Paint that feels dry to the touch may still be soft underneath. Let it cure before installing hooks or hanging jewelry. This prevents dents, chips, and the heartbreak of discovering your favorite necklace has left a tiny groove in your beautiful new paint job.
Budget-Friendly Ways to Customize It
This project is naturally budget-friendly because the main star can be a secondhand frame. To save even more, ask a hardware store if they sell smaller cuts of chicken wire, or use leftover netting from another home project. Repurpose old knobs from a dresser, reuse hooks from a broken wall rack, or paint the frame with leftover sample paint.
You can also add a small shelf at the bottom using scrap wood. This gives you a place for perfume bottles, rings, watches, or sunglasses. Another smart upgrade is to attach the organizer inside a closet door. That keeps accessories hidden but still easy to reach.
If you are making this as a gift, customize the paint color to match the recipient’s room. Add initials, a small plaque, or a few starter hooks. It makes a thoughtful handmade present for birthdays, dorm rooms, bridal showers, Mother’s Day, or anyone whose jewelry box currently sounds like a drawer full of wind chimes.
How to Keep Your Jewelry Organizer Looking Good
Dust the frame regularly with a soft cloth. If you used a painted finish, avoid harsh cleaners that may dull or damage the surface. Check the hooks every few months to make sure they are still tight. If the chicken wire loosens over time, remove the jewelry and add a few extra staples to the back.
To make your organizer more functional, arrange jewelry by type. Keep earrings in one section, necklaces along the hooks, bracelets on S-hooks, and rings in a small dish nearby. You can also organize by color, metal tone, or frequency of use. Everyday pieces should be easiest to grab. Special occasion pieces can hang toward the sides like tiny guests waiting politely for their invitation.
Real-Life Experience: What This Project Teaches You
Making a vintage frame chicken wire jewelry organizer teaches you something important: useful home decor does not have to be expensive, complicated, or painfully perfect. In fact, the best version often comes from a frame that already has a story. Maybe it came from a flea market table stacked with old mirrors. Maybe it was hiding behind holiday decorations in the basement. Maybe it had a questionable landscape print inside it, featuring a barn, a duck, and a sunset that looked emotionally overwhelmed.
The first satisfying moment is removing the old backing and seeing the frame as raw material instead of outdated decor. Suddenly, it is not junk. It is potential. That shift is half the fun of upcycling. You begin noticing shapes, textures, and uses that were not obvious before. An old frame becomes storage. Chicken wire becomes a display grid. Paint becomes the bridge between “forgotten object” and “fabulous organizer.”
The painting stage is usually where the project develops its personality. A plain frame painted soft white can look clean and airy. The same frame in black feels bold and boutique-like. A brushed gold finish can make even a thrift-store find look like it belongs beside a velvet chair and a candle that costs more than lunch. Distressing the edges adds age and softness, while a glossy finish makes the piece feel polished and modern.
Working with chicken wire can be a little awkward at first. It curls, pokes, and behaves like it has somewhere else to be. But once it is cut, flattened, and stapled into place, the project changes quickly. The frame suddenly has purpose. The open wire pattern feels light, so it does not visually crowd a small room. It also gives jewelry breathing room, which is exactly what tangled necklaces and forgotten earrings need.
The best experience comes after hanging it on the wall and loading it with jewelry. Pieces that used to hide in drawers become part of the room. You may rediscover earrings you forgot you owned or finally separate two necklaces that had entered a long-term relationship without your permission. Getting ready becomes easier because everything is visible. Instead of digging, untangling, and sighing dramatically, you can choose accessories in seconds.
This project also makes you more aware of how small storage upgrades change daily routines. A jewelry organizer is not just about looking pretty. It saves time, protects delicate pieces, and encourages you to wear what you already have. When necklaces hang separately, they tangle less. When earrings are displayed in pairs, they are easier to match. When bracelets have a home, they stop rolling into the mysterious shadow zone behind the dresser.
Another lesson is that handmade items invite flexibility. You can add more hooks later. You can repaint the frame when your style changes. You can move it from a bedroom to a closet or turn it into a gift. Unlike many store-bought organizers, this one adapts. It can be rustic, elegant, colorful, minimal, romantic, or wonderfully odd. That is the beauty of DIY: the finished piece looks like something you chose, not something a warehouse algorithm selected for “people who also bought velvet hangers.”
In the end, this project proves that a vintage frame, chicken wire, and paint are more than random supplies. Together, they create a practical piece of wall decor with personality. It is affordable, customizable, and useful every single day. And when someone compliments it, you get the deep satisfaction of saying, “Thanks, I made it,” which is basically the DIY version of a standing ovation.
Conclusion
A vintage frame chicken wire jewelry organizer is the kind of project that makes DIY feel rewarding instead of intimidating. It turns forgotten materials into beautiful storage, clears clutter from your dresser, and gives your jewelry the spotlight it deserves. With a sturdy frame, careful paint prep, safe wire handling, and a few smart hooks, you can create an organizer that looks custom without costing custom money.
Whether your style is farmhouse, cottagecore, glam, boho, or “I just want my necklaces to stop wrestling,” this project delivers. It is simple enough for a weekend afternoon, creative enough to feel personal, and useful enough that you will wonder why you tolerated the old jewelry pile for so long.
Note: This article is original, web-ready content written in standard American English and contains no external citation placeholders or unnecessary source-reference elements.