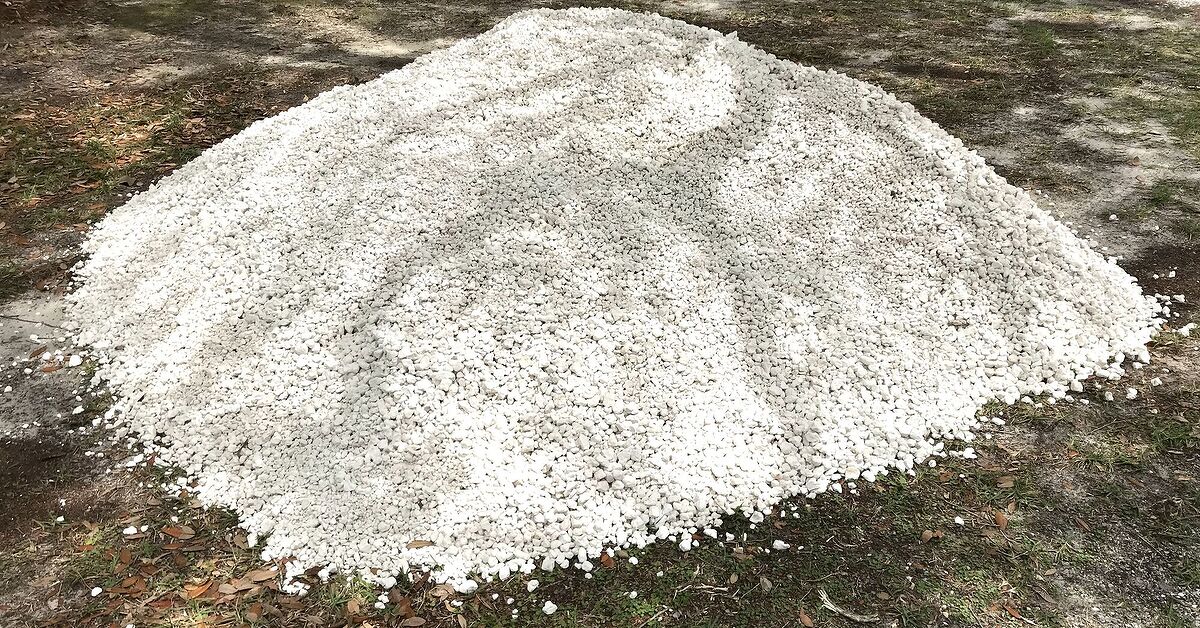
Some summer yard makeovers begin with a fancy pergola, a custom outdoor kitchen, or a contractor arriving with a clipboard and the confidence of someone who knows exactly how expensive your weekend is about to become. Others begin with something far humbler: a pile of gravel sitting in the driveway, looking like it was dropped off by a very practical mountain.
And yet, that simple pile of gravel can completely change a yard. It can turn a muddy side path into a charming walkway, transform a patchy lawn into a relaxing patio, frame garden beds, improve drainage, and make an outdoor space feel finished without draining the renovation fund. Gravel is one of those landscaping materials that quietly does the work. It is affordable, flexible, low-maintenance, and stylish in that “I planned this” wayeven when the plan started with, “What if we just covered that ugly spot?”
Used thoughtfully, gravel can give a yard an amazing summer update. The trick is knowing where to use it, what type to choose, how deep to install it, and how to keep it from wandering into the lawn like tiny decorative escape artists.
Why Gravel Is Having a Backyard Moment
Gravel has always been useful, but lately it has become a favorite for homeowners who want outdoor spaces that look polished without requiring constant mowing, watering, sealing, staining, or emotional support. A gravel patio or walkway can feel relaxed and natural, while still giving the yard structure. It works with cottage gardens, modern patios, desert-inspired landscapes, farmhouse yards, and small urban spaces.
One of gravel’s biggest strengths is its versatility. It can be used as a patio surface, a garden path, a fire pit seating area, a drainage solution, a border around raised beds, or a clean-looking filler between stepping stones. It can soften the look of hardscape, connect different zones of the yard, and create a summer-ready outdoor room with only a few materials.
It also solves a common yard problem: bare, awkward spaces. Many yards have at least one area where grass refuses to grow, water collects after rain, or foot traffic turns soil into a miniature mud festival. Gravel can be a smart fix because it creates a stable surface while allowing water to move through more easily than solid concrete.
The Big Idea: Turning Gravel Into a Summer Upgrade
The most popular way to use a pile of gravel is to create a small patio or lounge zone. Think of an unused corner of the yard, a space beside the deck, or the area under a tree where grass has given up and filed a formal resignation. With edging, landscape fabric, a compacted base, and the right gravel, that space can become a casual seating area for morning coffee, evening drinks, grilled dinners, or simply pretending you are “checking on the plants” while avoiding indoor chores.
A gravel patio is especially appealing because it does not need to look overly formal. A few Adirondack chairs, a bistro table, string lights, container plants, and maybe a fire bowl can make the whole area feel intentional. The gravel becomes a neutral floor, the plants provide softness, and the furniture tells everyone, “Yes, this is a destination now.”
Choosing the Right Gravel for the Yard
Not all gravel behaves the same way. Some types are smooth and comfortable underfoot, while others lock together more firmly. Choosing the right one depends on how the space will be used.
Pea Gravel
Pea gravel is one of the most popular choices for patios and paths. It is made of small, rounded stones, often about the size of peas, which explains the name. No actual peas are involved, so gardeners can relax. Pea gravel feels softer underfoot than sharp crushed stone, comes in earthy colors, and gives a casual, garden-friendly look.
The downside is that pea gravel can shift because the stones are round. For a patio with chairs, tables, or heavy foot traffic, edging is essential. A stabilizing grid can also help keep the surface from feeling too loose.
Crushed Stone
Crushed stone has angular edges that compact better than pea gravel. That makes it useful for paths, bases, and areas where furniture needs a steadier surface. It is less soft under bare feet, but it stays put better. If your summer dream includes a dining table that does not wobble like it is auditioning for a boat scene, crushed stone may be the better choice.
Decomposed Granite
Decomposed granite is another attractive option, especially for dry-climate or modern landscapes. It has a fine texture and can create a smooth, natural-looking surface. Stabilized decomposed granite includes a binder that helps it stay firm, which can be helpful for walkways and seating areas.
River Rock
River rock is beautiful, rounded, and larger than pea gravel. It works well in dry creek beds, drainage areas, and decorative borders. However, it is not usually the best choice for main walking surfaces because larger rounded stones can feel unstable underfoot. Save it for accent areas where it can show off without tripping your guests.
How to Build a Simple Gravel Patio
A gravel patio does not require a mansion-sized budget, but it does require proper preparation. Skipping the prep is how gravel projects become weed patches with better branding.
1. Pick the Right Location
Choose a spot that fits how you actually live. A patio close to the kitchen is great for grilling and outdoor meals. A quiet back corner is better for reading, relaxing, or escaping the soundtrack of daily life. Watch how water moves through the yard after rain, and avoid placing the patio where runoff will dump sediment or create pooling.
2. Mark the Shape
Use a garden hose, rope, marking paint, or stakes to outline the area. Curved shapes feel casual and garden-like, while rectangles and squares look clean and modern. Before digging, test the size with furniture. Put chairs or a table in the marked area and walk around them. If everyone has to shimmy sideways like they are boarding a crowded airplane, make the patio larger.
3. Excavate the Area
Remove grass, weeds, roots, and loose soil. For a typical gravel patio, digging down several inches allows room for the base, fabric, and top layer. The exact depth depends on the soil and materials, but the goal is to create a firm, level area that will not sink after the first summer thunderstorm.
4. Add a Compacted Base
A base layer of crushed stone helps with stability and drainage, especially in loose or sandy soil. Compacting the base is important. You can use a hand tamper for small projects or rent a plate compactor for larger areas. This is the step that makes the project feel less like pouring rocks on dirt and more like building a real outdoor surface.
5. Install Landscape Fabric Carefully
Permeable landscape fabric can help separate gravel from soil and reduce weed growth. It should allow water to pass through, not act like a plastic sheet. Fabric is useful under gravel patios and paths, but it is not magic. Over time, dust, soil, and organic debris can collect on top, allowing weeds to sprout anyway. That means maintenance still exists, but at least it is not a full-time job.
6. Add Strong Edging
Edging is non-negotiable. Gravel needs boundaries, much like toddlers, dogs, and group chats. Metal edging gives a clean modern look. Wood edging feels rustic. Stone or brick edging can tie into existing hardscape. Without edging, gravel will migrate into the lawn, garden beds, driveway, and possibly your shoes.
7. Spread the Gravel
For many patios and paths, a 2- to 3-inch top layer of gravel is practical. Too little gravel exposes fabric and base material. Too much gravel can feel like walking through a beach made of marbles. Spread it evenly with a rake, then walk the surface and adjust low spots.
Design Ideas That Make Gravel Look Expensive
The difference between “pile of rocks” and “beautiful summer update” is design. Gravel becomes stylish when it is framed, layered, and paired with the right elements.
Add Stepping Stones
Large pavers or flagstones set into gravel create a stable walking route and add visual rhythm. This is a great approach for garden paths, side yards, and patio entrances. The gravel fills the gaps, while the stones provide a comfortable surface for walking.
Create a Fire Pit Zone
A gravel fire pit area can feel cozy and practical. Gravel is not flammable, which makes it useful around seating zones, though local fire safety rules and proper clearances still matter. Add chairs in a circle, use large stones or metal edging to define the area, and keep the surface level so nobody’s chair slowly reclines against their will.
Frame Raised Garden Beds
Gravel paths between raised beds make vegetable gardens easier to navigate after rain. They reduce mud, create clear walking areas, and give the garden a tidy, organized look. Pea gravel works nicely for a softer look, while compacted crushed stone is better if wheelbarrows will be rolling through.
Build a Dry Creek Bed
If rainwater runs across the yard, a dry creek bed can turn a drainage issue into a landscape feature. Larger river rocks, smaller gravel, and drought-tolerant plants can mimic a natural streambed. It should be shaped to guide water safely away from structures, not simply decorated and hoped into submission.
Use Gravel Around Containers
Container gardens look especially sharp on gravel. Large planters with herbs, ornamental grasses, citrus trees, annual flowers, or succulents can soften the hardscape and add color. The best part is that containers can be rearranged when the mood changes, which is perfect for anyone who redecorates the yard like it is a living room with weather.
Plants That Pair Well With Gravel
Gravel looks best when balanced with plants. Too much rock can make a yard feel hot and sterile, while plants bring movement, shade, color, and habitat value. Drought-tolerant plants are especially good partners for gravel because they often prefer well-drained conditions.
In sunny areas, consider lavender, salvia, ornamental grasses, yarrow, sedum, coneflower, catmint, agave, rosemary, or native flowering perennials suited to your region. In partial shade, try ferns, hostas, coral bells, carex, or shade-tolerant groundcovers near the edges rather than directly in the hottest gravel zones.
The key is to avoid burying plant crowns or piling gravel against stems and trunks. Keep gravel pulled back slightly from plant bases. Around trees and shrubs, organic mulch is often better than rock because it improves soil as it breaks down and helps moderate soil conditions.
Where Gravel Works Bestand Where It Does Not
Gravel is excellent for patios, walkways, seating areas, side yards, fire pit zones, dry creek beds, and spaces that need better drainage. It is especially useful where a solid concrete slab would feel too expensive, too permanent, or too visually heavy.
However, gravel is not perfect everywhere. It can increase reflected heat in hot climates, especially when used in large areas without shade or planting. It is not the best mulch for moisture-loving garden beds. It can be difficult to keep clean under trees that drop leaves, seeds, fruit, or twigs. It may also be restricted by some homeowners associations, so checking local rules before ordering several tons is wise. Nothing says “summer drama” like an HOA letter about decorative aggregate.
Drainage Benefits of a Gravel Update
One reason gravel remains popular is that it can help water move through a surface instead of sitting on top of it. Unlike solid pavement, gravel allows rainfall to filter downward when the base and soil are suitable. That can reduce puddles and make outdoor areas usable sooner after rain.
Still, gravel is not a universal drainage cure. If the yard has heavy clay, poor grading, or water flowing toward the house, the problem may require regrading, a French drain, a swale, or professional advice. Gravel can improve a surface, but it cannot politely ask gravity to change direction.
Common Gravel Mistakes to Avoid
Using the Wrong Depth
Too shallow, and the fabric or soil shows through. Too deep, and chairs sink or feet slide. For most decorative patios and walkways, a moderate layer works better than a gravel avalanche.
Skipping Edging
Without edging, gravel spreads. It may look fine for a week, then slowly creep into nearby areas. Strong edging keeps the project neat and reduces maintenance.
Choosing Beauty Over Function
Some stones look gorgeous in photos but are uncomfortable or unstable in real life. If the area will be walked on daily, prioritize texture, size, and stability.
Forgetting Maintenance
Gravel is low-maintenance, not no-maintenance. Leaves need removing, weeds need pulling, and thin spots may need topping off. A metal rake, leaf blower, and occasional hand weeding can keep the area looking fresh.
Using Too Much Rock Near Plants
Rock-heavy landscapes can feel hotter and less hospitable to plants and pollinators. Mix gravel with planted beds, shade, containers, and organic materials to keep the yard lively.
Budget-Friendly Ways to Make Gravel Feel Custom
A gravel project does not need to be huge to make a big difference. Start with one problem area: a muddy path from the gate, a bare patch by the patio, or a forgotten corner near the fence. Add edging, a layer of gravel, a few large planters, and seating. Suddenly, the yard has a new purpose.
For a higher-end look, repeat materials already used around the home. If the house has brick details, use brick edging. If the patio has concrete pavers, set matching pavers into the gravel. If the garden has natural stone, echo that color in the gravel choice. Repetition makes the update feel designed instead of improvised, even if the entire plan was sketched on a receipt while standing in the garden center.
How to Keep a Gravel Yard Update Looking Fresh
Once the gravel is installed, regular light maintenance is better than one heroic annual cleanup. Rake the surface occasionally to smooth footprints and furniture marks. Pull weeds when they are small. Blow or sweep leaves before they break down into soil. Top off thin areas as needed, especially near entrances and seating zones.
If gravel spills over the edge, sweep or rake it back. If furniture legs sink, add flat pavers under chairs and tables. If weeds become persistent, check whether soil has accumulated on top of the gravel. Often, refreshing the surface and removing organic debris solves much of the problem.
A Realistic Experience: What It Feels Like to Update a Yard With Gravel
The experience of using gravel for a summer yard update usually begins with optimism, a tape measure, and a dangerous amount of confidence. At first, the project seems almost too easy. Mark the area, dig a little, add fabric, pour gravel, and enjoy lemonade under the string lights. Simple, right?
Then the gravel arrives.
A pile of gravel looks charming in a design article. In a driveway, it looks like a small geological event. The first lesson is that gravel is heavier than it appears. One shovel does not seem like much. Twenty shovels later, you may begin negotiating with your future self about gym memberships you no longer need. A wheelbarrow becomes your best friend, worst enemy, and personal trainer all at once.
The second lesson is that preparation matters more than the pretty final layer. Digging out grass and weeds is not glamorous, but it is the part that determines whether the finished space stays level and tidy. The base layer is also easy to underestimate. When compacted properly, it gives the patio or path a solid feel. When skipped, the surface can settle unevenly and announce every shortcut you took.
Edging is another detail that proves its value quickly. A gravel area without edging may look acceptable on day one, but after a few weeks of footsteps, rain, pets, and enthusiastic lawn mowing, the stones begin to travel. With edging, the whole project looks cleaner. It creates a defined line that makes the yard feel organized, even if the garden hose is still lying in the background like modern sculpture.
One of the most satisfying parts of a gravel makeover is how quickly the yard changes. Unlike growing a lawn or waiting for shrubs to mature, gravel gives instant structure. A dull corner can become a sitting area in a weekend. A muddy walkway can become a dry, attractive path almost immediately. Add two chairs, a planter of herbs, and a lantern, and suddenly the space has a purpose.
There are small surprises too. The sound of walking on gravel adds a pleasant crunch that makes the garden feel more intentional. Light-colored gravel can brighten a shady area, while warmer tan or brown tones blend naturally with wood fences and garden beds. Darker gravel can look modern and dramatic, especially beside concrete, black planters, or ornamental grasses.
Maintenance is manageable, but real. Leaves will fall. Weeds will test your patience. A dog may decide the new gravel zone is the world’s finest racetrack. Furniture may need pavers underneath to stay level. But compared with patchy grass, muddy corners, or cracked temporary stepping stones, gravel often feels like a major upgrade for the effort involved.
The biggest takeaway from the experience is that gravel works best when it is treated as part of a design, not just a cover-up. It needs edges, depth, balance, and plants around it. When those pieces come together, the result feels relaxed, useful, and surprisingly polished. That pile of gravel in the driveway may not look glamorous at first, but by the end of the project, it can become the foundation of the best summer hangout in the yard.
Conclusion
A pile of gravel may not look exciting when it first arrives, but it has serious makeover potential. With the right type of stone, proper preparation, sturdy edging, and a few design touches, gravel can turn an overlooked yard into a beautiful summer-ready space. It can create patios, paths, seating areas, garden borders, and drainage-friendly features without the cost or permanence of poured concrete.
The secret is using gravel thoughtfully. Pair it with plants. Keep it contained. Choose materials that match the way the space will be used. Do not expect it to eliminate every weed or solve every drainage issue overnight. Treat it like a practical design tool, and it will reward you with a yard that feels cleaner, calmer, and much more inviting.
In other words, do not underestimate the humble gravel pile. It may look like a landscaping chore at first, but with a little planning and a decent rake, it can become the summer update your yard has been waiting for.
Note: This article is written for general home landscaping inspiration. Homeowners should adjust gravel depth, drainage planning, plant choices, and fire safety details based on local climate, soil conditions, building codes, and homeowners association rules.