“`
Cutting cable by hand sounds simple until you have to do it 200 times. First, you measure. Then you cut. Then you realize the last piece is mysteriously half an inch shorter than the others, even though you swear you measured it correctly. At that point, the humble cable cutter becomes less of a tool and more of a test of patience, wrist strength, and emotional maturity.
That is exactly why a cable cutting machine can feel like a small miracle in a workshop, electronics lab, electrical shop, or wire-harness production line. It turns a slow, repetitive, error-prone job into a controlled process: enter the length, set the quantity, feed the cable, and let the machine do the boring part. No drama. No tape measure gymnastics. No pile of “almost right” wires staring at you from the bench like tiny copper accusations.
The idea is not new. Professional wire processing equipment has been used for decades in automotive, appliance, aerospace, industrial control, and electronics manufacturing. What makes the topic especially interesting today is the growing overlap between industrial automation and maker ingenuity. A homemade cable cutting machine may not replace a factory-grade cut-and-strip line, but it proves a valuable point: when a job is repetitive, measurable, and physically tiring, automation is often not a luxury. It is common sense wearing safety glasses.
Why Cable Cutting Becomes Tedious So Quickly
One cable? Easy. Ten cables? Fine. Fifty cables? Annoying. Five hundred cables? Welcome to the land of hand cramps and counting mistakes.
Manual cable cutting usually involves three separate tasks: measuring the desired length, positioning the cable, and making a clean cut. Each step creates room for variation. A cable can flex, slide, twist, or curl. A tape measure can shift. A tired operator can cut on the wrong mark. Even a small inconsistency matters when those cables are going into a control cabinet, LED installation, wiring harness, audio rack, robotics project, or batch of custom electronics kits.
The bigger the batch, the more obvious the problem becomes. Repetitive hand cutting also slows down downstream work. If wire lengths vary too much, the person stripping, crimping, labeling, bundling, or routing the cable has to compensate. That means more rework, more inspection, and more muttering under one’s breath. In a shop environment, muttering is technically free, but it is rarely productive.
What a Cable Cutting Machine Actually Does
A cable cutting machine is designed to feed cable to a set length and cut it repeatedly with consistent results. The simplest versions only measure and cut. More advanced machines may also strip insulation, mark wires, coil finished lengths, count batches, store programs, or integrate with larger production systems.
At its core, the machine solves three problems: length control, repeatability, and cutting force. A feed mechanism pulls cable from a spool or coil. A measuring system tracks how much material has moved. A blade, shear, rotary cutter, pneumatic cutter, or servo-driven cutting head performs the cut. The operator sets the length and quantity, then monitors the process instead of manually doing every motion.
For light-duty electronics work, a small benchtop automatic wire cutter can be enough. For industrial cable preparation, manufacturers use heavier machines capable of processing thick power cable, multiconductor cable, tubing, ribbon cable, and sometimes shielded or high-voltage cable. The best machine depends on the material, outer diameter, conductor size, insulation type, target tolerance, and production volume.
The Maker Version: Simple Idea, Clever Execution
The project behind the phrase “Cable Cutting Machine Makes Fast Work Of A Tedious Job” shows how practical shop automation often begins: someone gets tired of doing a boring task and decides the machine should suffer instead.
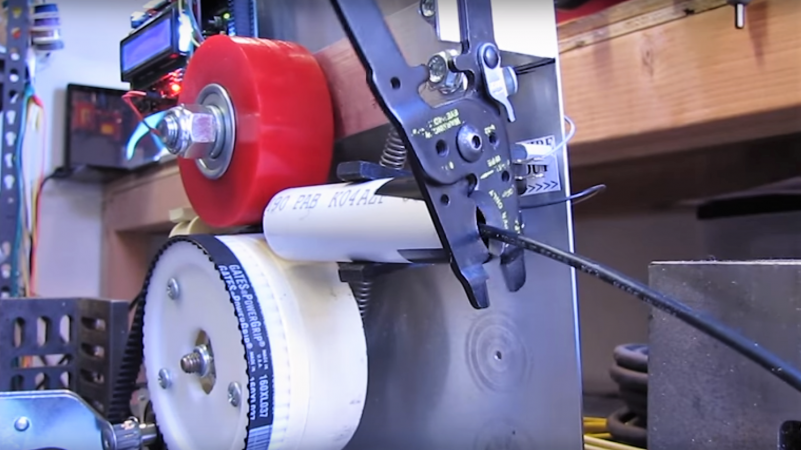
In one maker-style build, the creator started with a measuring device, added motorized feed control, and used a cutting mechanism driven by a motorized linkage. The result was a machine that could measure cable length, feed the wire, cut it, and repeat the process for a set number of pieces. Another homemade design used an Arduino controller, 3D-printed parts, a frame structure, buttons, and a display so the operator could enter cable length and quantity. In other words, it was a tiny production assistant with no coffee breaks and no opinions about Monday mornings.
This kind of machine is not meant to compete directly with commercial wire processing equipment. Instead, it demonstrates the design logic behind automation. If a task has a clear input, a clear output, and repeatable motion, it can often be automated with surprisingly modest components. The real challenge is making it reliable, safe, accurate, and easy enough to use that it does not create new problems while solving old ones.
Key Parts of a Cable Cutting Machine
1. Feed Mechanism
The feed mechanism controls how cable moves through the machine. Many systems use rollers, belts, friction wheels, or driven guides. The goal is to pull the cable without slipping, crushing insulation, or introducing twists. For flexible cable, this is harder than it sounds. Cable behaves like a stubborn noodle with a copper spine.
Good feed design matters because length accuracy depends on controlled motion. If the rollers slip, every cut can drift. If the pressure is too high, the insulation can deform. If the cable spool does not unwind smoothly, the machine may tug, pause, or feed unevenly.
2. Measuring System
Some machines calculate length by counting motor steps. Others use encoder wheels or sensor-based measurement. Step counting can work well when friction and cable diameter remain consistent, but encoders provide better feedback when material conditions vary.
For shop use, the acceptable tolerance depends on the job. A decorative LED strip lead may tolerate small variation. A wire harness for a compact enclosure may not. The machine should be tested with the actual cable, not just whatever scrap wire happens to be lying around and looking available.
3. Cutting Head
The cutting head does the heavy work. Light-gauge wire may only need a small shear blade. Larger cable may require a ratcheting, pneumatic, hydraulic, or servo-powered cutter. Industrial machines use specialized tooling designed for clean cuts, high cycle counts, and specific material types.
A clean cut is more than cosmetic. Ragged ends can make stripping difficult. Crushed insulation can affect fit. Damaged conductors can compromise electrical performance. The blade should match the cable type, and dull tooling should be replaced before it starts chewing cable like an angry beaver.
4. Controller and Interface
A controller stores settings and coordinates the feed and cut cycle. On a DIY machine, that might be an Arduino, stepper driver, LCD, and a few buttons. On a commercial unit, it may be a touchscreen interface with batch memory, speed settings, diagnostics, and production counters.
The best interface is boring in the nicest possible way. Operators should be able to set length, quantity, feed speed, and cutting mode without needing a secret handshake. In production, simple operation reduces training time and prevents avoidable mistakes.
Why Automation Improves Cable Preparation
Speed Without Guesswork
The obvious benefit is speed. A machine can feed and cut piece after piece faster than a person working with a tape measure and hand cutter. But the deeper advantage is that speed comes with consistency. Once the machine is dialed in, every cycle follows the same logic.
In a small electronics shop, that could mean preparing wire kits for assembly. In a contractor’s workshop, it might mean cutting multiple equal cable runs before going to a jobsite. In manufacturing, it can mean feeding the next stage of stripping, crimping, labeling, or harness assembly without bottlenecks.
Better Repeatability
Repeatability is the quiet hero of cable cutting. A machine that cuts 100 pieces to nearly the same length reduces layout problems and makes the final product look professional. Consistent lengths also help with documentation, packaging, and quality control.
When every wire is slightly different, workers spend time adjusting. When every wire is consistent, the rest of the process moves like it has somewhere important to be.
Less Fatigue
Anyone who has cut heavy cable by hand knows the feeling: forearms complaining, shoulders tightening, and fingers wondering if they should file a formal workplace grievance. Manual cutting can be physically demanding, especially with large copper or aluminum cable.
Automation reduces repeated squeezing, measuring, bending, and repositioning. Even when a machine does not fully eliminate manual work, it can shift the operator’s role from muscle power to setup, monitoring, and inspection.
Lower Error Rate
Manual work is vulnerable to distraction. A phone rings, someone asks a question, the operator loses count, and suddenly batch number 47 is actually batch number 46 with confidence issues. Machines can count cycles and maintain settings, helping reduce simple human errors.
That does not mean machines are magic. They still need calibration, maintenance, and supervision. But a well-set machine is usually better at repeating a boring task than a human being who has been doing that task for two hours while thinking about lunch.
Commercial Cable Cutting Machines vs. DIY Builds
A DIY cable cutting machine is attractive because it can be affordable, customizable, and deeply satisfying to build. It is ideal for learning, prototyping, hobby electronics, small-batch production, and situations where commercial equipment is too expensive or oversized.
Commercial machines, however, exist for a reason. They are built for durability, safety, support, speed, precision, and material range. Many professional systems process different wire gauges, store multiple job programs, include guarded cutting areas, and offer accessories for collecting or organizing finished wires. Heavy-duty models may handle cable diameters and conductor sizes far beyond what a homemade machine can safely manage.
The practical choice depends on volume and risk. If you cut a few dozen light wires once a month, a DIY fixture or simple benchtop cutter may be enough. If your shop cuts thousands of wires a week, pays employees to do it, and needs traceable quality, commercial equipment starts looking less like an expense and more like a very responsible adult in machine form.
Safety Should Not Be an Optional Accessory
A cable cutting machine uses force. That force does not care whether it is cutting insulation, copper, aluminum, or the wrong object placed in the wrong location. Safety is not the part of the build you add after the machine works. Safety is part of making the machine work correctly.
Important safety features include guarding around the blade, emergency stop controls, stable mounting, protected pinch points, proper wiring, strain relief, clear operating procedures, and lockout practices for maintenance. Operators should keep hands away from the cutting area and use feeding guides or fixtures when needed.
For industrial settings, machine guarding requirements are a serious matter. Cutting tools, shears, rollers, and moving linkages can create point-of-operation hazards. A responsible design prevents fingers from entering the danger zone during the cutting cycle. The best cable cutting machine is not the one that merely cuts fast; it is the one that cuts fast while keeping the operator fully attached to all original body parts.
Accuracy: The Difference Between “Close Enough” and “Correct”
Accuracy is where cable cutting machines earn their keep. A machine may feed cable based on roller rotation, motor steps, encoder feedback, or a calibrated measuring wheel. Whatever the method, it should be tested under real conditions.
Cable diameter, insulation texture, spool tension, roller pressure, feed speed, and blade condition can all affect results. Soft insulation may compress. Slick jacket material may slip. A heavy spool may resist feeding. A sharp bend before the feed rollers may cause inconsistent motion.
A good setup process includes cutting test pieces, measuring them, adjusting feed calibration, and checking the batch again after several cycles. For high-quality production, operators should inspect samples at intervals rather than assuming the first perfect piece guarantees the next 500 will behave.
Where Cable Cutting Machines Are Most Useful
Electronics Workshops
Small electronics teams often prepare jumper wires, power leads, sensor cables, and internal wiring for prototypes or kits. A compact automatic wire cutter can reduce bench time and make assemblies look cleaner.
Electrical Contractors
Contractors may cut repeated cable lengths for panels, lighting systems, low-voltage installations, or prefabricated assemblies. Pre-cutting in a controlled workspace can reduce jobsite delays.
Wire Harness Production
Wire harness manufacturing depends on repeatable preparation. Cutting, stripping, crimping, labeling, bundling, and testing all work better when the first step is consistent. Automated cutting supports predictable flow through the entire process.
Robotics and Maker Projects
Robotics projects are wire-hungry creatures. Motors, sensors, controllers, batteries, switches, and lights all need connections. A cable cutting machine can save hours when building multiple robots, test rigs, or educational kits.
Audio, Lighting, and Event Work
Custom cable lengths are common in studios, theaters, churches, clubs, and event setups. Clean, repeatable cable prep helps with labeling, routing, storage, and maintenance.
Choosing the Right Cable Cutting Machine
Before buying or building a cable cutting machine, define the work clearly. What material will be cut? What is the smallest and largest cable diameter? How many pieces are needed per batch? What tolerance is acceptable? Does the cable also need stripping, marking, coiling, or counting?
For light wire, a compact benchtop cut-and-strip machine may be ideal. For large power cable, a heavy-duty cutter with stronger feed and blade systems is necessary. For mixed production, flexibility matters more than maximum speed. For repetitive work, stored programs and batch counting can save huge amounts of time.
Also consider maintenance. Blades wear. Rollers collect dust. Guides need cleaning. Calibration changes. A machine that is easy to maintain will stay useful longer. A machine that requires heroic disassembly for basic cleaning may eventually become an expensive shelf ornament.
Common Mistakes to Avoid
The first mistake is assuming all cable behaves the same. It does not. Silicone wire, PVC-jacketed wire, coaxial cable, ribbon cable, stranded power cable, and tubing all feed differently. Test the actual material before trusting a full production batch.
The second mistake is ignoring spool management. A perfect cutting machine can still struggle if the cable snarls before it reaches the feed rollers. Use smooth spool holders, dereelers, guides, or light tension control where needed.
The third mistake is chasing speed too early. Faster is only better when the cut remains accurate and clean. Start slower, verify quality, then increase speed carefully.
The fourth mistake is treating guarding as an inconvenience. Any machine strong enough to cut cable deserves respect. If a blade can cut copper, it can ruin a day very quickly.
Real-World Experience: What It Feels Like to Use One
The first time you use a cable cutting machine for a real batch, the experience feels slightly ridiculous. You enter a length, enter a quantity, press start, and the machine begins doing the thing you were prepared to spend an hour doing by hand. There is a moment when you watch the first few pieces fall into the collection tray and think, “Wait, that’s it?” This is usually followed by a second thought: “Why did I not do this sooner?”
In a small shop, the biggest change is not just speed. It is mental relief. Manual measuring and cutting forces you to stay focused on a dull task where mistakes are easy and excitement is limited. The machine takes over the repetition, freeing you to prepare labels, check drawings, organize connectors, or simply supervise the batch with a cup of coffee that is finally still warm.
There is also a quality difference you can see immediately. A pile of machine-cut wires looks intentional. The ends line up. The batch feels controlled. When those wires move to stripping or assembly, the workbench looks less chaotic. That matters because clean preparation often leads to cleaner final assemblies. A messy start rarely produces an elegant finish.
Of course, the machine has its own personality. Feed pressure may need adjustment. A curly cable may try to escape its guide. A soft jacket may require slower speed. A dull blade may announce itself with ugly cuts. Like any useful shop tool, a cable cutting machine rewards setup. Give it the right settings and it behaves beautifully. Rush the setup and it will teach you humility one inaccurate piece at a time.
For DIY users, building or modifying a cable cutter can be as educational as it is useful. You learn about stepper motors, torque, feed calibration, friction, mechanical leverage, blade alignment, user interface design, and the eternal truth that wires love to tangle when humans are watching. The project also forces practical thinking. Where will finished pieces land? How will the machine know a cut is complete? What happens if the cable jams? How does the operator stop the cycle quickly? These questions turn a fun gadget into a real tool.
For professional users, the experience is more about workflow. A machine that cuts consistently can change how work is scheduled. Instead of cutting wires only when someone needs them, a shop can prepare batches ahead of assembly. That reduces waiting, keeps technicians focused, and makes production easier to track. In higher-volume environments, automatic cutting becomes the first step in a disciplined process rather than a side chore squeezed between “more important” tasks.
One of the most underrated benefits is morale. Nobody starts a technical career dreaming of measuring the same cable length 300 times. People like building, solving, testing, improving, and finishing. When automation removes the dullest part of the job, the human role becomes more skilled and less exhausting. That is not laziness. That is good process design.
The best lesson from using a cable cutting machine is simple: tedious work is often a signal. It tells you where time is leaking, where mistakes are hiding, and where a small amount of automation can make the whole operation better. You do not need a giant factory robot to improve a shop. Sometimes all you need is a smart little machine that measures, feeds, cuts, and quietly makes everyone wonder why they tolerated the old way for so long.
Conclusion
A cable cutting machine may not look glamorous, but it solves a real problem with beautiful directness. It takes a repetitive job, applies measurement and controlled force, and produces consistent cable lengths with less effort. Whether it is a homemade Arduino-based project, a compact benchtop cutter, or a professional wire processing system, the principle is the same: stop wasting skilled human attention on a task a machine can repeat more reliably.
For hobbyists, it is a satisfying automation project. For shops, it is a productivity upgrade. For manufacturers, it is a foundation for consistent wire harness quality. And for anyone who has ever cut cable by hand until their wrist felt like it had filed for retirement, it is proof that sometimes the best tool in the room is the one that handles the boring work without complaining.
Note: This body-only HTML article is written in standard American English for web publishing, with SEO structure, natural keyword usage, added real-world experience content, and JSON-format SEO tags at the end.
“`