At first, a concrete canoe sounds like a prank invented by civil engineering students after too much coffee. Concrete sinks, right? Well, a bowling ball sinks too, but a steel ship floats, and the same basic physics helps a concrete canoe glide across water instead of heading directly to the bottom like an overconfident patio slab. The secret is shape, displacement, lightweight concrete, reinforcement, careful curing, and a healthy respect for the fact that wet cement is not hand lotion.
Making a concrete canoe is a serious project, but it is also wonderfully strange. It combines boat design, materials science, teamwork, mold building, sanding, testing, and enough patience to make a sourdough baker look impulsive. Concrete canoe teams in the United States often treat the process like a mini engineering campaign: they design the hull, test mixes, build a mold, layer concrete and reinforcement, cure the canoe, seal it, and then prove it can float under real paddling conditions.
This guide explains how to make a concrete canoe from concept to launch. It is written for educational projects, student teams, makers, and curious builders who want a practical overview before they turn the garage into a tiny shipyard.
Safety note: A concrete canoe is not a casual weekend toy. Work with experienced builders when possible, wear proper protective gear, test the canoe in shallow controlled water first, and never paddle without approved life jackets, flotation planning, and local safety supervision.
Why Concrete Canoes Float
A concrete canoe floats because it displaces more water than it weighs. The concrete itself may be dense, but the canoe is shaped like a thin shell with an open interior. When placed in water, the hull pushes water aside. If the weight of that displaced water is greater than the combined weight of the canoe, paddlers, and gear, the canoe floats.
Think of it like a soup bowl. A ceramic bowl is heavier than water by material density, but it can float for a moment if it traps enough air and spreads its weight over a wide enough volume. A concrete canoe does the same job with more engineering and fewer kitchen disasters.
The real challenge is not simply floating. A good concrete canoe must be light enough to carry, strong enough to survive paddling forces, stiff enough to hold shape, and stable enough that the paddlers are not immediately introduced to the fish. That is why successful builds rely on three big ideas: a hydrodynamic hull, a lightweight cementitious mix, and tensile reinforcement.
Plan the Canoe Before Mixing Anything
The worst time to invent your canoe design is when the concrete is already mixed and slowly hardening in a bucket. Start with a clear plan.
Choose the Purpose
Decide whether the canoe is for display, racing, classroom demonstration, or full-scale paddling. A display canoe can be heavier and simpler. A race canoe needs better balance, lower weight, and a more refined hull. A student competition canoe must also satisfy rules related to materials, dimensions, documentation, and testing.
Select Basic Dimensions
Most full-size concrete canoes are long and narrow, often in the general range of 16 to 22 feet. The exact length depends on the team, paddler count, stability goals, and transport limits. A longer canoe can track well and move efficiently, but it is harder to store, mold, cure, and carry. A wider canoe improves stability but may create more drag. For first-time builders, a smaller prototype is smart. Build a model or short test section before committing to the floating concrete limousine.
Design the Hull Shape
The hull should have smooth curves, a clean centerline, and enough volume to support the expected load. Avoid sharp corners, sudden changes in width, or deep pockets that are hard to place concrete into. A shallow-V or rounded bottom can work well, but the best shape depends on whether you prioritize speed, stability, or ease of construction.
Many teams use CAD software to model the hull and generate cross-sections for the mold. If you do not have access to design software, you can still work from measured drawings, station templates, and careful symmetry checks. The main rule is simple: both sides must match. A canoe with one charmingly “creative” side will paddle like a shopping cart with one bad wheel.
Gather Materials and Tools
A concrete canoe uses familiar ingredients in unfamiliar ways. The materials must create a thin, tough, workable shell rather than a sidewalk.
Common Materials
- Portland cement or blended cement: The main binder that hardens through hydration.
- Supplementary cementitious materials: Fly ash, slag cement, silica fume, metakaolin, or pozzolan can improve workability, durability, density, or sustainability.
- Lightweight aggregates: Perlite, expanded shale, expanded clay, pumice, lightweight sand, glass bubbles, or similar materials help reduce density.
- Fine sand or graded fillers: Small particles help fill voids and create a smoother paste.
- Admixtures: Water reducer, superplasticizer, viscosity modifier, latex modifier, or air-entraining admixture may improve placement and performance.
- Reinforcement mesh: Fiberglass, carbon fiber, basalt, nylon, or other noncorrosive mesh can add tensile strength.
- Fibers: Short synthetic, glass, basalt, or carbon fibers may help control microcracking.
- Mold materials: Foam, plywood, MDF, fiberglass, plastic sheeting, tape, fairing compound, and mold release.
- Sealant: Concrete sealer, marine epoxy, polyurethane, or another water-resistant coating suitable for thin concrete shells.
Essential Tools
- Digital scale for accurate mix batching
- Buckets, mixing paddles, and a drill mixer
- Trowels, putty knives, and flexible spreaders
- Respirator, safety glasses, alkali-resistant gloves, long sleeves, and waterproof footwear
- Sandpaper, sanding blocks, and dust control equipment
- Measuring tapes, levels, centerline string, and templates
- Plastic sheeting, wet towels, spray bottles, and curing covers
Create a Lightweight Concrete Mix
The mix is the heart of the project. Ordinary driveway concrete is far too heavy and coarse for a canoe. A concrete canoe mix should be fine-grained, workable, cohesive, and light. The goal is not maximum compressive strength alone. The mix must spread in thin layers, bond to reinforcement, resist cracking, and cure into a durable shell.
Start With Test Batches
Never build the canoe with an untested mix. Make small trial batches first. Cast sample strips, tiles, or mini panels with the same thickness and reinforcement you plan to use in the final canoe. After curing, test them by bending, tapping, weighing, and checking for cracks. This is where you learn whether your mix behaves like elegant engineering material or crumbly gray cake.
Control the Water
Water makes concrete workable, but too much water weakens the hardened paste and increases shrinkage. Use the lowest water content that still allows placement. A water reducer or superplasticizer can help the mix flow without turning it into soup. The texture should be similar to thick frosting or peanut butter: spreadable, cohesive, and able to hold position on the mold.
Use Lightweight Aggregates Carefully
Lightweight aggregates reduce density, but they can absorb water and affect workability. Some should be pre-wetted so they do not steal water from the cement paste during mixing. Others are fragile and can break if mixed too aggressively. Add them gently and track every batch by weight so you can repeat successful results.
Balance Strength and Weight
A lighter canoe is easier to carry and paddle, but an ultra-light mix that cracks during demolding is not a victory. Aim for a practical balance. Many successful concrete canoe designs use thin concrete layers combined with mesh reinforcement rather than relying on a thick concrete wall. The reinforcement carries tension, while the concrete handles compression and shape.
Build the Mold
The mold determines the final shape of the canoe. Spend time here. A smooth, accurate mold saves hours of patching and sanding later.
Male vs. Female Mold
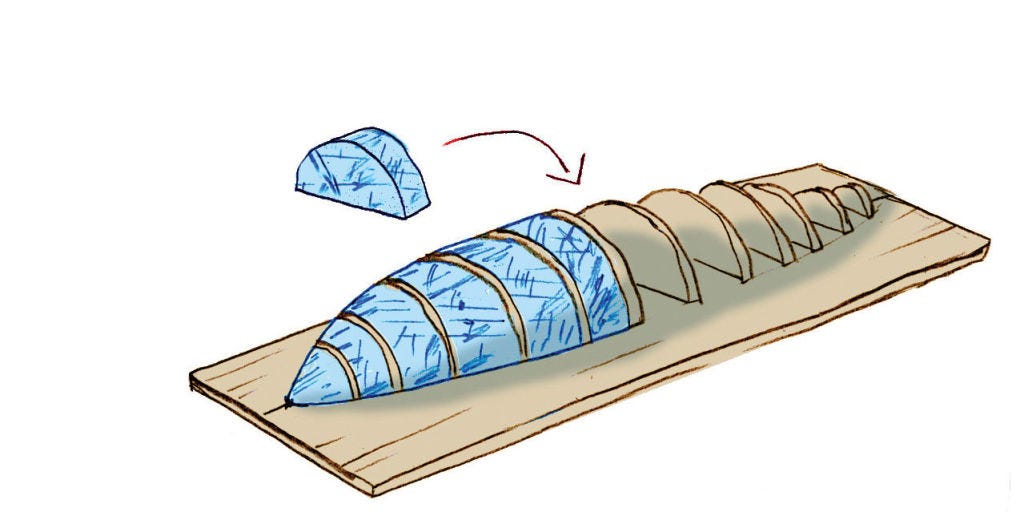
A male mold is a solid positive form over which the canoe is built. The outside of the canoe is formed against open air, while the inside touches the mold. A female mold is a hollow negative form where concrete is placed inside. Both can work, but many student teams use foam or wood-based molds shaped from cross-section templates.
A male mold is often easier for first-time builders because you can see the outside shape as you work. A female mold can produce a smoother exterior if built well, but it may be more challenging to place reinforcement and concrete evenly.
Shape and Fair the Mold
Cut station forms from plywood or foam, align them on a straight strongback, then fill the gaps with foam blocks, strips, or fairing material. Sand the surface until the hull shape is smooth and symmetrical. Check the centerline often. Use long sanding boards to remove bumps and waves.
When the mold is fair, seal it with plastic film, tape, wax, or another release system. Concrete loves to bond where you do not want it to bond. A good release layer is the difference between demolding a canoe and accidentally creating a permanent concrete sculpture of your mold.
Prepare the Reinforcement Scheme
Concrete is strong in compression but weak in tension. Canoes bend under paddler weight, water pressure, transport loads, and accidental bumps. Reinforcement helps resist those forces.
Choose Noncorrosive Mesh
Fiberglass mesh is common because it is light, available, and resistant to corrosion. Carbon fiber and basalt mesh can also work, though they may cost more. Steel can add strength, but it can rust if water reaches it, so many modern canoe projects avoid ordinary steel reinforcement in thin shells.
Layer the Shell
A typical approach is to apply a thin layer of concrete, embed mesh, add another layer of concrete, add more mesh if needed, and finish with a final layer. Some teams build shells around 3/8 inch to 5/8 inch thick, depending on the design and reinforcement. The key is uniform thickness. Thin spots become weak spots; thick spots become unnecessary ballast.
Add Ribs, Gunwales, and Bulkheads
Longitudinal ribs can stiffen the bottom. Gunwales along the top edge help the canoe keep its shape and provide a stronger rim. Bulkheads or sealed foam compartments near the ends can improve flotation if the canoe takes on water. These details add weight, so design them intentionally rather than decorating the canoe like a concrete wedding cake.
Place the Concrete
Plan the placement day like a small construction operation. Gather people, tools, pre-cut reinforcement, measured ingredients, and curing materials before mixing begins. Once cement meets water, the clock starts.
Step 1: Dry Fit Everything
Place the reinforcement on the mold before mixing. Confirm mesh pieces overlap correctly and lie flat. Mark where ribs, bulkheads, or gunwales will go. Rehearse the sequence so the team knows who mixes, who spreads, who places mesh, and who checks thickness.
Step 2: Mix in Controlled Batches
Measure ingredients by weight, not by “that looks about right.” Start with dry materials, blend thoroughly, then add water and admixtures gradually. Keep notes on batch time, temperature, workability, and any adjustments. Consistency matters because the canoe should behave as one structure, not as a patchwork of mystery concrete.
Step 3: Apply the First Layer
Spread a thin, even coat over the mold. Press it into the surface to remove air pockets. Avoid dragging large aggregate across the mold, which can tear the release layer or leave grooves. Work steadily from one end to the other.
Step 4: Embed Reinforcement
Lay the mesh into the fresh concrete and press it gently until it is fully embedded. Do not leave dry mesh floating between layers. Mesh works best when the concrete surrounds it completely. Use small tools to remove wrinkles and maintain alignment.
Step 5: Add Additional Layers
Apply the next concrete layer and continue until the shell reaches the target thickness. Check thickness with a simple gauge. Pay extra attention to the bow, stern, keel line, and gunwales, where geometry can make placement tricky.
Step 6: Finish the Surface
Smooth the surface without overworking it. Too much troweling can pull paste to the top and disturb reinforcement. The finish does not need to be perfect on placement day; sanding and patching come later. Your main goals are coverage, bonding, thickness, and absence of major voids.
Cure the Canoe Properly
Curing is not just waiting. It is controlled moisture management while cement hydration continues. If the canoe dries too fast, it can shrink, crack, and lose strength. Thin concrete shells are especially vulnerable because they have a large surface area compared with their volume.
Cover the canoe with damp towels, burlap, or sheets, then seal it with plastic to hold moisture. Keep it damp, not flooded in a way that damages the fresh surface. Many builders plan for a 28-day curing period, with special care during the first week. Temperature matters too. Avoid freezing conditions and protect the canoe from direct hot sun or dry wind.
Do not rush demolding. Concrete may feel hard after a day or two, but early strength is not the same as full readiness. Patience is cheaper than rebuilding the canoe because someone got excited and treated green concrete like seasoned oak.
Demold, Patch, Sand, and Seal
When the canoe has gained enough strength, carefully remove it from the mold. Use several people and support the hull evenly. Twisting a thin concrete canoe during demolding can create cracks before it ever sees water.
Inspect the Hull
Look for voids, exposed reinforcement, cracks, thin areas, and rough transitions. Tap gently and listen for hollow spots. Small surface defects can be patched with a compatible fine repair mix. Larger structural defects require careful evaluation; do not simply smear paste over a serious crack and call it “character.”
Sand Smoothly
Sanding improves hydrodynamics and appearance. Use dust control and respiratory protection. Concrete dust is not something to casually inhale while congratulating yourself on craftsmanship. Wet sanding can reduce dust, but manage runoff responsibly.
Seal Against Water Intrusion
A sealer helps reduce water absorption and protects the surface. Choose a product compatible with cementitious materials and the intended use. Marine epoxy can create a strong barrier, while concrete sealers may preserve more of the natural concrete look. Apply according to the manufacturer’s instructions and allow full cure before flotation testing.
Test Before You Paddle
The first water test should be boring. Boring is excellent. Boring means the canoe floats level, does not leak, and does not make cracking sounds that cause everyone on shore to suddenly become religious.
Start With a Float Test
Place the empty canoe in shallow, calm water. Keep it close to shore. Watch for leaks, uneven trim, or unexpected flexing. Add weight gradually using sandbags or water containers before adding people. This allows you to test load capacity without asking a paddler to become the first passenger on the S.S. Questionable Decisions.
Check Stability
Load the canoe with expected paddler weight and observe freeboard, or the distance from waterline to the top edge. The canoe should have enough freeboard to handle small waves and movement. If it sits too low, it may be overweight or under-volumed.
Practice Handling
Once the canoe passes basic tests, paddle gently in controlled conditions. Avoid fast currents, cold water, boat traffic, and windy days during early trials. Record observations: tracking, turning, flexing, leaks, paddler position, and comfort. Use that feedback to improve future designs.
Common Mistakes to Avoid
Making the Canoe Too Thick
Adding thickness feels safe, but it quickly adds weight. A heavy canoe may still float, but carrying it becomes a team-building exercise in spinal regret. Use reinforcement and smart geometry instead of simply piling on concrete.
Skipping Mix Testing
A concrete canoe is not the place for improvisational batching. Test panels reveal workability, cracking, density, and strength problems before they become full-size disasters.
Using Too Much Water
Extra water makes the mix easier to spread, but it can weaken the final shell. Use admixtures and proper aggregate grading to improve workability instead.
Ignoring Curing
Fast drying can ruin a good mix. Keep the canoe moist and protected. Curing is quiet, unglamorous, and absolutely essential.
Forgetting Safety
Dry cement dust can irritate the eyes and lungs. Wet concrete can burn skin. Grinding and sanding can create respirable dust. Wear protective gear, ventilate the workspace, and clean up carefully.
Experience Notes: What Building a Concrete Canoe Teaches You
The first lesson of making a concrete canoe is humility. On paper, the process looks tidy: design, mold, mix, place, cure, paddle. In real life, every step has opinions. Foam dust gets everywhere. A mold that looked perfect from five feet away suddenly reveals a suspicious bump near the bow. The first mix may be too dry, the second too sticky, and the third so perfect that someone forgets to write down exactly what changed. That is why good notes are as important as good tools.
One of the most useful experiences is learning how small adjustments affect the whole project. A little extra water may make the concrete easier to spread, but later the test panel may show more shrinkage or lower stiffness. A lightweight aggregate may reduce density, but if it absorbs water unpredictably, the batch can turn from creamy to crumbly in minutes. A mesh that looks flexible on the table may wrinkle when wrapped around the bow. These are not failures; they are the project speaking. The trick is to listen before the final pour.
Team coordination also becomes very real. Concrete placement is not a solo performance. The best pour days feel like a kitchen during dinner rush, except the cake weighs several hundred pounds and nobody should lick the spoon. One person mixes, another tracks batch numbers, others spread, embed mesh, check thickness, clean edges, and prepare curing materials. When the workflow is organized, the canoe slowly appears. When it is not, everyone gathers around the same six inches of hull while the next batch stiffens in the bucket.
Another memorable lesson is that surface quality begins long before sanding. A fair mold, tight release layer, clean reinforcement, and consistent placement produce a smoother canoe. Sanding can improve a surface, but it cannot magically fix poor geometry. Builders quickly learn to respect preparation. Every hour spent aligning templates and smoothing the mold saves several hours later, usually at the exact moment when everyone is tired and covered in gray dust.
The launch is the reward. There is a peculiar silence when the canoe first touches water. Everyone watches the waterline. Someone pretends not to be nervous. Then it floats, and suddenly the entire project makes sense. The canoe may not be perfect. It may be heavier than planned, slower than hoped, or decorated with patches that tell tiny war stories. But it floats because design, materials, labor, and patience came together. That is the real magic of a concrete canoe: it turns an impossible-sounding idea into a working object you can paddle across a pond.
Conclusion
Learning how to make a concrete canoe is really learning how to balance contradictions. You need a material known for sidewalks to behave like a boat. You need strength without too much weight, stiffness without brittleness, smoothness without overworking, and patience when every excited builder wants to launch early. The process rewards planning, testing, and careful execution.
Start with a practical hull design. Build a smooth mold. Develop a lightweight concrete mix through test batches. Use noncorrosive reinforcement. Place the concrete in controlled layers. Cure it slowly and properly. Seal it well. Then test it carefully before paddling. Follow those principles, and your concrete canoe has a real chance to do what still sounds ridiculous at first: float gracefully.
Final note: This article is intended for educational and informational use. A full-size concrete canoe should be built and tested with appropriate supervision, safety equipment, flotation planning, and respect for local boating rules.