There is a special kind of holiday magic that happens when a humble dollar-store item suddenly looks like it wandered out of a snowy Hallmark movie. That is exactly the charm behind this project: learning how to turn Dollar Tree house frames into a Christmas village that looks cozy, custom, and far more expensive than it has any right to be.
The idea is wonderfully simple. Take small house-shaped frames, paint them, add festive paper or printed backgrounds, decorate the fronts with tiny trims, and arrange them together like a miniature winter town. Before you know it, your mantel has a bakery, a chapel, a toy shop, a cottage, and possibly a suspiciously cute mayor’s office. No zoning permits required.
This DIY Christmas village is budget-friendly, flexible, and beginner-friendly. It works for small apartments, family craft nights, farmhouse holiday decor, neutral winter displays, and anyone who has ever looked at an expensive ceramic village and whispered, “Beautiful, but my wallet just fainted.”
Why Dollar Tree House Frames Work So Well for a DIY Christmas Village
Dollar Tree and similar dollar-store craft aisles often carry small wood, MDF, or house-shaped frames that are perfect for seasonal makeovers. Their simple silhouettes already look like little buildings, which means half the design work is done before the glue gun even wakes up.
Unlike traditional ceramic Christmas houses, house frames are lightweight, easy to customize, and forgiving. If one building turns out slightly crooked, just call it “historic charm.” A little paint, paper, glitter, faux snow, and ribbon can transform a basic frame into a cheerful miniature storefront.
The best part is that each frame can have its own personality. One can become a gingerbread cottage with candy-cane trim. Another can become a white chapel with a tiny wreath. A third can become a toy shop with red shutters and a snowy roofline. When grouped together, the frames create a layered Christmas village display that feels handmade in the best possible way.
Materials You Will Need
You do not need a professional workshop for this project. You need a table, a little patience, and the emotional strength to stop buying tiny bottlebrush trees after the seventh pack.
Basic Supplies
- Dollar Tree house-shaped frames or small wooden house frames
- Acrylic paint or chalk paint in white, cream, red, green, brown, black, gold, or pastel tones
- Paintbrushes or foam brushes
- Holiday cards, scrapbook paper, wrapping paper, or decorative gift bags
- Mod Podge or craft glue
- Hot glue gun or strong craft adhesive
- Scissors
- Pencil for tracing
- Mini wreaths, ribbon, stickers, faux snow, wood beads, pom-poms, or small ornaments
- Battery-operated LED tea lights or fairy lights
- Foam board, wood plank, tray, riser, or cardboard base for display
Optional Details for a More Realistic Village
- Craft sticks for roof trim, shutters, signs, or fences
- Mini bottlebrush trees
- Small figurines, deer, snowmen, or tiny cars
- White caulk or dimensional paint for snowy roof edges
- Fine glitter for frosty sparkle
- Printable brick, wood, plaid, or snowy window backgrounds
- Battery candles with timers
Step-by-Step: How to Turn Dollar Tree House Frames Into a Christmas Village
Step 1: Choose a Theme Before You Start
Before painting anything, decide what style you want. This prevents your village from looking like Santa’s craft drawer exploded. Popular themes include classic red-and-green Christmas, snowy white farmhouse, gingerbread village, pastel candy town, rustic woodland, vintage toy shop, or modern neutral winter village.
If you like a clean look, stick to two or three colors. White, wood tone, and gold create an elegant winter scene. Red, green, and black feel traditional. Pink, mint, and ivory create a candy-shop style. A theme helps each house look different while still belonging to the same tiny neighborhood.
Step 2: Remove the Backing and Prepare the Frame
If your house frame has glass or a backing, remove it carefully. Set aside any piece you may reuse. Lightly wipe the frame to remove dust. If the surface is rough, give it a quick sanding with fine-grit sandpaper.
For darker wood or slick finishes, apply a thin base coat of white paint or primer. This helps your final colors look brighter and more polished. Let each coat dry fully before adding the next one. Rushing paint is like rushing cookie dough: technically possible, emotionally disappointing.
Step 3: Paint the House Frames
Paint the outside of each frame in your chosen colors. White is a safe favorite because it instantly gives a snowy village effect. Cream feels warm and vintage. Red and green make great storefronts. Black or charcoal can create a modern Scandinavian look when paired with white details.
Use thin coats instead of one thick coat. Thin layers dry smoother and reduce brush marks. If you want an aged look, dry-brush a little brown or gray along the edges. If you want a gingerbread effect, paint the frame warm brown and add white “icing” details around the roofline and windows.
Step 4: Add Backgrounds Using Cards, Gift Bags, or Paper
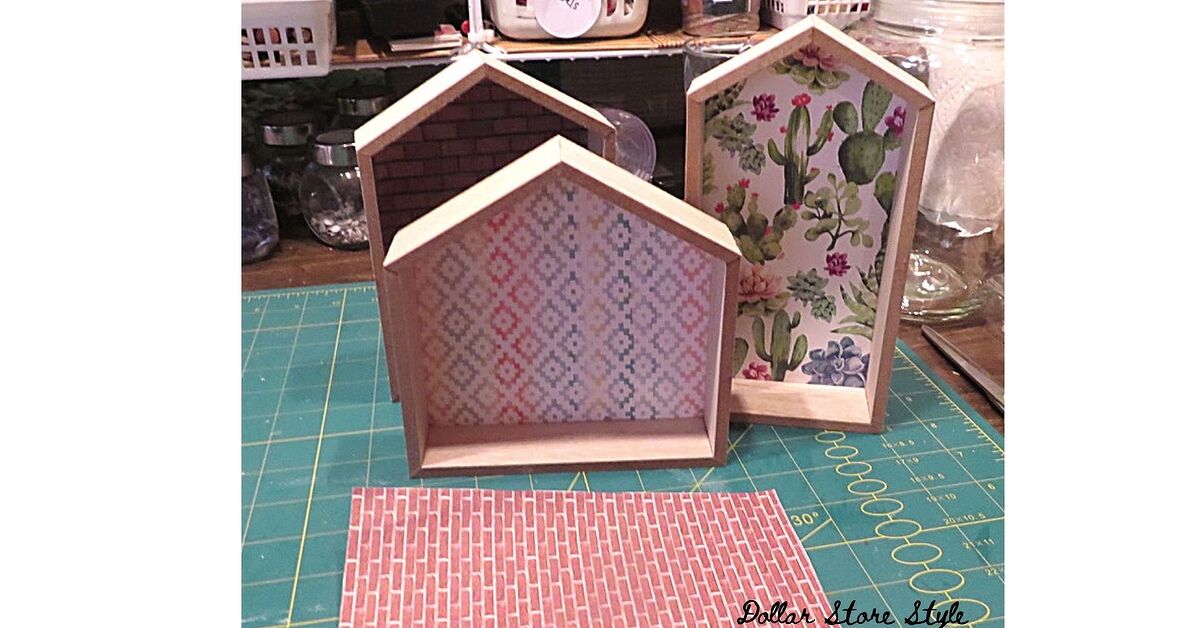
This is where the project becomes fun. Choose a holiday card, gift bag, scrapbook paper, or printable design to sit inside the frame. Brick paper can make a bakery. Plaid paper can make a cozy cabin. A snowy forest image can make a cottage look like it sits deep in the woods.
Place the frame face down on the back of your paper and trace the shape. Cut just inside the pencil line so the paper fits neatly. Attach it to the backing with Mod Podge, craft glue, or double-sided tape. Smooth from the center outward to avoid bubbles.
If you use Mod Podge, apply a thin coat under the paper, press the paper down, and then seal the top if you want extra durability. Let it dry completely before reassembling the frame. A matte finish works nicely for rustic villages, while gloss adds a shiny holiday-card look.
Step 5: Create Doors, Windows, and Storefront Details
Now give each little house a job. A simple rectangle becomes a door. Two tiny squares become windows. A small strip of craft stick becomes a shop sign. Suddenly, your frame is not just a frame; it is “Mrs. Claus’s Bakery,” and yes, the gingerbread muffins are imaginary but emotionally real.
Use cardstock, stickers, craft sticks, or painted paper scraps for architectural details. Try these ideas:
- Add a red door with a mini wreath for a cozy cottage.
- Glue tiny shutters beside the windows for farmhouse style.
- Use striped paper as an awning for a candy shop.
- Add gold stickers or letter beads to create a toy store sign.
- Use white paint dots around the roof to mimic falling snow.
- Add a tiny bell, bow, or button as a door handle.
Step 6: Add Snow, Greenery, and Texture
A Christmas village needs texture. This is the difference between “cute craft” and “tiny winter wonderland.” Add faux snow along the roofline, around the base, and on window ledges. Use a small amount of hot glue or craft glue, then sprinkle faux snow while the adhesive is still wet.
For greenery, cut small pieces from mini garland, faux pine picks, or old wreath scraps. Glue them around doors, across rooflines, or along the bottom of the frame. A tiny red bow can make even the plainest house look ready for a Christmas open house.
Do not overdo the glitter unless you want your dining table to sparkle until spring. A little shimmer is charming. A glitter blizzard is a long-term lifestyle choice.
Step 7: Build a Base for the Village
Your houses can stand alone on a mantel, shelf, or tiered tray, but a base makes the display feel intentional. Use foam board, a wood plank, a serving tray, a shallow crate, or sturdy cardboard wrapped in white felt. Add different heights with small boxes hidden under batting or faux snow.
Height is important because a flat village can look crowded. Place taller houses in the back and smaller pieces in front. Create a main street using a strip of gray paper, craft foam, or painted cardboard. Add bottlebrush trees, small figurines, and little fences to guide the eye through the display.
Step 8: Light the Village Safely
Lighting makes the village glow, but safety matters. Use battery-operated LED tea lights or LED fairy lights instead of real candles. Real flames do not belong near paper, glue, faux snow, wood frames, or anything that has been enthusiastically decorated by a person holding a glue gun.
Place LED lights behind the frames, inside open-back houses, or under cotton snow for a soft glow. Keep battery packs accessible so you do not have to dismantle the entire village just to turn it off. If you use string lights, check that the wires are not damaged and avoid overloading outlets.
Creative House Ideas for Your Dollar Tree Christmas Village
1. The Snowy White Chapel
Paint one frame bright white, add a gold or silver paper background, and glue a tiny wreath above the door. A small craft-stick cross or bell detail can create a chapel feel. Place it near the center or back of the village to act as a focal point.
2. The Gingerbread Cottage
Paint the frame warm brown and add white paint around the edges like icing. Use red pom-poms as gumdrops and striped ribbon as candy-cane trim. This style is especially fun for families and kids, though younger crafters should have help with hot glue and sharp tools.
3. The Christmas Bakery
Use brick-pattern paper as the background. Add a red door, striped awning, and a small sign that says “Bakery.” Glue tiny beads or buttons near the window to resemble pastries. This house pairs beautifully with miniature trees and a tiny bench.
4. The Toy Shop
Choose cheerful colors like red, green, yellow, and blue. Add window boxes filled with tiny pom-poms or mini ornaments. Use letter stickers for the sign. This is the building that should look like it has a sugar rush and no regrets.
5. The Rustic Woodland Cabin
Use wood-grain paper or brown paint. Add pine sprigs, twine, tiny pinecones, and white snow details. This style works well with neutral decor and looks especially pretty on a mantel with garland.
Where to Display Your Dollar Tree Christmas Village
A DIY Christmas village does not need a giant table. In fact, smaller displays often look more charming because every detail gets noticed. A mantel is the classic choice, but a bookshelf, entryway table, kitchen shelf, window ledge, coffee bar, or tiered tray can work beautifully.
For a mantel, spread the houses in a gentle curve and tuck garland behind them. For a shelf, create two levels with small risers. For a coffee bar, make a miniature “Main Street” with a bakery, cocoa shop, and toy store. For a windowsill, use LED lights so the village glows from inside and outside.
If you have pets or small children, place the display somewhere secure. Lightweight frames can tip over if bumped. Use removable adhesive dots or museum putty under the bases if needed.
Budget Tips for a High-End Look
The secret to making dollar-store crafts look expensive is editing. Choose fewer colors, repeat materials, and keep spacing balanced. A village made from five well-designed houses often looks better than twenty houses fighting for attention like they are auditioning for a holiday talent show.
Use wrapping paper, gift bags, or old Christmas cards as background art. Reuse ribbon from presents. Cut greenery from an old garland. Paint everything in a shared palette. Add one metallic accent, such as gold bells or silver snowflakes, to tie the whole scene together.
Another high-end trick is repetition. Use the same faux snow on every roof. Use the same white paint for all window trim. Use matching mini trees throughout the display. Repetition makes the village feel designed rather than randomly assembled during a peppermint-fueled craft emergency.
Common Mistakes to Avoid
Using Too Much Glue
Hot glue is helpful, but large blobs can make small crafts look messy. Use small dots and hold each piece in place until secure. For paper, use Mod Podge or craft glue instead of hot glue whenever possible.
Skipping Dry Time
Paint and decoupage need time to dry. If you decorate too soon, paper can wrinkle and details can slide around. Let each layer dry before moving to the next step.
Making Every House the Same
A village needs variety. Change roof colors, door styles, signs, and window shapes. Keep the palette consistent, but give each house a different role.
Forgetting the Back View
If your village is visible from more than one angle, finish the backs of the frames too. A quick coat of paint can make the display look polished from every side.
Experience Notes: What I Learned While Making a Dollar Tree House Frame Christmas Village
The first thing you learn when turning Dollar Tree house frames into a Christmas village is that the project looks easier on the table than it feels in your head. At the beginning, every frame looks plain. You may wonder whether it will really become anything special. Then you paint the first one white, add a tiny door, glue on a wreath, and suddenly you are emotionally attached to a two-dollar building. That is normal. That is crafting.
One practical lesson is to plan the village before decorating the individual houses. I like to line up all the frames and give each one a purpose: bakery, chapel, cottage, toy shop, cocoa stand, or tree farm. Once each house has a role, choosing colors becomes much easier. The bakery can have brick paper and a striped awning. The chapel can stay white and simple. The toy shop can be brighter. Without a plan, it is easy to make five houses that all look cute separately but chaotic together.
Another experience-based tip is to test paper placement before gluing. Holiday gift bags and cards often have beautiful artwork, but the best part of the image might disappear behind the frame opening if you do not trace carefully. I usually move the frame around the paper until the scene looks centered, then trace lightly with a pencil. If the paper has words, make sure they are straight. A crooked “Merry Christmas” sign will stare at you forever. It may not judge you, but you will know.
Paint choice also matters. Chalk paint gives a soft, cozy finish and covers well, while acrylic paint offers brighter color options. White paint is the hero of this project because it turns almost any piece into snowy decor. However, one coat rarely looks perfect. Two thin coats are better than one heavy coat. Heavy paint can collect in corners and make small frames look clumpy. Thin coats keep the edges sharp and clean.
For snow effects, less is usually more. A little faux snow on the roofline looks magical. Too much snow can cover the details you worked hard to create. I like to add snow after the doors, windows, and signs are finished so I can control where it lands. If using glitter, place the project on a tray or scrap paper. Glitter travels. It has ambition. It will move into rooms where no crafting occurred.
Lighting is the final “wow” moment. Battery-operated LED lights behind the houses create a warm glow without making the display complicated. I prefer lights with timers because they turn on automatically in the evening. If the battery pack is hidden too well, though, future you will not be amused. Always leave access behind the village or under a removable piece of faux snow.
The biggest lesson is that imperfections actually help. A slightly uneven roofline, a hand-painted sign, or a tiny wreath placed a little off-center makes the village feel handmade and loved. Store-bought villages are beautiful, but handmade villages have personality. They tell a story. They also allow you to say, “I made that,” which is one of the most satisfying holiday decorating sentences in the English language.
Final Thoughts
Learning how to turn Dollar Tree house frames into a Christmas village is one of those holiday projects that delivers maximum charm without requiring maximum money. With paint, paper, glue, faux snow, and a few LED lights, simple frames become a cozy winter town full of personality.
This project is also easy to customize. You can make it elegant, rustic, colorful, vintage, farmhouse, or gingerbread-sweet. You can build a tiny village for a shelf or a full snowy scene for a mantel. You can craft it alone with a holiday movie playing in the background, or turn it into a family project where everyone designs one house.
Best of all, a Dollar Tree Christmas village does not have to be perfect. It only has to feel warm, festive, and a little magical. After all, Christmas decorating is not about proving you own the fanciest decor. It is about creating a home that feels joyful. If that joy happens to come from a few budget frames, some fake snow, and a glue gun with main-character energy, even better.