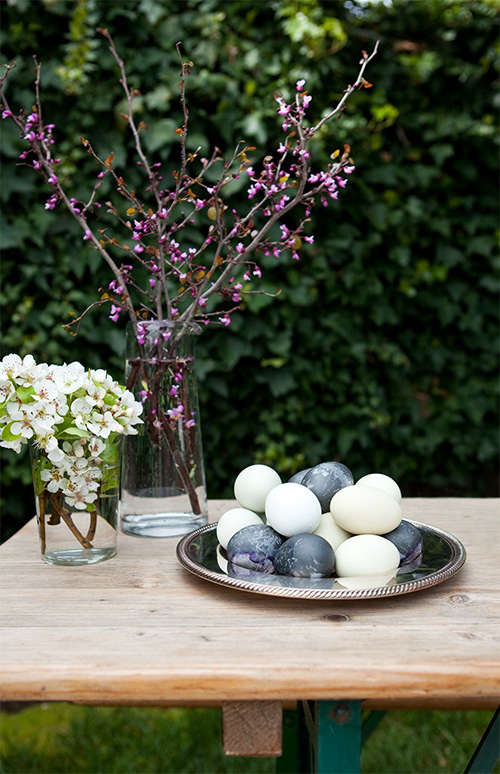
If your Easter egg kit is giving “elementary school cafeteria” and your Pinterest board is giving “moody botanical dreamscape,” hibiscus-dyed eggs are the happy medium. They are soft, dramatic, a little unpredictable, and wildly prettier than those neon tablets that somehow stain your fingers, your countertop, and possibly your soul. Using dried hibiscus flowers or strong hibiscus tea, you can create eggs in dusty rose, mauve, plum, smoky lavender, and the occasional mysterious gray-purple that looks straight out of a fancy spring centerpiece.
The charm of this DIY is that it feels equal parts craft project, kitchen experiment, and low-stakes color therapy. Natural egg dyeing has been around forever, but hibiscus brings a special kind of drama to the party. The tea is deeply pigmented, beautifully tart, and loaded with color compounds that respond to time, acidity, and even the type of eggshell you use. In other words, these eggs are not basic. They are the main character.
If you want an Easter project that looks elevated without requiring a design degree, a ring light, or twelve specialty supplies, this is it. Below, you’ll find a practical step-by-step guide, tips for getting richer color, ideas for styling your finished eggs, and a longer reflection on what the process is actually like when you do it at home with real dishes, real spills, and real expectations.
Why Hibiscus Works So Well as a Natural Easter Egg Dye
Hibiscus is one of those ingredients that seems almost suspiciously attractive. Brew it in water and it turns ruby red. Let it cool, add acid, change the soak time, or pair it with different shell colors, and suddenly the shade shifts. That is what makes it such a fun choice for DIY Easter eggs. It is a natural dye source with enough personality to feel creative but not so much chaos that you end up decorating eggs that look like a storm cloud had a rough morning.
Unlike bright synthetic dyes, hibiscus usually creates softer, more layered tones. On white eggs, the final result often lands somewhere between blush, mauve, lilac, and slate. On brown eggs, the color deepens and becomes moodier, often reading as smoky plum or antique rose. The exact finish depends on how strong your tea is, how much vinegar you use, how long the eggs soak, and whether the shells are especially smooth or a little chalky.
That unpredictability is not a flaw. It is the whole appeal. Natural dyes do not behave like paint swatches at the hardware store. They behave more like watercolor: layered, organic, and just different enough from egg to egg to make the finished batch feel handmade in the best possible way.
What You Need for Hibiscus-Dyed Easter Eggs
The supply list is refreshingly short. You do not need an official Easter egg kit, though your inner child may file a complaint.
Ingredients
12 hard-cooked eggs, white or brown
4 cups water
1 to 1 1/2 cups dried hibiscus flowers, or 6 to 8 strong hibiscus tea bags
2 tablespoons white vinegar
Optional: 1 teaspoon salt, a few extra tea bags for a stronger bath, or a tiny drizzle of oil for shine
Tools
Medium saucepan
Fine-mesh strainer
Heat-safe bowl, mug, or wide jar
Spoon or tongs
Paper towels or a wire rack
Refrigerator space, because your eggs deserve a proper spa retreat
White eggs generally give you a softer and more visible pastel result. Brown eggs create darker, earthier colors that can look especially rich and sophisticated. Neither is better. This is a vibe choice.
How to Make the Hibiscus Dye Bath
Step 1: Brew the color
Add the water and dried hibiscus flowers to a saucepan and bring the mixture just to a boil. Once it reaches that point, reduce the heat and let it simmer for about 20 to 30 minutes. If you are using tea bags, steep them in very hot water for at least 15 minutes, then press them gently to extract as much color as possible.
You are aiming for a dye bath that looks intense and dramatic in the pot. If it looks like weak pink tea, it will probably produce weak pink eggs. If it looks like something a gothic florist would serve over ice, you are on the right track.
Step 2: Strain and acidify
Strain out the flowers or remove the tea bags, then stir in the white vinegar. The vinegar helps the color bond more effectively to the eggshell. Let the dye cool to room temperature before adding the eggs, especially if the eggs are already cooked and chilled.
Step 3: Prep the eggs
If your eggs have condensation, fingerprints, or a little fridge funk on the shells, wipe them gently with a paper towel dampened with vinegar. This quick step helps the dye cling more evenly and can reduce patchiness. It is not glamorous, but it matters.
How to Dye the Eggs
Step 4: Soak for color
Carefully lower the eggs into the cooled hibiscus dye. Make sure they are fully submerged. If your container is shallow, rotate them occasionally so one side does not hog all the color like a diva in rehearsal.
Here is the general timing guide:
15 to 30 minutes: pale blush or light gray-lilac
1 to 2 hours: deeper mauve and dusty violet tones
Overnight in the refrigerator: the richest plum, smoky rose, and stormy purple shades
Natural dyes reward patience. If the eggs look underwhelming after twenty minutes, do not panic and start accusing the hibiscus of fraud. Just give it more time. Some of the best natural-dyed eggs look almost ordinary while wet and then reveal their real color once dry.
Step 5: Remove and dry
Lift the eggs out with a spoon or tongs and place them on a rack or paper towel to dry. Do not rub them while they are wet unless your goal is “abstract watercolor accident.” Let them dry naturally for the cleanest finish.
If you want a soft sheen, rub each completely dry egg with the tiniest drop of neutral oil on a paper towel. Not a tablespoon. Not a dramatic pour. Just enough to make the shell glow a little.
How to Get Better Color Every Time
Use stronger hibiscus than you think you need
Natural dye baths should be stronger than a cup of tea you would actually want to drink. More dried hibiscus usually equals more color depth, especially if you want eggs that read purple instead of merely pinkish.
Refrigerate for overnight soaking
If you want richer results, soak the eggs overnight in the refrigerator. This is the easiest upgrade and the one that usually makes people say, “Oh wow, these actually look expensive.”
Try brown eggs for moodier results
White eggs show the cleanest color. Brown eggs create deeper, smokier tones that feel a little vintage and very stylish. If you are going for cottagecore with a side of grown-up dinner-party energy, brown eggs are excellent.
Do not expect identical eggs
Natural dyeing is not about perfect duplication. One egg may turn dusty mauve, another slate purple, another pink with speckles. That variation is what gives the batch character. Think curated collection, not factory output.
Layer for complexity
Once the eggs are fully dry, you can briefly dip one or two into another natural dye bath, such as turmeric or red cabbage, for layered tones. This is optional, but it can create green-gray, plum-brown, or antique mauve effects that look wonderfully handmade.
Creative Styling Ideas for Hibiscus Easter Eggs
Hibiscus-dyed Easter eggs are naturally elegant, so they do not need much fussing. A few styling tricks go a long way.
Botanical look
Nest the finished eggs in a bowl lined with moss, fern clippings, or eucalyptus. The soft purple-pink tones look gorgeous next to green foliage and instantly make your table look more intentional.
Minimalist brunch centerpiece
Place the eggs in a stoneware bowl or a wooden tray with linen napkins and a few white flowers. Suddenly your Easter setup looks less “plastic grass explosion” and more “I casually understand color theory.”
Giftable egg carton
Arrange them in a kraft paper egg carton and tie it with ribbon. It is simple, sweet, and oddly chic. Add a handwritten note and you have a low-cost homemade Easter gift that feels thoughtful instead of last-minute.
Egg Safety: The Part Where We Keep the Pretty Eggs Safe to Eat
If you plan to eat the eggs after dyeing, treat them like actual food and not tiny seasonal sculptures. Start with properly hard-cooked eggs, cool them promptly, and keep them refrigerated when they are not being dyed, displayed briefly, or turned into deviled eggs five minutes before guests arrive.
Do not leave dyed hard-cooked eggs sitting out for hours just because they look adorable in a basket. If eggs are cracked during handling or sit out too long, they should be discarded. Food safety is not as glamorous as mauve eggs, but it is more useful.
If your goal is decoration only, blown-out eggs are another option. They let you keep your favorite results much longer. But for edible eggs, the rule is simple: chill promptly, display briefly, and enjoy within the week.
Why This DIY Easter Project Is Worth Doing
Hibiscus-dyed Easter eggs hit a sweet spot that a lot of holiday crafts miss. They are affordable, practical, beautiful, and genuinely fun to make. You can do them with kids, but they do not look childish. You can do them solo, but the process still feels festive. You can keep the project simple or fuss over every shade like you are casting a prestige drama about decorative eggs in springtime.
They also invite experimentation. You begin with a saucepan and a handful of tea, and suddenly you are comparing shell colors, soaking times, and drying methods like a tiny kitchen scientist. The process slows you down in a good way. It makes the holiday feel handmade rather than hurried. And when the eggs come out looking beautifully imperfect, it feels more satisfying than opening a kit, dropping in a color tablet, and hoping for the best.
In a season full of sugar, schedules, and overcommitted brunch plans, there is something deeply pleasant about making a mess on purpose and ending up with something lovely.
Experience Notes: What It Is Actually Like to Make DIY Hibiscus-Dyed Easter Eggs at Home
The first time you make hibiscus-dyed Easter eggs, you may assume it will be a quick little craft. Boil tea. Dunk eggs. Become effortlessly elegant. What actually happens is more charming than that. You brew the hibiscus and immediately realize the kitchen smells amazing, kind of tart and fruity, like a tea shop wandered into your house and decided to stay for Easter. The color in the pot looks so bold that you start making confident predictions about jewel-toned masterpieces.
Then you lower in the eggs and nothing dramatic happens right away. This is the emotional arc of natural dyeing: false confidence, suspicious waiting, then delighted surprise. At first the eggs may look unimpressive, almost disappointingly subtle. But once you give them time, especially an hour or more, they begin to develop those smoky, moody shades that make the whole project worth it. It is less like using paint and more like coaxing color out of the shells.
Another thing you notice quickly is that every egg behaves a little differently. One turns dusty rose. Another comes out with tiny speckles. Another somehow looks like a prop from a very tasteful spring wedding. Even when the eggs sit in the same dye bath, they rarely come out as identical twins. That unpredictability can feel inconvenient if you want total control, but it is fantastic if you want a batch that looks natural and handcrafted.
There is also a practical pleasure in how low-pressure the project feels. You are not dealing with fancy equipment or fragile materials. If the color is too light, soak longer. If it is too dark, call it moody and sophisticated. If you drip hibiscus on the counter, clean it up and keep moving. This is not one of those DIY projects where a single mistake turns the whole experience into a personal feud with the internet.
If you do this with family, the project becomes even better. Kids enjoy the transformation, adults appreciate that the final result does not scream cartoonish holiday craft, and everyone gets to pretend they are doing science without having to label anything a science project. The waiting time also works in your favor. Since the eggs need to sit, the activity does not feel frantic. You can make the dye, soak the eggs, go do something else, then return to check on them like tiny colorful experiments in progress.
Perhaps the nicest part is what happens at the end. Once the eggs are dry and gathered together, they look surprisingly elegant. The batch has depth. The colors relate to each other without matching too perfectly. They look good in wooden bowls, ceramic dishes, egg cartons, or scattered around a spring table. They feel seasonal without being loud. And because you made them from such simple ingredients, the result is satisfying in a way that feels both creative and grounded.
That is why hibiscus-dyed eggs tend to stick in your memory. They are not just another Easter craft. They are a small ritual: brew, soak, wait, reveal. And honestly, in a holiday season that can get a little overdecorated and overcomplicated, that ritual feels refreshingly human.
Conclusion
DIY hibiscus-dyed Easter eggs are proof that simple ingredients can create memorable holiday traditions. With little more than eggs, water, vinegar, and hibiscus tea, you can produce elegant natural colors that feel modern, handmade, and wonderfully imperfect. Whether you prefer pale mauve shades or deeper plum tones, the beauty of this project lies in the process as much as the result. It is easy enough for beginners, interesting enough for seasoned crafters, and stylish enough to earn a permanent spot in your Easter decorating rotation.