Baby gate installation sounds simple until you are standing in the hallway with a tape measure, a bag of mysterious screws, one crying baby, one curious toddler, and a dog who believes every gate is a personal insult. The good news? Installing a baby gate is not rocket science. The slightly less cozy news? It does require more thought than “stick gate here, hope for the best.”
A properly installed baby gate can help keep crawlers, cruisers, and tiny speed-runners away from stairs, kitchens, fireplaces, bathrooms, laundry rooms, home offices, and other areas that are not exactly designed for people who think cabinet hinges are fascinating. The key phrase, however, is properly installed. The right gate in the wrong placeor the wrong gate in a high-risk placecan create a false sense of security.
This guide walks you through choosing the right baby gate, measuring your space, installing hardware-mounted and pressure-mounted gates, avoiding common mistakes, and maintaining the gate after it goes up. Think of it as the calm, practical friend who says, “Maybe do not put a pressure gate at the top of the stairs,” while handing you the correct drill bit.
Why Baby Gate Installation Matters
Once babies begin rolling, crawling, pulling up, or walking, the home changes overnight. That quiet hallway becomes a racetrack. Stairs become Mount Everest. The kitchen becomes a land of shiny knobs, drawers, and forbidden snacks. Baby gates are not meant to replace supervision, but they create an important layer of protection.
Safety organizations commonly recommend installing gates before your baby becomes fully mobile, often around the time crawling or scooting is expected. Waiting until the first stair-climbing attempt is like waiting to buy an umbrella until after your socks are wet. Install early, test often, and adjust as your child grows stronger and more creative.
Types of Baby Gates
Hardware-Mounted Baby Gates
A hardware-mounted baby gate attaches directly to a wall, door frame, banister, or stud using screws and brackets. This type is the best choice for high-risk areas, especially the top of stairs. Because it is physically fastened into the structure, it is much harder for a child to push loose.
Hardware-mounted gates usually swing open like a door. Many models include a latch that adults can operate with one hand while carrying laundry, groceries, or a baby who has suddenly become a small wiggling octopus. For stairways, look for a gate without a bottom threshold bar, because that bar can become a tripping hazard.
Pressure-Mounted Baby Gates
A pressure-mounted gate stays in place by pressing rubber pads against two opposing surfaces. These gates are popular because they are quick to install and usually do not require drilling. They work best in low-risk areas such as doorways, hallways, or between rooms on the same floor.
Pressure-mounted gates should not be used at the top of stairs. Even a gate that feels firm can loosen over time from daily opening, closing, pushing, leaning, and toddler testing. At the top of stairs, “probably fine” is not a safety plan.
Retractable Baby Gates
Retractable gates roll or slide out of the way when not in use. They can be helpful in awkward spaces, wide openings, or areas where a swinging gate would be inconvenient. However, not every retractable gate is suitable for every location. Always check the manufacturer’s label and instructions, especially for stair use.
If you choose a retractable gate, make sure the mesh or fabric stays tight when locked, the latch is easy for adults but difficult for children, and the mounting hardware is installed into a secure surface.
Extra-Wide and Configurable Gates
Open floor plans are beautiful until you try to block one. Extra-wide gates and configurable panel gates are designed for large openings, fireplaces, irregular walls, and room dividers. These often require wall brackets and careful measuring. They can be very effective, but they must be installed according to the manufacturer’s instructions so panels do not flex or shift.
Where to Install Baby Gates
Top of Stairs
The top of stairs is the most important place to choose carefully. Use a hardware-mounted baby gate that screws securely into wall studs, solid wood trim, or approved banister mounting kits. Do not use a pressure-mounted gate here, even if it includes wall cups. A gate at the top of stairs must resist pushing, pulling, shaking, and leaning.
Install the gate so it opens away from the stairs whenever possible. This helps prevent the gate from swinging out over the stairway. Also avoid models with a raised bottom bar at stair tops, because adults can trip over the threshold while carrying a child.
Bottom of Stairs
The bottom of stairs also benefits from a gate, especially when babies begin crawling upward. Many families use a hardware-mounted gate here as well, particularly if the staircase is heavily used. A pressure-mounted gate may be acceptable at the bottom in some homes, but only if it sits on a flat, secure surface and is not placed on a step.
Kitchen Entrances
Kitchens are full of temptations: hot surfaces, sharp tools, cleaning supplies, trash cans, pet bowls, and cabinets that apparently exist for babies to empty. A baby gate at the kitchen entrance can make meal prep less stressful. For standard doorways, pressure-mounted gates often work well, but hardware-mounted gates may be better if the opening is wide or frequently bumped.
Bathrooms and Laundry Rooms
Bathrooms and laundry rooms contain water, cleaning products, small objects, slippery floors, and appliances. A gate can help keep babies out, but it should be paired with cabinet locks, toilet locks, and secure storage. Gates are one layer of protection, not a magic force field.
Fireplaces and Wood Stoves
For fireplaces, wood stoves, and hearths, use a configurable safety gate designed for heat zones and wide barriers. The gate should sit far enough away from hot surfaces to prevent burns and should be secured so it cannot tip or collapse. Never rely on a lightweight freestanding barrier around a heat source.
Tools and Supplies You May Need
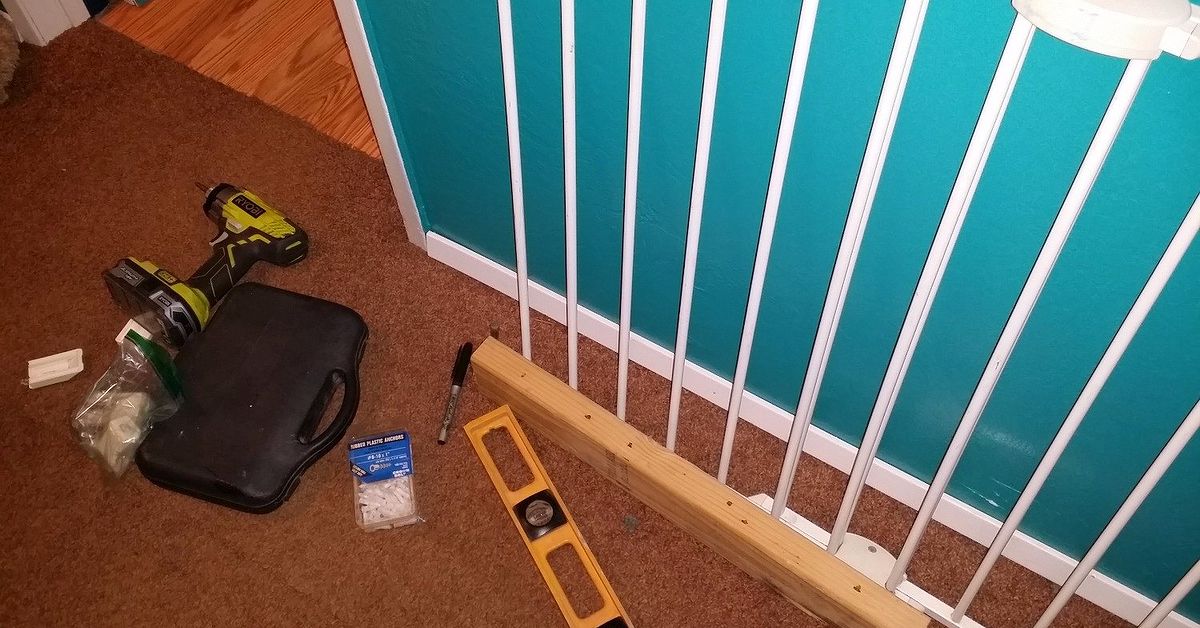
Before starting baby gate installation, gather the basics. You may need a tape measure, pencil, level, screwdriver, drill, drill bits, stud finder, wall anchors, mounting brackets, screws, banister adapter kit, and the gate’s instruction manual. Yes, the manual matters. It may not be thrilling literature, but it is safer than guessing.
For hardware-mounted gates, the strongest installation usually involves drilling into studs or solid wood. Drywall alone is not strong enough for a stair gate unless the product specifically includes approved anchors for that use. When in doubt, use a stud finder or ask a qualified installer.
How to Measure for a Baby Gate
Measuring is the step that saves you from returning a gate while muttering in the customer service line. Start by measuring the width of the opening at the exact height where the gate will sit. Measure at the top, middle, and bottom because walls and trim are not always perfectly straight.
Next, check the mounting surfaces. Are both sides flat? Is there baseboard molding in the way? Is one side a banister and the other side drywall? Is the wall angled? These details determine whether you need a standard gate, an angle-mount gate, a banister kit, or a custom solution.
Also measure the height. Many baby gates are around 28 to 36 inches tall, but taller gates may be useful for older toddlers or homes with pets. The gate should be high enough to discourage climbing, and the design should not include horizontal bars that act like a ladder.
Step-by-Step: Installing a Hardware-Mounted Baby Gate
Step 1: Choose the Correct Location
Place the gate on a flat, stable surface. At the top of stairs, install it at the landing rather than on a step. Make sure the gate will not interfere with doors, handrails, or walking paths.
Step 2: Find the Studs or Solid Mounting Points
Use a stud finder to locate wall studs. Mark the center of each stud with a pencil. If installing on a banister, use a manufacturer-approved banister mounting kit rather than drilling randomly into railings or improvising with questionable materials from the garage.
Step 3: Mark the Bracket Height
Hold the gate in place and use a level to keep it straight. Mark the bracket holes carefully. A crooked baby gate will still block a doorway, but it may swing poorly, latch badly, and quietly annoy you every single day.
Step 4: Drill Pilot Holes
Drill pilot holes where marked. Pilot holes help prevent wood from splitting and make screws easier to drive. Use the drill bit size recommended by the manufacturer.
Step 5: Attach the Mounting Brackets
Screw the brackets into the wall, trim, stud, or approved mounting kit. Tighten firmly, but do not over-tighten to the point of stripping screws or cracking trim.
Step 6: Hang the Gate
Attach the gate to the brackets according to the instructions. Check that the gate swings smoothly, closes fully, and latches securely. If it has a stop bracket for stair use, install it so the gate cannot swing out over the stairs.
Step 7: Test the Gate
Push and pull the gate from several angles. It should not wobble, slide, or detach. Open and close it multiple times. If the latch sticks or the gate sags, adjust it before relying on it.
Step-by-Step: Installing a Pressure-Mounted Baby Gate
Step 1: Confirm the Location Is Low-Risk
Use pressure-mounted gates only in places where a fall would not occur if the gate failed. Doorways and hallways are common choices. Avoid stair tops, uneven surfaces, and weak trim.
Step 2: Measure the Opening
Check the gate’s approved width range. Do not stretch a gate beyond its listed limit. Extensions should be manufacturer-approved and installed exactly as directed.
Step 3: Position the Gate
Place the gate level and centered in the opening. The pressure pads should contact solid, flat surfaces. If the pads rest partly on molding and partly on drywall, the gate may shift.
Step 4: Tighten Evenly
Adjust the tension knobs evenly on both sides. Many pressure gates look slightly “open” before tension is applied; this is normal for some models. As the gate tightens, the latch area aligns.
Step 5: Use Wall Cups if Required
Some pressure gates include wall cups that screw into the wall to keep the pads from sliding. If the manufacturer requires them, use them. Skipping required parts is not clever minimalism; it is just unfinished installation.
Step 6: Perform a Shake Test
Push the gate firmly from both sides. It should stay in place. Repeat this test regularly because pressure gates can loosen with use.
Common Baby Gate Installation Mistakes
Using a Pet Gate for a Child
Pet gates are designed for pets, not children. A child safety gate should meet current child safety standards, have secure latching, and avoid openings that could trap a head, neck, arm, or leg.
Installing an Old Accordion Gate
Older accordion-style gates with large diamond or V-shaped openings are unsafe because they can create entrapment hazards. If you inherited a gate from a cousin’s basement and it looks like a wooden expandable laundry rack, retire it with gratitude.
Drilling Into Drywall Only
For hardware-mounted stair gates, drywall alone is not a strong mounting surface. Screws should go into studs, solid wood, or approved mounting systems. A baby gate must withstand real-life force, not just look sturdy in a photo.
Ignoring Baseboards
Baseboards can push the lower bracket out farther than the upper bracket, causing the gate to lean. Some gates include spacers for this problem. In other cases, you may need a mounting board installed vertically to create a flat surface.
Placing the Gate Too High
A gap under the gate can become a crawling invitation. Follow the manufacturer’s clearance limits and keep the bottom gap small enough that a child cannot squeeze underneath.
Forgetting Adult Traffic
A gate that is annoying for adults may be left open. Choose a model that fits your daily routine. A gate should be secure, but it should also be practical enough that everyone in the household actually uses it.
Baby Gate Installation for Tricky Spaces
Banisters and Railings
Banisters are common troublemakers. Avoid drilling into decorative posts unless you are sure it is safe and acceptable. Banister adapter kits can create a flat mounting surface without damaging the railing. For stair tops, make sure the final installation is rigid and secure.
Angled Walls
Some stairways have walls that do not face each other evenly. In this case, look for an angle-mount baby gate. These gates allow brackets to attach at different angles while keeping the gate aligned.
Extra-Wide Openings
For wide spaces, use an extra-wide gate or modular panel system. Do not combine random extensions from different brands. Baby gates are tested as systems, and mixing parts can weaken the setup.
Rental Homes and Apartments
Renters often prefer pressure-mounted gates to avoid holes. That can work for low-risk doorways, but stair tops still require secure hardware mounting. Ask your landlord about installation options, and remember that small screw holes are usually easier to repair than preventable injuries are to undo.
How to Maintain a Baby Gate
Baby gate installation is not a one-and-done event. Check gates regularly, especially after heavy use, moving furniture, houseguests, or a toddler growth spurt. Tighten screws, inspect brackets, test latches, and make sure pressure gates have not shifted.
Clean sticky latches and hinges according to the manufacturer’s instructions. Do not oil or modify parts unless the manual allows it. If a gate becomes bent, cracked, loose, or difficult to latch, replace it.
When to Remove a Baby Gate
Many gates are intended for children from about 6 months to 24 months, but every child develops differently. Remove or reconsider a gate once your child can climb over it, open it, shake it loose, or use nearby furniture to defeat it. A gate that becomes climbing equipment is no longer helping.
For older toddlers, stair safety shifts toward teaching careful stair use, keeping stairs well lit, holding the handrail, removing clutter, and supervising closely. The goal is not to turn your home into a padded museum forever. It is to match safety measures to your child’s stage.
Baby Gate Installation Checklist
- Install gates before your baby becomes fully mobile.
- Use hardware-mounted gates at the top of stairs.
- Use pressure-mounted gates only in low-risk areas.
- Measure the opening at the top, middle, and bottom.
- Mount into studs, solid wood, or approved adapters.
- Avoid older accordion-style gates and pet-only gates.
- Choose gates adults can open easily and children cannot dislodge.
- Test gates after installation and check them regularly.
Conclusion
Baby gate installation is one of those parenting projects that looks small but does a big job. The right gate, correctly installed, can reduce access to stairs and risky rooms while giving your child safer space to explore. The secret is matching the gate to the location: hardware-mounted gates for stair tops and other high-risk areas, pressure-mounted gates for safer doorways and hallways, and specialized gates for wide, angled, or unusual openings.
Do not rush the measuring stage. Do not skip the instructions. Do not trust drywall alone with a stair gate. And definitely do not assume that “the baby is not crawling yet” gives you unlimited time, because babies treat developmental milestones like surprise parties.
A well-installed baby gate should feel boring in the best possible way: secure, steady, easy for adults, impossible for little explorers, and not something you have to think about every five minutes. That is the dream. Well, that and drinking coffee while it is still warm.
Real-Life Experience: What Baby Gate Installation Teaches You
The first experience many parents have with baby gate installation is discovering that their home is not as square, flat, or cooperative as they once believed. A doorway that looked perfectly normal yesterday suddenly has uneven trim, a baseboard that sticks out like a tiny architectural cliff, and a wall that seems to lean just enough to make the gate latch complain. This is normal. Homes have character. Baby gates have opinions.
One practical lesson is to measure more than once. Measure the opening at the floor, at latch height, and near the top of the gate. Many people buy a gate based on one quick measurement, only to learn that the bottom of the doorway is wider than the top. That tiny difference can matter, especially for pressure-mounted gates. A few extra minutes with a tape measure can save a return trip and a dramatic sigh in the parking lot.
Another common experience is underestimating daily convenience. A gate may be safe, but if the latch is too awkward, adults may leave it open “just for a second.” Those seconds are exactly when toddlers activate their secret turbo mode. Choose a latch that caregivers can operate consistently, including grandparents, babysitters, and older siblings who are responsible enough to pass through but not responsible enough to assemble furniture without leftover screws.
Stair gates teach the biggest lesson: secure mounting matters. A hardware-mounted gate may take longer to install, but the confidence it provides is worth it. Parents often worry about screw holes in trim or walls, especially in rentals. That concern is understandable, but stair safety should come first. In many cases, small holes can be patched later. A loose gate at the top of stairs is not a compromise worth making.
Families with pets learn another lesson quickly: babies and pets use gates differently. A dog may respect a barrier. A toddler may study it like an engineer. Some children shake, lean, pull, climb, and test the latch repeatedly. This is why child-rated gates are important and why routine checks matter. If a gate loosens after a week of use, tighten it immediately rather than waiting for “later,” the magical time when household tasks go to disappear.
Wide openings can also surprise parents. Open-concept homes are wonderful for light and traffic flow, but they can be tricky for babyproofing. Extra-wide gates or configurable panels may solve the problem, but they need proper anchoring. Long gates can flex if installed poorly. When blocking a fireplace, play area, or large room opening, make sure every panel connection is secure and that the gate cannot be pushed inward.
Another experience worth sharing: install gates before the baby is officially mobile. Many parents wait until crawling begins, then discover that crawling begins on a Tuesday afternoon with no warning and suspicious speed. Installing early lets you test the gate calmly, adjust the latch, and build the habit of closing it every time. It also gives pets and adults time to adapt before the baby becomes the household safety inspector.
Finally, baby gate installation reminds parents that safety is a system. Gates work best alongside cabinet locks, anchored furniture, covered outlets, secured cords, safe stair habits, and close supervision. No gate can replace an attentive adult, but a good gate can buy precious seconds and prevent access to high-risk areas. In the world of parenting, precious seconds are basically gold, especially when someone small is crawling toward the stairs with the confidence of an action movie hero.
Note: This article is educational and based on current U.S. child-safety guidance. Always follow the instructions for your specific baby gate model, and consider a professional childproofing installer for unusual stairs, banisters, angled walls, or extra-wide openings.