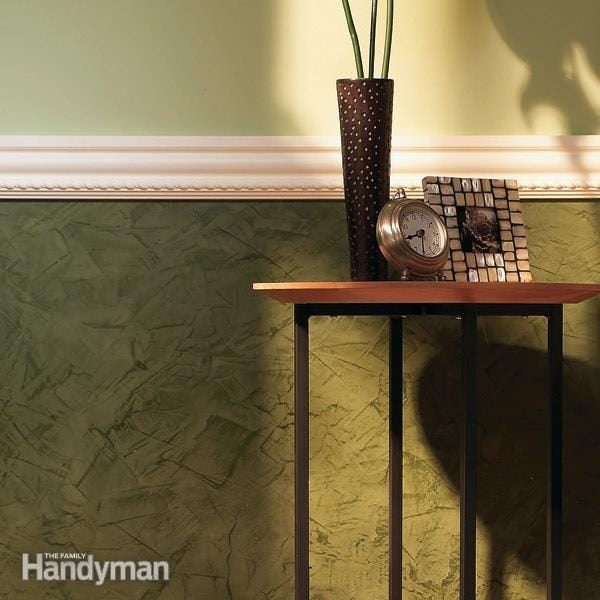
Chair rail molding is one of those home details that quietly walks into a room wearing a tiny tuxedo. It does not shout. It does not demand applause. But once it is installed well, the walls suddenly look more intentional, the room feels more finished, and everyone assumes you either hired a designer or have a secret Pinterest board with military-level organization.
At its simplest, chair rail molding is a horizontal strip of trim installed around a wall, usually somewhere around the lower third of the room. Historically, it helped protect plaster walls from the backs of chairs, especially in dining rooms. Today, it still offers some protection, but its biggest job is visual: it divides a wall, adds architectural detail, creates opportunities for two-tone paint or wallpaper, and gives plain drywall a much-needed personality upgrade.
Whether you are refreshing a dining room, dressing up a hallway, adding charm to a bedroom, or trying to make a new-build home feel less like a blank cereal box, chair rail molding can be a surprisingly powerful design tool. The trick is choosing the right height, profile, material, finish, and installation approach for your space.
What Is Chair Rail Molding?
Chair rail molding, also called chair rail trim or dado rail in some design circles, is a decorative and sometimes protective strip of molding that runs horizontally along interior walls. It is usually installed between the baseboard and the ceiling, most often at about one-third of the wall height. In traditional rooms, it may sit above wainscoting or beadboard. In modern spaces, it might simply divide two paint colors, frame wallpaper, or create a clean architectural line.
The name comes from its original purpose: preventing chairs from bumping, scraping, and denting walls. Before washable paints and durable wall finishes became common, chair rails were a practical defense system. Think of them as tiny wall bodyguards, standing between your plaster and Aunt Linda’s enthusiastic dining chair scoot.
Today, chair rail molding is more flexible. It can be functional, decorative, or both. In a formal dining room, it can reinforce classic elegance. In a child’s room, it can separate a darker lower wall color from a lighter upper wall color, helping hide scuffs. In a hallway, it can break up a long stretch of wall and make the space feel more thoughtfully designed.
Why Chair Rail Molding Still Works in Modern Homes
Some people hear “chair rail” and picture an overly formal 1980s dining room with burgundy paint, heavy drapes, and a chandelier that looks like it came with its own mortgage. But chair rail molding has moved far beyond that. When used with fresh colors, simple profiles, clean lines, and smart proportions, it can look timeless, transitional, cottage-style, farmhouse, traditional, or even contemporary.
It Adds Architecture Without Major Renovation
One of the biggest benefits of chair rail molding is that it creates architectural interest without tearing open walls. You are not moving plumbing, rebuilding ceilings, or discovering mysterious electrical decisions made in 1974. You are adding trim, caulk, paint, and polish. For a relatively small project, the visual impact can be huge.
It Helps Divide Wall Treatments
Chair rail molding is perfect when you want two wall finishes in one room. You can paint the lower wall a rich color and keep the upper wall light. You can use wallpaper above the rail and painted paneling below. You can install beadboard beneath it for a cottage look or picture frame molding below it for a more formal style.
It Protects High-Traffic Walls
Although chair rail molding is now largely decorative, it still offers practical protection. Hallways, breakfast nooks, dining rooms, mudrooms, playrooms, and stair landings can all benefit from a durable lower wall treatment. If your walls regularly meet backpacks, pet tails, chair backs, laundry baskets, or children moving through the house like tiny weather systems, chair rail molding can help.
How High Should Chair Rail Molding Be Installed?
The most common question is also the one that causes the most debate: how high should chair rail molding be? The traditional rule is to install it around one-third of the wall height from the floor. For an 8-foot ceiling, that often places the chair rail somewhere around 30 to 36 inches high. Some modern installation guides suggest a range of about 32 to 42 inches, but the best height depends on the room’s proportions, ceiling height, existing trim, furniture, and the style you want.
Here is the practical approach: do not blindly pick 36 inches just because someone’s uncle once said it while holding a tape measure. Instead, look at the whole room. A lower rail often feels more historically accurate and elegant, especially in traditional homes. A slightly higher rail can work in rooms with taller ceilings or when it aligns with window sills, built-ins, or wainscoting panels.
Before installing, use painter’s tape to mark the proposed height around the room. Step back. Sit down. Walk through the space. Look at it in daylight and at night. If the line makes the room feel balanced, you are probably close. If it chops the wall awkwardly or makes the ceiling feel lower, adjust it before the sawdust starts flying.
Best Rooms for Chair Rail Molding
Dining Rooms
The dining room is the classic chair rail location for a reason. Chairs actually move in this room, walls are often visible above and around furniture, and a little formality feels natural. Pair chair rail molding with wainscoting, wallpaper, or a rich lower wall color to create a polished space that feels ready for dinner guests, even if dinner is takeout pretending to be homemade.
Hallways
Hallways are often neglected, which is unfair because they work harder than almost any other space. Chair rail molding can add rhythm and structure to long corridors. It can also help protect walls from scuffs, bags, shoes, and the occasional dramatic family entrance. In narrow hallways, keep the profile slim and the color palette cohesive so the trim adds depth without making the walls feel crowded.
Bedrooms
In bedrooms, chair rail molding can create a soft, layered look. Try wallpaper above the rail and painted trim below for a cozy cottage feel. In a modern bedroom, paint the wall and molding the same color for a subtle tone-on-tone effect. Behind a bed, chair rail molding can act almost like a built-in headboard line, grounding the furniture visually.
Bathrooms and Powder Rooms
Chair rail molding can make a small bathroom feel charming and custom. Use moisture-resistant materials such as PVC, polyurethane, or properly sealed wood. A powder room is also a great place to be bold with wallpaper above the rail because the space is small enough to handle personality without feeling like the wallpaper has taken over the household.
Living Rooms
In a living room, chair rail molding works best when it supports the furniture layout. It can frame a seating area, connect with picture frame molding, or add subtle detail to a feature wall. For a contemporary look, choose a simple trim profile and paint it the same color as the wall.
Chair Rail Molding Materials
Chair rail molding comes in several materials, and each has strengths. Solid wood is traditional, durable, and stainable, making it ideal for historic homes or spaces where natural grain matters. Pine is budget-friendly and easy to paint, while hardwoods cost more but look beautiful when stained.
MDF is another popular option. It is smooth, affordable, and excellent for painted trim. It does not have wood grain, which can be a benefit if you want a flawless painted finish. However, standard MDF is not the best choice for damp areas unless it is specifically rated for moisture resistance.
PVC and polyurethane moldings are lightweight and moisture resistant, which makes them useful in bathrooms, laundry rooms, and humid climates. They are often easier to cut and install than heavy wood, though they may not have the same authentic feel as real wood in traditional spaces.
For most DIY homeowners, pre-primed wood or MDF chair rail molding offers the best balance of cost, appearance, and ease of installation. It paints well, cuts cleanly, and does not require a professional-level finishing setup.
Chair Rail Molding Profiles and Styles
The molding profile matters more than many people realize. A slim, simple rail can look clean and modern. A more detailed profile with curves, beads, and shadow lines feels traditional. A wide or layered rail can look dramatic, especially above wainscoting, but it can overwhelm a small room if the proportions are off.
For 8-foot ceilings, a chair rail between 2 and 3 inches wide often works well. Larger rooms with higher ceilings can usually handle a wider profile. If your home already has crown molding, baseboards, or window casing, choose a chair rail that feels related to those details. The goal is harmony, not a trim family reunion where every piece is competing for attention.
Chair Rail Molding Installation: Step-by-Step Overview
1. Plan the Layout
Measure the room carefully and decide which walls will receive molding. Chair rail can wrap an entire room, stop at door casings, or be used on one feature wall. Sketch the layout and note inside corners, outside corners, doorways, windows, outlets, and any awkward wall transitions.
2. Choose the Height
Mark the proposed height on each wall. Use a laser level or long level to create a consistent line. In older homes, floors may not be perfectly level, so you may need to balance mathematical accuracy with visual alignment. The rail should look level to the eye, because the eye is the judge, jury, and occasionally the drama queen.
3. Measure Twice, Cut Carefully
Measure each wall section individually. Cut the molding with a miter saw for clean angles. Inside corners can be mitered, but coping one piece into the profile of another often creates a tighter joint, especially in older homes where corners are not perfectly square.
4. Dry-Fit Before Attaching
Before using nails or adhesive, hold each piece in place to check the fit. Dry-fitting helps catch errors before they become permanent wall jewelry. Make adjustments as needed.
5. Attach the Chair Rail
Apply construction adhesive to the back of the molding if appropriate, then secure it with finishing nails or a brad nailer. Whenever possible, nail into studs for a stronger hold. If you are using a nail gun, keep your angle consistent and avoid overdriving nails too deeply into softer trim.
6. Fill, Caulk, Sand, and Paint
After installation, fill nail holes with wood filler or spackle, caulk the top and bottom edges, and sand any rough spots. Caulk is the magic eraser of trim work. It will not fix bad measurements, but it will make small gaps disappear like they were never invited. Finish with paint or stain, depending on the material and design.
Chair Rail Molding Ideas for Every Style
Two-Tone Painted Walls
This is one of the easiest and most effective chair rail ideas. Paint the lower wall a deeper shade and the upper wall a lighter color. Navy below and warm white above feels classic. Sage green below and soft cream above feels calm and fresh. Charcoal below and pale gray above creates a more modern look.
Wallpaper Above the Rail
Wallpaper and chair rail molding are best friends. Wallpaper above the rail adds pattern and personality, while painted trim and lower walls keep the look grounded. This approach works beautifully in dining rooms, powder rooms, nurseries, and guest bedrooms.
Beadboard Below the Rail
Beadboard beneath a chair rail creates a cottage, coastal, or farmhouse feel. It is especially useful in mudrooms, bathrooms, and breakfast areas because it adds texture and durability. Paint it white for a classic look or use a bold color for a more modern twist.
Picture Frame Molding Below the Rail
For a more elegant style, install rectangular picture frame molding below the chair rail. This creates the look of traditional wall panels without the cost of full raised-panel wainscoting. Keep spacing consistent between boxes, corners, baseboards, and the chair rail so the finished wall feels intentional.
Tone-on-Tone Chair Rail
If you want subtle texture rather than contrast, paint the chair rail, upper wall, and lower wall the same color. This creates a quiet architectural effect that works well in modern, transitional, and minimalist interiors. The shadows from the trim provide interest without visual clutter.
Bold Lower Wall Color
A chair rail gives you permission to use a dramatic color without overwhelming the room. Try forest green, oxblood, deep teal, chocolate brown, or smoky blue below the rail, then balance it with a lighter color above. The result feels rich, layered, and confident.
Chair Rail in a Kids’ Room
Use chair rail molding to divide playful wallpaper above from washable paint below. This is both adorable and practical. The lower wall can handle scuffs, toy collisions, and whatever mysterious substances children bring into a room while insisting they “didn’t touch anything.”
Common Chair Rail Installation Mistakes
The first mistake is installing the rail too high. A chair rail that floats halfway up the wall can make the room feel squat and awkward. The second mistake is choosing a profile that is too bulky for the room. Trim should enhance the wall, not look like it is trying to become furniture.
Another common mistake is skipping the level line. Walls, floors, and ceilings are rarely perfect, especially in older homes. A consistent guide line helps avoid a wavy installation. Also, do not forget to caulk. Even skilled carpenters rely on caulk for a seamless painted finish.
Finally, avoid treating chair rail molding as an isolated detail. It should relate to the baseboards, door casing, crown molding, wall color, ceiling height, and furniture. The best installations look like they always belonged there.
My Practical Experience With Chair Rail Molding Projects
One of the biggest lessons from working with chair rail molding is that the project looks simple until the room starts revealing its secrets. On paper, it is just a horizontal strip of trim. In real life, there are corners that are not square, walls that bow slightly, floors that slope just enough to be annoying, and door casings that force you to make design decisions while holding a half-cut piece of molding and questioning your life choices.
The first experience many DIYers have is in a dining room, and that is a great place to start. Dining rooms usually have clear wall sections, visible corners, and a natural reason for chair rail molding. In one typical project, a plain beige dining room can be transformed by installing a simple 2.5-inch chair rail at about one-third of the wall height, painting the lower section a muted blue-gray, and keeping the upper wall warm white. The room immediately feels more finished. The furniture looks more anchored. Even a basic dining table suddenly appears to have better manners.
A key experience-based tip is to test the height with painter’s tape before buying or cutting anything. It is surprising how different a line can feel once it wraps around the room. A height that looks reasonable on one wall may run awkwardly into a window sill or light switch on another. Taping the line gives you a preview without commitment. It is the home improvement version of trying on jeans before deciding whether your weekend has been ruined.
Another lesson is that paint strategy matters as much as the molding itself. If the trim is painted white while the lower wall is dark, the chair rail becomes a crisp dividing line. If everything is painted the same color, the effect is softer and more architectural. In smaller rooms, tone-on-tone paint can be especially successful because it adds depth without chopping up the space. In larger rooms, contrast can help define zones and make the walls feel more dynamic.
When installing chair rail in hallways, durability becomes more important. Hallways collect scuffs the way refrigerators collect magnets. A slightly tougher paint finish on the lower wall, combined with a sturdy chair rail, makes the area easier to maintain. Semi-gloss or satin paint on the trim is usually easier to wipe clean than flat paint. This matters if your hallway is a daily parade route for shoes, backpacks, pets, grocery bags, and people who apparently believe walls are handrails.
The most satisfying part of a chair rail project is the finishing stage. Once the trim is nailed up, the room may still look rough. Nail holes are visible. Joints may show. Tiny gaps appear along the wall. Then comes filler, caulk, sanding, and paint. This is where the project changes from “I may have made a mistake” to “I am basically a craftsperson now.” Good finishing work is what separates a professional-looking chair rail from one that looks like it was installed during a power outage.
For beginners, the best advice is to start with a simple profile, buy a little extra molding for mistakes, and avoid rushing the cuts. Measure each wall section separately, because rooms are rarely as symmetrical as they appear. Label pieces as you go. Use sharp blades. Dry-fit corners before attaching them. And remember: a tiny gap can be caulked, but a piece cut too short becomes a very elegant scrap.
Chair rail molding is rewarding because it offers a rare combination of beauty, practicality, and manageable difficulty. It does not require a full renovation budget, but it can make a room look like it received one. With thoughtful planning, careful installation, and the right finish, chair rail molding can turn flat walls into a design feature that feels classic, personal, and quietly impressive.
Conclusion
Chair rail molding is more than a decorative strip of trim. It is a practical wall protector, a design divider, and a simple way to add architectural character to a home. The best results come from choosing the right height, matching the molding profile to the room, using quality materials, and finishing the installation with patience. Whether paired with wainscoting, wallpaper, beadboard, two-tone paint, or a subtle monochromatic palette, chair rail molding can make a room feel complete without making it feel overdone.
If your walls feel plain, chair rail molding may be the upgrade they have been quietly waiting for. It is affordable, versatile, and surprisingly transformative. Just remember to measure carefully, respect the room’s proportions, and keep the caulk nearby. The walls will thank you, even if the chairs continue to behave badly.
Note: This article was created from a synthesis of established U.S. home improvement, interior design, molding, millwork, and DIY installation guidance, rewritten fully in original language for web publication.