Somewhere in your recycling bin, an empty coffee can is waiting for its dramatic makeover montage. It has already done the hard work of holding your morning motivation. Now it deserves a second career as a charming desk organizer, kitchen utensil holder, planter sleeve, craft-room container, or gift bucket that looks like it came from a boutique instead of the “I forgot to take out the recycling” corner.
A coffee can decoupage project is one of those rare DIY crafts that checks almost every box: budget-friendly, beginner-friendly, eco-conscious, customizable, and forgiving enough that a wrinkle in the paper can be called “texture” with complete confidence. Using decoupage medium, decorative paper, fabric, napkins, magazine cutouts, wrapping paper, or even printed artwork, you can turn a plain metal or cardboard coffee container into something useful and surprisingly stylish.
This guide walks through the full process: choosing the right can, prepping the surface, selecting materials, applying decoupage smoothly, sealing the finished piece, and styling it around the house. We will also cover troubleshooting, creative variations, and real-world experience tips that save you from sticky fingers, soggy paper, and the classic “why is this glued to my elbow?” crafting moment.
What Is Decoupage?
Decoupage is the art of decorating an object by gluing paper, fabric, or other thin materials onto a surface and sealing everything with layers of adhesive or varnish. In simple terms, it is cut, paste, smooth, seal, admire. The technique has been used on boxes, furniture, trays, bottles, frames, plates, ornaments, and storage containers for years because it gives ordinary surfaces a custom, hand-painted look without requiring professional painting skills.
For a coffee can, decoupage works especially well because the shape is simple, the surface is sturdy, and the finished container is naturally useful. A tall coffee can can hold paintbrushes, spatulas, faux flowers, knitting needles, dog treats, office supplies, seed packets, or wrapped gifts. A shorter can works beautifully for pencils, makeup brushes, tea bags, cotton balls, or small craft tools.
Why Use a Coffee Can for Decoupage?
Empty coffee cans are underrated craft heroes. They are strong, easy to clean, and usually come with a plastic lid that can be reused if you want a covered container. Metal coffee cans offer a smooth surface and great durability, while cardboard composite coffee cans are lightweight and easy to cut or punch if needed.
The biggest advantage is cost. You are starting with something you already own, which means the project can be made almost entirely from leftover supplies: scrapbooking paper, old maps, book pages, paper napkins, fabric remnants, ribbon, twine, buttons, labels, or bits of gift wrap. It is recycling with a glue brush and better lighting.
Best Uses for a Decoupaged Coffee Can
A finished coffee can craft can be practical, decorative, or both. Try using one as a:
- Desk organizer for pens, markers, scissors, and rulers
- Kitchen utensil holder for wooden spoons and spatulas
- Craft-room storage container for brushes, glue sticks, and yarn scraps
- Planter sleeve for herbs or small houseplants
- Gift container for cookies, cocoa packets, coffee beans, or spa items
- Bathroom holder for cotton rounds, brushes, or rolled washcloths
- Seasonal centerpiece filled with faux flowers, pinecones, ornaments, or greenery
Supplies You Will Need
You do not need a professional craft studio for this project. A kitchen table, a protective covering, and a willingness to get a little sticky will do the job.
Basic Materials
- Empty coffee can, clean and dry
- Decoupage medium such as Mod Podge or another craft sealer-glue
- Foam brush or soft bristle brush
- Decorative paper, napkins, fabric, tissue paper, maps, or printed designs
- Scissors or craft knife
- Ruler or measuring tape
- Pencil
- Acrylic paint or primer, optional
- Fine-grit sandpaper, optional
- Clear acrylic sealer, optional for extra protection
- Ribbon, twine, lace, labels, buttons, or charms for embellishing
Safety and Prep Supplies
- Dish soap and warm water
- Rubbing alcohol or vinegar for removing residue
- Protective gloves if the can has sharp edges
- Painter’s tape if you want clean borders
- Newspaper, parchment paper, or a craft mat to protect your work surface
Step-by-Step Coffee Can Decoupage Project
The best decoupage results come from patient layering. This is not difficult, but it does reward anyone who can resist the urge to slap everything on at once like a caffeinated raccoon. Thin coats, smooth pressure, and dry time are your friends.
Step 1: Clean the Coffee Can
Remove the label and wash the can with warm, soapy water. Let it dry completely. If sticky label residue remains, rub it gently with a little oil, vinegar, or rubbing alcohol, then wash again. Decoupage medium sticks best to a clean, dry surface, so do not skip this step unless you enjoy watching paper peel up like a tiny craft rebellion.
If the can has a sharp inner rim, cover it with decorative trim, folded fabric, washi tape, or a plastic lid ring. For projects kids will use, an adult should inspect the edge carefully before decorating begins.
Step 2: Decide on the Design
Choose a theme before cutting. Your design might be farmhouse, vintage, botanical, coastal, holiday, retro diner, colorful boho, minimalist black-and-white, classroom-friendly, or coffee-themed because, yes, a coffee can decorated with coffee art is delightfully on the nose.
For beginners, one full sheet of decorative paper wrapped around the can is easiest. For a collage style, use smaller torn or cut pieces and overlap them. Paper napkins create a soft, painted look, while fabric gives texture and durability. Old maps are great for travel-themed storage, and sheet music works beautifully for vintage decor.
Step 3: Measure and Cut
Measure the height of the can and the distance around it. Cut your main paper slightly taller than the can if you want to fold the edges over the top and bottom, or cut it exactly to height for a cleaner banded look. Leave a small overlap at the back seam so the paper wraps neatly.
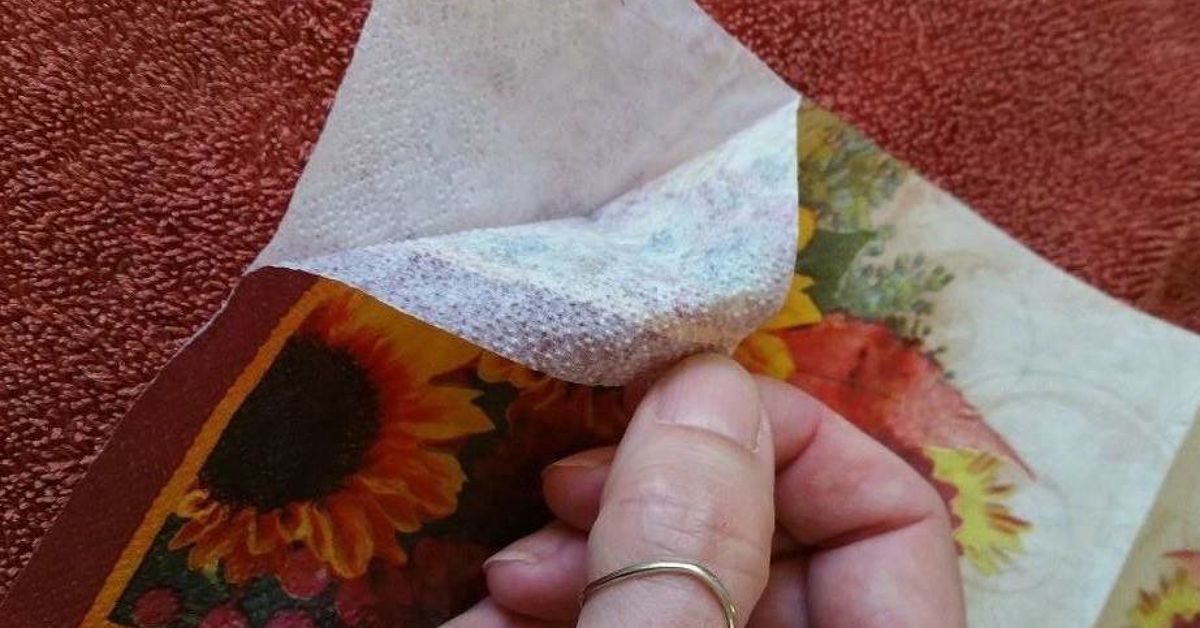
If you are using napkins, separate the printed top layer from the plain backing layers. Use only the thin printed layer for decoupage. It is delicate, so handle it gently. Tissue paper and napkins wrinkle more easily, but they also create a lovely blended effect.
Step 4: Paint or Prime the Can
This step is optional, but it can improve the finished look. If your paper is thin or light-colored, paint the can white or another pale shade first so the original can graphics do not show through. Acrylic paint works well for most craft projects. Let the paint dry fully before applying decoupage medium.
If the coffee can is very glossy, lightly sanding the surface can help the paint and glue grip better. Wipe away dust before moving to the next step.
Step 5: Apply the First Layer of Decoupage Medium
Brush a thin, even coat of decoupage medium onto a small section of the can. Do not coat the entire can at once unless you are unusually fast and have the calm hand of a museum conservator. Work in sections so the glue stays wet while you position the paper.
Place the paper onto the glued area and smooth it from the center outward. Use your fingers, a clean dry brush, a brayer, or a plastic card wrapped in wax paper to remove air bubbles. Be gentle, especially with napkins and tissue paper.
Step 6: Wrap, Smooth, and Overlap
Continue applying glue and smoothing the paper around the can. When you reach the seam, overlap the final edge slightly and press it down firmly. If you are creating a collage, overlap pieces in different directions for a layered look. Torn edges blend more softly than straight-cut edges, while precise cuts create a polished pattern.
For fabric, apply a slightly heavier coat of decoupage medium to the can, press the fabric in place, and smooth slowly. Fabric may need extra glue at the seam and edges.
Step 7: Seal the Surface
Once the first glued layer is in place, brush a thin coat of decoupage medium over the entire decorated surface. It may look cloudy at first, but most craft decoupage mediums dry clear. Let it dry according to the product instructions, then add another thin coat. Two to three top coats usually provide enough protection for indoor decorative storage.
Use smooth brush strokes in the same direction for the final coat if you want a cleaner finish. For a more handmade look, crosshatch strokes can add subtle texture.
Step 8: Add Embellishments
After the can is dry, add finishing details. Tie twine around the top, glue ribbon near the bottom, add a chalkboard label, attach a small tag, or glue on buttons, charms, lace, or flat-backed gems. Keep embellishments practical if the can will be handled often. A utensil holder covered in dangling decorations may look cute until it attacks your spatula collection.
Step 9: Let It Cure
Dry and cured are not always the same thing. A decoupaged can may feel dry after an hour, but the finish becomes more durable after additional curing time. Let the project sit overnight before using it, and give it several days before heavy handling. If you add a clear acrylic sealer, apply it in a well-ventilated area and allow it to dry completely.
Design Ideas for a Coffee Can Decoupage Project
The beauty of this project is that one basic method can create dozens of looks. Below are several creative directions to try.
Vintage Kitchen Utensil Holder
Use old cookbook pages, faux vintage labels, gingham paper, or botanical vegetable prints. Finish with jute twine and a small kraft-paper tag labeled “Spoons,” “Utensils,” or “Things I Stir With While Pretending I Follow Recipes.”
Botanical Planter Sleeve
Decorate the can with floral napkins, pressed-flower-style paper, or green leaf prints. Instead of planting directly inside the can, place a nursery pot inside it. This keeps moisture away from the decoupaged surface. If you do plant directly in a metal can, add drainage holes and protect the inside from rust where possible.
Kids’ Art Supply Organizer
Use bright scrapbook paper, comic book pages, alphabet cutouts, or the child’s own drawings. Seal well and add a name label. Make several cans for crayons, colored pencils, markers, and paintbrushes. Bonus: when the supplies finally have a home, they may stop migrating under the couch. No promises.
Holiday Gift Can
Wrap the can in seasonal paper and fill it with homemade cookies, cocoa mix, tea bags, candy, small ornaments, or coffee beans. Add ribbon and a gift tag. A decoupaged coffee can makes packaging feel personal without requiring expensive gift boxes.
Office Desk Organizer
Try marble paper, black-and-white patterns, kraft paper, linen-textured paper, or muted geometric designs. Add a simple label holder to the front. It looks tidy, intentional, and slightly more adult than the mug full of pens that mysteriously contains no working pens.
Best Papers and Materials for Decoupage
Not every material behaves the same way. Some are sturdy and easy to smooth; others require a gentler touch.
Scrapbook Paper
Scrapbook paper is excellent for beginners because it is thick enough to handle but flexible enough to wrap around a can. Choose medium-weight paper rather than very heavy cardstock, which may resist curving around the can.
Paper Napkins
Napkins are perfect for a soft, painterly finish. Use only the printed top layer. Because napkins are thin, paint the can a light color first. Apply the top coat carefully to avoid tearing.
Fabric Scraps
Fabric creates a rich, textured look. Cotton works better than thick upholstery fabric. Trim loose threads before gluing, and pay extra attention to the seam.
Magazine Pages and Book Pages
Magazine pages are colorful and great for collage, but glossy paper can sometimes wrinkle or resist glue. Book pages create a vintage look and work beautifully with painted borders, stamps, or inked edges.
Tissue Paper
Tissue paper is delicate but wonderful for layered color. Tear pieces instead of cutting them if you want blended edges. Expect wrinkles; with tissue paper, wrinkles are part of the charm.
Common Mistakes and How to Fix Them
Wrinkles in the Paper
Small wrinkles are normal. To reduce them, use thin coats of glue and smooth from the center outward. If the paper is still wet, gently lift and reposition it. If it has dried, embrace the texture or add another decorative layer over the area.
Bubbles Under the Surface
Bubbles happen when air gets trapped under the paper. Press them toward the edge while the glue is wet. For dried bubbles, carefully prick the bubble with a pin, add a tiny bit of decoupage medium, press flat, and reseal.
Paper Tearing
Thin paper tears when overworked. Use a light touch and avoid brushing the same spot repeatedly. If a tear happens, patch it with another piece of paper and call it “mixed media.” Crafting is 40 percent technique and 60 percent confident storytelling.
Sticky Finish
A tacky finish may come from thick coats, humidity, or not enough curing time. Let the can dry longer. If it remains sticky, add a clear acrylic sealer suitable for crafts.
Visible Can Graphics
If the original coffee label shows through, use a primer or acrylic paint base before decoupaging. White paint works best under napkins, tissue, and light papers.
How to Make the Project More Durable
A decoupaged coffee can is best for indoor use or protected display. It should not be soaked, scrubbed aggressively, or placed in the dishwasher. Wipe it with a dry or slightly damp cloth when needed.
For a container that will get frequent handling, add at least three thin coats of decoupage medium and consider a final clear sealer. If the can will sit near water, such as in a bathroom or by a sink, use extra sealing and avoid leaving standing water on the surface.
If using the can as a planter, the safest method is to keep the plant in a separate plastic nursery pot and use the decorated coffee can as a sleeve. This protects the finish and makes watering easier.
Eco-Friendly Benefits of Upcycling Coffee Cans
Upcycling gives household containers a longer useful life before they enter the waste stream. A coffee can decoupage project does not solve every environmental problem, but it does encourage a practical habit: looking at packaging as a material, not just trash. Empty cans, jars, boxes, and tubes can often become organizers, planters, gift packaging, or art supplies.
This project is also a low-cost way to decorate. Instead of buying another plastic bin or decorative holder, you can create one from a container you already have. That is good for your wallet, your storage situation, and your inner craft goblin, who just wants one more reason to save pretty paper scraps.
of Real-World Experience: What This Project Teaches You
The first thing you learn from a coffee can decoupage project is that preparation matters more than excitement. Excitement says, “Let’s glue this beautiful floral napkin on immediately.” Experience says, “Maybe wash the coffee dust out first unless you want the finished piece to smell like a craft store married an espresso machine.” A clean, dry can makes the whole process easier, and a painted base can be the difference between polished and patchy.
The second lesson is that thin coats win. When people first try decoupage, they often use too much medium because it feels safer. More glue must mean more stick, right? Not exactly. Thick glue can cause bubbling, sliding, wrinkling, and long drying times. A thin, even coat gives you more control. It also keeps delicate paper from becoming mushy. Think of decoupage medium like hot sauce: useful, powerful, and best applied with restraint unless you enjoy chaos.
Another practical discovery is that paper choice changes everything. Scrapbook paper gives a crisp, graphic result and is great for beginners. Napkins look elegant and hand-painted, but they require patience. Fabric feels cozy and substantial, but seams can get bulky. Magazine pages are fun for collage, although glossy finishes sometimes need extra smoothing. After making a few cans, most crafters start combining materials: a painted base, torn book pages, a napkin flower, a ribbon border, and a label. That is when the project begins to feel personal instead of simply decorative.
You also learn that imperfections are not disasters. A tiny wrinkle may disappear once the whole can is sealed. A crooked seam can be covered with ribbon. A torn section can become the perfect spot for a label. Decoupage is wonderfully forgiving because it allows layers. If one area looks awkward, add another piece. If the color feels flat, add trim. If the pattern feels too busy, paint the top and bottom rims in a solid color to calm it down. The project rarely fails; it usually just changes direction.
Function is another important experience point. Before decorating, it helps to decide how the can will be used. A pencil cup does not need the same protection as a planter sleeve. A kitchen utensil holder should have a sealed surface and a stable base. A gift can should look good with the lid on. A bathroom container needs extra moisture protection. Designing with the final use in mind prevents disappointment later.
Finally, this project teaches the joy of small transformations. You begin with an empty coffee can, something ordinary and forgettable. An hour or two later, it becomes a useful object with color, personality, and a tiny story attached. It is not just a container anymore. It is proof that creativity does not require expensive supplies or a perfect workspace. Sometimes it only needs leftover paper, a brush, and the willingness to see potential in the recycling bin.
Conclusion
A coffee can decoupage project is a simple, satisfying way to turn an everyday container into something useful and beautiful. With basic supplies, careful surface prep, thin coats of decoupage medium, and a little imagination, an empty coffee can can become a desk organizer, planter sleeve, kitchen holder, holiday gift container, or craft-room storage piece. The project is affordable, customizable, and beginner-friendly, making it perfect for adults, families, classrooms, and anyone who believes a good DIY makeover should involve both creativity and snacks.
The best part is that every finished can looks different. Your choice of paper, color, trim, and purpose gives the project its personality. Whether you prefer vintage book pages, bold florals, farmhouse labels, modern patterns, or kid-made artwork, decoupage lets you create decor that feels handmade in the best possible way. So rinse that coffee can, grab the glue, and give your recycling bin a reason to feel nervous.