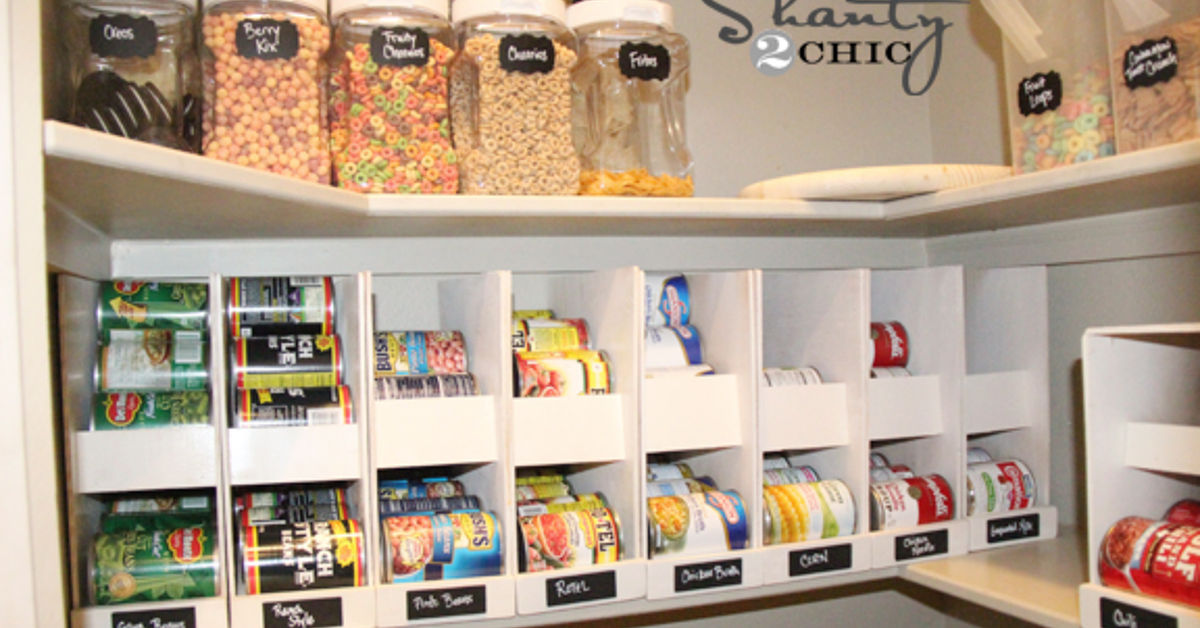
Canned food is wonderfully dependable until twelve nearly identical cylinders form a steel jungle at the back of the pantry. One minute you are looking for black beans; the next, you are excavating creamed corn like a kitchen archaeologist. A good DIY canned food organizer makes every can visible, reachable, and easy to rotate.
With basic materials and careful measurements, you can build a storage system that fits your shelf, shopping habits, and the cans your family actually eats. This guide covers tiered risers, gravity-fed dispensers, recycled boxes, wall racks, pull-outs, safety, and hands-on lessons.
Why Build a DIY Canned Food Organizer?
Store-bought racks can work, but pantry shelves vary in width, depth, height, and door clearance. A custom organizer uses awkward space efficiently and can match your usual inventory.
Visibility is the larger benefit. Rows, tiers, or labeled channels show what you own, reduce duplicate purchases, speed meal planning, and help older cans get used first. The organizer is not merely holding beans; it is stopping them from forming a secret society behind the cereal.
Choose the System Before the Materials
Count your typical stock, measure common can sizes, and decide whether you value visibility, bulk capacity, automatic rotation, or portability. Store cans in a clean, cool, dry area away from heat and moisture. Before loading them, reject containers that are swollen, leaking, punctured, deeply rusted, or badly damaged around seams.
Storage and damaged-container guidance: FDA and National Center for Home Food Preservation.
Measure Your Pantry Like You Mean It
Measure shelf width, depth, and clear height at the front and back because cabinets are not always square. Leave side clearance for removal and account for hinges, face frames, shelf pins, and door swing.
Measure the largest can in each category. Standard soup cans, tuna tins, tomato paste, and oversized cans may need different lanes. Confirm that the shelf and organizer can support the expected full load and that your hand can reach the loading area.
Match the Organizer to Your Pantry
No single design wins every pantry. A riser gives excellent label visibility but does not automatically rotate stock. A gravity-fed rack stores more cans in a compact footprint, yet it requires accurate channels and enough height for loading. Bins are flexible and easy to clean, although cans at the bottom may still hide. Choose the simplest system that solves your actual problem.
| Pantry Problem | Best DIY Option | Why It Works |
|---|---|---|
| Shallow upper cabinet | Three-tier riser | Keeps labels visible without needing rolling space |
| Bulk purchases of identical cans | Gravity-fed dispenser | Creates dense storage and easy first-in-first-out rotation |
| Very small budget | Reinforced soda boxes | Uses common materials and tests the layout before a permanent build |
| Unused wall area | Wall-mounted corral | Converts vertical space into visible storage |
| Deep lower cabinet | Pull-out bin | Brings the entire inventory forward at once |
| Narrow gap near a cabinet | Rolling cart | Adds movable storage while keeping heavy cans low |
Before cutting lumber, make a cardboard mock-up of one lane or one tier. Load it with the heaviest cans you regularly buy and practice restocking it. This ten-minute prototype can reveal poor hand clearance, an inconvenient stop height, or a lane that is just narrow enough to jam.
Organizer concepts synthesized from Better Homes & Gardens, HGTV, Real Simple, Martha Stewart, and Ana White.
Five DIY Canned Food Organizer Ideas
1. A Custom Three-Tier Can Riser
A tiered riser is the easiest woodworking option for shallow cabinets. Build three steps from 1/2-inch plywood, 1-by lumber, or sturdy scraps so each rear row sits 2 to 3 inches above the one before it. Adjust heights to preserve loading clearance, join with glue and fasteners, sand smooth, and add low side panels if cans might roll off.
Label the front by category: beans, vegetables, soup, tomatoes, fruit, or “mystery can whose paper label vanished during the move.”
2. A Gravity-Fed FIFO Can Dispenser
A gravity-fed organizer stores cans on their sides in sloped channels. New cans enter at the upper rear; older cans leave from the lower front, creating a first-in, first-out system. Use plywood or 1-by boards for the frame, thin dividers, and wood strips or dowels as stops. Each lane should be slightly wider than the can. Keep the slope gentle; the goal is controlled movement, not a tomato-soup luge event.
- Build a rectangular outer frame sized to the shelf.
- Install a lower ramp that slopes toward the front opening.
- Add an upper loading ramp that slopes toward the back, creating an S-shaped path if desired.
- Install dividers to keep cans in separate channels.
- Add front stops high enough to contain the cans but low enough for easy removal.
- Test one fully loaded lane before finishing the remaining channels.
Secure tall or wall-mounted dispensers to studs or solid cabinet framing. Cans are compact, but a large group of them has the ambition of a kettlebell set.
3. A Cardboard Soda-Box Can Organizer
For a no-saw project, reuse clean, sturdy soda cartons. Reinforce seams with heavy-duty tape, cover the exterior if desired, and cut a front opening for one can. Load newer cans through the rear or top and remove older ones from the front. Keep cardboard dry and treat it as a light-duty or trial version before building in wood.
4. A Wall-Mounted Can Corral
Turn an empty pantry wall into shallow vertical corrals using 1-by-3 boards, a plywood back, and an acrylic front or retaining strips. Keep the rack clear of walking paths and door swing, mount it to studs, and place frequently used cans between waist and shoulder height. Avoid loading a hollow door unless its structure and hardware are rated for the weight.
5. Pull-Out Bins or a Slim Rolling Pantry Cart
Deep cabinets hide cans more effectively than a witness-protection program. Build low wooden crates on full-extension slides, or make a slim rolling cart for a gap beside a cabinet. Use locking casters, rails around each level, and place heavy cans low. If the cart feels tippy while empty, forty pounds of food will not improve its personality.
Materials and Tools for a Durable Build
Typical supplies include 1/2-inch or 3/4-inch plywood, straight 1-by boards, glue, screws or brads, thin divider material, labels, a tape measure, square, saw, drill-driver, and sanding block. Avoid splinters and protruding fasteners, round sharp corners, clean away sawdust, and let any finish cure fully before loading food. Use only clean cardboard that has never held chemicals or strongly scented products.
How to Organize Cans After the Build
Group, Rotate, and Limit
Group cans by food type and keep frequently used items at eye level. Put earlier dates in front and newer purchases behind; mark the month and year on can tops when printed dates are hard to see. Use labels broad enough to survive changing habits, such as “beans” or “quick meals.” Finally, let each lane define your maximum stock. When the tomato lane is full, stop buying tomatoes until space opens.
Category, visibility, labeling, and rotation practices synthesized from The Spruce, Lowe’s, Apartment Therapy, Good Housekeeping, and Food Network.
Safety and Maintenance
During pantry cleanouts, discard cans that are bulging, leaking, punctured, deeply rusted, or badly crushed, especially around seams. Never taste food from a suspicious container to check it; your digestive system is not a laboratory.
Wipe spills promptly, keep cardboard and wood dry, and avoid heat or plumbing leaks. Quarterly, confirm that channels roll freely, tighten hardware, inspect wall mounts, and remove stray products. Do not overload the organizer.
Pantry-cleaning and maintenance practices also reflect Bob Vila and Martha Stewart guidance.
Common DIY Mistakes to Avoid
- Building before measuring: A rack that misses the opening by 1/8 inch is modern sculpture.
- Using one lane size: Tuna, standard, and oversized cans differ.
- Making ramps too steep: Fast cans jam or jump the stop.
- Ignoring hand clearance: Leave room to load upper channels.
- Skipping a full-load test: Check strength and stability before finishing.
- Using weak mounting: Heavy units need structural support.
Conclusion
The best DIY canned food organizer is the one that fits your pantry, shows what you own, supports safe storage, and makes rotation easy. A tiered riser improves visibility, a gravity-fed dispenser handles bulk stock, a soda box offers an almost-free trial, and pull-outs rescue deep cabinets.
Measure first, build for the cans you use, test under a realistic load, and keep categories simple. Your pantry may not look like a magazine every day, but it can become practical, calm, and free of surprise creamed corn.
Hands-On Experience: What I Learned From Building and Using Can Organizers
The first organizer I tried was the cardboard version because it required almost no commitment. I reinforced two soda cartons, wrapped them in removable shelf paper, and labeled one “tomatoes” and the other “beans.” It was not glamorous, but it immediately exposed a problem: the shelf was deep enough for two boxes, yet the cabinet face frame made the rear box difficult to remove. That small test prevented me from building a wooden unit that would have fit the shelf but not the opening.
The cardboard channels also taught me that can size matters more than expected. Standard vegetable cans rolled smoothly, while shorter tuna cans turned sideways and behaved like loose poker chips. The solution was not a more complicated universal rack. It was a separate shallow bin for tuna and tomato paste. Simpler won.
My next build was a three-tier plywood riser. I cut the platforms to the full usable width of the cabinet and made each step deep enough for one row of cans. Visibility improved immediately. I could read every front label without moving anything, and grocery-list checks took seconds. The main mistake was making the rear tier too high. Tall cans nearly touched the shelf above, so loading them required an awkward tilt. Lowering the final tier by an inch made the organizer much easier to live with.
The gravity-fed dispenser delivered the most satisfying result but required the most testing. My first ramp was too steep, and a can of diced tomatoes hit the stop with enough enthusiasm to make everyone in the kitchen turn around. I reduced the slope, raised the front stop, and widened each lane slightly. After that, the cans advanced smoothly instead of auditioning for a stunt show.
Labeling also evolved through use. Detailed labels looked tidy at first, but they became restrictive when our shopping changed. A channel marked “black beans” sat half empty while chickpeas accumulated elsewhere. Broader labels such as “beans,” “tomato products,” and “quick meals” proved more flexible. I also began writing purchase months on can tops when dates were printed faintly along the rim. That made rotation much faster.
The biggest practical lesson was to design around restocking. An organizer can look brilliant when half full and become annoying when you return from the grocery store. Leave room for your hand, make upper loading openings generous, and avoid channels so deep that you cannot retrieve a jammed can. Removable dividers are worth the extra effort because they let the system adapt to new products.
Finally, I learned that pantry organization is not a one-time ceremony. A quick monthly glance and a deeper quarterly reset keep the system working. I wipe the shelves, inspect cans, move older items forward, and remove anything we are unlikely to eat. The organizer does most of the daily work, but those brief checkups prevent clutter from rebuilding. The reward is modest yet real: fewer duplicate purchases, faster meal decisions, and no more kneeling on the kitchen floor while muttering, “I know there is another can of corn in here.”
Note: Adjust all dimensions to your cabinet, can sizes, and expected load. Secure heavy wall-mounted or tall organizers to appropriate structural support, and follow tool manufacturers’ safety instructions.