Some people see a refrigerator and think, “Ah yes, the place where cheese goes to become emotionally important.” Others see a blank canvas. If your fridge is currently wearing a chaotic outfit made of school photos, wedding save-the-dates, grocery coupons, pizza magnets, birthday cards, and one suspiciously old dentist reminder, this guide is for you.
A DIY fridge photo display is one of the easiest ways to turn everyday kitchen clutter into a warm, organized, personality-filled mini gallery. It gives your favorite photos, holiday cards, postcards, kids’ artwork, invitations, and little sentimental scraps a real homewithout making your refrigerator look like it lost a fight with a craft drawer.
The best part? You do not need power tools, a design degree, or the emotional strength to throw away every cute card you have ever received. With ribbon, magnetic frames, removable strips, clips, or a simple rotating system, you can create a display that looks intentional, stays tidy, and still makes you smile when you reach for the milk.
Why a Fridge Photo Display Works So Well
The kitchen is often the busiest room in the house. It is where coffee happens, snacks disappear, family schedules collide, and someone always asks what is for dinner while standing directly in front of a fully stocked refrigerator. That makes the fridge a natural place to display meaningful photos and cards.
Unlike a formal gallery wall, a refrigerator display feels relaxed and personal. It can change with the seasons, holidays, school years, vacations, birthdays, and family milestones. One month it might feature Christmas cards and snowy family photos. The next, it could hold summer postcards, baby announcements, or a row of silly photo booth strips.
But there is a fine line between charming and cluttered. A few thoughtfully placed photos feel cozy. Forty-seven overlapping magnets and a coupon from 2021 feel like visual static. The goal is not to erase personalityit is to give personality a little structure.
Before You Start: Check Your Fridge Surface
Before buying supplies, test your fridge. Some refrigerator surfaces are magnetic, while othersespecially certain stainless-steel finishesmay not hold magnets well. If a regular magnet slides off or refuses to stick, do not panic. You still have options.
For Magnetic Refrigerators
If magnets stick securely, you can use magnetic photo frames, magnetic clips, magnetic tape, small decorative magnets, or flexible magnetic sheets. This is the easiest route because you can move items around whenever inspiration strikesor whenever Aunt Linda sends another holiday card featuring her dog in a sweater.
For Non-Magnetic Refrigerators
If your fridge is not magnetic, use removable adhesive strips, clear mounting squares, suction-based options on smooth surfaces, or a display attached to the side panel if that area is magnetic. You can also hang a lightweight ribbon strip using removable hooks and clip photos to the ribbon.
Always test adhesives in a hidden spot first. Clean the surface, let it dry fully, and avoid sticking anything to delicate, peeling, textured, greasy, or warm surfaces. Refrigerator doors are touched often, so good surface prep makes a big difference.
Supplies You Can Use for a DIY Fridge Photo Display
You can keep this project extremely simple or turn it into a tiny design event. Either way, most supplies are inexpensive and easy to find at craft stores, office supply stores, big-box retailers, or even your junk drawerthe place where rubber bands go to retire.
Basic Supplies
- Printed photos, greeting cards, invitations, postcards, or kids’ artwork
- Mini clothespins, binder clips, magnetic clips, or paper clips
- Ribbon, twine, leather cord, or cotton string
- Removable adhesive strips or mounting squares
- Magnetic tape, magnetic sheets, or magnetic photo frames
- Scissors, ruler, pencil, and a soft cleaning cloth
Optional Decorative Supplies
- Washi tape for borders or labels
- Paint pens for writing dates or captions
- Small wooden tags or label stickers
- Clear acrylic frames for a cleaner look
- Seasonal ribbon for holidays
- Decorative magnets made from shells, buttons, wood slices, or bottle caps
Method 1: The Ribbon-and-Clothespin Fridge Display
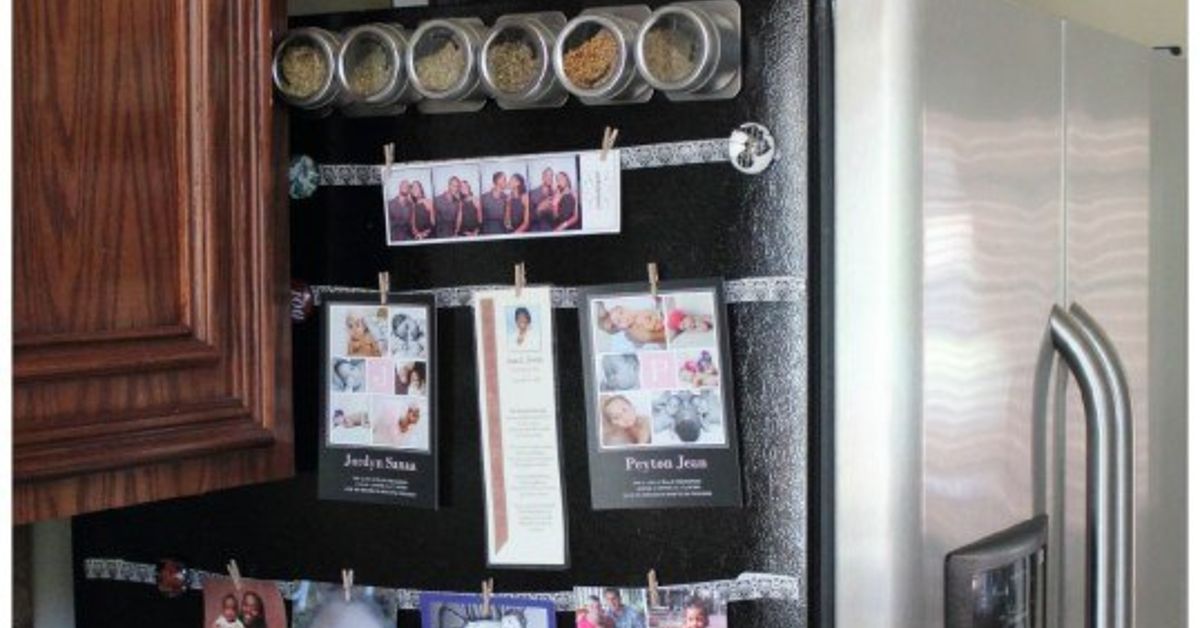
This is one of the easiest and prettiest ways to display photos and cards on a fridge. It works especially well on the side of a refrigerator, where the display feels intentional but does not overwhelm the main door.
How to Make It
- Choose a ribbon or twine that matches your kitchen style. Neutral cotton ribbon looks clean and modern, while colorful ribbon feels playful.
- Cut two to four vertical strips, depending on how many photos you want to display.
- Clean the fridge surface with a soft cloth and let it dry.
- Attach the top and bottom of each ribbon strip with removable adhesive strips or strong magnets.
- Clip photos and cards onto the ribbon using mini clothespins.
For a polished look, separate vertical and horizontal photos onto different ribbon strips. Put cards on one strip, family photos on another, and kids’ artwork on a third. Suddenly, your fridge has zones. Very official. Very adult. Still fun.
Method 2: Magnetic Photo Frames for a Clean Gallery Look
If your fridge is magnetic, magnetic frames are the fastest way to make photos look neat. They create the same visual effect as a gallery wall, but without nails, holes, measuring drama, or the classic “why is this frame somehow crooked again?” experience.
You can buy ready-made magnetic frames or make your own. To DIY them, remove the backing from lightweight picture frames, attach magnetic tape or small flat magnets to the back, and slide your photos inside. Choose frames in one color for a clean modern look, or mix vintage-inspired frames for a collected, cozy feel.
Best Uses for Magnetic Frames
- School portraits
- Family snapshots
- Small art prints
- Polaroid-style photos
- Recipe cards
- Baby announcements
For the most stylish result, leave a little breathing room between frames. When everything touches everything else, the eye gets tired. When each item has space, the display feels curatedeven if one photo is of your toddler wearing a mixing bowl as a helmet.
Method 3: Magnetic Clips for Cards, Invitations, and Rotating Displays
Cards and invitations are tricky because they come in different sizes and shapes. Magnetic clips solve that problem beautifully. Use one strong clip for a postcard or two clips for a larger greeting card. You can line them up in rows or group them in a small cluster.
This method is perfect for people who like changing their fridge display often. When a new wedding invitation, birthday card, thank-you note, or holiday greeting arrives, swap it in. No tape. No residue. No commitment issues.
Pro Tip: Create a “Now Showing” Section
Designate one area of the fridge for current cards and reminders. After the event passes, decide whether to recycle, save, photograph, or move the card into a memory box. This keeps your fridge from turning into a historical archive of expired baby shower invitations.
Method 4: A Mini Fridge Memory Grid
A memory grid gives your photo display structure. Instead of placing photos randomly, arrange them in a clean grid with equal spacing. This works especially well with square prints, instant photos, or 4-by-6 photos trimmed to the same size.
Use magnetic strips, magnetic frames, or removable mounting squares. Keep the spacing consistentabout half an inch to one inch between each item. A simple grid can make even casual snapshots look like an intentional design feature.
Ideas for Grid Themes
- Vacation memories
- Grandparents and family history
- Kids’ school-year highlights
- Pet photos, because pets are tiny celebrities
- Black-and-white family portraits
- Seasonal cards and postcards
Method 5: A Hidden Side-Fridge Display
If you love personal photos but dislike visual clutter on the front of the fridge, use the side panel. The side of the refrigerator is often underused, especially when it faces a cabinet, wall, pantry, or breakfast nook. It is visible enough to enjoy but tucked away enough to keep the kitchen looking calm.
This is a great place for a vertical ribbon display, a magnetic strip, a small mail holder, or a rotating photo column. It also works well for families who want to display kids’ artwork without covering every shiny inch of the appliance.
How to Make Your Fridge Display Look Designed, Not Dumped
The secret to a beautiful fridge photo display is not expensive supplies. It is editing. Think of your fridge like a tiny museum where the curator also happens to be hungry.
Pick a Color Palette
Choose clips, ribbon, frames, or magnets in two or three colors. Black, white, wood, brass, clear acrylic, soft beige, navy, or muted green all work well in modern kitchens. For a playful look, use bright colors, but repeat them intentionally.
Group Similar Items Together
Photos look better when grouped with photos. Cards look better when grouped with cards. Kids’ artwork can have its own section. This simple organization trick keeps the display from looking like everything landed there during a strong breeze.
Use Odd Numbers
Groups of three, five, or seven often feel natural to the eye. Try three magnetic frames in a vertical line, five postcards in a cluster, or seven mini photos clipped to one ribbon. Odd-number groupings create movement without feeling too rigid.
Leave Empty Space
Empty space is not wasted space. It is what allows your favorite pieces to stand out. If every inch of the fridge is covered, nothing feels special. Give your best photos room to breathe.
How to Protect Photos and Cards on the Fridge
Kitchen displays are exposed to light, steam, fingerprints, cooking residue, and the occasional mysterious splash. To keep photos looking good, make copies of important prints before displaying them. Save originals in an album, box, or frame away from direct sunlight and moisture.
Avoid placing valuable or irreplaceable photos on the fridge. Use reprints instead. If a card is sentimental, take a picture of it before displaying it, or store it after a few weeks. For prints you want to keep bright, avoid areas that receive strong sunlight. Light, humidity, and frequent handling can fade or damage paper over time.
Clear magnetic sleeves or acrylic frames can add protection, especially for favorite photos. However, avoid cheap plastic sleeves that feel sticky, smell strongly of chemicals, or cling tightly to glossy prints. When in doubt, use display copies and keep the originals safe.
Best Photo Sizes for a Fridge Display
The best photo size depends on your fridge and your design style. A small fridge looks better with smaller prints, while a wide French-door refrigerator can handle larger frames or a grid.
Recommended Sizes
- 2 x 3 inches: Great for instant-photo style displays and mini grids.
- 3 x 4 inches: Perfect for magnetic frames and small family snapshots.
- 4 x 6 inches: Classic, easy to print, and ideal for ribbon displays.
- 5 x 7 inches: Best for one or two statement photos, not a crowded display.
- Square prints: Excellent for modern grids and social-media-style layouts.
If your fridge display feels messy, the problem may not be the number of photosit may be inconsistent sizes. Try printing everything in the same format for a cleaner look.
Creative Themes for Your DIY Fridge Photo Display
A themed fridge display makes updates easier. Instead of asking, “What should I put here?” you already have a plan.
Seasonal Family Gallery
Switch the display four times a year. Spring can feature garden photos and pastel cards. Summer can show beach trips, camp memories, and postcards. Fall can bring school pictures and pumpkin patch snapshots. Winter can hold holiday cards and cozy family photos.
Travel Postcard Wall
Display postcards from trips, national parks, museums, road stops, or friends who travel. Add a small label with the date or location. Over time, your fridge becomes a low-pressure travel journal.
Kids’ Art of the Month
Instead of displaying every masterpiece forever, choose one or two favorites each month. Photograph the rest and save the best originals in a folder. This keeps the fridge fresh and makes each displayed piece feel special.
Family Timeline
Arrange photos chronologically: baby pictures, birthdays, graduations, vacations, anniversaries, and everyday moments. This works beautifully on a side panel or wide refrigerator door.
Pet Hall of Fame
Give your pets their rightful place in household leadership. Add tiny captions like “Snack Inspector,” “Chief Nap Officer,” or “Director of Squirrel Surveillance.”
Common Mistakes to Avoid
A fridge photo display should be easy, but a few small mistakes can make it look messy or damage the surface.
Using Too Many Heavy Magnets
Heavy or rough magnets can slide, scratch, or leave marks. Choose smooth, flat magnets whenever possible. If a magnet feels sharp on the back, do not use it directly on the fridge surface.
Covering the Whole Door
Unless you love a maximalist collage, avoid covering the entire fridge. Pick one zone: top left, side panel, center column, or one clean grid.
Forgetting to Rotate Items
When everything stays up forever, the display becomes background noise. Refresh it monthly, seasonally, or whenever new cards arrive.
Displaying Originals
Original wedding photos, old family pictures, signed cards, or one-of-a-kind prints should be copied before display. The kitchen is not exactly a museum-grade preservation environment. It is where spaghetti sauce has ambitions.
Easy Maintenance: The 10-Minute Monthly Reset
Once a month, give your fridge photo display a quick reset. Remove everything, wipe the surface with a soft cloth, sort the photos and cards, and put back only your favorites. Recycle expired reminders, store sentimental cards, and reprint any photo that is curling, fading, or getting handled too much.
This small habit keeps your kitchen looking fresh and prevents the display from growing into a paper jungle. It also gives you a chance to enjoy your memories instead of letting them blend into the background.
500-Word Experience Section: What I Learned from Making a DIY Fridge Photo Display
The first time I tried to organize a fridge photo display, I made the classic beginner mistake: I thought “cute” and “organized” were the same thing. They are cousins, yes, but not twins. I had adorable photos, sweet cards, a few postcards, and enough mismatched magnets to start a tiny hardware store. I placed everything on the fridge with confidence. Then I stepped back and realized it looked less like a memory board and more like my refrigerator had been collecting evidence for a detective case.
The biggest lesson was that a fridge display needs boundaries. Once I chose one area instead of using the entire door, everything instantly looked calmer. I used the side panel for family photos and kept the front mostly clear except for one current card and one grocery note. That small change made the kitchen feel cleaner without removing the personal touch.
I also learned that matching supplies matter more than fancy supplies. You do not need expensive frames or designer magnets. Even simple mini clothespins look great when they are all the same color. A ribbon display with evenly spaced clips can look more polished than a collection of pricey magnets scattered everywhere. Consistency is the secret sauce. Not actual sauce, because again, kitchen surfaces have suffered enough.
Another experience-based tip: reprint your favorite photos. At first, I displayed original prints because they were already sitting in a drawer. After a few weeks of fingerprints, corner bends, and one near-disaster involving a wet handprint, I realized copies were the smarter choice. Now I keep originals in an album and use inexpensive reprints on the fridge. That way, if a photo gets damaged, it is not a tragedyit is a quick reprint.
Rotating the display also made a surprising difference. Instead of letting every card stay up until it became part of the architecture, I started changing the display once a month. Birthday cards stayed for a few weeks. Holiday cards got their own season. Vacation photos came out in summer. School pictures got a clean little row in the fall. The display began to feel alive rather than abandoned.
One of my favorite upgrades was adding captions. Nothing fancyjust tiny labels with dates, places, or funny names. A beach photo became “The Great Sand-in-Shoes Day.” A pet photo became “Supervisor of Snacks.” A family dinner photo became “Proof We All Sat Down at Once.” Captions made the display more personal and gave guests something to smile at.
The most useful takeaway is this: your fridge photo display should match your real life. If you are busy, choose magnetic frames or clips that make swapping easy. If you love crafts, make ribbon rows or handmade magnets. If you dislike clutter, use the side of the fridge. If you love maximalism, create a full collagebut organize it by color, shape, or theme.
A good DIY fridge photo display is not about perfection. It is about making everyday memories visible in a way that feels joyful, tidy, and easy to maintain. The fridge is already part of daily life. With a little planning, it can also become one of the sweetest corners of your home.
Conclusion
A DIY fridge photo display turns ordinary kitchen space into a warm, personal, and practical memory wall. Whether you use ribbon and clothespins, magnetic frames, clear sleeves, decorative magnets, or a simple rotating card system, the key is to create structure. Choose a zone, limit the number of items, protect important photos, and refresh the display regularly.
Your refrigerator does not have to look like a clutter magnet in the emotional sense. It can showcase your favorite photos and cards beautifully while keeping your kitchen neat. Start small, use what you already have, and let your fridge tell your family’s storyone snapshot, postcard, and delightfully awkward school photo at a time.
Note: This article was created from practical home organization, appliance-care, adhesive-use, photo-preservation, and DIY decorating guidance. Always test magnets and removable adhesives on a hidden area first, and use copy prints instead of irreplaceable originals for everyday fridge displays.