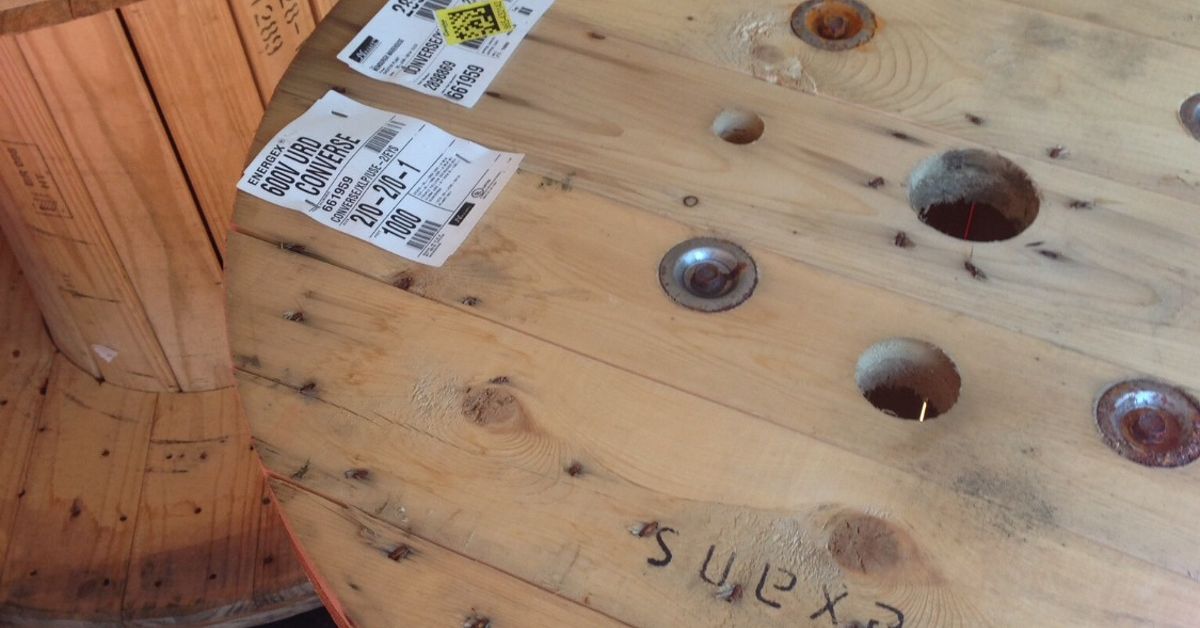
A discarded wooden cable spool may not look like future wall decor when it is sitting behind a warehouse collecting dust and questionable life choices. Look closer, however, and you will see something remarkably clock-shaped. One round wooden flange, a dependable quartz movement, a set of oversized hands, and a little refinishing work can turn industrial scrap into a dramatic focal point.
This DIY large wall clock from a cable spool works especially well in farmhouse, rustic, industrial, coastal, and vintage-inspired interiors. Unlike a mass-produced clock, every spool has its own grain patterns, nail holes, stamps, dents, and weathered edges. Those imperfections give the finished piece characterprovided the wood is clean, stable, and safe to bring indoors.
The project is approachable for an intermediate DIYer and can often be completed over a weekend, not counting drying time. The most important challenges are choosing the right spool, matching the clock movement to the thickness of the wood, laying out the hour markers accurately, and securely mounting the finished clock. Get those details right, and your former cable carrier will keep time instead of merely taking up space.
Why Use a Cable Spool for a Large Wall Clock?
The circular end of a wooden cable spool is practically a ready-made oversized clock face. Depending on the spool, the diameter may range from roughly 24 inches to more than 48 inches. That is large enough to fill an empty wall above a fireplace, sofa, console table, or dining-room buffet without requiring you to glue boards together and cut a perfect circle.
Reusing a spool can also reduce material costs. You may still need to purchase a clock movement, hands, paint, stain, sealer, numerals, and hanging hardware, but the largest component of the project may be free. Ask electrical contractors, utility companies, construction businesses, hardware suppliers, or local recycling centers whether they have an empty spool available. Always obtain permission before taking one. “But it looked abandoned” is not a universally accepted procurement strategy.
The spool’s industrial history is part of its appeal. Original markings can be preserved for a rugged workshop look, softened under whitewash for farmhouse decor, or covered completely for a clean modern finish.
Choose a Safe, Usable Cable Spool
Find Out Where It Came From
Not every reclaimed wooden spool belongs inside a home. Ask what type of cable or material it carried and whether the wood was treated, exposed to chemicals, stored in contaminated conditions, or painted with an unknown coating. Avoid spools with oily residue, strong chemical odors, extensive mold, unidentified spills, or signs of rot.
Older painted wood deserves extra caution. Sanding an unknown coating can release hazardous dust, including lead-contaminated dust in some older materials. Test questionable paint before disturbing it, and do not power-sand a surface you cannot identify. When the spool’s history is a mystery wrapped in a sticky stain, choose another spool.
Reclaimed-material safety guidance synthesized from Penn State Extension, Popular Woodworking, and U.S. EPA resources.
Inspect the Wood Carefully
Look for cracks around the center hole, loose planks, deep splits, insect activity, protruding staples, nails, bolts, and damaged edges. Small cosmetic gaps can add rustic charm, but structural cracks near the center or mounting points can make the clock unsafe.
Run a metal detector over reclaimed wood before drilling, routing, or cutting. Cable spools often contain hidden fasteners, and a router bit meeting an old nail is the woodworking equivalent of biting down on a fork.
Consider the Weight
A thick spool flange can be surprisingly heavy. Weigh the wooden circle after disassembly and again after adding hardware. The final weight determines whether you can use picture-hanging hardware, heavy-duty anchors, a metal cleat, or a wooden French cleat attached to wall studs.
Tools and Materials
Recommended Tools
- Drill and drill bits
- Socket set, wrenches, or adjustable wrench
- Pry bar and nail puller
- Random-orbit sander or sanding block
- 80-, 120-, 150-, 180-, and 220-grit sandpaper
- Tape measure and straightedge
- Compass, string, or homemade circle guide
- Combination square
- Stud finder
- Level
- Jigsaw or oscillating multi-tool, if repairs are needed
- Router with a straight bit, if the movement must be recessed
- Clamps
- Safety glasses, hearing protection, gloves, and a dust mask or respirator
Materials
- One clean wooden cable spool
- High-torque quartz clock movement
- Oversized clock hands
- One AA battery or the battery specified by the movement manufacturer
- Wood filler or two-part epoxy, if needed
- Wood glue and screws for loose boards
- Paint, stain, whitewash, or decorative glaze
- Clear polyurethane or another compatible protective finish
- Clock numerals, stencils, vinyl decals, or wooden markers
- Painter’s tape
- Lint-free rags
- French cleat, metal Z-clips, or appropriately rated hanging hardware
How to Make a DIY Large Wall Clock From a Cable Spool
Step 1: Disassemble the Spool
Place the spool on a stable work surface. Most wooden cable spools consist of two circular flanges connected by a cylindrical center section with threaded rods, bolts, or fasteners. Remove the nuts and hardware while a helper supports the opposite flange. Large spools can shift suddenly, so do not attempt to wrestle one apart while wearing flip-flops and optimism.
Separate the two round ends and select the better one for your clock. Compare flatness, grain, damage, markings, and overall appearance. Save the second flange for another clock, a tabletop, a sign, or the inevitable future project pile.
If the chosen flange is made from several boards, check every connection. Reinforce loose pieces from the back using wood glue and screws that will not penetrate the face.
Cable-spool clock construction approaches reviewed from established DIY project examples.
Step 2: Clean and Repair the Wood
Brush away loose debris, then vacuum both sides. Wipe the wood using a mild cleaning solution appropriate for unfinished wood, taking care not to saturate it. Allow it to dry completely before sanding.
Remove protruding metal and set any fasteners you intend to preserve below the surface. Fill dangerous voids, unstable cracks, and deep holes with wood filler or epoxy. You do not need to erase every scar. A cable-spool clock should look reclaimed, not as though it recently graduated from a luxury furniture academy.
If the circle has badly splintered edges, trim loose fibers with a sharp chisel and sand the perimeter. Slight irregularity is fine, but sharp edges are not.
Step 3: Sand the Clock Face
Begin with the least aggressive grit capable of leveling the surface. For rough, unfinished wood, that may be 80 grit. For a relatively smooth face you want to preserve, start around 120 or 150 grit.
Sand evenly across the face and follow the wood grain whenever possible. Progress through finer grits rather than jumping directly from coarse paper to 220 grit. A typical sequence is 80, 120, 150, and 180 grit. Use a sanding block around edges and between boards where a power sander cannot reach safely.
Vacuum thoroughly after sanding, including the gaps between planks. Finish by wiping the surface with a clean, lint-free cloth. Dust left behind becomes tiny bumps in the topcoat, each one waiting to catch the light and mock you.
Sanding and surface-preparation practices synthesized from The Home Depot and This Old House woodworking guidance.
Step 4: Locate the True Center
Do not automatically assume the existing center hole is perfectly centered. Measure the diameter in several directions and mark the midpoint of each line. Where the measurements intersect is your working center.
You can also trace the circle onto paper, fold the paper into quarters, and use the folds to locate the center. On an imperfect spool, average several measurements rather than trusting one edge.
Drill the center hole according to the diameter required by the movement shaft. Keep the drill perpendicular to the face. A crooked hole can tilt the movement and make the hands sit unevenly.
Step 5: Measure for the Clock Movement
The movement shaft must pass through the clock face far enough to accept its washer and mounting nut. Measure the thickness of the wood at the center, not at the outer edge. Spool boards can vary significantly in thickness.
For a thick flange, you may need to recess the clock mechanism into the back. Trace the movement case at the center and use a router to create a shallow pocket. Remove a little material at a time and test the fit frequently. Leave enough wood around the center to maintain strength.
A large clock should generally use a high-torque movement designed to drive long hands. Standard movements may struggle with the extra weight and leverage of oversized hands. Match the movement’s shaft length to the remaining dial thickness and confirm that the hand sizes fall within the manufacturer’s supported range.
Movement selection and shaft-measurement details based on Klockit and clock-repair guidance for large hands and thick dials.
Step 6: Apply the Decorative Finish
Test your finish on the back first. Reclaimed softwood can absorb stain unevenly, especially where the surface has weathered. A wood conditioner may help reduce blotching when using stain on pine or similar species.
Popular finishes include:
- Natural rustic: Clear-coat the sanded wood and retain original stamps.
- Dark farmhouse: Apply walnut or espresso stain with cream numerals.
- Whitewashed: Brush on diluted white paint, then wipe it back to reveal the grain.
- Distressed black: Paint the surface black and sand selected edges to expose wood.
- Industrial: Use charcoal stain, metal numerals, and simple hands.
- Modern: Paint the entire face a solid neutral color and use minimalist hour markers.
Follow the finish manufacturer’s instructions for ventilation, drying time, recoating, and cleanup. Once the color coat is fully dry, apply a compatible clear protective finish. Light sanding between clear coats can help produce a smoother surface, but remove every trace of dust before recoating.
Finishing recommendations synthesized from The Home Depot, Rust-Oleum, and This Old House.
Step 7: Lay Out the Hour Positions
Accurate hour-marker placement is what separates a functional clock from a very large circular suggestion of time.
Begin by marking 12, 3, 6, and 9 using two perpendicular lines through the center. Divide each quarter into three equal sections to establish the remaining hours. Because a clock has 12 positions around 360 degrees, each hour is separated by 30 degrees.
For a simple measuring method, create a paper template the same diameter as the clock. Mark the hour positions on the paper, lay it over the face, and transfer each point. Another option is to use a printed clock-face template sized through tiled printing.
Before permanently attaching anything, place all numerals or markers on the face and step back several feet. Check spacing, orientation, and readability. Pay special attention to Roman numerals. Decide whether you prefer the traditional clock-face “IIII” or the classical “IV” for four and remain consistent with your design.
Step 8: Add Numerals or Hour Markers
Painted numerals are lightweight and inexpensive. Secure a stencil with painter’s tape, use a nearly dry stencil brush or foam applicator, and build the color gradually to reduce bleeding.
Vinyl decals offer crisp edges but require a clean, smooth surface. Wooden or metal numerals add depth, although they also add weight. Arrange dimensional numbers before gluing and confirm that the clock hands can pass over them without contact.
You can also skip numerals entirely. Short painted lines, wood pegs, upholstery tacks, or small metal plates create a simpler face while preserving more of the spool’s grain.
Step 9: Install the Movement and Hands
Insert the movement shaft through the back of the clock. On the front, install the washer and nut in the sequence specified by the manufacturer. Tighten the nut until the movement is secure, but do not overtighten it and crush the wood fibers or damage the shaft.
Set the hour hand at 12, pressing it straight onto its shaft. Install the minute hand at 12, followed by the retaining nut or pin if included. Add the second hand only if your movement supports one and the design needs it.
Turn the minute hand carefully through a full 12-hour cycle. The hands must remain parallel and should not touch each other, the numerals, or the wood. Slightly bend a hand only when the manufacturer permits adjustment. Never force the hands around by grabbing both together.
Install the battery and allow the clock to run flat on a table for at least several hours. Confirm that it keeps time and does not stall at 6 or 9, where long hands may place different loads on the motor.
Step 10: Install Secure Hanging Hardware
Attach the hanging system to structural wood on the back of the clock, not merely to thin or cracked surface boards. For a large, heavy spool clock, a French cleat or rated metal Z-clip system distributes the load and helps the clock sit close to the wall.
Fasten the wall-mounted portion into studs whenever possible. Use screws and hardware rated for more than the clock’s actual weight. If stud placement does not match the desired clock position, consult the anchor manufacturer’s load specifications and choose fasteners designed for your wall type.
A two-point mounting system can reduce rotation and improve stability. After hanging the clock, check it with a level and add discreet rubber bumpers near the lower back edge to protect the wall.
Heavy-object mounting practices synthesized from Lowe’s, Rockler, and WOOD Magazine.
Design Ideas for Different Rooms
Farmhouse Dining Room
Use a medium-brown stain, white painted numerals, and black spade hands. Preserve a few bolt holes and weathered edges so the clock looks authentically reclaimed rather than artificially distressed with a chain during an emotional afternoon.
Industrial Loft
Retain printed cable markings, darken the face with charcoal glaze, and add metal hour markers. A black high-torque movement and straight hands will keep the design clean.
Coastal Living Room
Apply a pale gray or washed-blue finish, gently sand the edges, and use white or navy markers. A lighter finish can make a huge clock feel less visually heavy.
Modern Entryway
Fill major holes, paint the face matte black, and add only four markers at 12, 3, 6, and 9. Pair the dark surface with brass-tone hands for contrast.
Common Mistakes to Avoid
- Using an unidentified or contaminated spool: Attractive wood is not worth introducing chemical residue, mold, or hazardous paint dust into your home.
- Buying the movement too early: Measure the finished center thickness and planned hand length before ordering.
- Choosing a standard-torque motor: Long clock hands often require a movement specifically designed for oversized clocks.
- Trusting the original center hole: Verify the true center or the hour positions may look uneven.
- Skipping the test layout: Temporarily position all markers before gluing or painting them.
- Overdecorating the face: Too many words, numbers, borders, and graphics can compete with the natural wood.
- Hanging it from one small hook: A heavy wooden clock requires hardware matched to its weight and wall construction.
- Installing touching hands: Even light contact can stop the clock or produce inaccurate timekeeping.
Maintenance Tips
Dust the face using a microfiber cloth or soft brush. Avoid spraying cleaner directly onto unfinished gaps, painted numerals, or the clock movement. Replace the battery when the hands begin losing time or stop intermittently.
Check the hanging hardware periodically, especially during the first few months. Wood can expand and contract as indoor humidity changes. Tighten loose hardware carefully and inspect repaired cracks for movement.
If the hands stop, remove the clock from the wall before troubleshooting. Confirm that the battery is fresh, the hands are not touching, and the movement case has not shifted. A quartz movement is inexpensive to replace, so the clock face can remain in service even after the original motor retires.
Real-World Experience: What This Project Teaches You
The first lesson from building a cable-spool wall clock is that reclaimed materials rarely cooperate with the plan you drew while drinking coffee. A spool that appears round may be slightly oval. The center hole may be off by half an inch. One board may be thicker than its neighbors, and a bolt that looks removable may have developed a permanent emotional attachment to the wood.
That unpredictability is not a reason to avoid the project. It is the reason to measure before every major step. During one typical build, the existing center hole may look perfect until a tape measure reveals that it sits noticeably closer to one side. Enlarging that hole without checking would produce a clock whose 12 and 6 markers appear suspiciously crowded. Establishing a true center first saves the entire design.
Sanding usually takes longer than expected. Reclaimed spool wood can have saw marks, stamped lettering, sun damage, splinters, and compressed areas around old bolts. The temptation is to attack everything with coarse paper until the face resembles newly purchased lumber. That can remove the very character that made the spool interesting. A better approach is selective refinement: smooth anything sharp or unstable, level the areas needed for numerals, and preserve harmless scars that tell the material’s story.
Finishing also involves compromise. Dark stain can beautifully emphasize the grain while making black hands nearly disappear. Whitewash can brighten the clock but reduce the visibility of pale numerals. Testing a full design on the backor on scrap wood with a similar textureprevents these contrast problems. Readability matters more than a perfect color match. After all, a clock that cannot be read from across the room is just circular wall art with mechanical ambitions.
The most technical lesson is that the movement must match the project, not the other way around. Thick spool wood often requires routing a recess in the back. Making that recess shallow at first is wise. It is easy to remove another eighth of an inch; putting the wood back is considerably more difficult and generally involves language unsuitable for a family DIY blog.
Hand alignment deserves patience. Install both hands at 12, view them from the side, and rotate them through a complete cycle before hanging the clock. Long metal hands can be slightly curved from shipping. A nearly invisible bend may cause the minute hand to brush the hour hand once per hour. Testing the clock overnight on a flat surface is far easier than repeatedly lifting a heavy spool off the wall.
Finally, mounting is part of the build, not an afterthought. The completed clock may feel manageable while resting on a workbench, yet become awkward when lifted above shoulder height. Use a helper, mark the studs, level the wall cleat, and verify every fastener. A broad cleat provides more control than a tiny central hanger and makes final positioning easier.
The greatest reward arrives when the clock is installed. From a distance, it looks like an expensive custom decor piece. Up close, the old bolt holes, grain variations, and faded industrial marks reveal its history. The project succeeds not because the spool becomes flawless, but because its flaws become intentional parts of the design.
Conclusion
A DIY large wall clock from a cable spool combines practical woodworking, creative refinishing, and reclaimed-material charm. The spool provides an impressive ready-made circle, while your choice of finish, numerals, and hands determines whether the final clock feels farmhouse, industrial, coastal, vintage, or modern.
Start with clean, structurally sound wood. Verify the center, measure the dial thickness, choose a high-torque movement for oversized hands, and use a wall-mounting system rated for the finished weight. Take time with the layout and test the mechanism before installation. The result will be more than a device for checking the hourit will be a one-of-a-kind focal point with a history larger than its minute hand.
Safety note: The condition, treatment, weight, and construction of cable spools vary. Wear appropriate protective equipment, avoid wood with an unknown or contaminated history, follow tool and finish manufacturers’ instructions, and select mounting hardware based on the actual clock weight and wall structure.