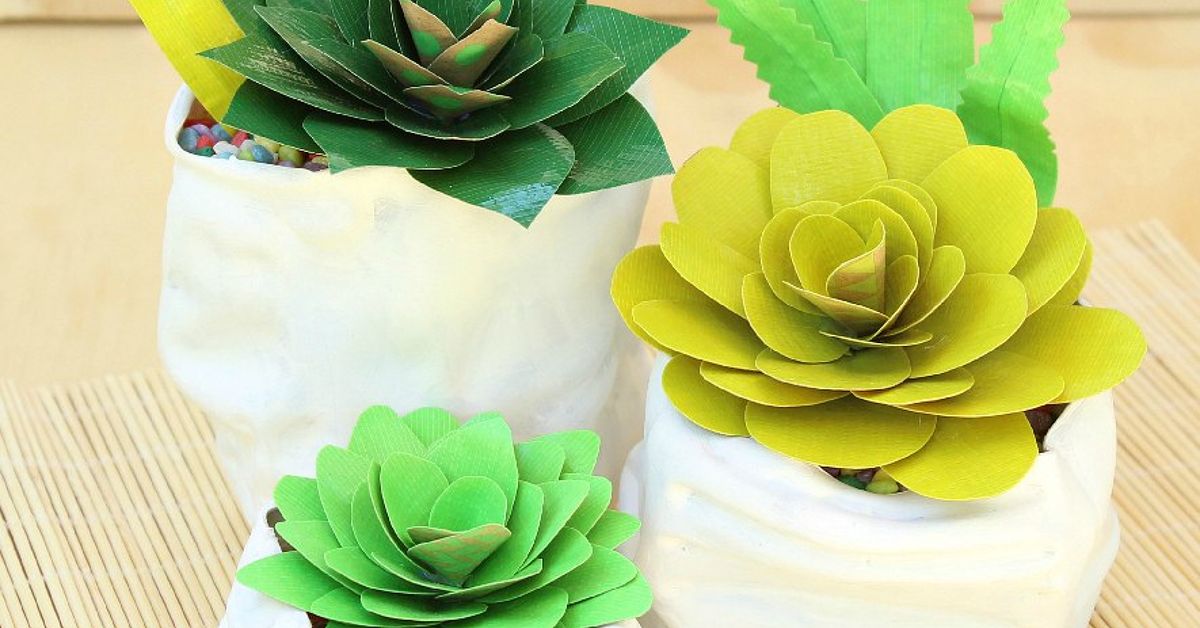
Some crafts whisper, “I am elegant.” Others proudly announce, “I was made on a kitchen table next to a suspiciously sticky pair of scissors.” Duct tape succulents and faux pinch pots somehow manage to be both. They look cheerful, handmade, and artsy, but they do not ask for sunlight, drainage holes, emotional commitment, or that one perfect windowsill already occupied by the family cat.
This project combines two wonderfully forgiving DIY trends: faux succulents made from colorful duct tape and handmade-style pinch pots that can be created with air-dry clay, lightweight modeling material, paper mache, or even recycled containers disguised with texture and paint. The result is a modern mini planter display that works for desks, shelves, dorm rooms, party favors, classroom crafts, handmade gifts, and anyone who has ever accidentally killed a cactus and felt personally judged.
The main keyword here is simple: duct tape succulents and faux pinch pots. But the real magic is in the mix of textures. Duct tape creates glossy, flexible leaves. Faux pinch pots bring that soft, imperfect pottery look. Together, they create an easy DIY succulent craft that feels playful, budget-friendly, and surprisingly stylish.
What Are Duct Tape Succulents and Faux Pinch Pots?
Duct tape succulents are artificial succulent plants made by cutting, folding, layering, and shaping duct tape into pointed leaves or rosettes. Instead of watering them, you occasionally dust them. That is the kind of plant care schedule many of us can confidently handle.
Faux pinch pots are small handmade-looking containers inspired by traditional pinch pottery. A real pinch pot is formed by pressing a thumb into a ball of clay and pinching the walls outward until a small bowl or planter shape appears. A faux version copies that charming handmade look without requiring a kiln. You can use air-dry clay, polymer clay, papier-mache, recycled yogurt cups, small tins, cardboard tubes, or store-bought mini pots altered to look hand-built.
When paired together, these two crafts create a mini succulent arrangement that looks like it came from a boutique maker market, minus the boutique price tag and the awkward moment where you pretend not to gasp at the total.
Why This DIY Craft Works So Well
The appeal of duct tape succulents and faux pinch pots comes down to three things: shape, color, and contrast. Succulents are naturally sculptural. Their leaves grow in rosettes, spirals, stacks, and chunky little clusters. Duct tape is great for recreating those shapes because it holds folds, resists tearing, and comes in colors ranging from soft sage green to “neon alien houseplant.”
The faux pinch pot adds softness. Real pottery often has finger marks, uneven rims, tiny dents, and organic curves. Those imperfections are not mistakes; they are the charm. A perfectly symmetrical pot can look factory-made. A slightly wobbly pinch pot looks like it has a personality and possibly a small Etsy shop.
This craft is also beginner-friendly. You do not need a pottery wheel, specialty sculpting tools, or advanced plant knowledge. You need tape, scissors, a base, and a willingness to say, “That leaf is not crooked; it is botanical drama.”
Materials You Will Need
For the Duct Tape Succulents
- Duct tape in green, blue-green, gray-green, purple, pink, or variegated patterns
- Sharp craft scissors or a craft knife with adult supervision
- Cutting mat or nonstick work surface
- Floral wire, toothpicks, skewers, or small cardboard circles for leaf bases
- Hot glue, craft glue, or strong double-sided tape
- Optional: chalk, marker, or acrylic paint for leaf shading
For the Faux Pinch Pots
- Air-dry clay, lightweight modeling clay, or polymer clay
- Small recycled cups, tins, or cardboard rings if you want a no-sculpt base
- Acrylic paint in terra-cotta, cream, blush, charcoal, sand, or sage
- Paintbrushes or sponge brushes
- Fine sandpaper for smoothing dry clay
- Clear matte sealer for durability
- Decorative gravel, moss, pebbles, or shredded paper filler
How to Make a Faux Pinch Pot
Step 1: Start With a Ball of Clay
Take a small ball of air-dry clay, about the size of a golf ball for a mini pot or a lemon for a larger one. Roll it between your palms until it is smooth. If the clay feels dry, dampen your fingers slightly. Do not soak it. Clay likes moisture, but it does not want to go swimming.
Step 2: Press the Center
Push your thumb gently into the middle of the clay ball, stopping before you break through the bottom. Think “tiny bowl,” not “clay doughnut.” Leave enough clay underneath so the pot can sit flat and support your faux succulent arrangement.
Step 3: Pinch the Walls
Rotate the clay slowly while pinching the walls between your thumb and fingers. Try to keep the thickness even. A good target is about one-quarter to one-half inch thick, depending on the size of the pot. Thin walls may crack; thick walls may look chunky. Chunky is cute, but only up to the point where your pot resembles a biscuit.
Step 4: Shape the Rim
Use your fingers to create a slightly uneven rim. This is where the handmade look shines. You can leave it wavy, flatten it with gentle taps, or curve one side higher than the other for an organic modern style. Smooth rough spots with a damp fingertip.
Step 5: Dry, Sand, and Paint
Let the pot dry according to your clay package instructions. Air-dry clay often needs a day or more depending on thickness and humidity. Once dry, lightly sand rough areas. Paint the pot with acrylic paint. Terra-cotta creates a classic planter look, while matte white, dusty pink, or charcoal gives it a trendy shelf-decor vibe.
No-Clay Option: Make a Faux Pinch Pot From Recycled Materials
If clay is not available, you can still make a convincing faux pinch pot. Start with a small yogurt cup, applesauce container, spice tin, or cut cardboard tube. Cover the outside with paper mache, joint compound, textured paint, or strips of masking tape. Build up the rim unevenly to mimic hand-shaped pottery.
Once dry, paint the container in a matte ceramic-inspired color. Dab on a second shade with a sponge to create depth. For example, use a tan base with cream highlights, or a terra-cotta base with soft peach and brown shading. The goal is not perfection. The goal is “handmade boutique object,” which is much easier to achieve when you stop fighting every little bump.
How to Make Duct Tape Succulent Leaves
Step 1: Create Tape Sheets
Cut two equal strips of duct tape and place them sticky sides together. This creates a flexible, double-sided sheet that can be cut into leaf shapes. Smooth out bubbles with your fingers or the edge of a ruler. If one corner wrinkles, congratulations: your succulent now has realism.
Step 2: Cut Leaf Shapes
Cut teardrop, oval, spear, or rounded triangle shapes from the tape sheet. Succulents look best when the leaves vary in size. Make larger leaves for the outside of the rosette and smaller ones for the center. For a mini succulent, cut about 18 to 30 leaves. For a fuller arrangement, make several clusters.
Step 3: Add Dimension
Pinch each leaf slightly at the base to make it curve. You can also fold a faint crease down the center. This step keeps the plant from looking flat. Flat succulents are fine in illustrations, but in a pot they can look like green tortilla chips. A little shaping makes a big difference.
Step 4: Build a Rosette
Start with a small rolled center leaf. Add leaves around it in a spiral, overlapping each one slightly. Use hot glue or small pieces of duct tape to secure the base. Continue adding leaves from smallest to largest until the succulent looks full. For variety, create one tight rosette, one spiky plant, and one trailing cluster.
Step 5: Shade and Detail
For a more realistic look, brush a little chalk pastel, acrylic paint, or marker along the leaf tips. Many real succulents have pink, purple, blue, or dusty edges. Do not overdo it. One soft accent color is enough. If your plant starts looking like it joined a carnival parade, pause and reassess.
Arranging the Succulents in the Faux Pinch Pot
Once the pot is painted and the succulents are shaped, fill the pot with floral foam, crumpled paper, cork, or cardboard. This gives the duct tape plants something to sit on. Cover the filler with decorative gravel, moss, sand, small pebbles, or shredded kraft paper.
Place the largest duct tape succulent slightly off center. Add smaller rosettes nearby. Tuck in spiky leaves around the edges. A natural arrangement usually looks better when it is asymmetrical. Real plants rarely line themselves up like they are taking a school photo.
Try combining colors carefully. Sage green, dusty blue, and lavender create a soft desert palette. Emerald green, lime, and yellow feel playful and kid-friendly. Black-and-white patterned duct tape can create a bold modern look when paired with a matte white faux pinch pot.
Design Ideas for Duct Tape Succulents and Faux Pinch Pots
Minimalist Desk Garden
Make three small white pinch pots and fill each with one duct tape succulent in a different shade of green. Line them up on a desk, bookshelf, or windowsill. This design is clean, calming, and ideal for people who like plants but not soil crumbs near their keyboard.
Boho Mini Planters
Paint the faux pinch pots in warm clay tones and add simple white line patterns. Use muted green duct tape for the succulents and top the pots with tan gravel. The result looks earthy, handmade, and ready to appear beside a candle with a name like “Desert Moon Blanket.”
Kids’ Craft Party Favor
Use recycled mini cups for the pots and let kids decorate them with paint pens or stickers. Pre-cut duct tape leaves for younger crafters so the project stays fun and safe. Each child can build a silly succulent with bright leaves, googly eyes, or a tiny name tag.
Holiday Succulent Pots
Change the color palette for the season. Use red and green tape for Christmas, orange and black accents for Halloween, pastels for spring, or metallic tape for New Year’s decor. Faux succulents are wonderfully flexible because they do not care what month it is.
Common Mistakes and How to Fix Them
The Leaves Look Too Flat
Pinch the base of each leaf and curve the tip outward. Layering is the secret. If you only place leaves side by side, the plant looks like a paper sunburst. Overlap them like real succulent growth.
The Pot Cracks While Drying
Clay cracks when it dries too quickly, is too thin in one area, or has been overworked. Keep wall thickness even and avoid placing wet clay in direct heat. Small cracks can be patched with a bit of fresh clay or embraced as rustic charm.
The Arrangement Looks Messy
Limit your color palette. Choose two or three tape colors and one pot color. Too many patterns can make the arrangement visually noisy. The craft table may be chaos, but the finished planter does not have to confess that.
The Tape Sticks to Everything
Use a cutting mat and wipe scissors occasionally. Duct tape adhesive can build up on blades, making cuts ragged. Nonstick scissors help, but even regular scissors work if you clean them as you go.
Why Faux Succulent Crafts Are Great for Home Decor
Faux succulent crafts are popular because they give you the look of greenery without the maintenance. They work in rooms with low light, busy households, classrooms, offices, and rental spaces where real plants may not thrive. They are also lightweight, inexpensive, and easy to customize.
Duct tape succulents and faux pinch pots are especially useful because they can match any style. Want farmhouse decor? Use cream pots and muted green leaves. Prefer modern decor? Try charcoal pots with blue-gray succulents. Need cheerful dorm decor? Bring in patterned tape, bright colors, and tiny labels with dramatic plant names like “Sir Prickly of Shelfington.”
They also make thoughtful handmade gifts. A mini faux succulent pot can be a teacher gift, coworker surprise, Mother’s Day craft, housewarming present, or table setting favor. Because the plant is artificial, the recipient does not need gardening skills. That is kindness disguised as decor.
Experience Notes: What I Learned Making Duct Tape Succulents and Faux Pinch Pots
The first thing I learned is that duct tape has opinions. It does not politely wait while you decide where a leaf should go. It sticks, folds, clings, and occasionally attaches itself to your sleeve like a needy craft gremlin. The trick is to prepare before peeling too much tape. Cut manageable strips, create double-sided sheets, and work with small batches of leaves. When I tried to cut thirty leaves at once from a giant tape sheet, the sheet curled into itself like a frightened armadillo. Smaller pieces saved the day.
The second lesson is that imperfect pinch pots look better than perfect ones. At first, I kept smoothing the rim, correcting one side, then correcting the correction, until the pot looked tired and I looked suspiciously emotionally invested in a lump of clay. Once I stopped chasing symmetry, the pot became more charming. A tiny lean, a wavy lip, and a thumbprint near the base gave it that handmade character people actually love. Faux pottery should feel human. If it looks too perfect, it loses the cozy magic.
Color also matters more than expected. Bright green duct tape can look fun, but mixing it with softer shades makes the succulent feel more natural. My favorite combination was sage green leaves with dusty purple tips in a warm terra-cotta pot. It looked stylish enough for a shelf but still playful enough to remind you it was made from tape. Patterned tape worked best as an accent, not the entire plant. One patterned rosette in a group of solid leaves can look intentional. Five different patterns together can look like the craft drawer exploded and filed for custody.
For the faux pinch pots, matte paint made the biggest difference. Glossy paint can make air-dry clay look plastic. Matte acrylics, especially in earthy colors, create a more ceramic effect. Dry brushing a lighter color over the raised areas adds depth. A little tan over terra-cotta or soft gray over charcoal can make the pot look aged and handmade.
The most satisfying part was arranging the finished succulents. I started with one large rosette, then added smaller leaves around it to hide the filler. Decorative gravel instantly made the project look more polished. Moss gave it a softer woodland feel. Sand looked clean and desert-inspired. The arrangement became much better when I stopped centering everything. Off-center placement feels more natural and modern.
My best advice is to make more leaves than you think you need. Succulents look full because they are layered. A sparse duct tape succulent can seem unfinished, while a lush one looks intentional and sculptural. Also, do not judge the project halfway through. Many handmade crafts go through an awkward teenage phase. Keep layering, shaping, and adjusting. By the end, you will have a tiny plant that never wilts, a pot that looks handmade, and a craft table that may require mild archaeological cleanup.
Final Thoughts
Duct tape succulents and faux pinch pots are the kind of DIY project that proves creativity does not need expensive supplies or perfect technique. With a few strips of tape, a little clay or recycled material, and some playful shaping, you can create a mini planter that looks cheerful, modern, and completely maintenance-free.
This project is ideal for beginners, families, classrooms, dorm rooms, and anyone who wants handmade home decor without the stress of keeping another living thing alive. The best part is that every pot and succulent turns out slightly different. One may look sleek and minimalist. Another may look quirky and cartoonish. Both are valid. Both are adorable. And neither will punish you for forgetting to water it.
So grab the duct tape, roll out a pinch pot, and let your tiny faux desert garden bloom. No sunlight required. No green thumb required. No judgment from actual plants required.