If you’ve ever stared at a lonely bead charm, a tiny jump ring, and a pair of earring hooks and thought, “Well, this feels suspiciously like jewelry surgery,” good news: it’s much easier than it looks. Learning how to attach earring hooks is one of the most useful beginner jewelry-making skills, whether you’re repairing a favorite pair, upgrading a cheap set, or building handmade earrings from scratch.
The basic idea is simple. You connect the decorative part of the earring to the hook using either a jump ring or the small loop already built into the hook. The part that tends to cause drama is technique. Open the ring the wrong way, and it turns into a sad little oval. Attach the pieces backward, and your earrings face the wrong direction like they’re avoiding eye contact. Close the loop poorly, and your cute charm may make a surprise exit halfway through brunch.
This guide walks you through exactly how to attach earring hooks in 9 clear steps, plus the common mistakes to avoid, the tools that actually matter, and a few real-life crafting experiences that will make you feel a lot better if your first attempt is more “handmade” than “heirloom.”
What You Need Before You Start
You do not need a professional jeweler’s bench, a magnifying visor, or the emotional support of a blacksmith. You just need a few small supplies:
- Earring hooks or ear wires: These are the curved findings that go through the ear.
- A charm, dangle, bead drop, or earring component: This is the decorative part you want to hang from the hook.
- Jump rings: Small metal rings used to connect pieces.
- Two pairs of jewelry pliers: Chain-nose pliers, flat-nose pliers, or one of each work well.
- Optional tools: Round-nose pliers, wire cutters, and a bead mat or soft towel so tiny parts stop trying to escape.
If your earring hook already has an open loop at the bottom, you may not even need a jump ring. If your charm has a loop and your hook has a loop, you can often connect them directly. If not, a jump ring acts like the tiny hero of the project.
Understand the Parts First
Before you start, take a close look at your materials. Earring hooks usually have one small loop at the bottom. Your charm or dangle may have a loop, a hole, or a wire-wrapped top. The goal is to join those two points securely.
There are two common ways to do this:
- Using a jump ring: Best for charms, pendants, and many premade dangles.
- Opening the hook’s bottom loop slightly: Best when you want a cleaner, more direct connection.
Either method works. The right choice depends on the style you want and how your earring component is built.
How to Attach Earring Hooks: 9 Steps
Step 1: Gather and Match Your Pieces
Lay everything out before you touch the pliers. Match your earring hooks, components, and jump rings so the metal colors make sense together. Silver with silver, gold with gold, black with black. Mixing metals can look stylish, but “I ran out of supplies and panicked” is a different aesthetic.
Also check that you have two matching hooks facing opposite directions. That sounds obvious until you finish a pair and realize both hooks point the same way. Congratulations, you made earrings for a very specific alien.
Step 2: Inspect the Hook and the Dangle
Look at the bottom of the earring hook. Does it have a closed loop, an open loop, or a small ring? Now inspect your charm or bead drop. Does it have a hole, a loop, or a wrapped wire top?
If both pieces already have loops, attaching them will be easy. If the decorative piece has only a hole, you may need to add a jump ring. If the charm is on a head pin or eye pin, make sure the loop is fully formed and not loose.
Step 3: Choose a Jump Ring Size That Makes Sense
Not all jump rings are equally helpful. A ring that is too tiny can be frustrating to work with. A ring that is too large can make the earring look sloppy or hang at an odd angle. For many lightweight earrings, small to medium jump rings work well because they connect the pieces without adding too much bulk.
As a general rule, use a ring large enough to move freely through both loops but small enough to keep the earring neat. If the charm cannot swing a little, the connection may bind. If it swings like a playground gate in a windstorm, try a smaller ring.
Step 4: Grip the Jump Ring with Two Pliers
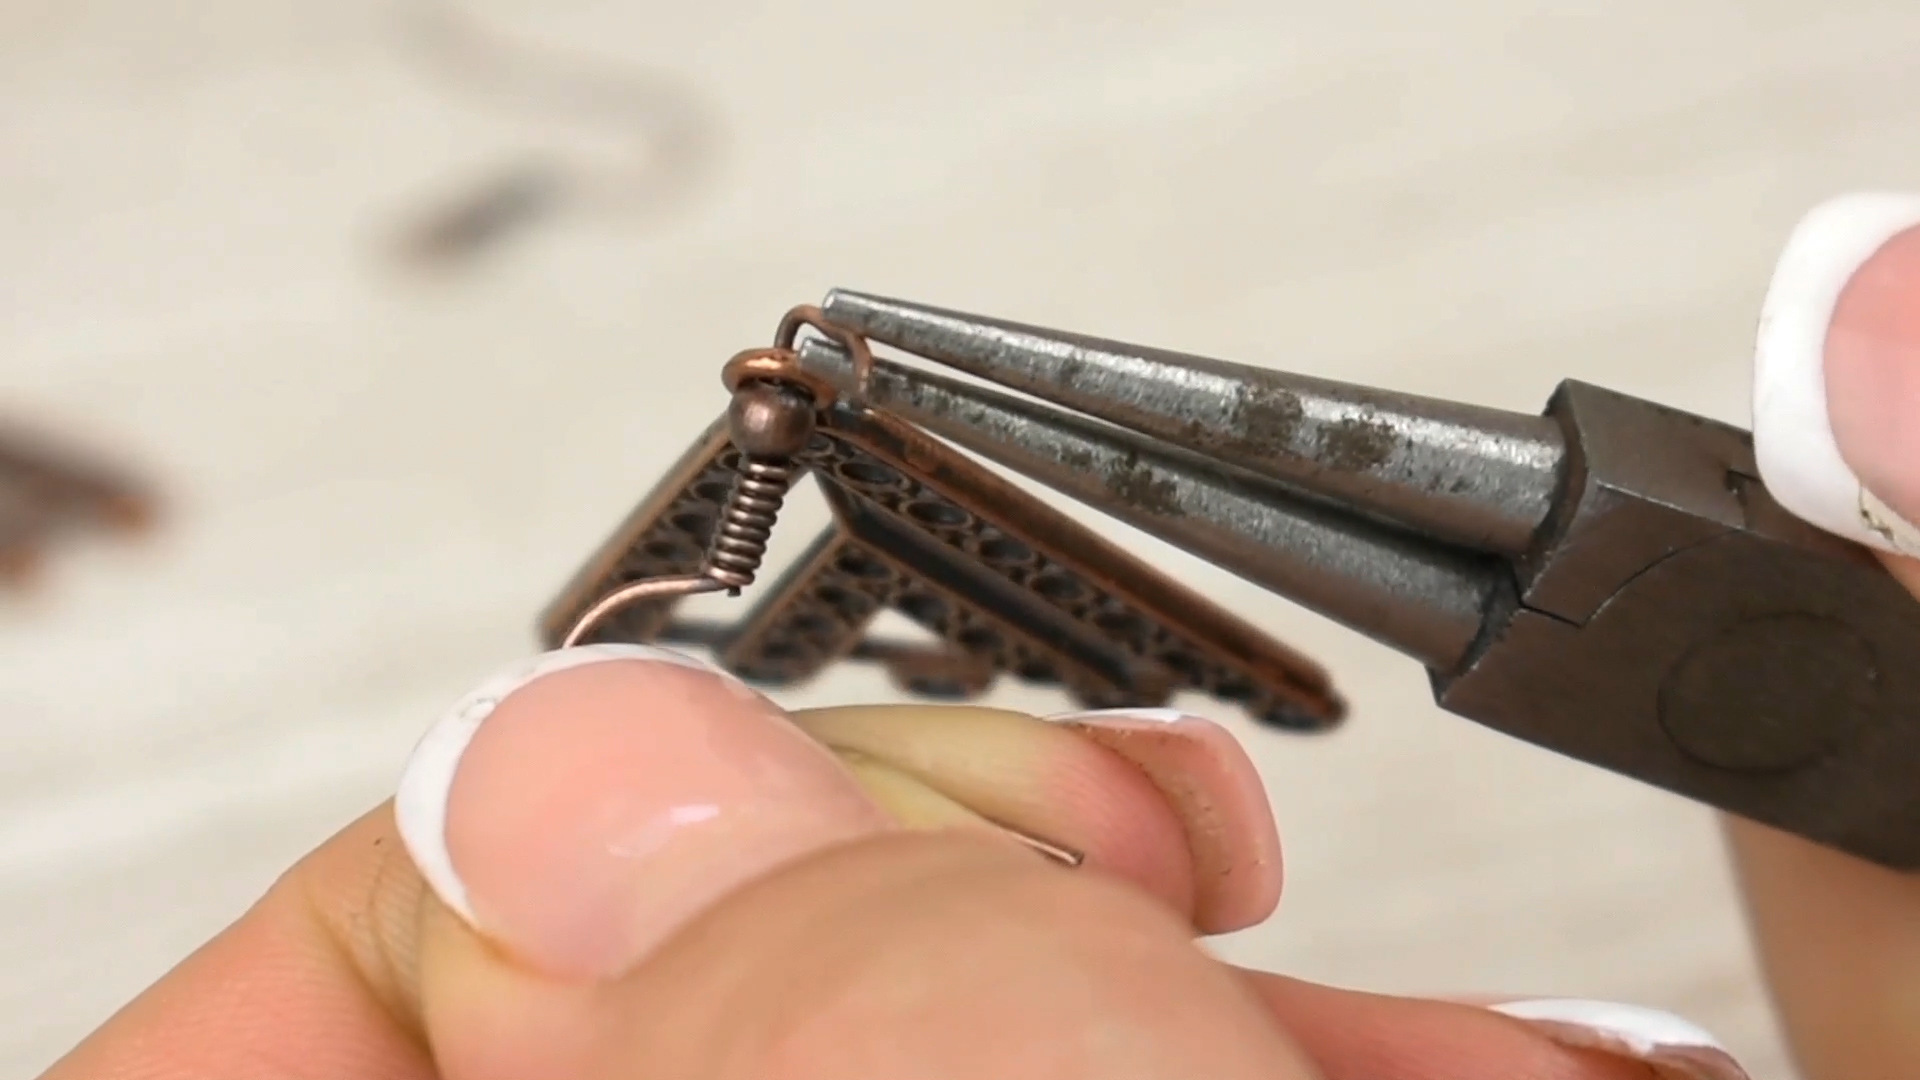
This is the step that separates smooth jewelry makers from people angrily chasing a bent ring across the table. Hold one side of the jump ring with one pair of pliers and the other side with your second pair. Position the opening of the ring at the top, around the 12 o’clock area, so you can control it easily.
Do not try to open the ring with your fingers. That is not confidence. That is optimism.
Step 5: Twist the Ring Sideways to Open It
Here is the key move: twist the ring sideways. Move one hand slightly forward and the other slightly backward. Do not pull the ends straight apart. Pulling stretches the ring out of shape, weakens the connection, and turns a nice circle into a miniature metal potato.
You only need to open the ring enough to slide on the pieces. Tiny movement is better than dramatic movement. If you swing it wide open, you will have to reshape it later.
Step 6: Add the Decorative Piece and Then the Hook
Slide the charm, dangle, or bead drop onto the open jump ring. Then slide on the loop at the bottom of the earring hook. If you are not using a jump ring and are opening the hook loop directly, add the decorative piece to that loop now.
This is also the moment to check orientation. When the earring hangs, the front of the charm should face forward, not backward. Many beginners accidentally attach everything correctly from a mechanical standpoint but backward from a visual standpoint. The earring is secure, yes, but it is also shy.
Step 7: Test the Direction Before Closing
Before you close the ring, hold the earring up as if it were hanging from an ear. This quick check saves time. Make sure the hook curves naturally and the decorative piece faces the front. If it twists awkwardly or hangs sideways, remove it and rotate the connection before closing the ring.
This tiny pause is worth it. It is much easier to fix direction now than after you have proudly closed everything and declared the project finished.
Step 8: Twist the Ring Closed Until the Ends Meet Flush
Use the same two-plier motion in reverse to close the jump ring. Twist the ends back together so they line up tightly. You want the seam to meet flush, with no visible gap large enough for the charm to slip out.
If the ends do not line up perfectly, gently nudge them past each other and let them spring back into place. That little bit of tension can help create a snug closure. The goal is a secure ring that looks round and feels solid.
Step 9: Tug-Test and Repeat for the Second Earring
Give the finished connection a gentle tug. Not a dramatic pirate-level yank. Just enough to make sure the charm stays put and the ring does not pop open. Then repeat the process for the second earring, checking again that the hooks mirror each other correctly.
Once both are done, compare them side by side. Do they hang at the same length? Are the charms facing the same direction? Are the rings fully closed? If yes, congratulations. You have attached earring hooks without launching any hardware into another dimension.
Common Mistakes to Avoid
Opening the Jump Ring the Wrong Way
The most common beginner mistake is pulling the ring outward instead of twisting it sideways. This distorts the shape and makes it harder to close neatly. If your ring ends up looking stretched, replace it if possible. Bent hardware has a talent for becoming a future problem.
Using Only One Pair of Pliers
One pair can work in a pinch, but two pairs give you much better control. That means fewer tool marks, cleaner closures, and less muttering under your breath.
Forgetting About Front and Back
An earring can be technically secure and still assembled backward. Always do the hang test before closing the ring completely.
Leaving a Tiny Gap
A small gap may not look serious, but it can let thin loops or wire-wrapped tops slip out over time. If there is daylight in the seam, close it tighter.
Choosing the Wrong Connection Method
Sometimes a jump ring makes the design too long. Sometimes opening the hook loop directly looks cleaner. If a project feels awkward, switch methods. Jewelry making is part technique and part tasteful stubbornness.
When to Attach Directly to the Hook Instead of Using a Jump Ring
If your earring hook has an open loop at the bottom, and your charm has a small top loop, you can often skip the jump ring entirely. Carefully open the hook’s loop sideways, slide on the charm, then close it again.
This gives the earring a cleaner look and can reduce extra movement. It is especially nice for lightweight bead drops, simple wire-wrapped charms, and minimalist designs. A jump ring is more useful when the charm hole is oddly placed, the loop is too thick for the hook, or you want extra flexibility in the way the earring hangs.
Best Tips for Cleaner, More Professional Results
- Work on a soft surface: A towel or bead mat keeps parts from rolling away.
- Use quality jump rings: Cheap rings can bend too easily and refuse to stay closed.
- Keep tool pressure light: Squeezing too hard can leave marks on plated metal.
- Make both earrings at the same time: Do Step 1 on both, then Step 2 on both, and so on. This helps keep them symmetrical.
- Check the closure twice: Once when you close it, and once again before you store or wear the earrings.
How This Skill Helps Beyond One Pair of Earrings
Once you know how to attach earring hooks, you can repair broken earrings, swap outdated hooks for new ones, turn charms into wearable pieces, and customize handmade gifts in minutes. It is one of those tiny jewelry skills that keeps paying you back. Suddenly, clearance-bin pendants look like potential earrings. Old bead drops become fresh accessories. A single packet of hooks turns your craft drawer into a small design studio.
And honestly, that is part of the fun. You start by fixing one pair and end up eyeing every loose charm in the house like a casting director scouting talent.
Experiences People Often Have When Learning How to Attach Earring Hooks
One common first experience is surprise at how small the hardware really is. On the package, jump rings seem manageable. On the table, they suddenly look like tiny metal commas with trust issues. A lot of beginners spend the first few minutes adjusting their grip, dropping the ring, picking it up, and wondering whether they accidentally signed up for a dexterity exam. Then, almost magically, the second or third try feels easier. The hand position starts to make sense, and the twisting motion becomes more natural. That little breakthrough is often the exact moment people go from “I can’t do this” to “Wait, I kind of love this.”
Another very common experience is assembling the earring backward the first time. It happens constantly, especially with flat charms, teardrops, or decorative frames that clearly have a front side. Everything looks secure on the table, but once the earring is lifted, the charm turns around and faces the wrong direction. That is usually when the maker learns the value of the hang test. It is a small lesson, but a memorable one. After making that mistake once, most people become delightfully paranoid in the best possible way and start checking orientation before closing every ring.
People who repair old earrings often describe a different experience: relief. Maybe a favorite pair lost its hook, or one ear wire got bent in a purse, a drawer, or a dramatic encounter with a sweater. Learning to attach a new hook can make the repair feel almost too easy. Instead of throwing the earrings away, they get a second life. That kind of quick fix feels satisfying because it is practical, inexpensive, and immediate. You are not just crafting for fun; you are rescuing something wearable.
Gift makers tend to notice something else: attaching the hook is the moment the project finally looks like real jewelry. Before that, it is just components. A bead drop. A charm. A wrapped loop. But once the hook goes on, the whole design suddenly makes visual sense. That final connection turns craft parts into earrings you can actually wear, box up, and hand to someone with a proud little smile.
There is also the classic experience of overconfidence. A beginner makes one successful pair and immediately decides to produce twelve more for birthdays, holidays, craft fairs, or “just because.” This is how many home jewelry collections begin. One packet of hooks becomes three. Then jump rings multiply. Then pliers live permanently on the kitchen table. It is a harmless spiral, but a very real one.
Most of all, people remember the satisfaction of getting a clean closure. It is a tiny detail, but it feels professional. The ring is round, the seam is tight, the earring hangs correctly, and nothing rattles loose. That little finished connection is oddly satisfying because it proves you did not just make something pretty. You made something that works.
Final Thoughts
Attaching earring hooks is a small skill with a big payoff. Once you learn how to open a jump ring correctly, connect the pieces in the right order, and close everything flush, you can make, repair, and customize earrings with confidence. The process is beginner-friendly, budget-friendly, and far less intimidating than it first appears.
So the next time you find a loose charm, a bead drop, or a sad single earring in need of rescue, do not toss it aside. Grab your pliers, open the ring sideways, and give it the glow-up it deserves.