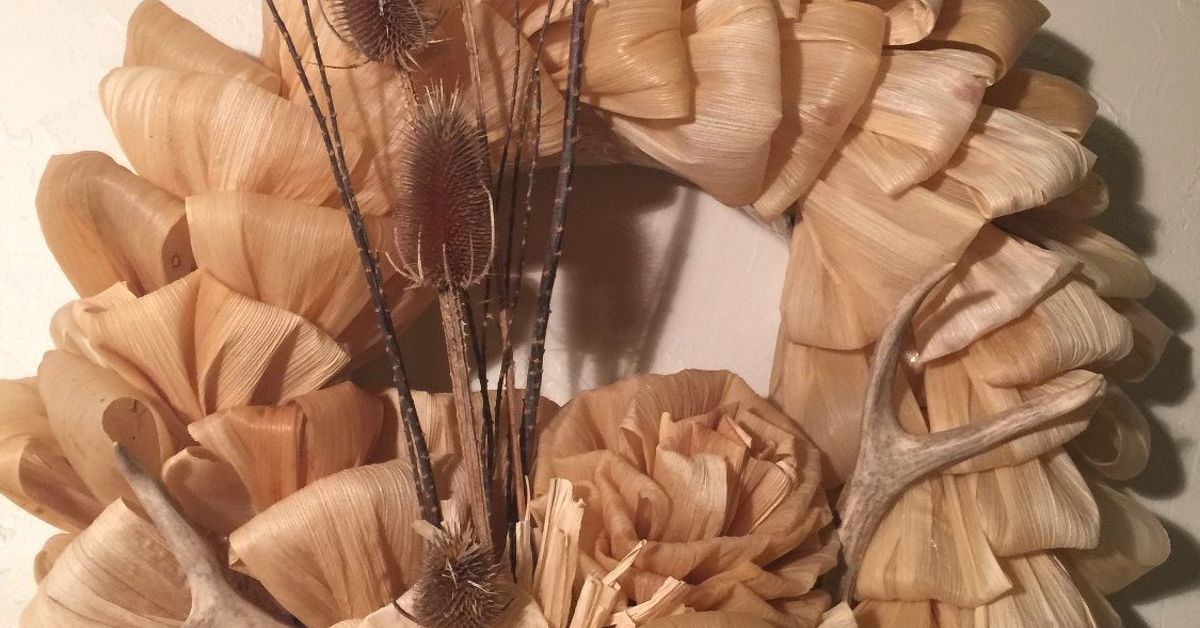
If fall decorating had a love language, this wreath would absolutely be it. A rustic corn husk wreath with deer antlers feels warm, woodsy, and just a little bit dramaticin the best possible way. It has that “I casually made this after wandering through a charming country market” energy, even if you actually built it at the kitchen table while guarding your glue gun like a tiny dragon.
This project combines dried corn husks, a sturdy wreath form, and either faux or naturally shed deer antlers for a look that feels right at home on a front door, over a mantel, or hanging in an entryway. The magic is in the contrast: soft, layered husks bring texture and movement, while antlers add shape, structure, and a bold rustic focal point. The result is seasonal without being cheesy, natural without being messy, and eye-catching without screaming for attention like a glitter pumpkin on espresso.
In this guide, you’ll learn how to make a corn husk wreath step by step, which materials work best, how to attach deer antlers securely, and how to style the finished piece so it looks collected rather than chaotic. Whether you lean farmhouse, lodge-inspired, cabin-core, or “I just want something prettier than the old plastic leaf wreath in the garage,” this DIY has range.
Why a Corn Husk Wreath with Deer Antlers Works So Well
A rustic wreath should feel textured, layered, and grounded in natural materials. Corn husks do that beautifully. Once softened and shaped, they create soft folds and petal-like layers that add fullness without making the wreath feel heavy. They also bring a muted, earthy color palette that plays nicely with wood doors, stone walls, neutral interiors, and most fall decor.
Deer antlers bring contrast. Their sculptural shape breaks up the round silhouette of a traditional wreath and gives the design a more collected, lodge-inspired look. If the husks provide softness, the antlers provide structure. Together, they create balancelike flannel and leather, or soup and bread, or any other iconic pairing that quietly makes life better.
This combination is also flexible. You can keep it simple and neutral, or dress it up with preserved leaves, berries, burlap ribbon, feathers, dried grasses, pinecones, jute twine, or small bells. Done right, it looks custom, not crafty. That distinction matters.
Materials You’ll Need
- 1 grapevine wreath form or wire wreath form, about 14 to 18 inches
- 40 to 70 dried corn husks, depending on wreath size and fullness
- 1 small pair of faux deer antlers or 1 set of naturally shed deer antlers
- Floral wire or paddle wire
- Hot glue gun and glue sticks
- Jute twine or thin natural rope
- Wire cutters
- Scissors
- Large bowl or sink with warm water
- Towel for drying husks
Optional accents
- Dried wheat, preserved eucalyptus, or faux fall stems
- Pinecones or seed pods
- Burlap or linen ribbon
- Wood beads
- Pheasant feathers or faux feathers
- Mini pumpkins or dried orange slices for a harvest look
If you’re using real antlers, choose small or medium ones that won’t overpower the wreath form. Naturally shed antlers are ideal if they were legally and ethically obtained. Faux antlers are also a great option because they’re lighter, easier to attach, and much less likely to make your wreath sag like it just heard bad news.
Before You Start: Prep the Corn Husks Properly
Dried corn husks are beautiful, but straight out of the package they can be brittle enough to crack if you try to force them into shape. The easiest fix is soaking them in warm water for about 10 to 15 minutes until they become flexible. You don’t want them mushy; you want them pliable.
After soaking, blot them gently with a towel. They should feel soft and bendable, not dripping wet. This step makes a huge difference in the finished wreath because softened husks fold more gracefully, tear less easily, and are much easier to wire or glue into layers.
While the husks soften, take a minute to look at your wreath form. A grapevine base creates a more organic, rustic look and makes it easy to tuck stems or wire in accents. A wire form is cleaner and more structured, but you may need more husks to cover it fully. Either one works; your choice depends on the look you want.
How to Make a Rustic Corn Husk Wreath with Deer Antlers
1. Plan the layout before attaching anything
Set your wreath form on a flat surface and place the antlers on top without securing them. Try a few arrangements. Most wreaths look best when the antlers sit slightly off-center or near the lower third of the wreath rather than dead center. That asymmetrical placement makes the design feel more natural and less like a target with horns.
Once you like the direction, take a quick photo with your phone. This gives you a visual reference when things get messy later, which they absolutely might.
2. Build a base layer of corn husks
Take one softened corn husk and fold the narrow end inward so it creates a fan or petal shape. Attach it to the wreath form with floral wire or a small amount of hot glue. Then add another husk overlapping the first. Continue around the wreath, always layering in the same direction.
The goal is to cover the form while creating movement. Think shingles on a roof, but prettier and less likely to involve a ladder. If you want a more polished look, keep the husk tips facing outward in a consistent pattern. If you want a looser, more organic style, vary the angles slightly.
For a fuller wreath, add a second layer on top of the first, especially around the outer edge. This gives the wreath more volume and helps hide the form underneath.
3. Add depth with folded clusters
Instead of attaching every husk flat, create small bunches of two or three husks and secure them together with wire at the base. Then attach each bunch to the wreath. These little clusters mimic flower petals or dried leaves and make the whole piece feel richer and more dimensional.
Mixing flat layers with clustered layers gives the wreath that styled, boutique look people usually assume came with a suspiciously high price tag.
4. Secure the deer antlers
Once the wreath base looks full, it’s time for the star of the show. Position the antlers where you want them and secure them with floral wire first. Loop the wire tightly around the antler base and through the wreath form several times. Twist the wire at the back until the antlers feel stable.
If you’re using a grapevine form, thread the wire through the vines for extra grip. If you’re using a wire form, wrap around the frame itself for maximum support. After wiring the antlers in place, add a little hot glue where the base meets the wreath to reduce shifting. Wire gives the strength; glue gives the “stay put, please” support.
If your antlers are heavy, reinforce the hanging point at the top of the wreath with extra wire or jute twine before moving on. A beautiful wreath is lovely. A beautiful wreath that stays on the door is better.
5. Hide the attachment points
Now go back with additional corn husks and tuck or glue them around the antler base. This softens the transition and makes the antlers look integrated into the wreath instead of awkwardly parked on top of it.
You can also use a small burlap bow, a knot of jute, or a cluster of dried grasses to disguise the mechanics. The best DIY projects always hide the engineering just enough to look effortless.
6. Add natural accents
Once the main structure is complete, add optional embellishments. Keep them restrained. Rustic decor is strongest when it feels layered, not overloaded.
- For a harvest look: add wheat stalks, dried leaves, or tiny white pumpkins
- For a woodland look: add pinecones, mossy bits, feathers, or seed pods
- For farmhouse style: add burlap ribbon, wood beads, or muted faux berries
- For winter transition: swap in evergreen sprigs, bells, or neutral ribbon
Group accents in clusters rather than scattering them evenly around the wreath. Visual grouping looks more intentional and keeps the antlers as the focal point.
7. Create a sturdy hanger
Attach a loop of jute twine or strong floral wire to the top back of the wreath. Test it by lifting the wreath gently before hanging it. If the wreath tips forward or feels off balance, adjust the hanger position slightly until it hangs straight.
This is not the glamorous part of the project, but it is the part that keeps your hard work from rotating sideways on the door like it’s trying to leave the conversation.
8. Let everything dry and settle
If you used hot glue heavily, let the wreath rest flat for at least 30 minutes before hanging it. This gives the glue time to cool and set fully. It also lets the corn husks relax into place, which helps the shape look more natural.
Design Tips for a More Expensive-Looking Finish
Keep the palette natural
The beauty of this DIY wreath is its earthy simplicity. Cream, tan, brown, muted green, soft rust, and weathered gray all work beautifully. Avoid adding too many bright elements unless you’re intentionally aiming for a more playful autumn style.
Vary the texture, not the chaos
Combine smooth antlers, papery husks, rough grapevine, and one or two accent materials. That contrast makes the wreath look rich and layered. Too many accents, though, can push it from rustic elegance into “craft store aisle had a clearance event.”
Use asymmetry to your advantage
Perfect symmetry can look stiff. Slightly off-center antlers, a cluster of wheat on one side, or a ribbon tail that drapes lower on one side all make the design feel more collected and less manufactured.
Match the wreath to where it hangs
If the wreath is going on a dark wood door, lighter husks will stand out beautifully. If it’s going above a mantel with a lot of visual detail, keep the design simpler so it doesn’t compete with the room.
Common Mistakes to Avoid
- Skipping the soak: Dry husks crack more easily and are harder to shape.
- Using antlers that are too heavy: Oversized antlers can pull the wreath out of balance.
- Relying on glue alone: Heavy focal pieces need wire support.
- Overdecorating: A few accents look intentional; too many look confused.
- Ignoring the hanger: An unbalanced wreath never looks quite right once it’s up.
How to Care for Your Rustic Wreath
If you’re using real corn husks and natural elements, display the wreath in a covered area whenever possible. Direct rain and intense sun can cause fading, warping, or mildew. For indoor use, keep it away from very damp rooms and heat vents.
Store it flat or hang it on a wreath hook in a dry place. Avoid crushing the husks under heavy holiday bins unless your storage strategy is “survival of the fittest,” which the wreath probably did not agree to.
What Crafting This Wreath Actually Feels Like: Real-World Experience and Lessons Learned
One of the best things about making a rustic corn husk wreath with deer antlers is that it feels more personal than buying one. Store-bought wreaths can be pretty, but they rarely have the same character as something you build yourself. When you make this wreath by hand, every fold, cluster, and little imperfection gives it personality. And honestly, rustic decor benefits from a bit of imperfection. A too-perfect wreath can feel stiff. A handmade one feels warm and lived-in.
Many people discover that the first ten minutes are the most awkward. The corn husks are damp, the glue gun is heating up, and the wreath form looks a little too bare to ever become something impressive. Then the layers start building, and suddenly it makes sense. That’s the turning point. Once the first ring of husks goes on, the project becomes much easier to visualize. It shifts from random supplies to actual decor.
Another common experience is realizing that antler placement changes everything. Move the antlers half an inch and the wreath can go from “stylish woodland entry” to “what exactly happened here?” That sounds dramatic, but focal placement really matters. Most crafters end up adjusting the antlers two or three times before wiring them down for good. That’s normal. In fact, it’s smart. The extra few minutes of fussing often make the difference between a decent result and a really striking one.
There’s also something satisfying about working with natural materials that don’t all match perfectly. Corn husks vary in width, length, curl, and color. Some are pale and silky; others are darker and crinklier. Instead of fighting that variation, the best approach is to use it. Layer lighter husks near the outer edge, tuck deeper-toned husks near the center, and let the natural contrast do some of the design work for you. It creates a wreath that feels collected from the season rather than manufactured in a factory somewhere under fluorescent lights.
People who make this kind of wreath often say the process becomes surprisingly relaxing after the initial setup. Folding husks, layering textures, and stepping back to make small adjustments has a rhythm to it. It’s the kind of DIY that keeps your hands busy and your brain pleasantly occupied. Not every project can say that. Some crafts feel like a battle of wills. This one, thankfully, usually feels more like styling than struggling.
And then there’s the payoff: hanging the finished wreath and realizing it looks far more expensive than the materials suggest. That’s the sweet spot in DIY. You want something that looks custom, feels meaningful, and gives guests just enough reason to ask, “Wait, you made that?” Ideally, they say it with admiration, not concern.
Over time, many crafters also start treating this wreath as a base they can update seasonally. In early fall, it may feature dried wheat and soft neutral ribbon. Later, you might add evergreens, bells, or berries for winter. That flexibility makes the project even more worthwhile. Instead of making one decoration for one month, you create a long-lasting piece that evolves with the season and your style.
In the end, the real experience of crafting a corn husk wreath with deer antlers is less about achieving perfection and more about creating atmosphere. It’s about texture, warmth, and a sense of place. It’s about making something that looks like it belongs in your home, not just in a catalog. And that’s exactly why this project works so well.
Final Thoughts
If you want a front door wreath that feels elevated, seasonal, and genuinely distinctive, a rustic corn husk wreath with deer antlers is a strong choice. It blends natural texture with sculptural detail, works across several decor styles, and leaves plenty of room for your own creative spin. Best of all, it looks thoughtful and custom without requiring advanced crafting skills or a workshop full of tools.
Take your time with the layering, secure the antlers well, and keep the styling restrained. That combination will give you a wreath that looks polished, inviting, and unmistakably autumnal. In other words: rustic, but make it refined.