If you have ever tried to convince a bird to step onto your finger and got the avian equivalent of “absolutely not,” welcome to the club. The good news is that step-up training is one of the most useful and realistic skills you can teach a pet bird. It helps with handling, bonding, cage transfers, playtime, and safety. The even better news? You do not need to be a professional trainer with a whistle, a clicker, and the confidence of a wildlife documentary host.
You just need patience, good timing, a steady hand, and a basic understanding of how birds think. Pet birds are smart, observant, and not especially impressed by force. They respond best when training feels safe, predictable, and rewarding. That is why the best step-up training uses trust, repetition, and positive reinforcement instead of pushing, chasing, grabbing, or turning your hand into a surprise forklift.
Whether you have a parakeet, cockatiel, conure, lovebird, or larger parrot, these simple steps can help you teach your bird to step onto your finger with confidence. Some birds learn quickly. Others need a slower pace. Either way, the goal is the same: a calm bird who understands the cue and chooses to cooperate.
Why Step-Up Training Matters
Before diving into the steps, it helps to know why this skill matters so much. Teaching a bird to step onto your finger is not just a cute trick for impressing relatives who already think your bird is secretly judging them. It is a practical foundation skill.
A reliable step-up cue can help you move your bird safely from cage to stand, prevent stressful chasing around the room, reduce fear during handling, and strengthen trust. It also opens the door to other useful behaviors, including recall, stationing, carrier training, and cooperative vet care. In short, step-up is the bird version of “let’s work together.”
Before You Start: Set Yourself Up for Success
Training goes better when your bird is calm, alert, and slightly interested in a reward. Choose a quiet room without other pets, ceiling fans, open windows, or distractions. Keep sessions short. Two or three focused minutes can work better than one long, confusing marathon. Use a small favorite reward such as millet, a tiny seed, or another safe high-value treat your bird does not get all day long.
Most important, pay attention to body language. A relaxed bird may preen, shift weight comfortably, blink slowly, or stay curious. A stressed bird may lean away, pin the eyes, lunge, flatten feathers tightly, move away, or look ready to launch. If your bird says “no thanks,” listen. Training should feel like a conversation, not a hostage negotiation.
How to Train a Bird to Step on Your Finger: 11 Simple Steps
1. Let Your Bird Get Comfortable With Your Presence
If your bird still thinks your hand is a suspicious sky monster, do not rush to step-up training. Start by sitting near the cage, talking softly, and being predictably boring in the best possible way. Offer treats through the bars or place them nearby. The goal here is simple: your bird learns that your presence brings good things, not chaos.
This stage can take a day or several weeks depending on the bird’s history, age, species, and personality. Rescue birds, hand-shy parrots, and birds that were grabbed in the past often need more time. That is normal. Slow trust is still trust.
2. Teach Your Bird to Take Treats Calmly
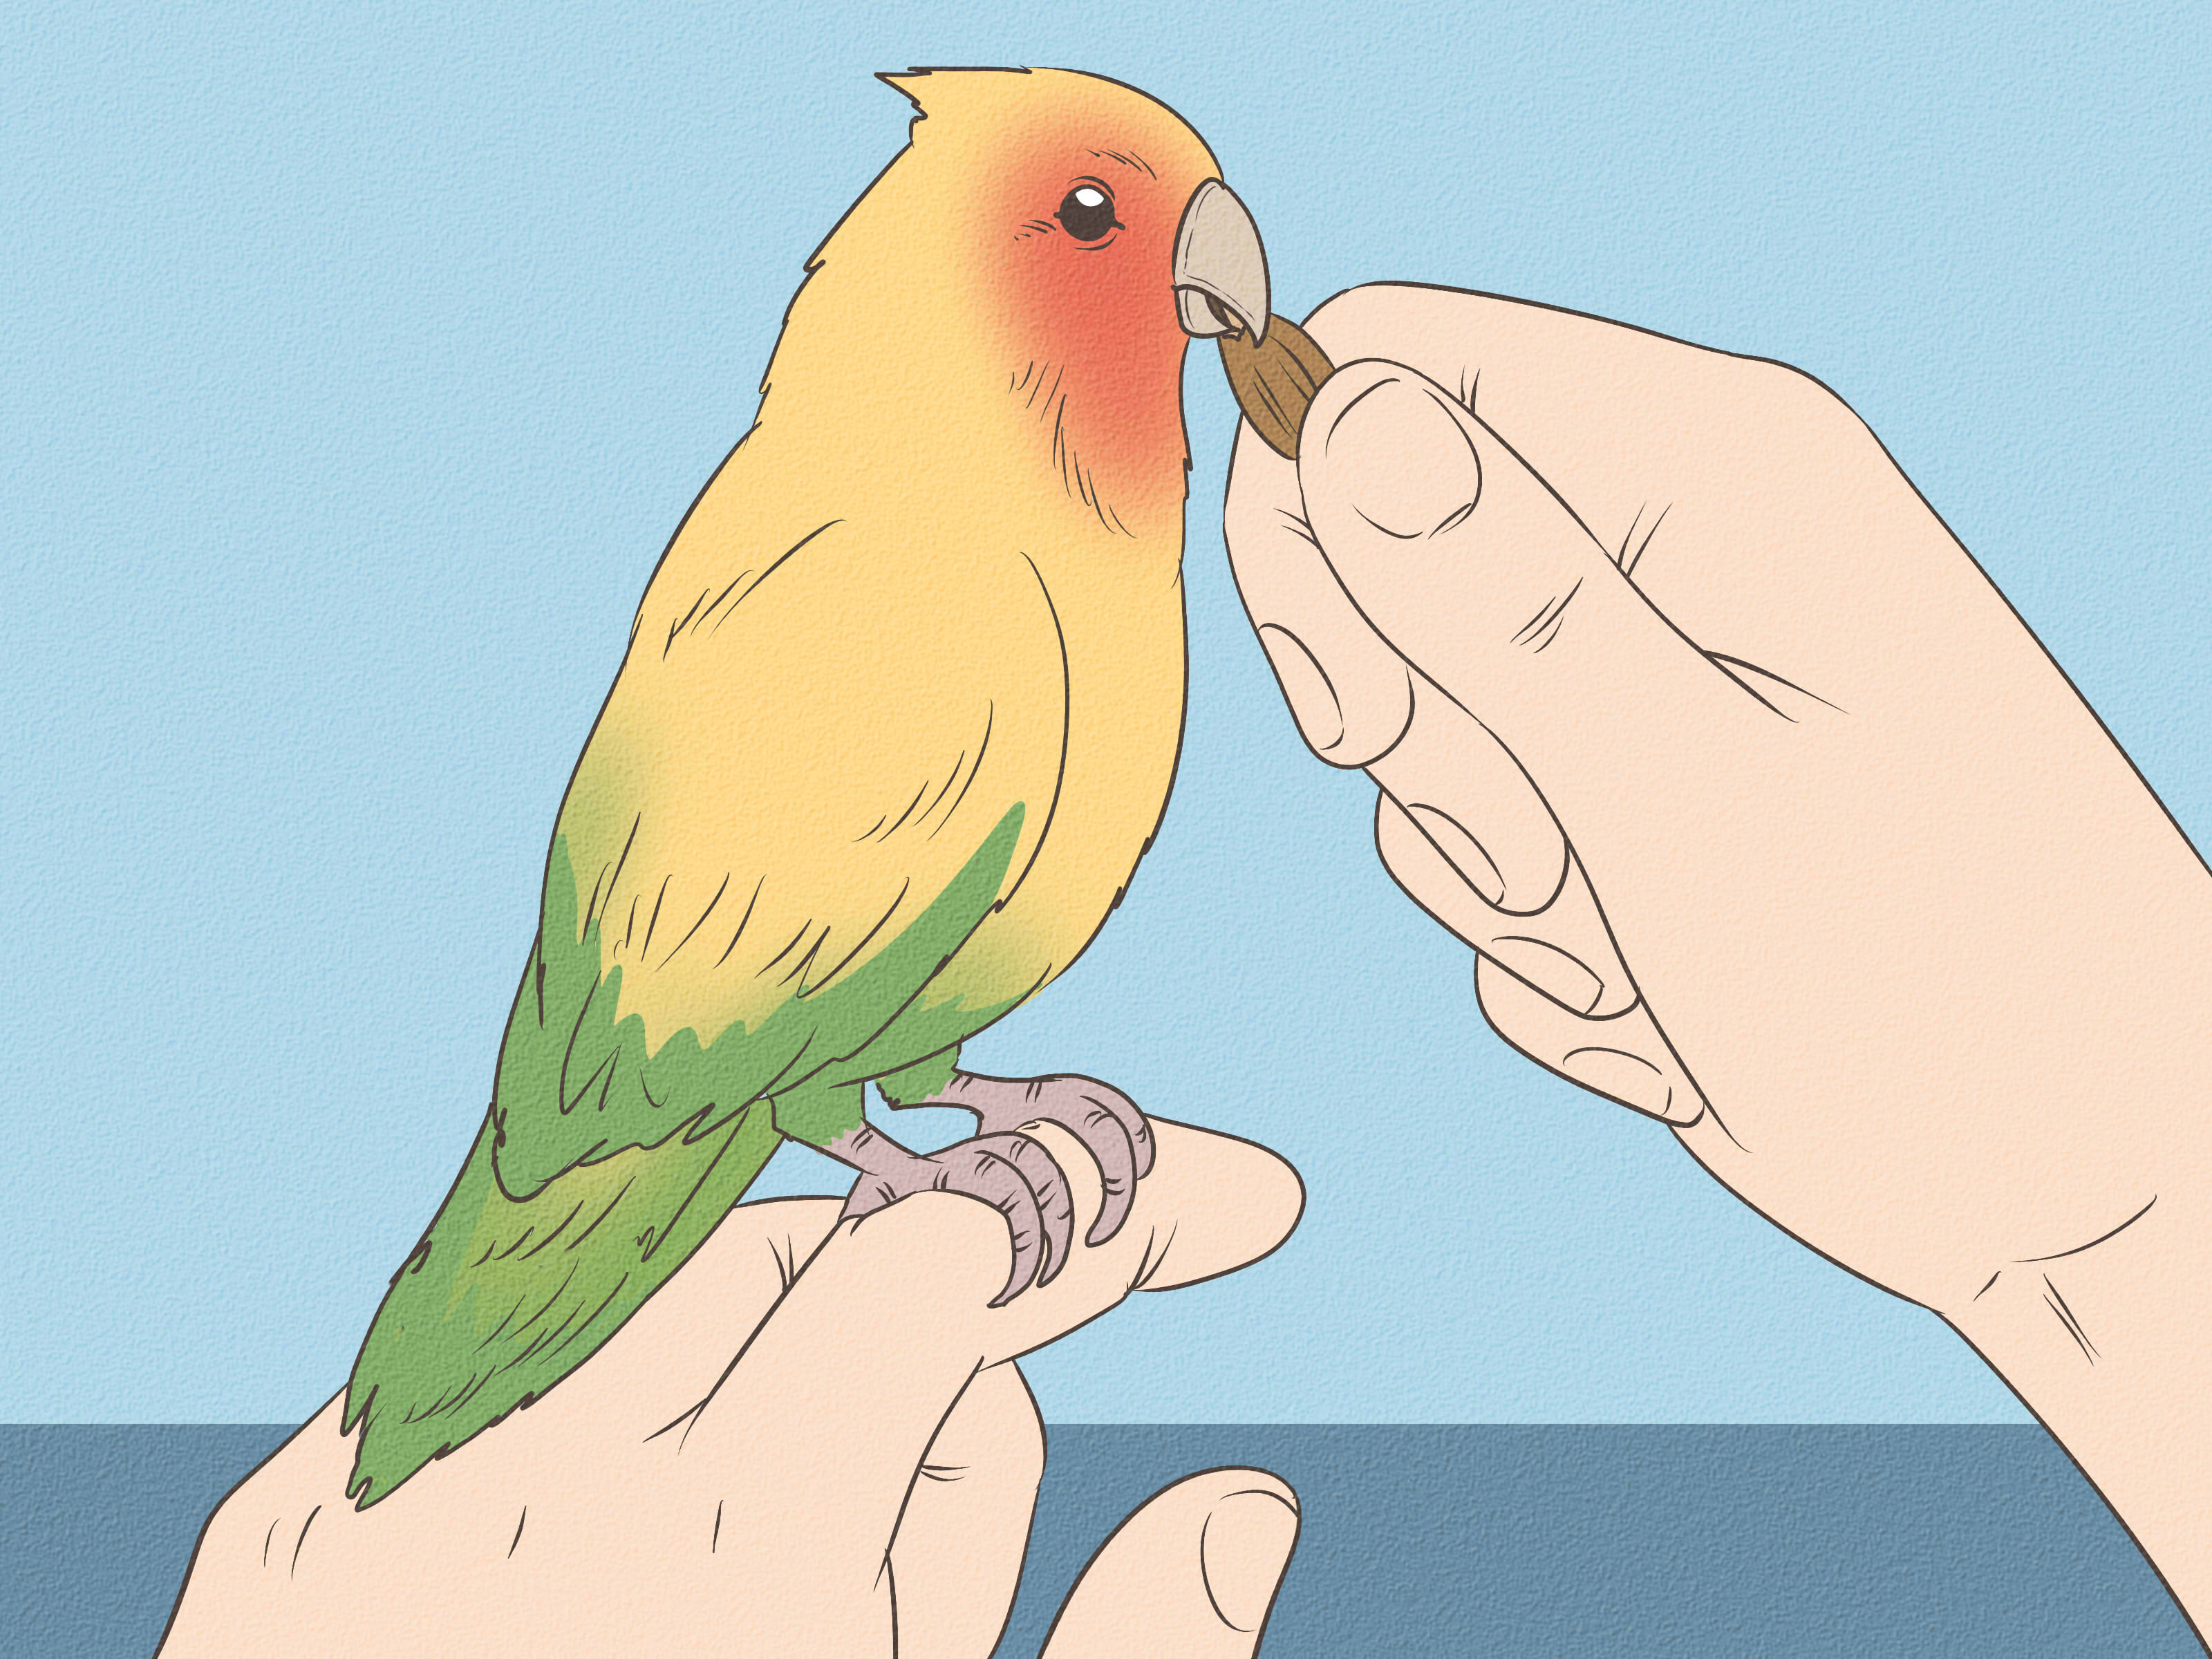
Before a bird will step onto your finger, it helps if the bird is already comfortable taking a reward from your hand. Offer a tiny treat without crowding the bird. Hold still. Let the bird approach. Avoid chasing the beak around like you are trying to feed a feathered toddler on the run.
If your bird will not take food from your fingers yet, place the treat in a dish while your hand remains nearby. Gradually reduce the distance over time. Once your bird happily accepts treats from your hand, you are ready for the next step.
3. Choose the Right Training Perch or Finger Position
For small birds, your index finger often works well. For larger birds, a hand, wrist, or forearm may feel steadier. Keep your finger level and stable. Wobbling is not encouraging. It is just weird.
If your bird is nervous about hands, begin with a perch, dowel, or handheld training stick. This is often called stick training. It can be a great bridge for fearful or bite-prone birds. Once the bird steps confidently onto the perch, you can gradually transition to your finger later.
4. Introduce the Cue Word
Pick one cue and stick with it. “Step up” is the classic choice because it is clear, short, and already widely used by bird owners. Say it in a calm, consistent voice every time you present your finger or perch.
Do not repeat the cue ten times in a row like you are trying to unlock a password. Say it once, then give your bird a moment to process. Birds learn patterns best when the cue always means the same thing.
5. Present Your Finger at Chest Level
Move your finger slowly toward the bird’s lower chest or just above the legs. For many birds, a gentle, steady touch at this level encourages a natural weight shift forward. The idea is to invite movement, not shove the bird off balance like a tiny feathery shopping cart.
Approach from below or at perch level rather than swooping in from above. A hand coming from overhead can feel threatening because birds are prey animals. Slow and predictable wins this game every time.
6. Reward Even Small Progress
At first, do not wait for perfection. If your bird leans toward your finger, lifts one foot, or even looks interested without panicking, reward that effort. This teaches your bird that trying is worthwhile.
Many beginners accidentally wait too long for the full behavior, then wonder why the bird loses interest. Think in baby steps. One foot on the finger is progress. A brief touch is progress. Calm curiosity is progress. Training gets easier when you notice the tiny wins.
7. Encourage One Foot, Then Two
Most birds begin by testing the situation with one foot. That is not hesitation. That is quality control. Let it happen. Reward the first foot. Then repeat until your bird is comfortable placing both feet on your finger or perch.
Once both feet are on, keep your hand steady and reward immediately. Timing matters. The faster the reward appears after the right action, the faster your bird understands the lesson.
8. Keep the Step-Up Brief and Easy
When your bird first succeeds, do not immediately carry it across the room like you won an award. Stay still for a second or two, reward, and let the bird step back if it wants. This keeps the new skill from becoming overwhelming.
Many birds are willing to step up but get nervous if the hand suddenly moves away from the cage or perch. Build duration gradually. First reward the step-up itself. Later, reward staying on the hand. Then reward taking one or two calm steps together.
9. Practice the “Step Down” Cue Too
Teaching step-up without step-down is like teaching someone to board a bus with no plan for getting off. Add a second cue such as “step down” or “down” and use it when your bird moves from your hand to a perch, stand, or cage door.
This gives your bird more control and helps prevent clinging, panic, or hand avoidance. Birds often relax more when they learn that stepping onto your hand does not mean getting stuck there forever.
10. Repeat in Short, Positive Sessions
Practice once or twice a day in very short sessions. End while things are still going well. That means stopping before your bird gets tired, cranky, distracted, or decides your earring looks more interesting than your lesson plan.
Consistency matters more than session length. Five calm, successful repetitions over several days can build more trust than one long session that ends in frustration. If your bird regresses one day, that does not mean training failed. It means your bird is a bird, not a robot.
11. Generalize the Skill Gradually
Once your bird knows how to step onto your finger in one easy setting, practice in other safe places: on top of the cage, from a play stand, near a table perch, or from different family members if the bird is comfortable with them. Keep the environment controlled and return to easier versions whenever needed.
This helps your bird understand that “step up” is a behavior, not just something that happens in one exact location on one oddly specific Tuesday mood. Generalization turns a beginner trick into a reliable life skill.
Common Mistakes That Slow Training Down
The biggest mistake is forcing the bird. Grabbing, cornering, or pushing too hard can damage trust fast. Another common mistake is ignoring body language. If your bird leans away, lunges, or looks frightened, pause and make the exercise easier.
Using treats that are too large can also backfire. Tiny rewards keep the bird interested without ending the session after one dramatic snack. Inconsistent cue words, noisy rooms, and long sessions can create confusion too. And if your bird suddenly becomes unusually fearful, aggressive, or resistant, consider whether pain, hormones, environment changes, or illness might be part of the picture. A sudden behavior change is worth discussing with an avian veterinarian.
Troubleshooting: What If Your Bird Refuses?
If your bird refuses to step up, go back one level. Work on taking treats calmly. Use a perch instead of your finger. Practice beside the cage instead of inside it if your bird gets territorial. Some birds also do better with a palm-down hand or forearm rather than a finger pointed directly at them.
If biting happens, avoid punishment. Punishment tends to increase fear and confusion. Instead, ask yourself what happened right before the bite. Were you moving too fast? Did the bird feel trapped? Was the session too long? Good training is less about “winning” and more about adjusting the setup so the right choice feels easy.
Real-World Experiences Bird Owners Often Have During Step-Up Training
One of the most common experiences people describe is that the first real breakthrough feels tiny. It is not usually a dramatic movie moment where the bird flies into your arms while uplifting music plays in the background. More often, it is a single lifted foot. A brief pause on your finger. A moment when your bird does not move away. That small win can feel huge because it means the bird is starting to trust the process.
Another familiar experience is discovering that progress is rarely linear. On Monday, your cockatiel steps up three times like a superstar. On Tuesday, the same bird looks at your finger like you have personally offended its ancestors. This is normal. Birds are sensitive to changes in sleep, noise, routine, hormones, room setup, and mood. Many owners assume they are doing something wrong when a bird has an off day, but often the best response is simply to lower expectations and return to an easier version of the behavior.
Many beginners also realize that their own body language matters just as much as the bird’s. If you tense up because you are afraid of being bitten, your hand may become shaky or hesitant. Birds notice that immediately. A lot of people report that training improved once they slowed down, breathed, and focused less on “making” the bird step up and more on inviting the bird to try. Calm energy sounds vague until you spend time around parrots. Then it suddenly becomes very real.
There is also the classic experience of learning your bird’s opinion about rewards. Some birds will work enthusiastically for millet. Others act like millet is an insult and would prefer a sunflower seed, a pellet, a bit of praise, or the chance to return to a favorite perch. Owners often make faster progress once they stop assuming all birds are motivated the same way. Training gets much easier when you figure out what your individual bird considers a jackpot.
Another big lesson people share is that hand-shy birds are not hopeless birds. Owners of rescues and timid parrots often start with a perch, a tabletop setup, or an arm parked quietly near the bird instead of direct handling. At first this can feel like “cheating,” but it is actually smart training. Many birds that refuse fingers at the start eventually transfer beautifully to a hand after enough low-pressure repetition.
Perhaps the most rewarding experience is noticing how step-up training changes the whole relationship. The bird starts watching you differently. There is less panic, less chasing, and more cooperation. Daily routines become easier. Even a bird that never turns into a cuddly social butterfly can still become confident, responsive, and easier to understand. And honestly, that is a pretty great outcome. Trust from a bird is earned one calm moment at a time, which makes it feel even more special when it finally shows up and says, in bird language, “Fine. I suppose you are acceptable.”
Conclusion
Teaching a bird to step on your finger is not about domination, speed, or forcing a result. It is about building a predictable, positive routine that helps your bird feel safe enough to participate. Start small, use rewards wisely, keep sessions short, and respect your bird’s signals. With patience, many birds learn that stepping up is easy, safe, and worth doing.
So yes, your bird may act skeptical at first. That is fair. Hands are weird. Humans are dramatic. But with consistency and kindness, step-up training can become one of the most valuable skills in your bird-care toolkit. And once your bird steps onto your finger willingly, everyday life gets a whole lot easier for both of you.