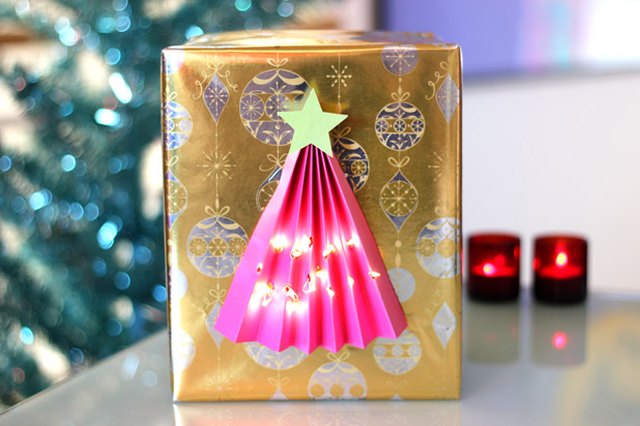
Some presents sit politely under the Christmas tree. Others arrive wearing their own Christmas treeand that tree lights up. Lighted Christmas tree gift wrap transforms an ordinary box into an interactive holiday display using folded cardstock and a strand of tiny battery-powered LED lights. It is part gift wrapping, part paper craft, and part proof that you may have become slightly too competitive with the family gift exchange.
The finished package features a three-dimensional accordion-fold Christmas tree attached to the box lid. Small LED bulbs shine through holes in the paper, while the battery pack remains hidden underneath the lid. The recipient can admire the glowing design, open the box without destroying the decoration, and potentially reuse the illuminated topper afterward.
Although the result looks elaborate, the basic project requires only a two-piece gift box, wrapping paper, cardstock, adhesive, a hole punch, and micro fairy lights. Careful measuring matters more than advanced crafting talent. In other words, you do not need an engineering degreejust a reasonably cooperative roll of tape.
What Is Lighted Christmas Tree Gift Wrap?
Lighted Christmas tree gift wrap is a decorative wrapping technique in which a folded paper tree is mounted on top of a wrapped present and illuminated with miniature lights. Unlike printed Christmas tree wrapping paper, this design creates a raised centerpiece with real points of light.
The most practical version uses a rigid, two-piece box with a removable lid. The lid and lower box are wrapped separately, allowing the recipient to lift the lid without tearing the paper or pulling apart the electrical components. The battery pack is secured to the underside of the lid, and the light wire passes through a small opening to the paper tree above.
This approach works especially well for clothing, books, framed photographs, handmade items, holiday treats, and other gifts that fit inside a shirt-style box. It is less suitable for objects that must be shipped long distances because the raised tree can be crushed. For mailed gifts, make the decorative tree detachable and pack it flat beside the present.
Why This Christmas Gift-Wrapping Idea Works
A successful gift presentation usually needs one clear focal point. The folded tree provides that focal point immediately. Its pleats add depth, the lights create movement and sparkle, and a simple background keeps the package from looking like a holiday craft store exploded on it.
The project also combines familiar Christmas elements in an unexpected way. Green paper suggests evergreen branches, warm-white bulbs resemble traditional tree lights, and a small star finishes the silhouette. Even before the gift is opened, the package creates a miniature holiday moment.
It is also highly customizable. Kraft paper and twine produce a rustic farmhouse look. Matte navy paper with a silver tree feels modern and wintry. Red paper, green cardstock, and multicolored bulbs deliver cheerful nostalgia. White-on-white materials with warm lights create a quieter, elegant design suitable for adult gifts or holiday hostess presents.
Materials and Tools
- A sturdy two-piece gift box with a removable lid
- Wrapping paper or recyclable kraft paper
- Heavy cardstock in green, white, gold, or another holiday color
- A short strand of battery-operated LED micro fairy lights
- Clear tape and strong removable tape
- Scissors or a craft knife
- A ruler and pencil
- A scoring tool, bone folder, or blunt butter knife
- A small hole punch or thick needle
- A stapler, paper fastener, or strong craft adhesive
- Low-temperature hot glue or strong double-sided craft tape
- Scrap paper for a star and optional gift tag
Choose micro LEDs rather than standard-size Christmas bulbs. Fine-wire fairy lights are lighter, easier to hide, and less likely to distort the folded cardstock. Battery power also eliminates the charming but impractical possibility of presenting someone with a gift that must remain plugged into the wall.
How to Make Lighted Christmas Tree Gift Wrap
1. Select the Right Gift Box
Begin with a rectangular two-piece box that has a lid deep enough to conceal the battery pack. Test the lid after placing the pack inside. It should still close without crushing the gift or creating a suspicious battery-shaped bump.
If the present is small, add tissue paper or another lightweight filler so the contents remain below the lid. Avoid placing the battery case directly against fragile items. A thin piece of cardboard taped over the pack can create a simple protective divider.
2. Wrap the Lid and Base Separately
Measure the paper before cutting. Use enough to cover each section neatly, but avoid excessive layers around the lid’s edges because bulky folds can prevent it from closing. Wrap the lower box first and test the fit before finishing the lid.
Place the lid upside down on the paper so the main seam ends up underneath. Pull the paper firmly, crease the corners, and use small pieces of tape rather than constructing a transparent tape monument. Crisp edges make the illuminated tree look intentional and polished.
3. Position the Battery Pack
Place the battery pack against the inside center or inside edge of the lid. Position the on-off switch where it remains easy to reach after the pack is secured. Strong removable tape is preferable because batteries will eventually need to be replaced.
Do not permanently glue the battery compartment shut. Future-you, standing beside a dim tree with a tiny screwdriver on Christmas Eve, will appreciate this decision.
4. Create an Opening for the Light Wire
Mark the approximate center of the tree’s future position on the top of the lid. Carefully make a small opening through the wrapping paper and cardboard. The hole should be just large enough for the thin light wire to pass through.
Thread the lights from the underside of the lid to the top, leaving the battery pack below. Reinforce the inside edge of the opening with tape if the cardboard begins to tear. Avoid sharply bending, stapling, or pinching the electrical wire.
5. Make the Accordion-Fold Tree
Cut a rectangle of cardstock approximately 12 inches wide by 8 inches tall for a medium gift box. Adjust the dimensions to suit your lid, leaving a visible border around the finished tree.
Mark evenly spaced lines about one inch apart across the cardstock. Score each line gently, then fold the paper back and forth in alternating directions. These accordion pleats will become the branches.
Pinch one short end together and secure it with a staple, paper fastener, or strong glue. Fan out the opposite end. The pleated cardstock should form a broad triangular tree. Trim the lower edges if necessary so the tree sits evenly on the package.
6. Plan the Light Placement
Switch on the light strand before making holes. Lay the wire loosely over the folded tree and note the distance between neighboring bulbs. Mark each intended opening with a pencil, creating a balanced zigzag pattern from top to bottom.
Do not space the holes farther apart than the bulbs can comfortably reach. A little extra wire between lights is helpful because it can hide beneath the folds. Pulling the strand tight may distort the tree and put stress on the connections.
7. Punch the Holes and Insert the LEDs
Use a small hole punch, awl, or thick needle to create openings at the marked points. Make each hole only slightly larger than the LED tip. Oversized holes can allow the bulbs to slip backward.
Starting near the top, gently push one bulb through each opening from behind the cardstock. Guide the wire along the reverse side of the tree, tucking extra length into the pleats. A small piece of paper tape can hold loose sections in place without adding much weight.
Turn the lights on again and inspect the pattern. Reposition uneven bulbs before attaching the tree to the box. This is much easier than performing miniature electrical landscaping after everything has been glued down.
8. Attach the Tree to the Lid
Arrange the tree over the wire opening and confirm that it is centered. Apply low-temperature hot glue or strong double-sided tape only to the pleats that touch the box. Press gently until the adhesive holds.
Keep glue away from the bulbs and electrical wire. If children are participating, an adult should handle the glue gun and any sharp piercing tools.
9. Add the Star and Gift Tag
Cut a small star from metallic cardstock, glitter-free gold paper, or a scrap of contrasting gift wrap. Attach it over the secured top of the accordion tree. A tiny bow, wooden star, or paper snowflake can also work.
Place the gift tag near a lower corner rather than competing with the tree. Keep the recipient’s name visible when the lights are switched off. Christmas morning is not the ideal time to play a mysterious, high-stakes game of “Whose glowing present is this?”
Important Lighting and Fire-Safety Tips
Use only battery-operated LED lights intended for decorative indoor use. LEDs consume less energy and generally remain cooler than traditional incandescent bulbs, making them the practical choice for a paper-based craft. Inspect the wire, battery case, and bulbs before installation, and do not use a set with exposed conductors, cracked insulation, corrosion, or loose connections.
Turn the lights off when the gift is unattended, overnight, or in storage. Keep the package away from candles, fireplaces, heaters, hot serving dishes, and other heat sources. Never place it where a small child or pet can pull out the lights or open the battery compartment.
Remove the batteries before storing the decoration for another year. Battery leakage can damage the pack and stain the paper. Rechargeable and lithium batteries should be handled and recycled according to local collection rules rather than automatically placed in household recycling.
Design Variations to Try
Rustic Woodland Tree
Wrap the box in plain kraft paper and use deep forest-green cardstock. Add a jute bow, a wooden star, and warm-white micro lights. A handwritten tag completes the cozy cabin look without requiring an actual cabin.
Snowy Minimalist Tree
Use matte white wrapping paper, white cardstock, and cool-white LEDs. Add a silver star and a narrow gray ribbon around the base of the box. The subtle texture of the pleats keeps the monochromatic package from looking unfinished.
Colorful Retro Christmas
Pair red wrapping paper with a bright green tree and multicolored lights. Add paper circles as oversized ornaments or use small adhesive stars. This version works especially well for children’s gifts and family gift exchanges.
Elegant Midnight Tree
Choose navy or black paper, metallic gold cardstock, and warm-white lights. Keep the rest of the embellishments simple. The contrast makes each bulb look brighter and gives the package a sophisticated evening-party appearance.
Reusable Tree Topper
Instead of gluing the tree directly to the wrapping paper, attach it to a thin piece of cardstock with removable adhesive dots. The recipient can lift off the entire illuminated panel and reuse it as shelf décor, a place-card display, or a topper for another gift.
Common Problems and Easy Fixes
The Tree Will Not Stay Open
The cardstock may be too soft or the folds may be too shallow. Use heavier paper, sharpen every crease with a bone folder, and secure several bottom pleats to the box. Avoid saturating the paper with liquid glue, which can cause warping.
The Lights Look Uneven
Switch them on in a dim room and view the tree from several feet away. Move bulbs from crowded sections to dark areas. A visually balanced pattern matters more than mathematically perfect spacing.
The Lid Will Not Close
Relocate the battery pack to an emptier area, reduce the amount of tape, or place a shallow cardboard spacer inside the box. Do not force the lid, since pressure can damage both the gift and the lighting hardware.
The Paper Tears Around the Holes
Cardstock that is too thin may split along the folds. Reinforce the back with small pieces of paper tape before repunching the openings. Make smaller holes and insert the bulbs slowly rather than pushing them through like tiny festive battering rams.
Making the Project More Eco-Friendly
Select recyclable kraft paper or uncoated paper made with recycled content. Shiny laminated paper, plastic coatings, glitter, foil finishes, and adhesive-heavy decorations may not be accepted by local recycling programs. Always check your community’s rules before placing gift wrap in the recycling bin.
Save the two-piece box, ribbon, paper star, and accordion tree for reuse. Fabric ribbon and natural twine can replace disposable plastic bows. Scraps of cardstock can become tags, ornaments, or miniature trees for future presents.
The electrical components should be separated from the paper before disposal. Keep a working light strand for another craft, and take damaged electronic lights or rechargeable batteries to an appropriate local collection site.
A Hands-On Experience With Lighted Christmas Tree Gift Wrap
The most surprising part of making lighted Christmas tree gift wrap is how quickly the project changes from “a box with folded paper” to “the present everyone keeps looking at.” During the early stages, the materials appear almost suspiciously ordinary. There is a box, a rectangle of cardstock, a wire, and enough tape to suggest that events may soon become complicated.
The first satisfying moment comes when the accordion folds open into a tree. Precise scoring helps, but tiny differences between folds are rarely noticeable after the paper is fanned out. In fact, slight irregularities can make the branches feel more natural. The important lesson is to crease confidently. Halfhearted folds create a tree that looks less like an evergreen and more like a tired paper fan.
Planning the bulbs requires the most patience. It is tempting to punch a cheerful collection of random holes and assume the lights will cooperate. They will not. The fixed distance between bulbs controls the pattern, so arranging the strand before punching saves considerable frustration. Turning on the lights during this stage makes each bulb easier to locate behind the folds.
The project becomes genuinely magical when the first few LEDs shine through the cardstock. The folds catch the light and create small shadows, giving the flat paper more dimension than expected. Warm-white bulbs tend to produce a classic glow, while multicolored lights turn the package into a miniature department-store window display.
One practical discovery is that less decoration usually produces a better result. The illuminated tree already supplies texture, shape, and sparkle. Adding a giant ribbon, three pinecones, six bells, and an artificial cardinal may technically be possible, but the package can begin to resemble a holiday parade float. A small star and simple tag are usually enough.
Another lesson is to test the lid repeatedly. The battery pack may fit perfectly before the gift and tissue paper are added, then suddenly behave as though it has doubled in size. Securing it near an edge often preserves more usable space. Removable tape is helpful because the recipient can access the batteries without dismantling the entire project.
The recipient’s reaction is part of the experience. People generally pause before opening a lighted present because it feels like a decoration rather than disposable packaging. Children may want to press the switch several times. Adults may examine the underside to determine how the lights work. At least one person will probably ask whether the tree can be saved, which is an excellent reason to use a detachable mounting panel.
The project also makes gift wrapping feel less like a December chore. Instead of rapidly covering boxes while watching the tape stick to itself, the maker becomes involved in a small creative process. Colors can be matched to the recipient, light patterns can be adjusted, and leftover paper can be turned into coordinating tags.
Most importantly, perfection is unnecessary. A slightly crooked star, an uneven pleat, or one bulb that insists on facing sideways will not ruin the effect. Once the room lights dim and the tiny tree begins to glow, those flaws become part of the handmade charm. The package feels personal, playful, and memorablewhich is considerably more impressive than achieving perfectly invisible tape seams.
Conclusion
Lighted Christmas tree gift wrap turns the presentation into part of the present. With a separately wrapped box, folded cardstock tree, and battery-operated LED fairy lights, you can create a glowing holiday package without advanced tools or complicated electrical work.
The best results come from careful planning: choose a sturdy box, measure the light spacing before punching holes, protect the wire from sharp bends, and keep the battery switch accessible. Finish with a restrained color palette and one or two simple embellishments so the illuminated tree remains the star of the showquite literally, once you glue the star on top.
Note: Use cool-running battery-operated LED micro lights, supervise children around sharp tools and hot glue, turn the lights off when unattended, and remove the batteries before storing the decoration.