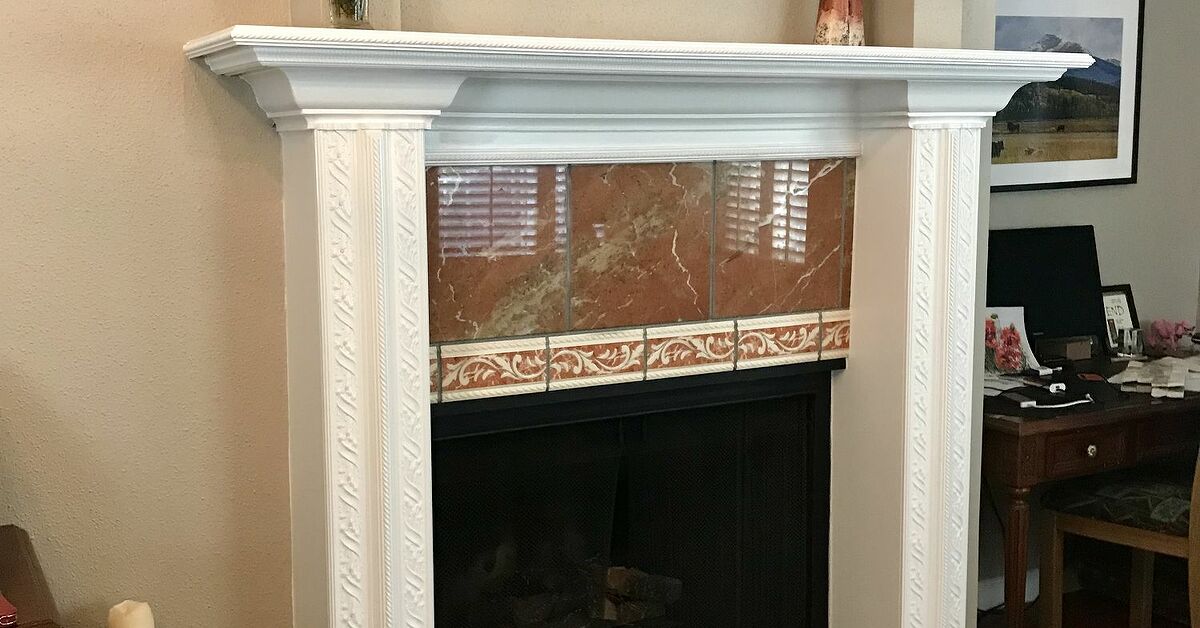
A fireplace has a special talent for becoming the loudest object in a room. Even when it is not burning, it sits there like a brick-faced judge, silently commenting on your sofa, your rug, your life choices, and that one decorative basket you bought because it was “on sale.” The good news? You do not always need a full demolition, a contractor army, or a budget that makes your wallet fake its own disappearance. A semi-DIY fireplace re-doespecially one centered on paintcan completely refresh a living room without turning your home into a construction documentary.
This guide explains how to paint a semi-DIY fireplace re-do the smart way: what to handle yourself, when to bring in a professional, which materials matter, how to prep brick or masonry correctly, and how to avoid common mistakes that make a fireplace look less “custom home” and more “weekend panic.” Whether your fireplace is red brick, dated brown brick, tired stone, old tile, or a mantel that has seen too many design decades, a painted fireplace makeover can create a cleaner, brighter, more modern focal point.
The key word is semi. You can DIY the cleaning, taping, priming, painting, and styling. But you may want professional help for chimney inspection, firebox repairs, gas insert work, damaged masonry, lead-paint concerns, or anything involving active heat and combustion. In other words: paint bravely, but do not freestyle with fire. Fire is famously bad at accepting apologies.
What Is a Semi-DIY Fireplace Re-do?
A semi-DIY fireplace re-do is a makeover where you do the approachable cosmetic work yourself while outsourcing the technical, risky, or highly specialized parts. For many homeowners, that means painting the exterior surround, refreshing the mantel, swapping accessories, updating the hearth look, and styling the wall around the fireplace. A pro may handle chimney safety checks, electrical work for a mounted TV, gas-line service, damaged brick repair, or tile installation if the project grows beyond paint.
This approach is popular because it keeps costs manageable while still giving the room a dramatic before-and-after transformation. Painting a brick fireplace, for example, can make a dark room feel larger, cleaner, and more current. A black painted fireplace can add modern contrast. A warm white finish can soften rustic brick. A limewash-inspired look can preserve texture while quieting loud color variation. The goal is not to erase the fireplace’s personality. The goal is to teach it some manners.
Before You Paint: Decide If Your Fireplace Should Be Painted
Painting brick or masonry is a lasting decision. Brick is porous, meaning it absorbs moisture and needs to breathe. Once painted, it is difficult to return to its original state without labor-intensive stripping that may damage the surface. That does not mean you should never paint brick. It means you should pause long enough to ask the right questions before opening the paint can like a person in a home-improvement montage.
Paint the fireplace if:
- The brick is unattractive, stained, mismatched, or already painted.
- The room feels dark or visually heavy because of the fireplace color.
- You want a cohesive modern, farmhouse, transitional, coastal, or minimalist look.
- The brick and mortar are structurally sound.
- You are comfortable maintaining a painted surface over time.
Think twice if:
- The brick is historic, handmade, rare, or architecturally important.
- There are moisture problems, crumbling mortar, or white powdery efflorescence.
- The fireplace surround gets unusually hot during use.
- You are planning to sell soon and the original brick has strong character.
- You are only painting because you saw one gorgeous photo online and forgot that your room has different lighting, flooring, and furniture.
If the fireplace is in good condition but the color bothers you, paint can be a practical solution. If the masonry is damaged, fix the problem before covering it. Paint is excellent at changing appearance; it is terrible at solving structural issues. It is basically makeup, not a medical degree.
Safety First: Know What Not to Paint
For most fireplace painting projects, you are painting the outside surroundnot the firebox interior where flames, extreme heat, or combustion gases are present. The interior firebox of a working wood-burning fireplace should not be painted with ordinary wall paint, masonry paint, or leftover trim paint from your garage. Areas exposed to flame require products specifically rated for high heat, and even then, product instructions matter.
If you have a gas fireplace, wood-burning fireplace, insert, or stove, check the manufacturer’s manual before painting nearby metal, brick, tile, doors, louvers, or trim. Some parts need ventilation clearance. Some surfaces get hotter than expected. Some finishes can release fumes if used incorrectly. If you cannot identify the fireplace type or you are unsure whether the unit is safe to use, schedule a professional inspection before starting the makeover.
Homes built before 1978 may also contain lead-based paint. If your mantel, trim, hearth, or surrounding wall has old peeling paint, do not sand it casually. Use a lead test kit or hire a certified professional. Dust from disturbed lead paint is a serious hazard, and no fireplace glow is worth turning your living room into a chemistry problem.
Tools and Materials for a Painted Fireplace Makeover
A successful semi-DIY fireplace re-do is mostly prep, patience, and choosing the right products. You do not need a professional paint sprayer, although one can help on very textured brick. Most homeowners can get excellent results with brushes and rollers.
Basic supplies:
- Drop cloths or rosin paper
- Painter’s tape
- Wire brush or stiff-bristle brush
- Vacuum with brush attachment
- Bucket, sponge, and mild detergent
- TSP substitute or masonry-safe cleaner for heavy soot
- Clean water for rinsing
- Acrylic caulk or masonry repair product for small gaps
- Masonry primer or stain-blocking primer suitable for brick
- Acrylic latex masonry paint or interior paint approved for masonry surfaces
- Angled sash brush
- Small stiff artist brush for mortar cracks
- Roller frame with 1/2-inch to 3/4-inch nap roller cover
- Paint tray and liners
- Protective gloves and safety glasses
For finish, satin and semi-gloss are easier to wipe clean than flat paint, especially near soot-prone areas. Matte finishes can look beautiful and modern, but they may show fingerprints, ash smudges, and dust more easily. On rough brick, a low-luster or satin masonry finish often hits the sweet spot: cleanable without looking shiny enough to signal aircraft.
Step 1: Clean the Fireplace Like You Mean It
Paint sticks best to a clean, dry surface. Brick fireplaces collect soot, dust, ash, pet hair, candle residue, and mysterious household grime that probably has its own zip code. Start by removing fireplace screens, tools, loose decor, and anything sitting on the mantel. Vacuum the brick face, mortar joints, hearth, and surrounding floor. Use a brush attachment to pull dust out of rough texture and grout lines.
Next, scrub the brick with warm water and mild detergent. If soot is stubborn near the firebox opening, use a cleaner suitable for masonry and follow the label carefully. Avoid soaking the brick. Masonry absorbs water, and trapped moisture can interfere with primer. Rinse with clean water and wipe away residue. Let the fireplace dry completely, ideally for at least 24 hours. If the brick still feels damp or cool to the touch, wait longer.
This is the step many people rush. Do not. Painting over soot is like frosting a dusty cake. Technically possible, emotionally upsetting, and not recommended.
Step 2: Inspect Brick, Mortar, Tile, and Mantel
After cleaning, inspect the fireplace closely. Look for loose mortar, cracks, flaking paint, crumbling brick, water stains, rust, or chalky white efflorescence. Small hairline gaps can often be filled with paintable masonry caulk or repair material. Larger cracks, loose bricks, or recurring moisture stains should be evaluated by a professional.
If your fireplace has glossy tile instead of brick, it needs a different prep process. Smooth tile often requires sanding or deglossing and a bonding primer designed for slick surfaces. If your surround is natural stone, test carefully. Limestone, sandstone, river rock, and other porous stones can be difficult to paint evenly and even harder to reverse. Brick is usually the easiest fireplace surface to paint successfully.
Step 3: Protect Everything You Do Not Want Painted
Painter’s tape is your friend, but it is not a miracle worker. Tape around the walls, mantel, hearth edge, floor, built-ins, and any trim that should stay paint-free. Press the edges firmly so paint does not sneak underneath like a tiny decorative burglar. Lay drop cloths on the floor and hearth. If you are painting near carpet, use rosin paper or plastic sheeting under canvas for extra protection.
Remove outlet covers if they are nearby. Cover fireplace doors or take them off if the design allows it. If you plan to paint the mantel a different color, decide the order before starting. Usually, paint the brick first, let it cure, then paint the mantel and trim. That keeps touch-ups simpler and prevents wet-edge chaos.
Step 4: Prime the Brick or Masonry
Primer is not optional on raw brick. Brick is porous, alkaline, textured, and thirsty. Without primer, the paint may absorb unevenly, peel, flash, or require so many coats that you begin questioning your entire personality. Choose a masonry primer, concrete and masonry primer, or high-quality bonding primer recommended for brick surfaces.
Use a stiff brush to push primer into mortar joints, pits, and crevices. Then use a thick-nap roller to cover the brick faces. Work from top to bottom so drips do not ruin finished areas. On very rough brick, roll in multiple directions and back-brush where needed. The goal is not a perfect white coat; it is an even sealed surface that gives paint something reliable to grip.
Let primer dry according to the manufacturer’s instructions. Dry time depends on product, temperature, humidity, and brick absorbency. If stains bleed through after the first primer coat, apply a second coat before painting.
Step 5: Choose the Right Fireplace Paint Color
Color can make or break the makeover. White is popular because it brightens a room and makes brick texture feel fresh instead of heavy. Warm white works well with beige, cream, oak, brass, and traditional interiors. Soft gray suits cooler palettes, black metal accents, and modern furniture. Charcoal or matte black can create a dramatic focal point, especially when paired with a wood mantel and lighter walls.
For a semi-DIY fireplace re-do, test at least two paint samples directly on the primed fireplace or on a sample board held against the brick. Look at the color in morning light, afternoon light, and evening lamp light. Fireplaces are vertical focal points, so undertones show up strongly. A white that looks crisp in the store may turn icy blue at home. A gray may reveal purple undertones. Paint samples are cheaper than repainting the entire fireplace while muttering at the wall.
Reliable fireplace color ideas:
- Warm white: Bright, classic, forgiving, and ideal for farmhouse or transitional rooms.
- Soft greige: Good for cozy spaces where pure white feels too stark.
- Charcoal: Modern, moody, and excellent for hiding soot shadows.
- Black: Bold and architectural, especially with a wood mantel.
- Muted green or blue: Stylish for cottage, vintage, or eclectic interiors.
- Limewash-inspired whitewash: Great when you want brick texture and variation to remain visible.
Step 6: Paint the Fireplace Surround
Once the primer is dry, apply the first coat of paint. Use an angled brush for edges, corners, mortar lines, and areas close to the firebox opening. Then use a roller with a thick nap to cover broad brick faces. Work in manageable sections so you can blend brushed and rolled areas while the paint is still wet.
Do not overload the roller. Heavy coats can drip into mortar grooves and create thick, uneven patches. Two lighter coats are usually better than one heroic coat that looks like the fireplace was dipped in pudding. Allow the first coat to dry fully, then apply a second coat. Very dark brick painted white may require a third coat, especially if the brick is highly textured.
Remove painter’s tape before the final coat fully hardens, unless the product instructions say otherwise. Pull tape slowly at an angle for cleaner lines. Keep a small artist brush nearby for touch-ups.
Step 7: Refresh the Mantel, Hearth, and Surrounding Wall
The best semi-DIY fireplace re-do does not stop at the brick. A freshly painted fireplace can make the old mantel look more dated by comparison. Consider painting the mantel a crisp trim color, staining it warmer, or replacing it with a simple wood beam. If the hearth tile is unattractive but intact, you may be able to paint it with a bonding primer and floor-rated or tile-rated paint. For a more durable upgrade, hire a pro to retile the hearth.
Also consider the wall above the fireplace. A painted brick surround often looks more intentional when paired with art, a mirror, sconces, built-ins, or a clean TV installation. If you mount a TV, plan cable management before painting. Nothing ruins a beautiful fireplace makeover faster than black cords dangling down like electronic spaghetti.
Common Mistakes to Avoid
Skipping the dry time
Brick holds moisture. If you paint too soon after cleaning, moisture may get trapped under the finish and cause peeling or bubbling later.
Using the wrong paint
Ordinary wall paint may work on some primed interior brick surrounds, but masonry paint or acrylic latex paint approved for masonry is often a better choice. Always read product labels and choose paint suitable for the surface and heat conditions.
Painting the firebox incorrectly
The firebox is not the same as the decorative surround. Do not use standard paint inside a working wood-burning fireplace. If the interior needs attention, consult the fireplace manufacturer or a professional.
Ignoring soot stains
Soot is oily and can bleed through paint. Clean thoroughly and use the right primer near stained areas.
Choosing a color too quickly
Fireplaces dominate a room. Test samples before committing. The tiny paint chip at the store is not legally responsible for what happens in your living room.
How Much Does a Semi-DIY Fireplace Re-do Cost?
A basic painted brick fireplace makeover can be very affordable. If you already own brushes, rollers, and drop cloths, your main costs may be cleaner, primer, paint, tape, and small repair supplies. Many homeowners can complete the painting portion for under a few hundred dollars, depending on the size of the fireplace and product choices.
A semi-DIY re-do costs more when you add professional services. A chimney inspection, masonry repair, mantel replacement, electrical work, custom built-ins, or new tile can raise the total. Still, compared with demolition and a full fireplace rebuild, a paint-focused update is one of the most cost-effective ways to change a room’s personality.
How Long Does the Project Take?
Most fireplace painting projects take a weekend, but the actual painting time is not the whole story. Cleaning may take one to two hours. Drying after cleaning may take a full day. Priming and painting require additional drying time between coats. If you add mantel paint, hearth paint, or styling, plan for two to three days of stop-and-start work.
The best schedule looks something like this: clean on Friday evening, prime Saturday morning, paint Saturday afternoon, apply the second coat Sunday, then style the room after the paint has had time to cure. Do not rush to place heavy decor, tools, or screens against fresh paint. Paint may feel dry before it has fully hardened.
Design Ideas for a Semi-DIY Fireplace Makeover
A painted fireplace works best when it connects to the rest of the room. Repeat the fireplace color in small details, such as pillows, frames, vases, or cabinet hardware. If you paint the brick white, add contrast with a wood mantel, black screen, or dark art frame. If you paint it black, balance the drama with lighter walls, warm textiles, and natural materials.
For a modern farmhouse look
Paint the brick warm white, add a stained wood mantel, use a black fireplace screen, and keep decor simple. Think candlesticks, a landscape print, and maybe one plant that you promise you will water this time.
For a dramatic modern look
Choose charcoal or soft black for the fireplace, paint the surrounding wall a warm neutral, and use clean-lined accessories. This look pairs beautifully with leather, linen, brass, and oak.
For a cottage look
Try a whitewash or limewash-inspired effect that lets some brick variation show through. Add vintage art, layered baskets, and a mantel arrangement that feels collected rather than staged.
For a budget-friendly refresh
Paint only the brick, deep-clean the hearth, update the screen, and restyle the mantel. Even small changes can make the fireplace feel intentional instead of inherited from a previous decade with questionable confidence.
Maintenance After Painting
Once painted, the fireplace will need occasional cleaning. Use a soft cloth or sponge with mild soap and water. Avoid harsh abrasives that can dull or damage the finish. For soot marks, test any cleaner in a hidden spot first. A satin or semi-gloss finish is usually easier to maintain than flat paint, especially on white or light-colored fireplaces.
Keep combustible decor away from the firebox opening. Do not hang fabric garlands, paper decorations, or dried plants close to active flames or heat. If you use the fireplace regularly, schedule chimney maintenance and inspections as recommended for your fireplace type. A beautiful fireplace should also be a safe fireplace. Beauty and safety can share a mantel. They do not even need to argue about it.
Real-World Experience: What a Semi-DIY Fireplace Re-do Actually Feels Like
The first thing most people learn during a fireplace painting project is that brick has texture with a capital T. From across the room, the fireplace may look like a flat surface. Up close, it is a tiny mountain range of pits, ridges, mortar valleys, and stubborn corners. This is why the brush-and-roller combo matters. The roller makes you feel productive. The brush does the detail work that keeps the final result from looking patchy. It is teamwork, except one teammate is covered in primer and the other keeps falling into the paint tray.
Another real experience: cleaning takes longer than expected. Soot hides in mortar joints like it is paying rent. Even fireplaces that look “pretty clean” can release gray smudges once you start scrubbing. The best approach is to accept cleaning as part of the transformation, not as boring pre-work. Every bit of dust and soot you remove gives primer a better chance to bond. A clean fireplace is not glamorous, but it is the difference between paint that lasts and paint that gives up emotionally by next winter.
Color testing is also more important than people think. A warm white may look creamy on the sample card but turn yellow beside a beige sofa. A cool white may look fresh at noon and icy under evening lamps. Black can be stunning, but it may make a small room feel heavier if there is not enough natural light. One helpful trick is to paint sample boards and place them against the fireplace at different times of day. Live with them for 24 hours. Yes, it feels dramatic. No, you are not being difficult. You are preventing a repainting crisis.
Many semi-DIYers also discover that the fireplace makeover changes the rest of the room. Once the brick looks fresh, the old brass screen may suddenly look extra shiny. The mantel decor may feel too cluttered. The wall color may seem dingy. This is normal. A fireplace is a focal point, so improving it can reveal what else needs adjusting. Start small before buying everything new. Clean the screen, simplify the mantel, move existing artwork, and try decor from another room. Sometimes the best accessory is the one already hiding in a closet, waiting for its big comeback.
Finally, the emotional payoff is real. A painted fireplace can make a room feel brighter, calmer, and more finished in a single weekend. It is one of those projects where the before-and-after difference feels bigger than the budget. The semi-DIY method makes it even better because you get the satisfaction of doing the visible work while still respecting the technical side of fireplace safety. That balance is the sweet spot: confident enough to transform the room, wise enough not to pretend every fireplace issue can be solved with a roller and a playlist.
Conclusion
Learning how to paint a semi-DIY fireplace re-do is really about learning how to combine vision with restraint. Paint can modernize dated brick, brighten a dark living room, and turn an ignored fireplace into a polished focal point. But the best results come from careful prep, the right primer, suitable masonry paint, smart color testing, and a healthy respect for heat, ventilation, and fireplace safety.
If your fireplace is structurally sound, the exterior surround is suitable for paint, and you are ready for a lasting design change, this project can deliver a major upgrade without a full remodel. Clean thoroughly, prime patiently, paint in thin coats, and finish the room with thoughtful styling. Your fireplace may still be the loudest object in the roombut after this makeover, at least it will finally be saying something nice.
Note: This article is synthesized from established U.S. home-improvement, paint-manufacturer, design, and fireplace-safety best practices. Product labels, local codes, and fireplace manufacturer instructions should always guide the final project decisions.