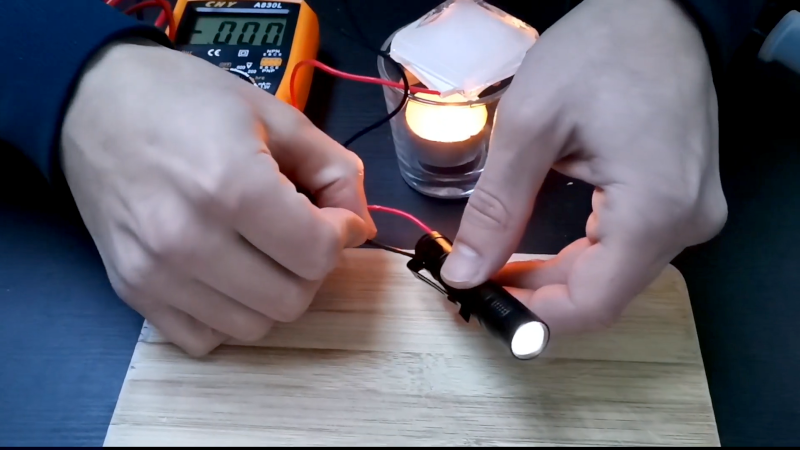
Most flashlights are not especially dramatic. You click a button, a battery sighs, an LED wakes up, and the darkness politely leaves the room. Useful? Absolutely. Magical? Not unless you are trying to find a dropped screw under the couch and suddenly feel like an archaeologist.
But a flashlight powered by fire and ice? Now we are in “science fair meets wizardry” territory. The idea sounds like it escaped from a fantasy novel: put heat on one side, cold on the other, and make light appear. No disposable batteries rolling around in a drawer. No frantic charging cable hunt. Just a temperature difference, a thermoelectric module, and the ancient human desire to say, “Wait, that actually works?”
The concept behind A Flashlight Of Fire And Ice is based on the Seebeck effect, a real physical phenomenon where certain materials produce voltage when one side is hot and the other side is cold. In a clever DIY demonstration, a Peltier-style thermoelectric cooler can be used in reverse: instead of consuming electricity to create a hot side and a cold side, it uses a hot side and a cold side to create electricity. Add an LED flashlight circuit, and suddenly your campfire and ice pack become reluctant coworkers.
What Is a Fire-and-Ice Flashlight?
A fire-and-ice flashlight is a small experimental light source powered by a temperature difference. One side of a thermoelectric module is heated, often by a flame, candle, alcohol burner, or hot metal surface. The opposite side is cooled with ice, cold water, or a heat sink. When the temperature gap becomes large enough, the module produces a small electrical voltage. That electricity can then be boosted or routed to power an LED.
In plain English: the flashlight is not “burning ice,” which is good because that would be both impossible and deeply confusing. Instead, it is using the contrast between hot and cold. The bigger the difference, the more useful the output becomes. It is the same general family of ideas used in thermoelectric generators, though a DIY flashlight is obviously much smaller than the systems used in spacecraft or industrial waste-heat recovery.
The beauty of the project is that it makes invisible physics visible. Heat usually feels like something that disappears into the air, especially when you stand near a campfire and wonder why your face is roasting while your back is auditioning for life as a popsicle. A thermoelectric flashlight shows that heat flow can be harvested, at least in small amounts, and turned into usable electrical energy.
The Science: How Fire and Ice Become Light
The Seebeck Effect, Without the Lab-Coat Headache
The Seebeck effect occurs when a temperature difference across certain conductive or semiconductive materials causes charge carriers to move. That movement creates voltage. If the circuit is arranged correctly, current can flow and power a load, such as an LED.
Imagine a crowd at a summer concert. The hot side is the packed front row, where everyone is sweating, waving arms, and wondering why they paid extra for this. The cold side is the open grassy area near the drink stand. Naturally, people drift from the uncomfortable hot zone toward the cooler space. In thermoelectric materials, electrons and holes respond to temperature gradients in a similar spirit. Their movement can create an electrical potential.
A single thermocouple produces only a small voltage. That is why thermoelectric modules use many tiny semiconductor junctions connected in series electrically and in parallel thermally. Together, they turn a modest physical effect into something practical enough to measure, demonstrate, and sometimes use.
Peltier vs. Seebeck: Two Sides of the Same Coin
The terms “Peltier module” and “thermoelectric generator” often get tossed around like interchangeable socks in a laundry basket. They are related, but the direction of energy flow matters.
When electricity is applied to a Peltier module, one side gets hot and the other side gets cold. That is the Peltier effect. It is used in small cooling gadgets, compact beverage coolers, electronics temperature control, and the occasional tiny fridge that sounds better in the product listing than it performs during a heat wave.
When one side of the same kind of module is heated and the other is cooled, it can generate electricity. That is the Seebeck effect. In other words, the module can behave like a heat-powered generator. It is not free energy. It is energy conversion. The “fuel” is the flow of heat from the hot side to the cold side.
Key Parts Inside a Fire-and-Ice Flashlight
1. Thermoelectric Module
The thermoelectric module is the star of the show. It is usually a flat ceramic square with semiconductor elements sandwiched inside. In cooling mode, it moves heat when powered. In generator mode, it produces power when heated on one face and cooled on the other.
2. Heat Source
The “fire” side may come from a candle, small burner, hot plate, or controlled flame. The goal is steady heat, not a miniature dragon. Too little heat gives weak output. Too much heat can crack the module, melt surrounding materials, or turn your experiment into a cautionary tale.
3. Cold Source
The “ice” side needs to stay cool. Ice, cold water, a metal heat sink, or a combination of both can help maintain the temperature difference. If both sides warm up, the output drops. This is where many DIY builds fail: the hot side gets hot, the cold side also gets hot, and the flashlight says, “Nice try.”
4. LED and Driver Circuit
LEDs are efficient, but they still need the right voltage and current. A thermoelectric module may produce low, changing voltage depending on the heat difference. A boost converter or LED driver can help stabilize the power so the LED does not flicker like a haunted porch light.
5. Heat Sink and Mechanical Frame
Good thermal design is everything. The hot side must receive heat efficiently, while the cold side must shed heat efficiently. Metal plates, thermal paste, clamps, and heat sinks can make a huge difference. A sloppy thermal path wastes energy before it ever reaches the LED.
Why LEDs Make This Project Possible
A fire-and-ice flashlight would be much less exciting if it had to power an old incandescent bulb. Incandescent bulbs waste a great deal of energy as heat, which is hilarious in a project already juggling heat, but not very practical. LEDs are far more efficient and can produce useful light from relatively low power.
Modern LED lighting also highlights a funny engineering truth: LEDs are efficient, but they are not heat-free. The tiny LED junction still produces heat, and long life depends on proper heat management. That is why quality LED flashlights use metal bodies, heat sinks, and current regulation. In a thermoelectric flashlight, heat management matters twice: once for generating power and again for protecting the LED.
Practical Uses: Is This More Than a Cool Trick?
Yes, but with realistic expectations. A flashlight powered by fire and ice is not likely to replace your rechargeable tactical flashlight, your phone light, or the headlamp that has lived in your junk drawer since 2018. It is not the tool you grab when the basement floods at 2 a.m. and you are wearing one sock.
However, the concept has real value in education, emergency thinking, and off-grid experimentation. It demonstrates how waste heat can be converted into electricity. It teaches thermal gradients, semiconductor behavior, energy conversion, and LED power requirements in a way that feels memorable. Students may forget a textbook diagram, but they usually remember a flashlight that runs because one side is being warmed and the other side is chilling like a snow cone.
In survival or camping scenarios, thermoelectric generators can be useful when paired with consistent heat sources, such as camp stoves. Some commercial camp-stove accessories use waste heat to charge small devices. The fire-and-ice flashlight belongs to the same idea family, though a homemade version is best treated as a learning tool unless it is carefully engineered and tested.
The Engineering Challenge: Keeping the Temperature Difference Alive
The central challenge is not simply making one side hot. Any enthusiastic marshmallow toaster can do that. The hard part is keeping one side hot while keeping the other side cold. Heat is sneaky. It travels through metal, air, screws, brackets, and bad design decisions. If your cold side warms too quickly, voltage drops and the LED fades.
This is why serious thermoelectric designs focus on thermal isolation and heat transfer. The hot side needs controlled contact with the heat source. The cold side needs a heat sink, airflow, water cooling, or ice. The module needs even pressure so it does not crack. Thermal paste can reduce gaps. Insulation can slow heat creep. The entire system becomes a tiny negotiation between physics and patience.
Thermoelectric devices are also not famous for high efficiency. They are valued because they are solid-state, compact, quiet, and capable of working without moving parts. That makes them fascinating in harsh, remote, or specialized environments. But if your goal is maximum energy efficiency, a thermoelectric flashlight is more “clever demonstration” than “power company panic button.”
Safety First: Fire, Ice, and Common Sense
Any project involving open flame deserves respect. A small candle can ignite nearby paper, fabric, plastic, or hair. Hair is particularly rude because it burns fast and smells like regret. Keep flame-based experiments on a stable, nonflammable surface. Do not leave the setup unattended. Keep water or an appropriate extinguisher nearby. Keep children and pets away unless closely supervised.
Also, do not overheat the thermoelectric module. Many common modules are designed for moderate temperature ranges. Excess heat can damage the ceramic plates, solder joints, internal semiconductor legs, or wiring. If you are using a battery or capacitor in the circuit, follow safe charging and protection practices. Lithium-ion cells, in particular, require proper charging circuits and protection from overheating, puncture, short circuits, and abuse.
Finally, do not treat a flame-powered flashlight as your primary emergency light. For power outages, battery-powered flashlights and lanterns are safer and more dependable than candles or open flames. A fire-and-ice flashlight is a terrific conversation starter, but your emergency kit should still include boring, reliable gear. Boring gear saves the day. Flashy science gets the applause.
How to Improve a Fire-and-Ice Flashlight Design
Use a Better Heat Sink
The cold side benefits from more surface area. A finned aluminum heat sink, water-cooled block, or ice-water reservoir can help preserve the temperature gradient longer.
Control the Flame
A steady heat source is better than a wild flame. Use a stable burner or candle holder, and keep the module protected from direct soot and uneven heating.
Add a Boost Converter
A boost converter can raise low voltage to a level usable by an LED. This makes the light more stable and helps the project work across a wider range of temperatures.
Use Thermal Paste
Thermal paste fills microscopic air gaps between the module and metal plates. Better contact means better heat transfer and stronger performance.
Measure Everything
A multimeter turns guessing into learning. Measure hot-side temperature, cold-side temperature, open-circuit voltage, loaded voltage, and LED current. Science gets much less mysterious when numbers join the party.
Why This Project Captures the Imagination
The phrase A Flashlight Of Fire And Ice works because it feels impossible at first. Fire destroys. Ice preserves. Flashlights usually need batteries. Yet the project reveals a bridge between opposites. The light exists because heat wants to move. The cold side gives that heat somewhere to go. The thermoelectric module captures a little of that journey and turns it into electricity.
That is the charm of good DIY engineering. It does not merely produce a gadget. It changes how you look at ordinary things. A candle is no longer just a candle. Ice is no longer just what ruins your drink ratio. A flashlight is no longer only a tube with batteries. Together, they become a lesson in energy, materials, and clever design.
Experiences Related to A Flashlight Of Fire And Ice
The first time someone sees a fire-and-ice flashlight work, there is usually a pause. Not a polite pause. A real pause. The kind where the brain checks the receipt and says, “I did not order this.” The flame is clearly there. The ice is clearly there. The wires are not secretly plugged into the wall. Then the LED glows, and suddenly the room has the atmosphere of a tiny science museum run by a magician with a soldering iron.
One of the most memorable experiences with this type of project is the moment you realize the setup is more sensitive than it looks. At first, you may think the flame is the hero. Add more heat, get more light, right? Not exactly. Push too much heat into the module and the cold side warms up. The temperature difference shrinks. The LED dims. The experiment teaches humility with the quiet confidence of a physics teacher who has seen your mistake coming for 20 minutes.
Another lesson comes from the cold side. Ice looks simple, but it is doing serious work. If the cold plate is poorly attached, the module barely produces useful output. If the ice melts into a shallow puddle that no longer contacts the heat sink well, performance falls. If condensation drips onto electronics, you suddenly learn why waterproofing and separation matter. It is a beautiful project, but it is not above splashing your circuit board just to keep you honest.
Testing the flashlight in a dark room makes the experience even better. In bright daylight, a small LED glow may look unimpressive. In darkness, that little point of light feels like a victory. It is not stadium lighting. It will not guide aircraft. But it proves the system is alive. The light is not coming from a battery. It is coming from a thermal gradient you created with your own hands. That makes even a modest glow feel dramatic.
For classrooms, maker spaces, or family science nights, the fire-and-ice flashlight is especially powerful because it invites questions. Why does the LED get brighter when the ice is fresh? Why does voltage drop when both sides become warm? Why does clamping pressure matter? Why does a module used for cooling also generate electricity? These questions lead naturally into energy conservation, semiconductor physics, emergency preparedness, and product design.
The best experience is probably the simplest: watching people stop underestimating heat. We waste heat constantlyfrom engines, electronics, stoves, laptops, lamps, and industrial processes. Most of it disappears into the environment without doing useful work. A fire-and-ice flashlight does not solve that global problem, but it makes the idea personal. It says, “Look, even this tiny temperature difference can do something.” That is a surprisingly motivating message from a small LED sitting between a flame and a piece of ice.
In the end, the project is not only about building a flashlight. It is about building curiosity. It turns a familiar object into a conversation about energy. It makes a dramatic pair of oppositesfire and icecooperate long enough to push back the dark. And honestly, any gadget that can make thermodynamics feel like a campfire story deserves a place on the workbench.
Conclusion
A Flashlight Of Fire And Ice is more than a clever headline. It is a compact demonstration of how temperature differences can become electricity through the Seebeck effect. By heating one side of a thermoelectric module and cooling the other, a small voltage can be produced and used to power an LED. The result is part flashlight, part science lesson, part “please gather around and watch this weird thing glow.”
As a practical emergency tool, it has limits. As an educational project, it shines. It shows why thermal management matters, why LEDs are ideal for low-power lighting, and why energy conversion is never as simple as “add fire, get electricity.” The fire-and-ice flashlight is a reminder that invention often begins with a playful question: what happens if we put two opposites together and give them a circuit?