A baby’s first Christmas is a tiny holiday miracle wrapped in footed pajamas, sleepy smiles, and approximately 47 photos of the same child staring suspiciously at tree lights. It is also the perfect moment to create a keepsake that feels personal without requiring a professional art degree, a glitter-cleanup crew, or a second mortgage at the craft store. That is where “Baby’s First Christmas” silhouette ornaments shine.
These ornaments turn a simple baby profile into a timeless Christmas decoration. Instead of another generic bauble that says “First Christmas” in sparkly letters, a silhouette captures the sweet shape of your baby’s face at this exact stage: the round cheeks, tiny nose, fuzzy hair, and that unmistakable newborn softness. It is classic, sentimental, and surprisingly easy to make. Even better, silhouette ornaments work beautifully as handmade gifts for parents, grandparents, godparents, and anyone who believes a baby’s yawn counts as premium entertainment.
In this guide, we will explore what makes baby silhouette ornaments special, how to design them, the best materials to use, creative personalization ideas, safety tips, and real-life experience-based advice for making the process smoother. Whether you want a polished keepsake for your own tree or a heartfelt handmade Christmas gift, this project delivers big emotion in a very small package.
What Are “Baby’s First Christmas” Silhouette Ornaments?
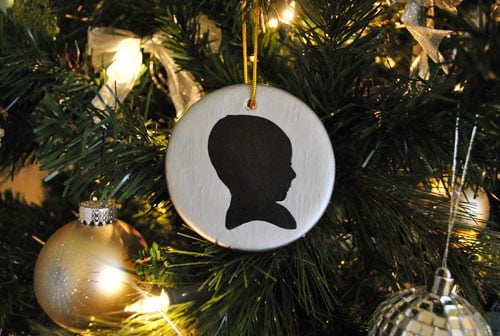
“Baby’s First Christmas” silhouette ornaments are personalized holiday keepsakes featuring the side profile, outline, or shadow-style image of a baby. The design is usually placed on wood, acrylic, ceramic, cardstock, glass, or a fillable ornament. Many include the baby’s name, birth year, Christmas year, birth stats, or a short phrase such as “Baby’s First Christmas,” “Our Little Star,” or “First Christmas 2026.”
The beauty of a silhouette is its simplicity. A black profile on a white or neutral background creates an elegant look that never really goes out of style. It feels vintage and modern at the same time, like something your grandmother would lovingly save and something you would proudly post on Instagram. A rare crafting win-win.
Why Silhouette Ornaments Feel So Meaningful
Photos are wonderful, of course, but silhouettes have a quiet charm. They reduce the image to shape and memory. The little curve of a baby’s forehead, the tiny button nose, the round chin, and even a few wisps of hair become part of the design. Years later, when your child is taller than the tree and asking for expensive electronics, that tiny profile will feel like a time capsule from a softer, sleepier season of life.
These ornaments are especially popular because they combine three things families love during the holidays: personalization, nostalgia, and handmade warmth. They are also flexible. You can make them rustic, elegant, playful, minimalist, farmhouse-inspired, or glittery enough to make Santa wear sunglasses.
Why Baby’s First Christmas Ornaments Are So Popular
Baby’s first Christmas is one of those milestone moments that parents want to preserve. The baby may not remember the holiday, but the adults absolutely will. The first tiny stocking, the first family Christmas card, the first photo beside the tree, and the first ornament all become part of a family’s holiday story.
A silhouette ornament stands apart because it is personal without being overly complicated. It can be made from a basic profile photo, customized with simple supplies, and displayed year after year. Unlike trendy decorations that may look outdated quickly, a silhouette has a classic keepsake quality.
A Keepsake That Grows More Precious Over Time
The first year with a baby can feel like a blur of bottles, blankets, laundry, and wondering whether that sound was normal. A Christmas ornament gives families a physical reminder of that wild, wonderful beginning. Each December, when the ornament comes out of storage, it brings back memories of the baby’s first holiday season: the outfit that almost fit, the family gathering where everyone wanted a turn holding the baby, and the photo session that took 80 attempts because the baby kept eating the ribbon.
Best Materials for Baby Silhouette Ornaments
The right material depends on your style, budget, and crafting confidence. Some parents love the natural look of wood slices. Others prefer clear acrylic, ceramic discs, or classic round ornaments. The best choice is one that looks beautiful, lasts well, and is safe to display around children.
Wood Slice Ornaments
Wood slices are popular for rustic and farmhouse-style Christmas decor. They feel warm, natural, and handmade. A baby silhouette can be painted, transferred, or applied with vinyl on a smooth wood slice. Add a red ribbon, twine hanger, or tiny bow for a cozy holiday finish.
Wood is also less fragile than glass, which makes it a practical option for homes with babies, toddlers, pets, or gravity-loving relatives. For the best result, choose a sanded wood slice and seal it with a clear non-toxic craft finish after the design dries.
Acrylic Ornaments
Acrylic ornaments create a clean, modern look. A black silhouette on clear acrylic can look especially elegant with white lettering or gold accents. Acrylic is lightweight and usually more durable than glass, making it a nice option for families who want a polished ornament without worrying too much about breakage.
Ceramic Ornaments
Ceramic ornaments feel traditional and gift-worthy. They are often used for professional personalized baby ornaments, but they can also be decorated with vinyl decals, paint pens, or sublimation designs if you have the right tools. Ceramic looks lovely, but it can break, so it should be hung high on the tree and stored carefully.
Glass or Fillable Baubles
Clear ornaments can hold a rolled cardstock silhouette, a small photo, ribbon, faux snow, hospital bracelet copies, or tiny paper stars. A fillable ornament turns the silhouette into a mini memory capsule. However, glass ornaments should be used with caution in homes with small children. If you love the look, consider shatter-resistant plastic instead.
Cardstock and Paper
Cardstock is affordable, easy to cut, and great for framed or layered silhouette ornaments. Use high-quality acid-free cardstock if you want the ornament to last. Black cardstock creates the traditional silhouette effect, while white, navy, gold, or blush can give the design a softer twist.
How to Make a Baby Silhouette Ornament Step by Step
You do not need to be a professional crafter to make a beautiful baby’s first Christmas silhouette ornament. The key is starting with a clear side-profile photo. Once you have the image, the rest is mostly tracing, cutting, and adding personal details.
Step 1: Take a Clear Profile Photo
Place your baby near a window or soft light source and take a side-view photo. The baby does not need to pose like a tiny Victorian poet. You simply need a clear outline of the forehead, nose, lips, and chin. A plain background helps make the profile easier to trace.
For newborns, it may be easiest to take the photo while the baby is asleep or resting in someone’s arms. For older babies, try using a toy, rattle, or dramatic parent dance routine to get them to look sideways. No judgment. Holiday crafting sometimes requires performance art.
Step 2: Convert the Photo Into a Silhouette
You can create the silhouette several ways. The simplest method is to print the profile photo, trace the outline, cut it out, and use it as a template. If you prefer digital tools, upload the image to a design program and remove the background, then adjust it into a solid shape. Cutting machines such as Cricut or Silhouette can make this step easier, especially if you want a clean vinyl decal.
When tracing, focus on the most recognizable features: forehead, nose, lips, chin, and hair outline. Do not worry about every tiny detail. A silhouette should be clean and readable, not an anatomy textbook.
Step 3: Choose the Ornament Base
Select your base before sizing the silhouette. A round ornament, wood slice, acrylic disc, or oval frame all work beautifully. Measure the usable space and scale the profile so it fits comfortably. Leave room for the baby’s name and year if you plan to add text.
Step 4: Apply the Silhouette
If using cardstock, glue the cut profile onto the ornament background with a thin layer of craft glue. If using vinyl, transfer the decal slowly and smooth out bubbles with a scraper or credit card. If painting, lightly pencil the outline first, then fill it in with a small brush and acrylic paint.
For a more refined design, place the silhouette inside an oval or circle frame shape. This gives the ornament a cameo-style look, which is perfect for a classic Christmas tree.
Step 5: Personalize the Ornament
Add the baby’s first name, full name, initials, birth date, Christmas year, or birth stats. Popular wording ideas include:
- Baby’s First Christmas
- First Christmas as Our Little One
- Our Christmas Miracle
- First Christmas 2026
- Little Star, Big Joy
- Made with Love and Very Little Sleep
Keep the text short. The silhouette should remain the star of the ornament. Too many words can make a small ornament feel crowded.
Step 6: Add Ribbon and Finishing Touches
A ribbon or twine hanger completes the ornament. Velvet ribbon looks elegant, gingham feels farmhouse, satin looks classic, and baker’s twine adds a playful handmade touch. You can also add a tiny charm, bell, bow, or date tag.
Seal painted or paper designs with a protective craft sealer if the material allows. Let everything dry completely before packing, gifting, or hanging on the tree.
Design Ideas for “Baby’s First Christmas” Silhouette Ornaments
One of the best things about silhouette ornaments is how easy they are to customize. A simple profile can become sweet, stylish, funny, sentimental, or heirloom-worthy depending on the colors, materials, and details you choose.
Classic Black and White Silhouette
This is the traditional choice for a reason. A black baby profile on a white background looks timeless. Add the baby’s name in a simple script font and the year in a small serif font. The result is clean, elegant, and easy to match with any Christmas decor.
Gold and Cream Keepsake Ornament
For a warmer look, use a cream background with gold lettering and a black or dark brown silhouette. A velvet ribbon in ivory, burgundy, or forest green makes it feel luxurious without being over-the-top.
Rustic Wood Slice Silhouette
Apply a black silhouette to a natural wood slice and add white lettering. This style pairs beautifully with farmhouse Christmas decor, plaid ribbon, dried orange garlands, and pinecones. It also makes a lovely handmade gift for grandparents.
Clear Acrylic Modern Ornament
Use a clear acrylic disc with a black silhouette and white lettering. Add a metallic ribbon for a modern look. This design photographs beautifully and works well on trees decorated with neutral, silver, or minimalist ornaments.
Memory Capsule Ornament
Place a small silhouette inside a clear fillable ornament along with curled ribbon, faux snow, tiny paper hearts, or a copy of the baby’s birth stats. You can also include a small strip of paper with a handwritten note from the parents.
Sibling Silhouette Set
If the baby has siblings, make matching silhouette ornaments for each child. Displaying them together creates a sweet family tradition. You can make a new one each year and watch how the profiles change over time.
Personalization Details That Make the Ornament Special
A baby silhouette is already meaningful, but thoughtful details make it even better. The secret is to personalize without cluttering. Think of the ornament as a tiny story, not a holiday résumé.
Add the Baby’s Name and Year
The simplest and most useful detail is the baby’s name and Christmas year. Years later, nobody has to squint at the ornament and ask, “Was this 2025 or the year we all had matching pajamas and regrets?”
Include Birth Stats
Some parents like to add birth date, weight, length, and time of birth. This works best on larger ornaments or on the back side. If the front design is small, keep the silhouette and name on the front, then place the birth stats on the back.
Use Handwriting
A handwritten name or note from a parent can make the ornament feel incredibly personal. You can write directly on the back with a fine paint pen or scan handwriting and turn it into a small vinyl decal.
Add a Tiny Photo on the Back
For families who cannot choose between a photo ornament and a silhouette ornament, use both. Put the silhouette on the front and a tiny printed photo on the back. It becomes a two-sided keepsake that captures both the baby’s profile and their full holiday cuteness.
Safety Tips for Displaying Baby Christmas Ornaments
Sentimental ornaments are wonderful, but safety matters, especially when babies and toddlers are nearby. Choose sturdy materials when possible, avoid sharp edges, and keep small pieces, hooks, glass, and breakable ornaments out of reach.
If your ornament includes beads, bells, charms, or detachable decorations, hang it high on the tree. Avoid placing delicate ornaments on lower branches where little hands can grab them. Babies are adorable, but their ornament-review process often involves pulling, chewing, and gravity testing.
Use ribbon loops instead of sharp metal hooks when possible. For homes with crawling babies or curious pets, consider shatter-resistant acrylic, wood, or plastic ornaments. Store keepsake ornaments in a labeled box with tissue paper or soft wrapping so they last for future Christmases.
Gift Ideas Using Baby Silhouette Ornaments
A personalized baby silhouette ornament makes a beautiful Christmas gift because it feels intimate and thoughtful. It is especially meaningful for grandparents, aunts, uncles, godparents, and close family friends.
Grandparent Gift Set
Create two or three matching ornaments with slightly different ribbons. Package each in a small kraft box with tissue paper and a handwritten tag. Grandparents love gifts that say, “Here is your grandbaby, preserved in ornament form, please enjoy crying near the tree.”
New Parent Christmas Gift
If you are making the ornament for new parents, include a small note explaining how the silhouette was created. Parents will appreciate the thought behind the keepsake, especially during a season when they may be too tired to make one themselves.
Baby Shower or Holiday Announcement Gift
For babies born close to Christmas, a silhouette ornament can also work as a holiday birth announcement. Add the baby’s name and birth date, then give it to family members as a surprise keepsake.
Common Mistakes to Avoid
Silhouette ornaments are simple, but a few small mistakes can affect the final look. Fortunately, they are easy to avoid.
Using a Blurry Profile Photo
The silhouette is only as good as the outline. Use a clear side-view photo with good lighting. If the baby’s face blends into the background, tracing becomes harder and the final shape may look less recognizable.
Making the Design Too Small
Tiny details disappear on small ornaments. Make the silhouette large enough to see from a short distance. If you want to include lots of information, put extra details on the back.
Choosing Too Many Fonts
One or two fonts are enough. A script font for the name and a simple font for the year usually works well. Too many fonts can make the ornament look busy.
Skipping Drying Time
Paint, glue, and sealer need time to dry. Rushing the process can cause smudges, peeling, or stuck packaging. Give the ornament several hours, or overnight if possible, before wrapping it.
How to Store Baby’s First Christmas Silhouette Ornaments
A keepsake ornament deserves careful storage. Wrap it in acid-free tissue paper, soft cloth, or bubble wrap. Place it in a small box labeled with the child’s name and year. If you make several keepsake ornaments over the years, consider using a divided ornament storage container.
Keep the ornament away from damp areas, extreme heat, and direct sunlight. Paper and photos can fade over time, while wood may warp if stored in humid conditions. A little care now means the ornament can become part of your family’s Christmas tradition for decades.
Experience-Based Tips for Making “Baby’s First Christmas” Silhouette Ornaments
Making a baby silhouette ornament sounds peaceful in theory. In practice, it may involve a baby who refuses to look sideways, a parent covered in craft glue, and a dog walking off with the ribbon. The good news is that the imperfect moments often become part of the memory.
One of the best experiences related to making these ornaments is the photo-taking stage. It seems simple: take a side profile of the baby. But babies are famously uninterested in artistic direction. The trick is to work around their rhythm. Try taking the photo after a feeding, during a calm moment, or while the baby is staring at holiday lights. If the baby is sleepy, even better. A relaxed baby profile often creates the sweetest silhouette.
Another helpful lesson is to make more than one version. The first cutout may not be perfect, and that is completely normal. Print or trace two or three sizes before choosing the final one. Sometimes the slightly larger profile looks better on a round ornament, while a smaller one works beautifully inside an oval frame. Crafting is much less stressful when you give yourself permission to test.
For families making ornaments as gifts, assembly-line crafting can save time. Prepare all the bases first, then cut all the silhouettes, then add names and ribbons. This keeps the project organized and prevents the classic “Where did I put the baby’s nose?” problem that can happen when tiny paper pieces are involved.
Parents often find that the back of the ornament becomes just as meaningful as the front. A small handwritten note such as “Your first Christmas was full of cuddles, lights, and very little sleep” can turn a pretty ornament into a true family treasure. Even a short message captures the emotion of that first holiday season.
Another real-world tip is to choose durability over drama. Glitter, glass, and tiny charms look beautiful, but they are not always practical in a home with babies. Wood, acrylic, cardstock inside a sealed ornament, or shatter-resistant plastic can still look gorgeous while being easier to manage. The ornament does not need to be fragile to feel special.
Finally, remember that handmade does not mean flawless. A slightly uneven ribbon, a tiny paint wobble, or a silhouette that captures one little cowlick too honestly can make the ornament more personal. Years from now, the charm will not come from perfection. It will come from remembering how small your baby was, how full your heart felt, and how magical that first Christmas seemed.
Conclusion
“Baby’s First Christmas” silhouette ornaments are more than holiday decorations. They are tiny keepsakes that capture a once-in-a-lifetime season. With a simple profile photo, a thoughtful ornament base, and a few personal details, you can create something that feels elegant, emotional, and deeply personal.
Whether you choose wood, acrylic, ceramic, cardstock, or a fillable bauble, the heart of the ornament is the same: preserving the sweet outline of your baby during their first Christmas. Hang it high, store it carefully, and bring it out every year as part of your family’s holiday tradition. One day, that little baby may roll their eyes at the sentimental story behind it. Hang it anyway. That is your official parental right.
Note: For safety, keep all ornaments with small parts, sharp edges, ribbons, hooks, or breakable materials out of reach of babies and young children.