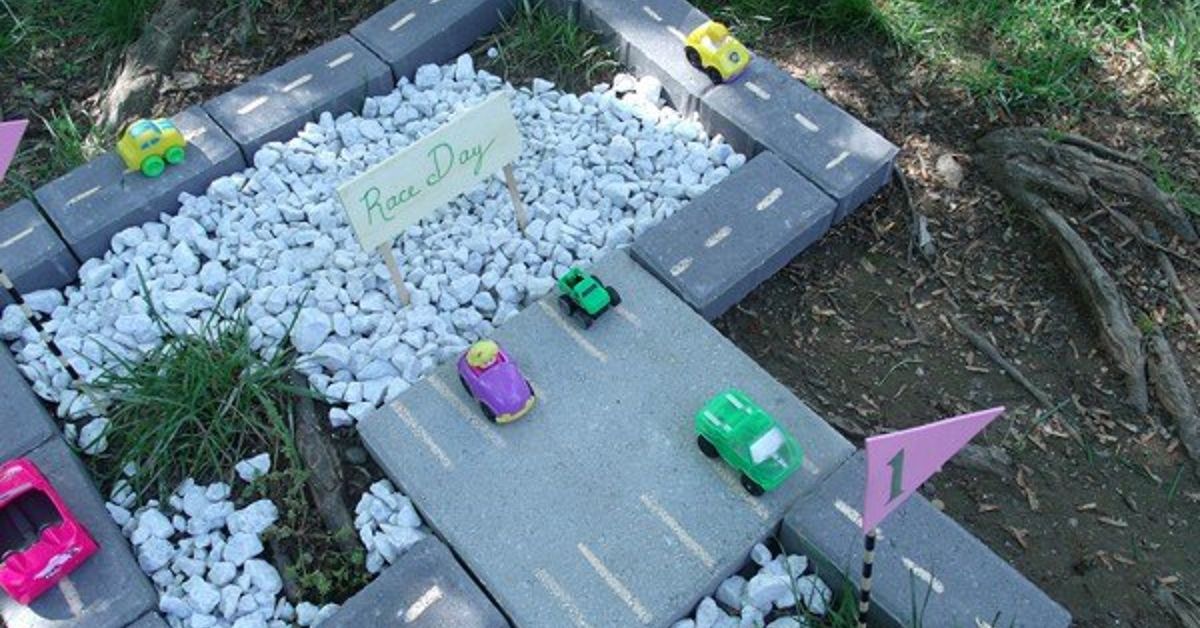
Some backyards have patios. Some have gardens. Some have a lonely folding chair slowly becoming one with the weather. But with a little planning, a few basic tools, and a healthy respect for drainage, your yard can become something far more exciting: a DIY backyard racetrack.
Before anyone imagines a NASCAR-grade oval squeezing between the tomato plants and the dog’s favorite digging zone, let’s define the idea. A backyard racetrack can be a small loop for ride-on toys, pedal cars, balance bikes, scooters, RC cars, or even a low-speed bicycle skills track. It is not a place for high-speed motorized vehicles unless you have serious acreage, professional grading, local approval, noise tolerance from neighbors, and possibly a lawyer who answers texts quickly.
The beauty of a backyard race track is that it can be simple, affordable, and wildly fun. It can be made from compacted soil, gravel, mulch, pavers, turf, rubber mats, or a mix of materials. It can include painted lanes, small berms, cones, pit stops, start lines, and funny signs that say “Speed Limit: Dad Jogging.” Done well, it becomes a play area, outdoor activity zone, and landscaping feature all in one.
What Is a DIY Backyard Racetrack?
A DIY backyard racetrack is a custom path or loop built in a residential yard for safe, repeatable movement. That movement might be kids riding bikes, toddlers pushing toy trucks, parents racing remote-control cars, or a family inventing weekend competitions that somehow always end with someone yelling, “Best two out of three!”
The most popular backyard racetrack styles include:
- Kids bike track: A compact loop for balance bikes, scooters, and pedal bikes.
- RC car track: A dirt or gravel course with lanes, jumps, turns, and barriers.
- Ride-on toy track: A smooth path for plastic cars, wagons, tricycles, and small electric ride-ons.
- Garden racetrack path: A decorative loop that doubles as a walkway.
- Mini pump-style track: A low, rolling bike course with gentle mounds and bermed turns.
The best version depends on your yard size, soil type, weather, users’ ages, and how much maintenance you are willing to do. Be honest here. If you do not enjoy raking gravel, do not build a design that requires weekly gravel grooming like it’s a tiny golf course with an attitude problem.
Step 1: Choose the Right Location
Start with a flat or gently sloped area that is visible from the house. Visibility matters, especially for kids. A track tucked behind a shed may feel adventurous, but supervision becomes harder, and “I only crashed a little” becomes the official family injury report.
Look for these features:
- Good sightlines from a patio, kitchen window, or seating area
- Natural drainage away from the house and garage
- Enough clearance from fences, trees, fire pits, grills, steps, and garden beds
- A surface that can be leveled without major excavation
- Room for safe stopping zones near the start and finish
Avoid building the track where water already pools after rain. Standing water ruins compacted surfaces, turns dirt into pudding, and creates a mosquito lounge with bottle service. If the only available area is damp, solve drainage first with grading, gravel base layers, French drains, or a small rain garden nearby.
Step 2: Pick a Track Design That Fits Your Yard
A backyard racetrack does not need to be huge. In fact, smaller tracks are often better because they are easier to maintain and safer for younger riders. A compact loop can still feel exciting if it includes curves, lane changes, a tunnel effect through plants, or a “pit stop” area.
Simple Oval Track
The oval is the easiest layout. It works well for RC cars, toddlers, ride-on toys, and beginner bike riders. Use two straightaways with rounded turns at both ends. This layout is simple to mark, easy to mow around, and friendly for parents who do not want to spend three weekends arguing with geometry.
Figure-Eight Track
A figure-eight layout feels more dynamic, but it needs careful planning. Avoid real crossing points for kids on bikes or scooters. Instead, create a painted “pretend bridge,” use cones to guide traffic, or make one loop purely decorative. For RC cars, a crossover jump can be fun, but only if there is enough space and a soft landing area.
Winding Road Track
A winding track looks natural in a landscape and works beautifully around trees, flower beds, or seating areas. Curves slow riders down, which is good for safety. The trick is to keep turns wide enough so bikes, scooters, or toy cars do not tip every three seconds like a shopping cart with one dramatic wheel.
Mini Skills Track
For older kids or bike-loving families, a mini skills track can include low rollers, gentle berms, and wide turns. Keep features small and progressive. The goal is confidence, not launching a child into low orbit.
Step 3: Decide on Track Width
Track width depends on the main user. For RC cars, lanes of 3 to 5 feet can work. For kids on bikes or scooters, aim for 4 to 6 feet wide where possible. For ride-on toys and tricycles, 3 to 4 feet is usually comfortable. Wider turns are always better than narrow ones because turning is where most slow-motion backyard disasters begin.
Leave buffer space around the track. Keep hard objects, raised edging, furniture, planters, and walls away from the outer edge. If children will use the track, soft borders such as grass, rubber mulch, wood chips, or low plantings are safer than stone corners or metal stakes.
Step 4: Choose the Best Surface Material
The track surface controls speed, maintenance, drainage, and comfort. There is no single perfect material, but there is probably a best material for your yard and budget.
Compacted Dirt
Compacted dirt is affordable and excellent for RC cars and bike skills tracks. It can be shaped into berms and rollers, and it feels natural. However, it gets muddy in wet weather, dusty in dry weather, and bumpy if roots or weeds take over. Clay-heavy soil can compact well, while sandy soil may need amendments or a stabilizing top layer.
Crushed Stone or Decomposed Granite
Crushed stone and decomposed granite make a durable, attractive backyard race track surface. They drain better than plain dirt and can be compacted into a firm path. Use edging to keep loose material from spreading into the lawn. This surface is great for RC cars, walking paths, garden tracks, and some ride-on toys, but it may be too rough for tiny plastic wheels.
Pea Gravel
Pea gravel looks friendly and drains well, but it shifts under wheels. It is better for decorative track borders, walking areas, or low-speed play than for bikes or scooters. If you use pea gravel, install solid edging and keep the layer shallow enough to avoid wheel sink.
Pavers
Pavers create a clean, smooth, long-lasting racetrack. They are great for ride-on toys, scooters, and garden-style paths. The downside is cost and installation time. A proper paver base usually includes compacted gravel, bedding sand, and joint sand. If you rush the base, the track may settle unevenly and become the world’s tiniest off-road course.
Rubber Pavers or Mats
Rubber surfaces can be helpful in play zones, especially near stopping areas or around features. They are softer than stone and can reduce impact from falls. They cost more, but strategic use at corners, start zones, and pit areas can improve comfort and safety.
Artificial Turf
Artificial turf can create a neat, low-mud track, especially for toy cars and imaginative play. It requires a prepared base and drainage layer to avoid wrinkles, puddles, and odor issues. It is not ideal for fast RC cars unless the vehicle is designed for that type of surface.
Step 5: Plan Drainage Before You Build Anything Fun
Drainage is the unglamorous hero of every good DIY backyard racetrack. Nobody cheers for drainage, but everyone complains when it fails. A track should never send water toward your home, garage, basement, neighbor’s yard, or prize hydrangeas.
Use a slight slope so water moves off the track. For gravel or paver-style tracks, a compacted base helps prevent rutting and settling. For dirt tracks, shape the surface so water sheds to the side instead of sitting in the racing line. On a loop track, avoid creating a low “bowl” in the center unless you want a surprise pond called Lake Bad Planning.
Good drainage ideas include:
- Building the track slightly higher than the surrounding lawn
- Adding a compacted gravel base beneath loose surfaces
- Creating shallow swales along the outside edge
- Using permeable materials that allow rain to soak into the ground
- Directing runoff toward a rain garden or planted area
Step 6: Mark the Layout
Before digging, mark the track with garden hoses, rope, landscape paint, flour, or temporary flags. Walk it. Push a toy car around it. Ride a bike slowly through it if the design is for bikes. Stand back and look at it from the house. Then adjust.
This preview step saves time because tracks often look great on paper and weird in the yard. A turn may be too tight. A straightaway may aim directly at the grill. A “cute little loop” may accidentally trap the lawn mower like a mechanical goat in a maze.
Once the layout feels right, mark the outer and inner edges clearly. Measure the width in several spots. Curves should be wider than straight sections because riders naturally drift outward.
Step 7: Excavate and Build the Base
For gravel, decomposed granite, or paver tracks, remove grass and topsoil from the marked area. A depth of 4 to 6 inches is common for a stable path, depending on your surface and soil. Remove roots, rocks, and soft organic material. Compact the soil before adding base material.
A basic gravel-style build may include:
- Excavate the track area.
- Compact the exposed soil.
- Install landscape fabric if appropriate for weed control and separation.
- Add crushed stone or paver base in layers.
- Compact each layer thoroughly.
- Add the final surface material.
- Rake, level, and compact again.
Do not dump all the base material at once and hope gravity becomes your contractor. Layering and compaction are what make the track firm instead of squishy.
Step 8: Install Edging
Edging keeps the racetrack from slowly migrating into the lawn. Metal, plastic, brick, stone, pressure-treated lumber, and composite edging can all work. Choose the material based on the track type and user age.
For kids, avoid sharp corners, exposed stakes, or raised edges that can catch wheels. For RC tracks, flexible drainage pipe, landscape timbers, or low plastic barriers can define lanes. For a garden-style track, brick or stone edging looks polished, but keep it outside the main fall zone.
Good edging should be visible, stable, and low enough not to become a hazard. It should also follow curves smoothly. Nothing says “homemade chaos” like an oval track with corners shaped like a nervous octagon.
Step 9: Add Racing Features
Now comes the fun part. Add features based on the track’s purpose.
For Kids
- Painted start and finish lines
- Traffic signs made from scrap wood
- A pit stop with a bench and water bottles
- Cones for slalom practice
- Chalkboard lap counter
- Soft borders near turns
For RC Cars
- Low dirt jumps
- Banked turns
- Drainage pipe lane dividers
- Timing gate or start box
- Short technical section
- Wide straightaway for controlled speed
For Bikes and Scooters
- Gentle rollers
- Wide sweeping turns
- Skill zones for braking and balance
- Painted arrows for one-way traffic
- Rest area away from the riding line
Keep features proportional. Backyard tracks are more enjoyable when riders can complete laps smoothly. Too many obstacles make the track frustrating, and frustration is when people start cutting corners through your flower bed.
Safety Tips for a Backyard Race Track
Safety is not the boring section. Safety is what keeps the track open instead of turning it into “that thing we built before the incident.”
- Use helmets for bikes, scooters, and ride-on toys.
- Keep traffic moving in one direction.
- Separate RC cars from children walking or riding.
- Avoid hard obstacles near curves and stopping zones.
- Inspect the track after rain.
- Do not build steep jumps for beginners.
- Keep lighting adequate if the area is used near dusk.
- Check local rules, HOA restrictions, and noise limits before building a large or motorized track.
If the track is for young children, soft surfacing around play zones is worth the effort. Wood chips, mulch, sand, pea gravel, rubber mats, and rubber-like materials are commonly used around play equipment because they are more forgiving than concrete, asphalt, or compacted stone. Even if your track is not a playground, the same thinking applies: hard surfaces make falls harder.
Budget-Friendly DIY Backyard Racetrack Ideas
You can build a backyard racetrack on a surprisingly flexible budget. A painted grass track may cost almost nothing. A compacted gravel loop with edging costs more but lasts longer. A paver racetrack can look beautiful, but it may require the kind of budget conversation that begins with, “So, technically, this is landscaping.”
To save money, use the existing shape of your yard. Natural slopes can become gentle downhill sections. Existing trees can frame the course. Leftover pavers can become the start line. Scrap lumber can become signs, curbs, or pit walls. Old traffic cones, pool noodles, and garden stakes can become temporary barriers.
One smart approach is to build in phases. Start with a simple marked loop. Use it for a few weekends. Watch where people naturally ride, where water collects, and which turns feel awkward. Then upgrade the surface, install edging, or add features. This prevents expensive mistakes and gives your family time to decide what kind of track they actually enjoy.
Maintenance: Keeping the Track Race-Ready
A backyard track is not a “build it and forget it” project. Fortunately, maintenance is usually simple if the base and drainage are done well.
- Rake gravel or dirt surfaces after heavy use.
- Top up low spots before they become puddles.
- Pull weeds along edges.
- Check edging for loose stakes or shifting boards.
- Trim nearby plants so sightlines stay clear.
- Repaint lane markings and signs as needed.
- Inspect jumps, rollers, and berms for erosion.
Seasonal maintenance matters too. In spring, repair winter damage and recompact soft areas. In summer, control dust with light watering if appropriate. In fall, clear leaves before they decompose into slippery track soup. In winter, avoid using the track when freeze-thaw cycles make the surface unstable.
Design Examples for Different Backyards
Small Suburban Yard
Build a narrow oval around a central lawn patch. Use painted grass lanes or compacted decomposed granite. Add a start line near the patio and a small pit stop bench. Keep features minimal so the yard still works for normal life, like grilling, gardening, and pretending you will someday organize the storage shed.
Medium Family Yard
Create a winding loop around play equipment, a sandbox, or garden beds. Use mulch or gravel borders and solar path lights. Add cones and signs that can be moved for different race days. This layout works well because the track becomes part of the backyard design instead of looking like a temporary construction accident.
Large Yard
Consider an RC dirt track or mini bike skills loop with wider turns, gentle berms, and a separate spectator area. Use the natural grade of the land, but manage runoff carefully. Large tracks are more fun but also require more maintenance, so build only what you can realistically care for.
Common Mistakes to Avoid
The first mistake is making the track too complicated. A simple loop that everyone uses beats an elaborate layout that only works for one person and a very specific remote-control truck.
The second mistake is ignoring drainage. Water will always reveal shortcuts. If the base is weak, the slope is wrong, or the surface traps runoff, rain will expose the problem like a home improvement detective.
The third mistake is using unsafe borders. Raised bricks, sharp metal edging, and exposed stakes may look tidy, but they can be risky near active play. Use soft transitions whenever possible.
The fourth mistake is skipping the test phase. Temporary layouts are your friend. Mark the course, use it, revise it, then build. Your first design is rarely your best design, and that is perfectly normal.
Extra Experiences: Lessons From Building and Using a DIY Backyard Racetrack
The best backyard racetrack experiences usually start with a simple idea and quickly become a family tradition. At first, the project may look like a weekend task: mark a loop, dig a little, spread some gravel, and call it done. But once people start using the track, you learn things no drawing can teach.
One of the first lessons is that riders create their own racing line. You might design a perfect curve, but kids, bikes, scooters, and RC cars will naturally drift to the easiest route. Watch the first few laps closely. If everyone cuts across the same corner, the turn is probably too tight or the lane is not obvious enough. Instead of fighting the behavior, adjust the track. Good design listens to users, even when those users are seven years old and wearing one sock.
Another experience is that speed increases over time. On day one, everyone moves carefully. By day five, the track has a champion, a rival, and someone claiming the rules were “never officially explained.” This is why the original design should include generous stopping zones and wide turns. A track that feels almost too easy at first often becomes perfect as confidence grows.
Maintenance also becomes part of the rhythm. A dirt RC track may need reshaping after rain. A gravel track may need raking where wheels push material outward. Painted grass lines fade and need refreshing. Instead of treating maintenance as a chore, make it part of race day. Kids can help reset cones, sweep pavers, pull weeds, or repaint signs. Suddenly, yard work has a scoreboard.
Neighbors are another real-world factor. A backyard racetrack can attract attention, especially if RC cars are buzzing around or kids are holding dramatic championship ceremonies. A friendly conversation helps. Let neighbors know the track is for daytime play, not midnight Grand Prix practice. If noise is a concern, set family rules for hours and vehicle types. A little courtesy keeps the fun from becoming a neighborhood committee agenda item.
Weather teaches the most expensive lessons. After the first heavy rain, walk the track before anyone uses it. Look for puddles, washed-out edges, soft spots, and places where gravel has moved. These clues show where to add base material, improve slope, or redirect water. Fixing small issues early prevents bigger repairs later.
The most satisfying experience is watching the backyard become more useful. A racetrack gives people a reason to go outside. It encourages movement, creativity, friendly competition, and hands-on play. It can be a bike loop in the morning, an RC course in the afternoon, and a chalk-decorated parade route by evening. Few backyard projects offer that much personality for the price of some planning, sweat, and a few questionable victory dances.
Conclusion
A DIY backyard racetrack is one of those rare projects that blends landscaping, play, creativity, and practical outdoor design. It can be as simple as a painted grass loop or as polished as a compacted gravel path with edging, signs, lighting, and a pit stop. The key is to build for your real users, real yard, and real maintenance habits.
Start with a safe location, plan the layout carefully, solve drainage early, choose the right surface, and keep features age-appropriate. Test before committing, build in phases, and leave enough room for mistakes, laughter, and the occasional dramatic photo finish. With the right approach, your backyard race track will not just be a weekend project. It will become the place where ordinary afternoons turn into tiny championships.
Note: This guide is intended for low-speed backyard play, RC cars, pedal toys, scooters, and beginner-friendly bike use. For motorized vehicles, major grading, electrical lighting, or permanent hardscape construction, check local building rules, HOA guidelines, utility locations, and professional safety recommendations before starting.