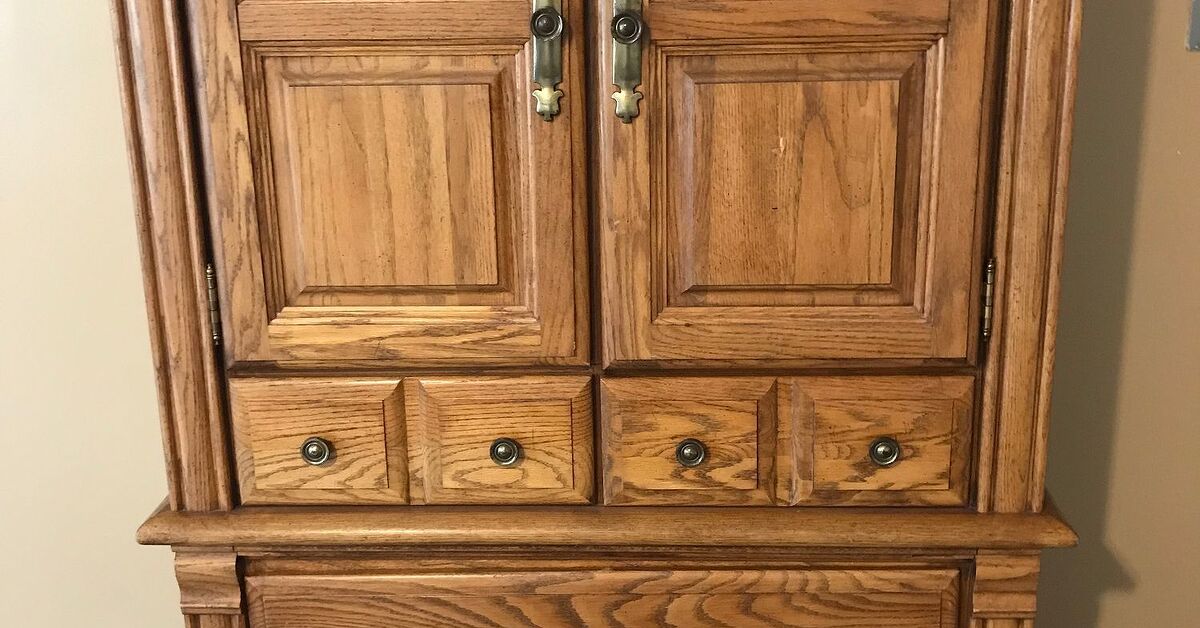
An old wooden hutch can have a strangely convincing talent for making an entire dining room look twenty years older. Maybe the finish is orange, the hardware is shiny brass in all the wrong ways, or the shelves have collected enough scratches to qualify as a historical record. Before hauling that bulky piece to the curb, however, consider what paint, thoughtful prep, and a few inexpensive updates can accomplish.
A farmhouse hutch makeover is one of those DIY projects where the before-and-after photos can look wildly disproportionate to the budget. The structure stays the same, but a warm white, muted greige, soft sage, charcoal, or two-tone wood-and-paint finish can turn dated furniture into an intentional focal point.
The best results do not come from attacking the cabinet with a paintbrush five minutes after bringing it home from the thrift store. Successful furniture makeovers depend on cleaning, repairing, sanding or deglossing where appropriate, priming troublesome surfaces, applying thin coats, and allowing finishes enough time to dry and cure.
Why an Old Hutch Is Perfect for a Farmhouse Makeover
Farmhouse decorating works especially well with older furniture because the style is comfortable with visible history. You do not need a flawless factory finish. Small dents, worn corners, traditional moldings, paneled doors, turned feet, and vintage proportions can actually make the finished piece more interesting.
A hutch is also unusually flexible. Depending on its size and layout, an outdated china cabinet can become a dining-room display cabinet, coffee station, kitchen pantry, linen cupboard, craft organizer, home bar, or living-room bookcase.
The goal is not necessarily to disguise the age of the piece. A better approach is to make its age look deliberate.
Farmhouse Hutch Makeover: The Before Assessment
Before choosing paint, inspect what you actually have. This ten-minute evaluation can prevent several hours of unnecessary sanding and a few regrettable encounters with wood filler.
Check the Structure First
Open every door and drawer. Check the back, shelves, legs, hinges, and joints. Tighten loose screws and make sure the cabinet sits reasonably level. Cosmetic problems are easy to fix; serious structural problems deserve attention before decorating begins.
Look for loose veneer, cracked trim, missing knobs, deep scratches, water damage, and holes left from old hardware.
Decide What Should Stay Wood
Do not automatically paint every square inch. A beautiful solid-wood top, interior shelf, or backing panel can provide welcome warmth against a painted cabinet.
One of the most convincing modern farmhouse combinations is a painted body with a natural or stained wood top. The contrast keeps the finished hutch from looking like one enormous block of paint.
Look at the Existing Finish
A glossy or slick finish usually needs more preparation than a dull, previously painted surface. Cleaning and light scuff-sanding help provide a better surface for primer or paint to grip.
If you are dealing with genuinely old painted furniture and do not know what coatings are present, avoid aggressively sanding unknown finishes. Appropriate testing and professional guidance may be sensible before disturbing them.
Supplies for a DIY Farmhouse Hutch Makeover
Your exact list depends on the condition of the hutch, but a typical project may require:
- Drop cloth or protective floor covering
- Screwdriver or drill for removing hardware
- Mild cleaner or appropriate pre-paint cleaner
- Clean lint-free rags
- Wood filler and putty knife
- Sanding sponges or fine-to-medium sandpaper
- Dust mask and eye protection for sanding
- Quality bonding or stain-blocking primer when needed
- Furniture, cabinet, trim, mineral, milk, or chalk-style paint
- Quality angled paintbrush
- Small smooth-finish foam or microfiber roller
- Optional glaze or antiquing product
- Optional clear protective finish or furniture wax
- Replacement knobs or pulls
Work in a properly ventilated area and follow the safety, application, drying, and curing directions supplied with every product you use.
Step 1: Disassemble Before You Paint
Remove knobs, pulls, drawers, adjustable shelves, and any easily removable doors. Put screws and hardware into labeled containers rather than forming the traditional DIY organization system known as “a mysterious pile somewhere on the garage floor.”
Label doors and drawers if several pieces look similar. Taking a few before photos is useful too, both for reassembly and for appreciating just how dramatic the transformation becomes.
Step 2: Clean the Hutch Thoroughly
Old furniture collects furniture polish, fingerprints, cooking residue, dust, and grime. Painting directly over that layer is asking the new finish to stick to dirt instead of the cabinet.
Clean according to the paint manufacturer’s preparation instructions, especially around handles, door edges, shelves, and the top. Remove cleaner residue if required and let the furniture dry completely.
This is not the glamorous part of a DIY hutch makeover, but it is one of the most important.
Step 3: Repair Scratches, Holes, and Loose Details
Use wood filler for unwanted holes, gouges, or damaged areas that you want to disappear. This is particularly useful when replacing hardware with pulls that require different screw spacing.
Once the filler dries, sand the repair flush with the surrounding surface. Reattach loose trim and address damaged joints before moving forward.
Do not erase every imperfection automatically. If you want authentic farmhouse character, a few shallow dents can add personality. There is a difference between charmingly aged and “did this cabinet fall down the stairs?”
Step 4: Sand or Degloss for Better Adhesion
For many painted furniture projects, the purpose of sanding is not to remove every trace of the original finish. Light sanding can simply dull a slick surface and create a better foundation for the next coating.
Work evenly, paying attention to glossy edges and frequently touched areas. After sanding, vacuum or wipe away the dust carefully. Dust left on the surface can create bumps and interfere with a smooth finish.
Some specialty furniture paints require less preparation than conventional coatings, but “less prep” should never be interpreted as “paint directly over pancake syrup and hope for the best.” Follow the instructions for the specific system you choose.
Step 5: Prime When the Surface Calls for It
Primer is particularly valuable when the hutch has dark stain, repaired areas, bare wood, stubborn discoloration, a very slick finish, or an extreme color change.
A bonding primer can improve adhesion, while an appropriate stain-blocking primer can help prevent discoloration from migrating through pale paint.
Apply primer in thin, controlled coats. Use a brush in corners, moldings, and decorative details and a small smooth roller on broad flat areas. Lightly smoothing the properly dried primer, when the product directions permit it, can produce an even better foundation.
Step 6: Choose a Farmhouse Paint Color That Will Age Well
White remains popular, but farmhouse furniture does not have to be refrigerator white. Slightly softened colors usually produce a more relaxed effect.
Warm White
Warm white makes a large hutch feel lighter and works especially well with natural wood, woven baskets, iron accents, pottery, and neutral dining rooms.
Greige or Putty
A beige-gray or putty shade feels warmer than cool gray and often blends well with both traditional and contemporary furniture.
Muted Sage Green
Soft green introduces color without overwhelming a room. Pair it with wood tones, cream ceramics, aged-looking metal hardware, and natural fibers.
Deep Charcoal or Near-Black
A dark farmhouse hutch can be surprisingly elegant. Black or charcoal emphasizes traditional moldings and can make pale dishes and glassware stand out dramatically.
Two-Tone Paint and Wood
Paint the cabinet while leaving the top or interior shelves wood-toned. This option is ideal when part of the original timber is attractive enough to feature.
Step 7: Paint the Hutch in Thin Coats
Start with detailed areas using an angled brush, then cover large flat surfaces with a small smooth roller if that application method suits your paint.
Thin coats generally produce a neater result than one heroic coat applied with the enthusiasm of someone trying to finish before dinner.
Watch corners and molding for drips. Inspect doors horizontally and vertically because runs have an irritating habit of hiding until the paint starts setting.
Allow each coat to dry according to the manufacturer’s directions before recoating. Depending on the color and product, a second coat may provide richer, more consistent coverage.
Step 8: Add Controlled Distressing for Farmhouse Character
Distressing should imitate natural wear rather than random destruction. Focus on places that hands and objects would realistically touch over decades:
- Door edges
- Raised molding
- Drawer corners
- Areas around knobs and pulls
- Outside corners
- Decorative trim
Lightly expose the underlying layer in selected areas instead of sanding every edge equally. Step away regularly and look at the entire cabinet. It is much easier to distress a little more than to put paint back after an enthusiastic sanding session.
If you prefer a cleaner modern farmhouse hutch makeover, skip distressing altogether. Matte or satin paint, simple hardware, and natural accessories can deliver farmhouse warmth without intentionally worn edges.
Step 9: Change the Hardware
Hardware is the jewelry of furniture, except nobody has to remember where they put the tiny velvet box.
Changing dated knobs and pulls can significantly alter the perceived age of a hutch. Popular farmhouse options include matte black, aged brass, antique-style bronze, simple wooden knobs, and understated cup pulls.
Choose hardware that complements the proportions of the cabinet. A delicate vintage hutch can look awkward with oversized industrial handles, while a substantial cabinet may need something stronger than tiny decorative knobs.
Step 10: Protect the Finish and Let It Cure
Whether an additional protective finish is necessary depends on the paint system and how heavily the hutch will be used. Chalk-style finishes commonly use compatible waxes or clear coats, while other furniture or cabinet paints may be designed to perform without a separate sealer.
Shelves, tops, and serving surfaces generally experience more wear than decorative sides, so consider durability when selecting your finishing system.
Most importantly, distinguish between dry and fully cured. A surface can feel dry while the coating underneath is still developing hardness. Reinstall hardware carefully and avoid immediately loading freshly painted shelves with a complete stoneware collection.
Farmhouse Hutch Before and After: What Actually Changes?
| Before | After |
|---|---|
| Heavy orange or dark finish | Warm neutral, soft color, or intentional wood contrast |
| Scratched, neglected surface | Clean and visually consistent finish |
| Dated hardware | Simple farmhouse-style knobs or pulls |
| Furniture that dominates the room | Piece that coordinates with surrounding decor |
| Unused china storage | Flexible pantry, coffee bar, display, or storage cabinet |
How to Style the Finished Farmhouse Hutch
Do not immediately fill every shelf. Leaving negative space lets the newly painted background and architectural details remain visible.
Start with several larger objects rather than dozens of tiny decorations. Try white dishes, stoneware bowls, cutting boards, glass jars, woven baskets, cookbooks, small plants, or vintage-looking pitchers.
Mix materials. Painted wood looks richer beside ceramic, clear glass, warm timber, woven fibers, and understated metal.
If the hutch has glass doors, remember that everything behind them becomes part of the display. Closed lower cabinets are excellent hiding places for less photogenic necessities. Nobody needs to know that the gorgeous farmhouse cabinet contains three mismatched food-storage lids and a waffle maker.
Common Farmhouse Hutch Makeover Mistakes
Skipping Cleaning
Paint cannot compensate for grease and residue beneath it. Preparation directly affects the quality of the final surface.
Using Heavy Paint Coats
Thick coats can produce drips, ridges, extended drying times, and soft areas. Build coverage gradually.
Distressing Everywhere
Natural wear is irregular. Identical sanding around every corner tends to look manufactured rather than genuinely aged.
Reassembling Too Soon
Fresh paint can stick where doors, shelves, and drawers contact one another. Respect product drying and curing instructions.
Trying to Make Every Farmhouse Element Rustic
A distressed cabinet, distressed sign, distressed table, galvanized everything, and twelve decorative roosters can turn “farmhouse” into “barn-themed gift shop.” Balance vintage character with simple, clean accessories.
Three Alternative Farmhouse Hutch Makeover Ideas
1. White Exterior With a Wood Interior
Use pale paint on the frame while allowing attractive interior wood to remain visible. The darker background adds depth and prevents an all-white cabinet from feeling flat.
2. Sage Green With Warm Brass Hardware
This combination feels traditional without becoming overly rustic. Add cream dishes and wood cutting boards for a calm, collected appearance.
3. Charcoal Exterior With a Natural Wood Top
For a more dramatic interpretation, deep charcoal creates contrast while the wood top keeps the piece grounded and warm. It works particularly well when the cabinet has substantial molding or paneled doors.
A Realistic DIY Experience: What a Hutch Makeover Weekend Usually Teaches You
The most surprising part of a farmhouse hutch makeover is often how little time is spent doing the glamorous part. You imagine yourself gracefully brushing creamy paint over a vintage cabinet while inspirational music plays in the background. In reality, the first stretch of the project involves removing eighteen screws, discovering one screw that apparently came from another dimension, scrubbing grime out of corners, and wondering why furniture manufacturers enjoy putting decorative grooves in places no cleaning cloth can reach.
That preparation pays off. Once the cabinet is clean, repaired, and lightly sanded, the project begins feeling less like rescuing old furniture and more like building something custom.
The first primer coat can actually be discouraging. Primer is not always pretty, and an uneven-looking first stage may make the original cabinet appear temporarily worse. This is where patience matters. After the appropriate drying period and the first proper paint coat, the transformation suddenly becomes obvious.
Color can also look different on a large cabinet than it did on a tiny sample. A warm white may become noticeably creamier beside cool walls, while sage can appear grayer or greener depending on lighting. Testing the color on a small inconspicuous section or sample board before committing to the entire hutch can prevent an unwanted surprise.
Another lesson is that perfection is not necessarily the goal. On a farmhouse piece, one subtle brush mark in a molding or an old dent beneath the new finish usually does not ruin the project. Those small variations can make a refinished hutch feel more authentic than furniture designed to look artificially old straight from a factory box.
Hardware tends to deliver the biggest “why didn’t I do that sooner?” moment. A painted cabinet can already look dramatically different, but replacing shiny dated pulls with simple black or warm metal hardware often completes the transformation. Suddenly the old silhouette makes sense again.
Styling the shelves provides another temptation: overfilling them. After putting hours into painting the interior, hiding every visible inch behind plates and decorations is a little like remodeling a kitchen and then covering the counters with cardboard boxes. Start with fewer pieces. Add height with cutting boards, books, or pitchers, then balance smaller objects around them.
The final lesson arrives after the paint feels dry: leave it alone. Fresh furniture paint can invite premature celebration. Doors get rehung, dishes go back, and suddenly two newly painted surfaces stick together. Giving the coating the full drying and curing time recommended by its manufacturer is less exciting than taking the final photograph, but it helps protect all the work that came before it.
When everything is finally assembled, the best farmhouse hutch makeovers do not look as though someone merely painted an old cabinet. They look like the piece finally belongs in the room. That is the real before-and-after difference.
Final Thoughts
A farmhouse hutch makeover DIY before and after project can transform a bulky, dated cabinet into one of the most useful and attractive pieces in a home without requiring a complete furniture replacement.
Start with a structurally sound hutch, clean it thoroughly, repair obvious damage, prepare the existing finish correctly, and choose a paint-and-primer system suited to the surface. Then use color, restrained distressing, wood accents, and updated hardware to give the cabinet personality.
The winning formula is surprisingly simple: preserve what makes the old piece interesting and change what makes it feel outdated. A little age adds character. A little paint adds style. And new hardware occasionally performs what can only be described as a minor decorating miracle.
Note: Product requirements vary. Follow manufacturer instructions for surface preparation, ventilation, protective equipment, application, drying, recoating, and full curing before returning refinished furniture to normal use.