Concrete has a reputation for being the bouncer of building materials: heavy, tough, and not easily impressed. So when noise still comes through a concrete ceiling, it feels unfair. Shouldn’t several inches of rock-hard material be enough to stop upstairs footsteps, furniture scrapes, subwoofer rumbles, and the mysterious midnight bowling tournament your neighbor insists is “just walking”?
The truth is that concrete is excellent at blocking some airborne noise because it has mass. But sound is sneaky. It travels through cracks, pipes, light fixtures, ducts, wall connections, and structural vibration paths. A concrete ceiling may reduce voices and TV noise fairly well, yet still transmit impact noise from shoes, dropped objects, pets, chairs, gym equipment, or a child discovering gravity one toy at a time.
This guide explains how to soundproof a concrete ceiling the practical way: by identifying the type of noise, sealing air leaks, adding sound-damping layers, using acoustic insulation, building a decoupled ceiling, and treating flanking paths. The goal is not magic silence. The goal is a quieter, more comfortable room that does not make you stare at the ceiling like it personally betrayed you.
Why Concrete Ceilings Still Let Noise Through
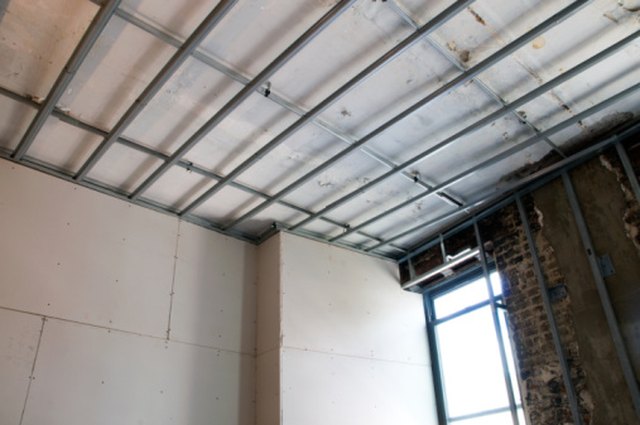
Soundproofing works best when you understand what you are fighting. Concrete helps because mass blocks sound transmission. However, mass alone does not solve every noise problem. A concrete slab can transmit vibration very efficiently because it is rigid and continuous. When someone walks on the floor above, the impact energy can travel through the slab, into walls, down columns, and into your room as low-frequency thuds.
There are three main noise problems in concrete ceilings:
1. Airborne Noise
Airborne noise includes voices, music, television, barking dogs, and general room noise. Concrete usually performs better against airborne sound than lightweight wood framing, but weak spots can undo the advantage. A tiny gap around a pipe, recessed light, ceiling fan box, or wall-ceiling joint can behave like a little noise straw sipping chaos from upstairs.
2. Impact Noise
Impact noise is caused by direct contact with the floor above: footsteps, dropped phones, moving chairs, kids running, exercise equipment, or furniture legs scraping tile. This is often the biggest complaint in apartments and condos with concrete slabs. Impact noise is harder to control from below because the vibration starts in the structure above you.
3. Flanking Noise
Flanking noise travels around the ceiling assembly instead of straight through it. It may move through shared walls, ductwork, plumbing chases, electrical boxes, elevator shafts, stairwells, or gaps at the perimeter. If you only treat the middle of the ceiling and ignore the edges, sound may simply take the scenic route.
Before You Start: Diagnose the Noise
Do not buy materials yet. That is how garages become museums of abandoned home improvement optimism. First, identify the noise source and pattern.
- Voices or TV: Usually airborne noise. Sealing gaps, adding mass, and damping can help.
- Footsteps and chair scraping: Usually impact noise. Decoupling and treatment on the floor above work best.
- Bass or vibration: Low-frequency sound. Needs isolation, damping, and serious mass; foam panels will not save the day.
- Noise near vents or pipes: Likely flanking through mechanical or plumbing paths.
- Echo inside your own room: That is room acoustics, not ceiling soundproofing. Acoustic panels can reduce echo but will not block much noise from upstairs.
A simple test helps: stand in different parts of the room while the noise occurs. Is it loudest at the ceiling center, near a wall, around a duct, or by a pipe chase? Mark those spots. Your ears may not be laboratory equipment, but they are free and surprisingly good at catching obvious leaks.
The Four Principles of Soundproofing a Concrete Ceiling
Successful ceiling soundproofing usually combines four principles: sealing, mass, damping, and decoupling. Absorption also matters, but it plays a supporting role inside cavities.
Sealing: Close the Tiny Sound Highways
Sound moves through air gaps. Even a dense ceiling loses performance when seams, cracks, and penetrations remain open. Use acoustical sealant around the perimeter of the ceiling, pipe penetrations, electrical boxes, HVAC openings, and any visible cracks. Unlike standard caulk, acoustic sealant remains flexible, which helps maintain the seal as materials expand, contract, and vibrate.
Mass: Make the Ceiling Harder to Move
Adding mass reduces airborne sound transmission. For a concrete ceiling, this often means adding one or two layers of 5/8-inch drywall below the slab, sometimes with mass-loaded vinyl or specialty acoustic drywall. More mass can help, but only when it is installed as part of a complete assembly. Randomly gluing heavy material to a ceiling may give you sore arms and limited results.
Damping: Reduce Vibration Between Layers
Damping products, such as viscoelastic compounds installed between two rigid layers of drywall, convert some vibration energy into tiny amounts of heat. That sounds dramatic, but do not expect your ceiling to become a toaster. The point is to reduce resonance and improve sound control, especially when adding drywall layers.
Decoupling: Separate the New Ceiling From the Structure
Decoupling is often the biggest upgrade for impact and low-frequency noise. Instead of attaching drywall directly to the concrete, you create a suspended or isolated ceiling using acoustic clips and hat channel. This reduces the direct vibration path from the slab to the finished ceiling. In plain English: you stop giving sound a rigid bridge into your room.
Best Materials for Soundproofing a Concrete Ceiling
| Material | Best For | Important Note |
|---|---|---|
| Acoustical sealant | Gaps, cracks, wall-ceiling joints, penetrations | Use it before and after drywall installation for airtight detailing. |
| 5/8-inch drywall | Adding mass | Two layers usually perform better than one, especially with damping compound. |
| Damping compound | Reducing vibration between rigid layers | Install between drywall layers, not as a surface coating or gap filler. |
| Acoustic clips and hat channel | Decoupling a ceiling from the concrete slab | Avoid short-circuiting the system with screws that touch the slab or framing. |
| Mineral wool or fiberglass batts | Absorption inside the ceiling cavity | Do not compress it tightly; fluffy insulation absorbs better than stuffed insulation. |
| Mass-loaded vinyl | Adding thin, flexible mass | Works best when sealed and combined with other assembly layers. |
| Acoustic ceiling panels | Reducing echo inside the room | Helpful for room comfort, but not a primary blocker of upstairs noise. |
How to Soundproof a Concrete Ceiling Step by Step
Step 1: Check Rules, Structure, and Safety
If you live in a condo, apartment, or multifamily building, check lease terms, HOA rules, building codes, and fire-rating requirements before starting. Never drill into a concrete slab without understanding what is inside it. Some buildings use post-tensioned concrete, and drilling into a tension cable is not a “fun DIY story.” It is expensive, dangerous, and the kind of mistake that makes engineers speak very slowly.
If the ceiling contains electrical wiring, sprinklers, ducts, plumbing, or recessed lighting, bring in licensed professionals as needed. Soundproofing should not compromise fire safety, ventilation, access panels, or structural performance.
Step 2: Seal Visible Cracks and Penetrations
Start with the least glamorous step because it is also one of the most important. Inspect the concrete ceiling and the perimeter where the ceiling meets the walls. Look around pipes, conduit, vents, sprinkler heads, electrical boxes, and any patchy areas. Fill small gaps with acoustical sealant. Larger openings may need backer rod, fire-rated materials, or professional repair before acoustic sealing.
Do not use regular expanding spray foam as your main soundproofing solution. Some foam products seal air leaks, but they are not dense enough to block serious noise and may create rigid connections. Use the right product for the job, especially where fire-rated assemblies are involved.
Step 3: Decide Between a Direct-Attached or Decoupled Ceiling
There are two common approaches. A direct-attached ceiling is thinner and simpler, but less effective for impact noise. A decoupled ceiling is deeper and more expensive, but it usually performs better because it separates the finished drywall from the vibrating slab.
Option A: Direct-attached mass and damping. This approach may involve furring strips, drywall, damping compound, and acoustic sealant. It can help with airborne noise, but because it remains connected to the slab, impact noise may still travel through.
Option B: Decoupled ceiling assembly. This approach uses acoustic isolation clips fastened to the concrete, hat channel, cavity insulation, and two layers of drywall with damping compound. It is the stronger choice for footsteps, thuds, and low-frequency vibration.
Step 4: Install Acoustic Clips and Hat Channel
For a serious retrofit, acoustic clips and hat channel create the support system for the new ceiling. The clips attach to the concrete using approved fasteners. Hat channel snaps or screws into the clips, and drywall attaches only to the channel, not to the slab. This detail matters. If a screw goes through the drywall and touches the concrete, the system is short-circuited. Sound now has a rigid path again, and your ceiling may perform like a fancy hat with a hole in it.
Follow the clip manufacturer’s spacing, load limits, and installation guide. Ceiling drywall is heavy, especially when using two layers of 5/8-inch board. Guessing is not a structural plan.
Step 5: Add Mineral Wool or Fiberglass Insulation in the Cavity
If the decoupled ceiling creates an air cavity, fill it loosely with mineral wool or fiberglass acoustic batts. This insulation absorbs sound energy inside the cavity and helps reduce resonance. It should not be jammed in like you are packing a suitcase five minutes before the airport. Leave it fluffy and properly supported.
Insulation alone will not soundproof a concrete ceiling, but inside a well-designed ceiling assembly it improves performance. Think of it as the reliable drummer in the band: not always the star, but the song falls apart without it.
Step 6: Hang the First Layer of Drywall
Install the first layer of 5/8-inch drywall perpendicular to the hat channel, following screw spacing requirements. Keep a small gap around the perimeter so it can be sealed with acoustical sealant. Do not force the drywall tight against the walls, because that rigid contact can transmit vibration.
Stagger the seams and avoid lining up joints with the second layer. The fewer continuous cracks you create, the better the assembly performs.
Step 7: Apply Damping Compound and Add the Second Drywall Layer
Apply damping compound to the back of the second drywall layer according to the manufacturer’s coverage instructions. Then lift the panel into place and fasten it to the hat channel. The compound belongs between two rigid layers, not on the exposed ceiling surface and not inside random holes.
Use a drywall lift if possible. Holding a heavy ceiling panel overhead while your helper says, “A little to the left,” is a classic test of friendship, shoulder strength, and emotional maturity.
Step 8: Seal the Perimeter and Finish the Ceiling
After the drywall layers are installed, seal the perimeter with acoustical sealant before taping and finishing. Seal around ceiling boxes, fixtures, and any penetrations. If you install recessed lights, choose airtight, acoustically thoughtful fixtures or avoid recessed lights altogether. Every hole in the ceiling is a potential sound leak.
Finish with joint compound, primer, and paint. If you want better room acoustics, add fabric-wrapped acoustic panels or a decorative acoustic ceiling treatment after the soundproofing assembly is complete. Just remember: panels reduce echo in your room; they do not replace isolation, mass, and sealing.
What If You Cannot Build a Full Ceiling Assembly?
Renters and condo owners may not be allowed to build a suspended drywall ceiling. In that case, focus on improvements you can control:
- Seal visible gaps around pipes and fixtures if allowed.
- Add thick rugs, carpet pads, or rubber underlayment upstairs if you control the floor above.
- Use acoustic panels to reduce echo inside your room.
- Add bookcases, curtains, upholstered furniture, and soft finishes to reduce reverberation.
- Ask building management about floor covering rules for upstairs units.
- Use white noise or sound masking for sleep while pursuing building-level fixes.
These steps will not equal a decoupled ceiling, but they can improve comfort. Sometimes the best soundproofing move is diplomatic: a polite conversation with the upstairs neighbor about rugs, chair pads, or quiet hours can outperform a truckload of materials. Bring cookies if appropriate. Cookies are not acoustic products, but they have impressive social STC.
Soundproofing From Above: The Most Effective Fix for Impact Noise
If impact noise is the main problem, treating the floor above is usually more effective than treating the ceiling below. The reason is simple: stop the vibration where it starts. Good options include thick carpet and pad, rubber underlayment, cork underlayment, acoustic mats, floating floors, or resilient underlayment under tile, laminate, or engineered wood.
In multifamily buildings, floor-ceiling assemblies are often evaluated with STC for airborne sound and IIC for impact sound. A ceiling retrofit can improve the receiving room, but the best impact-noise strategy often combines a resilient floor treatment above with an isolated ceiling below. That may sound like overkill until you hear someone dropping dumbbells at 6 a.m. Then it sounds like civilization.
Common Mistakes to Avoid
Using Foam Panels as “Soundproofing”
Foam panels absorb echo inside a room. They do not add enough mass or isolation to block significant upstairs noise. Foam has a place in studios, offices, and home theaters, but it will not stop concrete-slab impact noise.
Skipping Acoustic Sealant
Small gaps can cause big performance losses. Seal the perimeter, penetrations, seams, and boxes. A beautiful ceiling with unsealed edges is like a submarine with a screen door.
Short-Circuiting the Decoupled Ceiling
If screws, blocking, fixtures, or trim reconnect the new drywall layer to the concrete slab, the isolation system loses performance. Follow the assembly details carefully.
Ignoring Flanking Paths
Noise may come through walls, ducts, pipes, columns, or gaps around mechanical systems. If the ceiling assembly improves one path, sound may become more noticeable through another. This does not mean the ceiling failed; it means the next weakest path is now easier to hear.
Expecting Total Silence
Soundproofing reduces noise; it rarely eliminates it. Low-frequency bass and heavy impacts are especially difficult. Set realistic expectations and choose the assembly based on the actual noise problem.
How Much Ceiling Height Will You Lose?
A basic drywall overlay may lose less height, while a decoupled ceiling with clips, channel, insulation, and two drywall layers may lower the ceiling by several inches. In a room with tall ceilings, that tradeoff is usually acceptable. In a low basement or apartment, every inch matters. Measure carefully before selecting a system.
If ceiling height is tight, consider thinner acoustic clips, strategic sealing, acoustic drywall, or treatment from the floor above. The best system is not always the thickest one. It is the one that matches the noise, the structure, the budget, and the room.
When to Hire a Professional
DIY soundproofing can work for small sealing projects, simple ceiling finishes, or room-acoustic improvements. Hire a professional when the project involves concrete drilling, post-tension slabs, fire-rated assemblies, electrical relocation, sprinklers, HVAC, heavy ceiling systems, or condo approval documents.
An acoustical consultant can also help if the noise is severe, legal disputes are involved, or you need measurable performance. They may test airborne and impact noise, identify flanking paths, and recommend assemblies that match building requirements. Professional help costs money, but so does installing the wrong ceiling twice.
Maintenance and Long-Term Performance
After installation, protect the soundproofing details. Do not cut random holes for new lights or speakers without sealing them properly. Avoid mounting heavy items through the isolated ceiling into the slab unless the design accounts for it. If cracks open at the perimeter over time, reseal them with acoustic sealant. Soundproofing is not high-maintenance, but it does reward careful ownership.
If you later renovate walls, ducts, or floors, remember that sound control is a system. A new duct chase, open soffit, or unsealed access panel can weaken the ceiling work. Keep photos of the assembly before it is closed up so future contractors understand what is hidden above the paint.
Real-World Experience: What Actually Helps When Soundproofing a Concrete Ceiling
In real homes, soundproofing a concrete ceiling is rarely a one-step miracle. The most successful projects usually start with honest expectations. A homeowner hears upstairs footsteps and wants them gone. A contractor looks at the ceiling and says, “We can reduce them.” That difference matters. Footstep noise is stubborn because the slab itself vibrates. If the person upstairs walks in hard shoes on tile, the ceiling below receives the vibration like a drumhead receiving bad news.
One useful experience is to treat the project like detective work. In many concrete apartments, the loudest noise is not coming through the center of the slab. It is coming through the edge where the slab meets the wall, through a pipe chase, or through a shared duct. People often spend money on ceiling panels, then discover the noise still pours through a bathroom vent. Before building anything, stand near corners, closets, vents, and columns while the noise is happening. You may find the weak point is not where you expected.
Another lesson: sealing is boring but powerful. Homeowners love dramatic materials with impressive names, but a tube of acoustic sealant in the right gap can make a noticeable difference. Around pipes, conduits, wall-ceiling joints, and ceiling boxes, small openings let airborne sound leak through. If you can see a gap, assume sound can find it. Sound is basically water with better dance moves.
For heavier noise, the best experience comes from combining methods. A decoupled ceiling with acoustic clips, mineral wool in the cavity, two layers of 5/8-inch drywall, damping compound between layers, and careful perimeter sealing is far more convincing than one material used alone. Each layer has a job: clips reduce vibration transfer, insulation calms the cavity, drywall adds mass, damping reduces resonance, and sealant closes leaks. Remove one part and the system may still help, but it becomes less reliable.
It is also important to talk about upstairs cooperation. If the floor above can accept thick rugs, quality carpet pads, rubber underlayment, or furniture pads, impact noise can drop before it ever reaches the slab. This is why many apartment buildings require a certain percentage of floor area to be covered with rugs. From below, you are catching the bowling ball after it falls. From above, you are putting a cushion under it.
Finally, the emotional experience matters. Noise from above feels personal even when it is not. The neighbor may simply be walking normally on a hard floor attached to a highly efficient vibration highway. A good soundproofing plan gives you control without turning your home into a bunker. Start with diagnosis, fix leaks, choose the right assembly, and treat the ceiling as part of a whole-room system. The result may not be library silence, but it can be the difference between “I hear every footstep” and “I can finally read, work, and sleep without plotting revenge against gravity.”
Conclusion
Learning how to soundproof a concrete ceiling starts with one important reality: concrete is strong, but sound is persistent. A concrete slab already has mass, so the biggest improvements usually come from sealing gaps, reducing vibration, decoupling the finished ceiling, adding insulation in the cavity, and controlling flanking paths. For airborne noise, mass and sealing can make a meaningful difference. For impact noise, decoupling and treatment from the floor above are often essential.
The best approach is layered. Seal first. Add mass thoughtfully. Use damping between rigid layers. Install acoustic clips and hat channel when you need serious isolation. Add mineral wool or fiberglass batts inside the cavity. Finish every edge and penetration carefully. And please, do not rely on decorative foam squares to stop upstairs stomping unless you also believe a napkin can stop a thunderstorm.
A quieter ceiling is possible, but it requires a system. Build that system well, and your concrete ceiling can finally act less like a drum and more like the solid barrier it was always pretending to be.