Every thrift store has at least one mysterious wooden object sitting on a shelf, quietly wondering why nobody has adopted it yet. Sometimes it is a chunky candlestick. Sometimes it is a carved pineapple. And sometimes, if the secondhand gods are feeling generous, it is a wooden duck with excellent bones, questionable paint, and the facial expression of someone who has seen too many garage sales.
Painting a thrift store wood duck is one of those small DIY projects that delivers big satisfaction. It is affordable, beginner-friendly, and surprisingly stylish when done with a little planning. Whether your duck is a vintage decoy, a farmhouse-style carving, a shelf sitter, or a “what exactly is this bird doing?” decorative piece, a fresh coat of paint can turn it from dusty pond reject into charming home decor.
This guide walks you through how to clean, prep, paint, detail, and seal a thrifted wooden duck so it looks intentional rather than accidentally left behind by a lake cabin in 1987. We will cover supplies, color ideas, painting techniques, common mistakes, and real-world experience from the craft table.
Why Paint a Thrift Store Wood Duck?
Thrifted wooden ducks have a special kind of magic. They are usually inexpensive, often solid wood, and full of character. Many are hand-carved or at least shaped with enough detail to make them interesting. Even if the finish is scratched, faded, or aggressively orange, the form itself may be worth saving.
Painting a thrift store wood duck lets you customize it for your home. You can create a realistic wood duck with green, chestnut, white, and gold accents. You can go coastal with soft blue-gray tones. You can make it moody and modern with matte black. You can even paint it in playful colors for a kid’s room, nursery, or seasonal display. The duck is your canvas, and unlike a real duck, it will not waddle away in protest.
Supplies You Will Need
You do not need a professional workshop to paint a wooden duck. A small table, decent lighting, and a little patience are enough. Gather these supplies before you start:
- Thrift store wooden duck
- Mild dish soap or gentle cleaner
- Microfiber cloths
- Fine-grit sandpaper or sanding sponge
- Tack cloth or lint-free cloth
- Wood filler, if needed
- Primer suitable for wood
- Acrylic craft paint, chalk paint, or interior latex paint
- Small angled brush and fine detail brushes
- Painter’s tape, optional
- Clear water-based topcoat, wax, or matte sealer
- Gloves and a dust mask for sanding
Acrylic paint works well for small wood crafts because it dries quickly, comes in many colors, and is easy to layer. Chalk paint is another good option if you want a soft matte finish or a vintage, slightly distressed look. For a high-use piece, choose a durable topcoat. For a decorative shelf duck, a light sealer is usually enough.
Step 1: Inspect the Duck Before Painting
Before you grab a brush, inspect your thrifted duck carefully. Look for cracks, loose parts, waxy buildup, peeling paint, water damage, or old repairs. Check the bottom too. Thrift store treasures often carry surprises underneath, including felt pads, price stickers, glue blobs, or the occasional mystery crumb that has survived multiple decades with heroic determination.
If the duck already has paint on it and looks old, be careful before sanding. Antique or vintage painted items can sometimes contain lead-based paint. If you do not know the age of the finish, avoid aggressive sanding or scraping. Use a lead test kit when appropriate, work in a well-ventilated area, and keep dust away from children and pets. Safety is not the glamorous part of crafting, but neither is coughing up sanding dust while your duck watches silently.
Step 2: Clean the Surface Thoroughly
Paint does not like dirt, grease, wax, or dust. A thrift store wood duck may have been displayed in a kitchen, stored in a garage, or perched on a shelf near years of candle soot and potpourri. Cleaning is the step that separates a lasting makeover from a paint job that peels like a bad sunburn.
Mix a small amount of mild dish soap with warm water. Dampen a microfiber cloth and wipe the duck carefully, especially around carved lines, wings, tail feathers, and the base. Avoid soaking the wood. Too much water can raise the grain or loosen glued sections. For stubborn grime, use a soft toothbrush around grooves. Wipe again with a clean damp cloth, then let the piece dry completely.
Step 3: Lightly Sand for Better Adhesion
If the duck has a glossy finish, light sanding helps primer and paint grip the surface. Use fine-grit sandpaper, usually around 180 to 220 grit, and sand gently. The goal is not to erase the duck’s identity. You are simply dulling the shiny surface and smoothing rough spots.
Sand with the shape of the piece. Curved wooden ducks are not flat tabletops, so use a flexible sanding sponge or fold sandpaper around your fingers. Be gentle around carved feather details, beaks, and thin edges. After sanding, remove dust with a tack cloth or lint-free cloth. Dust left behind can create gritty paint, and nobody wants a duck that feels like it rolled through cracker crumbs.
Step 4: Repair Cracks or Dents
Small dents add character, but deep cracks can distract from the final look. If your wooden duck has holes, chips, or missing spots, fill them with wood filler. Apply a small amount with your finger or a putty knife, let it dry according to the product directions, and sand it smooth.
Do not overfill carved areas unless you want a cleaner, more modern silhouette. Some thrifted wood ducks look best when their nicks remain visible under paint. A tiny dent on the tail can say “vintage charm.” A giant split down the neck says “please fix me before I become firewood.” Use judgment.
Step 5: Prime the Wood Duck
Primer creates a smooth base, improves paint adhesion, and helps block stains from bleeding through. This is especially useful if the duck is dark stained wood, knotty pine, or previously finished with oil-based products. For small decor projects, one thin coat of bonding primer or wood primer usually works well.
Apply primer with a small brush, following the grain and shape of the duck. Avoid heavy coats that fill carved details. Let it dry fully, then lightly sand any rough spots with fine-grit sandpaper. Wipe away dust before painting. A smooth primer coat makes the final paint job look cleaner, brighter, and much less like a kindergarten art emergency.
Choosing a Style for Your Painted Duck
Realistic Wood Duck Look
A real male wood duck is famous for dramatic colors: an iridescent green head, chestnut breast, white facial striping, red eye, patterned wings, and warm golden sides. If you want a realistic style, start with reference photos and simplify the design. You do not need to paint every feather. Focus on the main color zones: head, bill, chest, wing, belly, and eye markings.
Vintage Decoy Style
A decoy-inspired duck can be more muted. Use earthy greens, browns, black, cream, and soft rust. Keep brushstrokes visible and slightly imperfect. Add dry-brushed highlights along the back and wings. This style looks wonderful on mantels, bookshelves, cabin decor, and rustic entry tables.
Modern Farmhouse Style
For farmhouse decor, try matte white, warm gray, charcoal, sage green, or weathered blue. You can paint the entire duck one color, then lightly distress raised edges with sandpaper. Add a clear matte topcoat to keep the finish soft and understated.
Whimsical Cottage Style
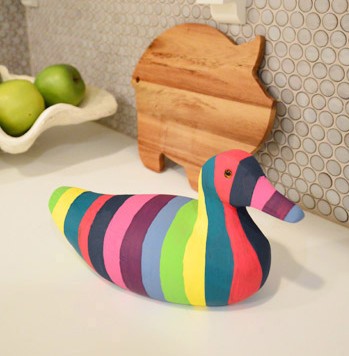
If you prefer a playful look, use pastel green, buttery yellow, dusty pink, or robin’s egg blue. Paint tiny flowers on the wings or add a checked ribbon around the neck. Is it biologically accurate? Absolutely not. Is it adorable? Also absolutely.
Step 6: Paint the Base Colors
Once the primer is dry, start with the largest color areas. For a realistic wood duck, paint the head deep green or blue-green, the chest reddish brown, the body warm tan or gray, and the underside creamy white. For a simple decorative duck, choose one main body color and one accent color for the bill or wing.
Use thin coats instead of one thick coat. Thin coats dry smoother and reduce brush marks. Let each coat dry before adding the next. If you rush, the brush can pull up half-dry paint, leaving streaks that look like the duck got into a disagreement with a rake.
Turn the duck as you work so you can reach every angle. Paint the bottom last or leave it unpainted if it sits flat. If the duck has a removable base, paint it separately for a cleaner result.
Step 7: Add Details That Make It Special
Details bring the duck to life. Use a fine brush for the eye, bill line, wing markings, and feather accents. On a realistic wood duck, white lines around the face are key. A curved white stripe behind the eye and along the crest instantly suggests the species. A red eye and red-orange bill add drama, while small white dots on the chest create a hand-painted folk-art effect.
For a vintage style, dry brushing works beautifully. Dip the brush lightly into paint, wipe most of it off on a paper towel, then skim it over raised areas. This highlights texture without covering the whole surface. Use cream on dark paint, tan on green, or gray on black.
You can also add shadow lines with watered-down brown or black paint. Brush the thin color into carved grooves, then wipe back the excess. This makes feather lines stand out and gives the duck more depth.
Step 8: Distress or Age the Finish
Distressing is optional, but it can make a thrifted wood duck look collected rather than freshly painted. Once the paint is dry, lightly sand raised areas such as the beak, wing edges, back, and tail. Use a gentle hand. Distressing should look like natural wear, not like the duck lost a bar fight.
Another aging method is a glaze or antiquing wax. Apply a small amount over the painted surface, let it settle into details, then wipe it back. This creates a warm, aged finish. Brown glaze works well for rustic ducks. Gray glaze gives a coastal or weathered look.
Step 9: Seal the Painted Duck
A sealer protects your work from dust, handling, and minor scratches. For indoor decor, a water-based clear coat in matte or satin finish is usually a smart choice. Water-based finishes are popular for painted crafts because they dry clear and are less likely to amber than some oil-based products.
Apply the sealer in thin coats with a clean brush. Avoid overbrushing, which can create streaks. Let the first coat dry, then add a second coat if the duck will be handled often. If you used chalk paint, you may choose wax instead of a clear topcoat, but wax needs occasional maintenance.
Where to Display Your Painted Thrift Store Wood Duck
A painted wooden duck can work in more places than you might expect. Set it on a bookshelf with old books and a small plant. Place it on a mantel with brass candlesticks. Add it to a lake house entryway, a cabin coffee table, or a cottage kitchen shelf. A modern black or white duck can even look surprisingly chic on a console table.
Seasonal styling is another fun option. In spring, pair the duck with moss, eggs, and fresh greenery. In fall, surround it with mini pumpkins and amber glass. During Christmas, tie on a velvet ribbon and suddenly your duck is festive. Not every holiday decoration needs to be a reindeer with glitter antlers.
Common Mistakes to Avoid
Skipping the Cleaning Step
Painting over grime is the fastest way to create a finish that chips or bubbles. Always clean first, even if the piece looks fine.
Using Paint Too Thickly
Thick paint hides carved details and can dry unevenly. Multiple thin coats look better and last longer.
Sanding Too Aggressively
Thrifted wooden ducks often have curves and delicate carved lines. Sand lightly, especially around the beak, crest, and tail.
Forgetting the Sealer
If the duck will be touched, moved, dusted, or styled often, seal it. A clear topcoat helps protect your effort.
Ignoring the Original Shape
Let the duck’s form guide your design. If it has carved wings, emphasize them. If it is sleek and simple, a minimalist paint job may look best.
Budget-Friendly Color Combinations
If you are standing in the craft paint aisle feeling personally attacked by 94 shades of green, start with a simple palette. For a classic wood duck, choose deep green, chestnut brown, cream, black, red, and golden tan. For a farmhouse duck, choose warm white, sage, taupe, and charcoal. For coastal decor, choose driftwood gray, soft blue, sand, and white. For a bold modern version, try matte black with metallic gold details.
Use what you already have when possible. Leftover wall paint can work for the base coat. Small acrylic bottles are perfect for details. A thrifted duck is already a budget project, so there is no need to spend enough money to make the duck question your financial decisions.
Experience: What I Learned From Painting a Thrift Store Wood Duck
The first thing I learned from painting a thrift store wood duck is that the duck always looks worse before it looks better. After cleaning and sanding, mine had dull patches, exposed scratches, and the general vibe of a bird that had been through a storage-unit breakup. That stage is normal. Do not panic. Primer is the great emotional support blanket of DIY painting.
I also learned that carved details are both a blessing and a tiny trap. They make the finished duck look more expensive, but they also catch dust, primer, and too much paint. A small brush is worth using, even if the project seems simple. When I tried using a larger brush to “save time,” I mostly saved myself from achieving neat edges. The paint pooled around the wings, and the duck looked like it was wearing a sweater two sizes too thick.
The best improvement came from layering colors. A flat brown body looked boring at first. Once I added darker shading under the wing and a soft tan highlight along the back, the shape suddenly made sense. Dry brushing was the hero technique. It picked up the raised feather lines and made the duck look intentionally rustic instead of merely repainted.
For the head, I tried deep green with a touch of navy. That small adjustment made the color richer and closer to the glossy look of a real wood duck. I did not attempt perfect realism because, honestly, nature is showing off with this bird. Instead, I used the real markings as inspiration: a white curve near the eye, a chestnut breast, and a warm red-orange bill. The result looked recognizable without requiring the patience of a museum wildlife artist.
Sealing made a bigger difference than expected. Before the clear coat, the paint looked slightly chalky and vulnerable. After a matte water-based sealer, the colors deepened just enough, and the duck felt finished. It also became easier to dust, which matters because decorative objects have one job: sit still and collect dust with dignity.
My biggest advice is to let the duck keep some personality. Do not sand every imperfection into oblivion. Do not worry if both eyes are not mathematically identical. Handmade charm is the point. A thrift store wood duck is not trying to be a factory-perfect sculpture. It is trying to become the quirky little accent piece that makes guests say, “Wait, where did you get that?” That is the sweet spot.
Conclusion
Painting a thrift store wood duck is a small project with a big payoff. With basic cleaning, light sanding, primer, thoughtful paint choices, and a protective sealer, you can transform a forgotten wooden bird into custom decor that fits your home beautifully. Whether you choose a realistic wood duck design, a rustic decoy finish, a farmhouse neutral look, or a playful cottage style, the process is flexible and forgiving.
The secret is preparation. Clean the piece well, sand only as needed, prime when the surface calls for it, and build color in thin layers. Add details slowly, step back often, and remember that charm beats perfection. A thrifted duck already has a story. Your paint job simply gives it a better next chapter.