Note: This article synthesizes current guidance on flexibility, warm-ups, stretching safety, and cheerleading injury prevention from reputable U.S.-based sports medicine, orthopedic, pediatric health, and cheer-safety resources, including AAOS, Mayo Clinic, ACE Fitness, Nationwide Children’s Hospital, Boston Children’s Hospital, Nemours KidsHealth, Stanford Children’s Health, AOSSM, USA Cheer, USASF, and cheer technique resources.
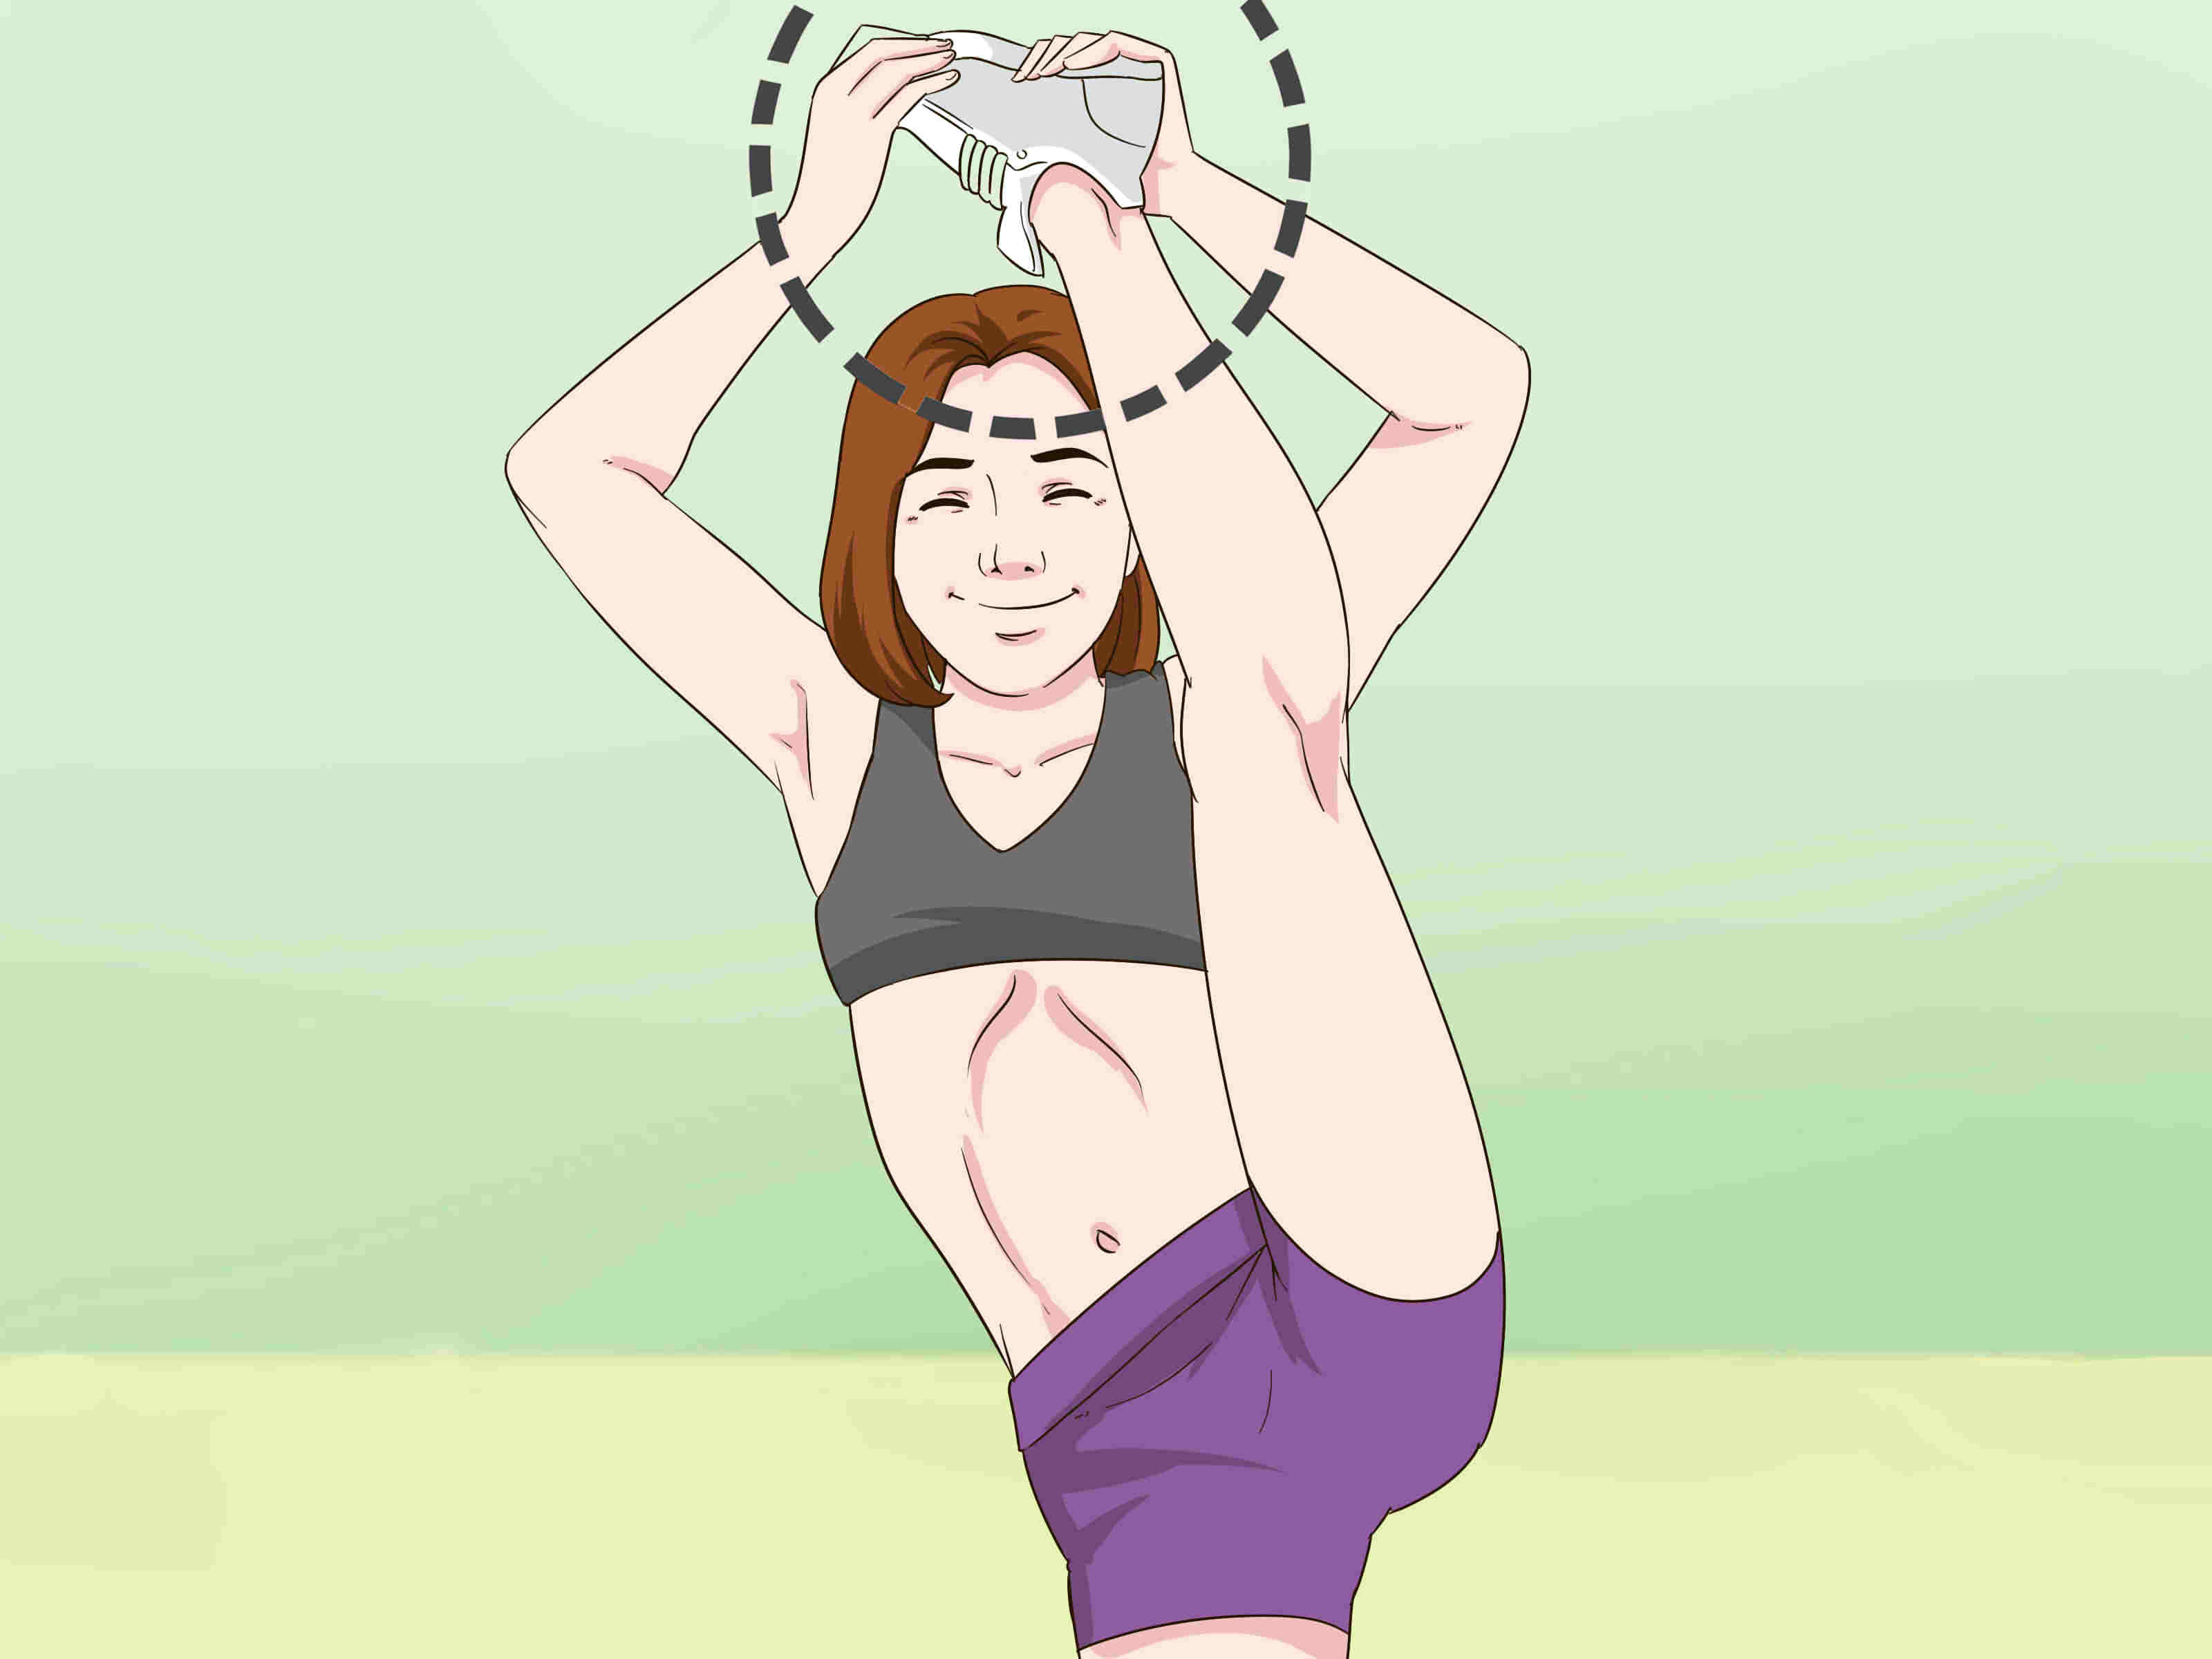
The heel stretch is one of those cheerleading and dance moves that looks effortlessuntil you try it and discover your hamstring has filed a formal complaint. In a classic cheer heel stretch, you balance on one leg, lift the other leg high in front or slightly to the side, grab the heel or arch with the same-side hand, straighten the lifted leg, and hold the position with posture, control, and a performance-ready smile. It is part flexibility challenge, part balance test, and part “please do not let my face introduce itself to the floor.”
Done well, a heel stretch can improve your flexibility, body control, hip mobility, core stability, and confidence. Done carelessly, it can irritate the hamstrings, hips, lower back, ankles, or knees. That is why this guide focuses not only on how to pull the shape, but how to prepare your body, avoid common mistakes, and build the skill safely over time. Medical and sports organizations consistently recommend warming up before stretching, avoiding bouncing, moving slowly, and stopping when pain appears rather than forcing range of motion.
What Is a Heel Stretch?
A heel stretch is a cheerleading body position commonly performed by flyers, dancers, and flexibility athletes. The performer stands on one leg while lifting the opposite leg upward, usually holding the heel or middle of the foot with the same-side hand. In cheerleading, the position may be performed on the ground for practice or in the air as part of a stunt, where safety rules, qualified coaching, spotters, and appropriate surfaces become essential. USA Cheer and USASF safety materials emphasize proper spotting, athlete readiness, and appropriate surfaces for technical cheer skills.
For beginners, the goal is not to yank the leg beside your ear on day one. The goal is to learn a controlled standing leg lift with a tall chest, engaged core, square hips, and a straight supporting leg that is not wobbling like a newborn giraffe. Flexibility matters, but strength and alignment matter just as much.
Before You Start: Safety Rules That Actually Matter
Before practicing a heel stretch, warm up for 5 to 10 minutes with light movement such as brisk walking, jogging in place, jumping jacks, or easy dynamic leg swings. Mayo Clinic notes that stretching cold muscles can increase injury risk, and AAOS recommends warming up first, stretching gently, breathing, and avoiding bouncy movements.
Use a clear, non-slip surface. If you are practicing cheerleading stunts, never perform technical skills on concrete, asphalt, wet floors, uneven ground, or surfaces with obstacles. Cheerleading safety sources also recommend qualified coaching, proper spotting, and structured stretching and conditioning routines before and after practices, games, competitions, and pep rallies.
If you have a recent hamstring strain, hip injury, ankle sprain, knee pain, back pain, or any sharp discomfort, get guidance from a coach, athletic trainer, physical therapist, or healthcare professional before practicing. Flexibility training should feel challenging, not dramatic. Your muscles should whisper “stretch,” not scream “lawsuit.”
How to Do a Heel Stretch: 14 Steps
Step 1: Warm Up Your Whole Body
Start with 5 to 10 minutes of light cardio. March in place, jog gently, do jumping jacks, or perform low-impact dance steps. The purpose is to raise your body temperature and increase blood flow before you ask your muscles for a big range of motion. A warm body stretches better and complains less.
Step 2: Mobilize Your Hips and Hamstrings
After warming up, add dynamic movements such as leg swings, walking lunges, hip circles, and gentle high knees. Keep the motion smooth and controlled. Dynamic stretching before activity helps prepare the body for movement, while static stretching is often better saved for after workouts or after a full warm-up.
Step 3: Stretch Your Hamstrings Gently
Sit on the floor with one leg extended and the other bent. Reach toward the toes of the extended leg while keeping your back long. Hold for 20 to 30 seconds, breathe, and switch sides. Do not bounce. You should feel tension along the back of the thigh, not a sharp pull behind the knee.
Step 4: Open Your Hip Flexors
Move into a low lunge with one foot forward and the opposite knee on the floor. Tuck your pelvis slightly and shift forward until you feel a stretch in the front of the back hip. ACE Fitness highlights the importance of neutral spine position and pelvic control during hip flexor stretching.
Step 5: Practice Splits or Split Progressions
A strong heel stretch often comes from a strong split foundation. Practice front split progressions using yoga blocks, folded towels, or your hands for support. Keep your hips as square as possible instead of letting the body twist open just to look lower. Square hips build cleaner lines and safer control.
Step 6: Stand Tall and Find Your Balance
Stand with your feet hip-width apart. Shift your weight onto your supporting leg. Keep that standing foot rooted into the floor, with the big toe, little toe, and heel pressing down like a tripod. Engage your core, lift through the chest, and relax your shoulders. Balance is easier when your body is stacked, not folded like a lawn chair.
Step 7: Bend and Lift the Stretching Leg
Bring the knee of your stretching leg upward in front of your body. Beginners may start by holding the thigh or shin. Keep your torso tall instead of collapsing forward. This stage teaches control before height. A messy high leg is less useful than a clean lower one.
Step 8: Grab the Heel or Arch
Use the same-side hand to grab the heel, arch, or lower part of the foot. For example, if you lift your right leg, grab it with your right hand. Many cheer technique guides describe the heel stretch as holding the heel or middle of the foot while extending the leg upward.
Step 9: Straighten the Lifted Leg Slowly
Begin extending the lifted leg upward. Move slowly. Do not kick violently into your hand. Keep your standing leg strong, your core engaged, and your chest lifted. If your lifted knee stays slightly bent at first, that is fine. Flexibility is not a microwave dinner; it does not become ready in 90 seconds.
Step 10: Keep Your Hips Square
Try to keep both hip bones facing forward. Many beginners open the lifted hip to the side because it makes the leg feel higher, but it can reduce control and create a crooked line. Imagine your pelvis is a pair of headlights pointing straight ahead. Do not let one headlight aim at the neighbor’s mailbox.
Step 11: Lift Through the Chest and Lengthen the Spine
A heel stretch is not just a leg trick. Your upper body matters. Pull the crown of your head upward, keep the ribs controlled, and avoid leaning back aggressively. If you arch your lower back to fake more height, your body may look taller for one second and feel crankier for the next week.
Step 12: Add the Free Arm Position
Once the leg is steady, place the free arm in a high V, touchdown, or another clean cheer arm position. Keep the wrist straight and the shoulder down. Your expression should say “I am graceful,” not “I am negotiating with gravity.” Practice in a mirror to check that the arm, chest, hips, and lifted leg all look intentional.
Step 13: Hold the Position With Control
Hold the heel stretch for 10 to 30 seconds, depending on your ability and comfort. AAOS recommends gentle stretching, breathing, and holding stretches without bouncing. Nationwide Children’s Hospital also recommends holding stretches for at least 30 seconds and repeating them several times as part of cheer injury prevention.
Step 14: Exit Safely
To come out of the heel stretch, bend the lifted knee slightly, release the foot with control, and place the leg back down. Do not just drop it. A controlled exit builds strength and prevents awkward landings. Shake out the legs, breathe, and repeat on the other side if appropriate.
Common Heel Stretch Mistakes
Pulling Before Warming Up
The fastest way to annoy your hamstrings is to grab your foot cold and yank. Always warm up first. Static stretching before your body is ready can increase discomfort and reduce performance quality.
Bouncing in the Stretch
Bouncing does not make you flexible faster. It can irritate muscles and connective tissue. Move into the heel stretch slowly, hold it, breathe, and release with control.
Leaning Too Far Back
Some athletes lean backward to make the leg look higher. This usually shifts stress into the lower back. Instead, lift the leg using flexibility, hip strength, and core control.
Grabbing the Toes Instead of the Heel
For the classic cheer heel stretch, hold the heel or arch rather than tugging the toes. Pulling from the toes may change the line of the foot and make the grip less secure.
Ignoring the Standing Leg
Your supporting leg is the foundation. Keep it strong and grounded. If your standing knee collapses inward or your ankle wobbles wildly, lower the lifted leg and rebuild the position.
Best Stretches to Improve Your Heel Stretch
Seated Hamstring Stretch
Sit with one leg straight and the other bent. Reach forward with a long spine. Hold 20 to 30 seconds per side. This supports the lifted-leg extension needed for a clean heel stretch.
Standing Quad Stretch
Stand tall, bend one knee, and bring the heel toward your glutes. Hold the ankle, keep the knees close, and gently tuck the pelvis. This helps balance the front and back of the legs.
Low Lunge Hip Flexor Stretch
A low lunge helps open the front of the hip, which is important for split lines, kicks, and leg lifts. Keep the spine neutral and avoid dumping into the lower back.
Wall Heel Stretch Drill
Stand near a wall or sturdy surface for balance. Lift one leg and place the heel lightly against the wall while keeping your hips square. Use the wall as support, not as a torture device. Increase height gradually.
Core and Balance Work
Add single-leg balances, planks, dead bugs, and standing marches. A heel stretch is easier when your core can stabilize your spine and pelvis. Flexibility without strength is like Wi-Fi without a password: technically present, but not very reliable.
How Often Should You Practice?
Practice flexibility drills 3 to 5 days per week, depending on your schedule, recovery, and training level. Short, consistent sessions usually work better than one heroic weekly stretch marathon. Hold stretches gently, breathe, and stop if you feel sharp pain. Many flexibility improvements come from patient repetition over weeks and months, not one dramatic session in your bedroom at midnight.
If you are a cheerleader, dancer, or gymnast, include heel stretch prep after warm-ups and after practice when your muscles are warm. If you are training for a team, follow your coach’s progression and safety rules. For flyers, never attempt elevated heel stretches without trained bases, spotters, proper surfaces, and supervision.
Experience Section: What Practicing a Heel Stretch Really Feels Like
Learning how to do a heel stretch is a funny little journey because the move looks simple from the audience. Someone lifts a leg, smiles, holds a pretty shape, and everyone claps. Then you try it yourself and realize there are approximately 47 things happening at once. Your standing foot is gripping the floor. Your hip wants to turn out. Your hamstring is negotiating. Your free arm is supposed to look elegant. Your face is supposed to smile instead of reveal that your brain is playing emergency music.
The first experience many beginners have is discovering that flexibility is only one piece of the puzzle. You may be able to do a decent split on the floor, but standing on one leg while pulling your heel up is a different challenge. The floor does not wobble. Your ankle does. That is why balance drills matter. Practicing single-leg stands while brushing your teeth, doing slow standing marches, or holding a wall-supported leg lift can make the full heel stretch feel less like a circus audition.
Another common experience is frustration with uneven sides. One leg may fly up like it has a personal elevator, while the other leg moves three inches and sends a strongly worded email. That is normal. Most people have one more flexible or more coordinated side. Instead of forcing the tighter side, give it patient attention. Work on hamstrings, hip flexors, calves, and core control. Celebrate tiny improvements, because flexibility progress often arrives quietly. One week your hand barely reaches your ankle; a few weeks later, you grab your heel without making the sound effects of a haunted door.
Practicing in front of a mirror can be humbling but helpful. Many athletes think their hips are square until the mirror reveals that one hip has escaped to another zip code. Use visual feedback to adjust your posture. Keep your chest lifted, your shoulders relaxed, and your standing leg strong. Record short practice clips if you are comfortable doing so. Video does not lie, although it can be rude about lighting.
The best progress usually happens when practice feels challenging but not painful. A productive heel stretch session may include a warm-up, dynamic leg swings, split progressions, wall drills, a few controlled standing attempts, and a cool-down. You do not need to destroy your muscles to improve. In fact, pushing too hard can make you tighter the next day. Think of flexibility training like teaching your body a new language. Repetition works better than yelling.
Confidence is also part of the experience. The first time you hold a heel stretch for even a few seconds, it feels fantastic. The leg may not be perfectly straight. The line may not be competition-ready. Your arm may be doing something suspicious. Still, the moment teaches you that the skill is possible. From there, refinement begins: straighter knee, taller posture, cleaner grip, steadier balance, stronger exit. Each detail adds polish.
For cheerleaders, the experience changes again when the heel stretch becomes part of choreography or stunting. Timing, counts, facial expression, and team safety become just as important as personal flexibility. The move must hit cleanly and come down safely. That is why coaches emphasize fundamentals before advanced versions. A beautiful heel stretch is not just high; it is controlled, repeatable, and safe.
Ultimately, learning a heel stretch teaches patience. It reminds you that impressive skills are built from unglamorous basics: warm-ups, stretching, balance, strength, repetition, and recovery. The move may look flashy, but the secret is consistency. Show up, stretch smart, practice cleanly, and let your progress build. Your hamstrings may never send you a thank-you card, but they will eventually cooperate.
Conclusion
A heel stretch is a beautiful cheerleading and dance skill that combines flexibility, balance, core strength, hip control, and confidence. To do it safely, warm up first, stretch gently, avoid bouncing, keep your hips square, engage your core, and practice on a safe surface. Start with lower leg lifts, use support when needed, and build toward a clean full extension over time. The goal is not to force your leg into position; the goal is to train your body to hold the shape with control.
Whether you are preparing for cheer tryouts, improving dance flexibility, or simply adding a new skill to your training routine, the heel stretch rewards consistency. Respect your body, practice both sides, use proper technique, and remember: flexibility is a long game. The best heel stretch is not the one you yank into onceit is the one you can hit, hold, smile through, and exit safely.