Plain terra cotta pots are the blue jeans of the gardening world: affordable, dependable, and weirdly easy to dress up. But when you marbleize them, they go from “nice little planter” to “whoa, where did you buy that?” in a single afternoon. That is the charm of this project. It feels fancy, but it is gloriously doable, even if your craft room is really just the kitchen table and your artistic assistant is a cup of coffee.
If you have been eyeing those dreamy swirled planters on Pinterest, Instagram, or your favorite DIY sites, the good news is this: marbleizing terra cotta pots does not require a fine arts degree, a studio assistant, or a dramatic scarf. It just takes the right prep, the right paint, and a willingness to accept that the first pot might look “abstract” before the second one looks amazing. In this guide, you will learn how to create a marble effect on terra cotta, which materials work best, how to avoid common mistakes, and how to make sure your pot is still practical for real plants after all the swirling and swooning.
Why Terra Cotta Pots Are Perfect for Marbleizing
Terra cotta is a crafter’s dream because it starts out with texture, warmth, and character. Unlike slick plastic containers that make paint behave like a cat near bathwater, unglazed terra cotta gives paint something to grip. It is naturally porous, which is excellent for many plants because it helps regulate moisture, but that same porosity also means prep matters. If you skip cleaning, priming, or sealing when needed, the pot may absorb moisture unevenly and your finish can bubble, fade, or act personally offended.
That is why marbleizing terra cotta pots is both a design project and a strategy project. You are not just making something pretty. You are working with a material that breathes, wicks moisture, and can live indoors or outdoors depending on how you finish it. In other words, the pot is not being dramatic. It just has needs.
What “Marbleizing” a Terra Cotta Pot Really Means
Marbleizing is simply creating a swirled, veined, layered look that mimics the movement of marble stone. On terra cotta pots, that effect usually comes from one of three approaches: water marbling, paint pouring, or brush-swirled layering. Each method creates a slightly different personality.
1. Water-Marbling
This technique uses paint floating on water, then transfers the pattern onto the pot by dipping. It creates loose, unpredictable swirls. The result feels playful, artsy, and a little impossible to duplicate exactly, which is part of the appeal.
2. Paint Pouring
This method mixes acrylic paint with a pouring medium, then drizzles and tilts the paint over the pot. It creates fluid ribbons and soft marbled movement. Think “gallery gift shop energy,” but in a good way.
3. Hand-Swirled Marble Effects
If you prefer more control, layer two or three paint shades and swirl lightly with a brush, sponge, feather, or toothpick. This approach is ideal when you want a cleaner palette or a more polished finish without the chaos of dipping.
Supplies You Will Need
- Unglazed terra cotta pots and saucers
- Acrylic craft paint, multi-surface paint, chalk paint, or paint mixed with pouring medium
- Primer or a light base coat
- A large container or tray for dipping
- Water, stir sticks, disposable cups, and gloves
- Soft brushes, foam brushes, or small detail tools
- Drop cloth or newspapers
- Sealer for clay pots or a clear protective finish
- Painters tape if you want crisp sections or color blocking
If the pot will live outdoors, choose paints and sealers labeled for outdoor or multi-surface use. If the pot will actually hold soil and a plant, not just serve as a decorative sleeve, do not ignore the sealing step. Your future self will thank you when the exterior does not blister like a sunburned tourist.
Prep Work: The Unsexy Part That Makes the Pretty Part Work
Before you start marbleizing, clean the pot. A brand-new terra cotta pot may carry dust from manufacturing or the garden center. A used pot may carry mineral deposits, old soil, or plant residue. Either way, wash it, scrub away grime, and let it dry fully. If you are reusing an old pot, make sure it is properly cleaned and sanitized before you turn it into a glamorous new home for a fresh plant.
Next, decide whether the pot is decorative only or intended for real planting. If you are planting directly in it, it helps to seal the interior first. This can reduce moisture transfer that sometimes causes exterior paint issues. Keep the drainage hole clear because roots like air and excess water likes an exit. Nobody wins when the pot turns into a swamp.
After that, apply primer or a base coat if your design needs it. White is especially useful if you want bright marbled colors to pop. On dark terra cotta, pale paints can look muted without a base layer. Chalk paint is also a strong option because it often covers porous clay faster than standard acrylic.
How to Marbleize Terra Cotta Pots: Step by Step
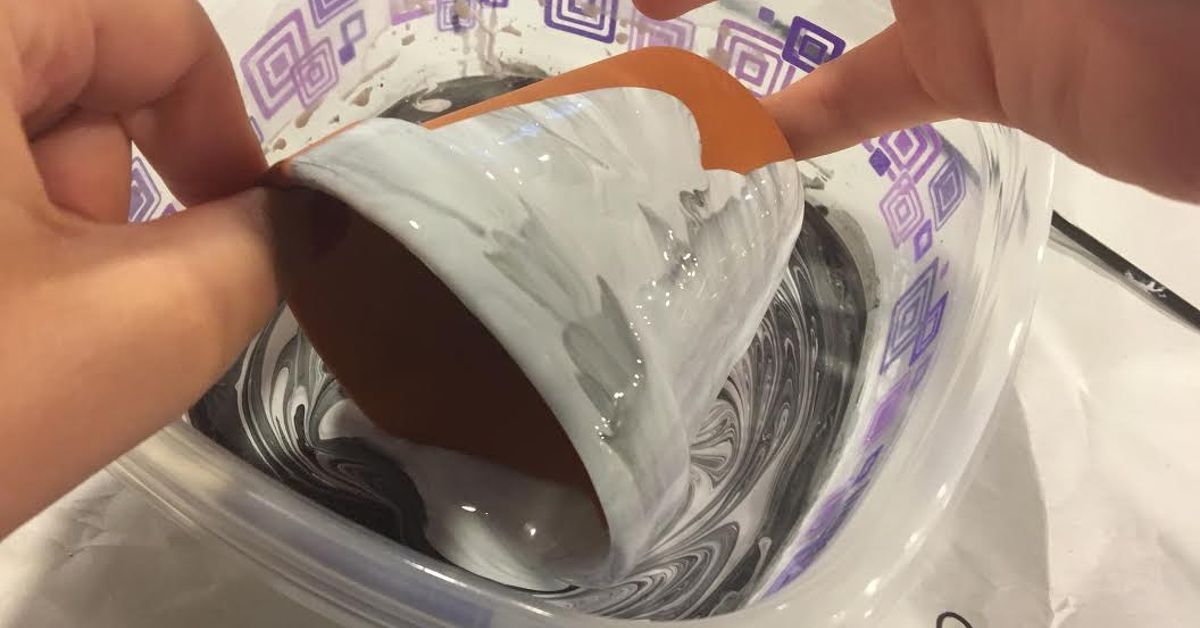
Method One: Easy Water-Marble Dip
- Fill a wide container with room-temperature water.
- Thin a few paint colors just enough to move on the water’s surface. You want fluid, not watery soup.
- Drizzle one color at a time onto the water.
- Use a skewer or toothpick to gently swirl the colors into a marble pattern.
- Hold the pot at an angle and dip part or all of the exterior into the pattern.
- Lift it out slowly and set it on a protected surface to dry.
This method works best when you avoid overmixing. The secret to a pretty marble look is restraint. Stir too much and you get mud. Stir too little and you get blobs. The sweet spot is somewhere between “elegant stone veining” and “I sneezed near the tray.”
Method Two: Acrylic Pour Marble Finish
- Mix acrylic paint with a pouring medium according to product directions.
- Start with two or three complementary colors.
- Pour the colors around the rim or down the side of the pot.
- Tilt and rotate the pot slowly so the paint flows across the surface.
- Stop before every square inch is overloaded. Negative space can look chic.
- Let the pot dry flat and undisturbed.
This method usually creates richer color movement than water marbling and gives you more control. It is also deeply satisfying in the same way icing a cake is satisfying, except the cake cannot later become a basil planter.
Method Three: Faux Marble by Hand
- Paint the pot a solid base color and let it dry.
- Add a second and third color in loose streaks or patches.
- Use a dry brush, sponge, or feather-light tool to blend and pull the paint into veins.
- Add thin white or gray lines for a stone-inspired finish.
- Soften the lines gently so they do not look drawn on.
This is the best approach if you want a more elevated, less accidental look. It is especially good for neutral palettes such as white, gray, taupe, blush, sage, or dusty blue.
Best Color Ideas for Marbleized Pots
You can go classic or wild here. White and gray create a traditional marble look. Blush and gold feel soft and modern. Blue and white look crisp and coastal. Green, cream, and clay tones feel grounded and botanical. Black and white can be stunning, though it also announces, “I have opinions about throw pillows.”
For a more natural style, let some terra cotta show through. That warm earthy orange underneath the marbling gives the piece character and keeps it from looking too polished. Terra cotta has rustic charm built in, so there is no shame in letting the pot be part of the color story.
How to Seal Marbleized Terra Cotta Pots
Once the paint is fully dry, seal the pot. This is the step that separates a beautiful craft from a beautiful craft that survives actual life. A good sealer helps protect the finish from scratches, moisture, and fading. If the pot will sit outside, choose a finish suitable for outdoor conditions. If the pot will be used for planting, sealing the interior and exterior thoughtfully can help the whole project last longer.
For decorative indoor use, a clear sealer or shellac-style finish may be enough. For outdoor pots, weather-resistant products are the safer bet. Let each coat dry thoroughly, and do not rush the curing time. Paint may feel dry to the touch before it is truly ready for soil, watering, sun, and weather. Much like bread, relationships, and brownies, a little patience improves the outcome.
Common Mistakes to Avoid
Skipping the Cleaning Step
Dust and residue interfere with adhesion. If the surface is dirty, your marble effect may peel, streak, or fail to bond evenly.
Using Too Many Colors
Marbling looks sophisticated when it has a little breathing room. Two or three colors usually beat five colors fighting for attention.
Overworking the Swirl
Once the pattern looks good, stop. Marbling rewards confidence, not endless fiddling.
Forgetting the Pot’s Real Job
A terra cotta pot is still a planter. Keep drainage in mind, avoid sealing the hole shut, and think about how moisture will move through the material.
Ignoring Weather
If you live where winters freeze, ordinary terra cotta can crack when trapped moisture freezes and expands. Bring cherished pots in, use them as seasonal decor, or protect them carefully if they stay outside.
Styling Ideas After the Marble Magic
Once your marbleized terra cotta pot is finished, you have options. Use it for succulents, herbs, trailing pothos, or a little rosemary that will judge your cooking. Pair several sizes together for a collected look. Match a saucer for a polished finish. Or use a marbleized pot as a cachepot and slip a nursery container inside if you want easier watering and less risk to the painted surface.
You can also build a whole set around one palette. A row of marbleized herb pots on a sunny kitchen sill looks expensive in the best possible way. A cluster of soft neutral planters on a patio feels calm and curated. A set of bright swirled pots in a kids’ garden says, “Yes, we are growing tomatoes and making art, and frankly we are thriving.”
Is Marbleizing Terra Cotta Pots Worth It?
Absolutely. It is one of those projects that is affordable, forgiving, useful, and oddly relaxing. You start with a simple clay pot that costs less than lunch, and you end with something that looks custom, personal, and gift-worthy. It is ideal for spring decorating, patio updates, handmade presents, housewarming gifts, and lazy Saturday crafting sessions where you want visible results without assembling a bookshelf.
Even better, every pot comes out slightly different. That uniqueness is the whole point. Marbleizing terra cotta pots gives you that sweet spot between natural imperfection and intentional design. In other words, it looks artistic without trying too hard, which is honestly the dream for both home decor and most social interactions.
Experience: What Marbleizing Terra Cotta Pots Actually Feels Like in Real Life
The first time I tried marbleizing terra cotta pots, I expected one of two outcomes: either a gorgeous artisan planter worthy of a boutique shelf, or a tragic clay object that looked like a melted sports drink. The truth landed somewhere in the middle at first, and that is exactly why the project ended up being so enjoyable. You learn fast with this craft. The first pot teaches you not to over-swirl. The second pot teaches you that color combinations matter more than you think. By the third pot, you are casually rotating the planter like you host your own craft competition show.
One of the most memorable parts of the process is how different the paint looks when it is wet versus when it dries. Fresh marbling can look wildly dramatic, almost too bold, and then settle into something softer and much more sophisticated after drying. That moment is a small thrill. You stop hovering over the pot like an anxious producer and realize the project knows what it is doing. Mostly.
I also learned that terra cotta has its own personality. It is not a blank plastic surface that passively accepts whatever you throw at it. It absorbs, grabs, and reacts. A clean, dry pot behaves beautifully. A dusty pot acts like it has somewhere else to be. That difference alone can make one attempt feel smooth and the next feel frustrating. After a few rounds, prep stopped feeling like a chore and started feeling like part of the ritual.
The most fun version for me was using two soft colors and one stronger accent. When I tried too many shades, the result lost that elegant stone effect and wandered into “mystery smoothie” territory. But with a restrained palette, the swirls looked intentional, stylish, and surprisingly high-end. Friends genuinely thought the finished pots were store-bought, which is the highest compliment a DIY project can receive besides, “Wait, you made that?”
Another thing that stood out was how versatile the finished pots became. Some held herbs in the kitchen. One ended up on a bookshelf with a faux plant because I did not feel emotionally ready to risk overwatering it. Another became a gift, and it was one of those rare handmade presents that looked polished instead of painfully homemade. That matters. A lot.
Most of all, marbleizing terra cotta pots felt satisfying because the project leaves room for experimentation without demanding perfection. A weird swirl can become the best detail on the whole pot. A tiny drip can make it look more organic. Even the slight differences between pots make the collection stronger. They look related, not cloned. That is probably why the project is so addictive. You do not finish one and feel done. You finish one and immediately start eyeing the next plain pot like, “You. Get ready. You are about to become fabulous.”
Conclusion
Marbleizing terra cotta pots is a simple DIY that delivers a lot of style for very little money. With the right prep, a restrained color palette, and a proper sealer, you can turn ordinary clay planters into custom pieces that look charming indoors and polished outdoors. Whether you prefer soft stone-inspired swirls or bold modern pours, the finished result feels creative, practical, and personal. And that is a rare combo in the world of weekend projects, where many ideas are either beautiful but useless or useful but boring. These pots manage to be neither. They are useful, beautiful, and just messy enough to be fun.